Understanding State Management with NGXS
You've likely come across discussions about state management before. If not, there's a good chance you still want your applications to be simpler to maintain and extend. While introducing a state management solution doesn't magically make an application more extensible, it does nudge us toward a Separation of Concerns that helps achieve that goal. In this piece, I'll break down what State Management involves and how you can apply it in Angular projects with NGXS.
Defining State
Before we jump into code, let's clarify what we mean by "state."
Imagine a Toggle component that lets users switch something on or off. That component can exist in one of two states: "On" or "Off." In essence, state is simply a snapshot of a system at a particular moment.

State isn't just a theoretical concept—we already interact with it in several places:
- Navigation
The navigation state tells us which page we're viewing in an application at any given time.
- Components
Using our Toggle as an example, the component can be in an On or Off state.
- Application
This category shows up frequently in blog posts. I'd describe the application state as the overall global state—things like user tokens, server data, and other app-wide information.
So what does state actually look like in practice?
For a component state, the information lives inside the component class itself:
import { Component } from '@angular/core';

@Component({
  selector: 'toggle',
  template: `The HTML code is not important for this article`,
})
export class ToggleComponent  {
  isToggled = false

  toggle() {
    this.isToggled = !this.isToggled;
  }
}
In that snippet, the isToggled property is what tracks the toggle's state.
For the global state, it's essentially an object structure:
{
  user: {
     id: 1234,
     token: 'jwt.token.value'
  },
  todoItems: [
     {
        id: 1,
        name: 'is this yet another todo?',
        isDone: true
     }
  ]
}
That object contains two nested objects: user and todoItems. These are accessible globally throughout the application. It's worth noting that these nested objects are commonly called state slices.
Why Bother with State Management?
At first glance, state seems straightforward—just an object with slices you can access directly. So why invest time learning a state management library?
Consider this scenario: You want to add items to the TodoItems array from one component and have another component react to that change. That doesn't sound too difficult; you could use BehaviourSubjects or Observables to hold the data. But what about notifying subscribers when items are removed? You'd need to handle every removal case carefully. Then there's the question of filtering: perhaps you need a function that collects all items where isDone=true and another for isDone=false. What if you need these filtered arrays in multiple places? Running that map function repeatedly n times isn't a big deal since it's lightweight, but for more complex, time-consuming operations, you'd likely need a memoization pattern.
These are just a few things to manage when dealing with global state. And you'd have to replicate this logic for each state slice. Keep extending that pattern, and congratulations—you've just built your own state management library?
But reinventing the wheel isn't necessary. Let's explore what NGXS offers.
Core Concepts of NGXS
NGXS follows the CQRS pattern, similar to NgRX and Redux. Often, CQRS is combined with Event Sourcing, where events dictate changes to the data state. For example, you might have AddTodoItem or RemoveTodoItem events. When you perform an action, an event is dispatched, and that event triggers a function—acting as an event handler—to mutate the state in the Store.
Let's illustrate this with a brief example.
Imagine the Store starts with this default State:
{
  todoItems: []
}
To add an item to the state, we dispatch the AddTodoItem event, and we need an event handler to process it. After dispatching AddTodoItem({id: 1, name: 'a todo item', isDone: false}), the state becomes:
{
  todoItems: [
     {
        id: 1,
        name: 'a todo item',
        isDone: false
     }
  ]
}
Of course, reading data from the store is equally important. Something like this:
const doneItems = todoItems.filter(todoItem => todoItem.isDone)Now, how does this translate to NGXS terminology?
- Actions
Think of Actions as Events. In the todo example, actions could be AddTodoItem, RemoveTodoItem, MarkTodoAsRead, or MarkTodoAsUnread. Actions describe what the application can do.
- Store
The Store is the container holding all the State(s). An application can have multiple states, and these all reside in the Store. It provides the API to read, mutate, and interact with the states—essentially the core of any state management library.
- State
A State defines the schema for a particular state slice and handles the actions related to it. While the Store is the library's heart, the State is the heart of its specific slice. - Queries/Selectors
Selectors are the mechanism for pulling data out of the state. Notably, in NGXS, reading and writing are separate operations, which fits the CQRS pattern.
Here's a visual representation of how these components interact.
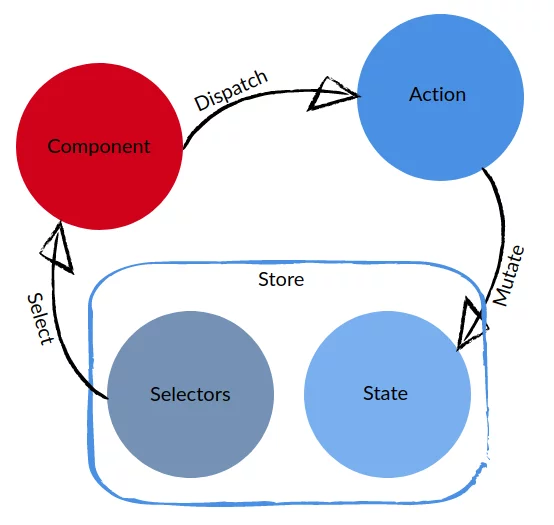
- A component dispatches an Action.
- The Action mutates the State in the Store.
- A component uses a Selector to retrieve data from the Store.
A Practical NGXS Example
Now for the fun part—coding!
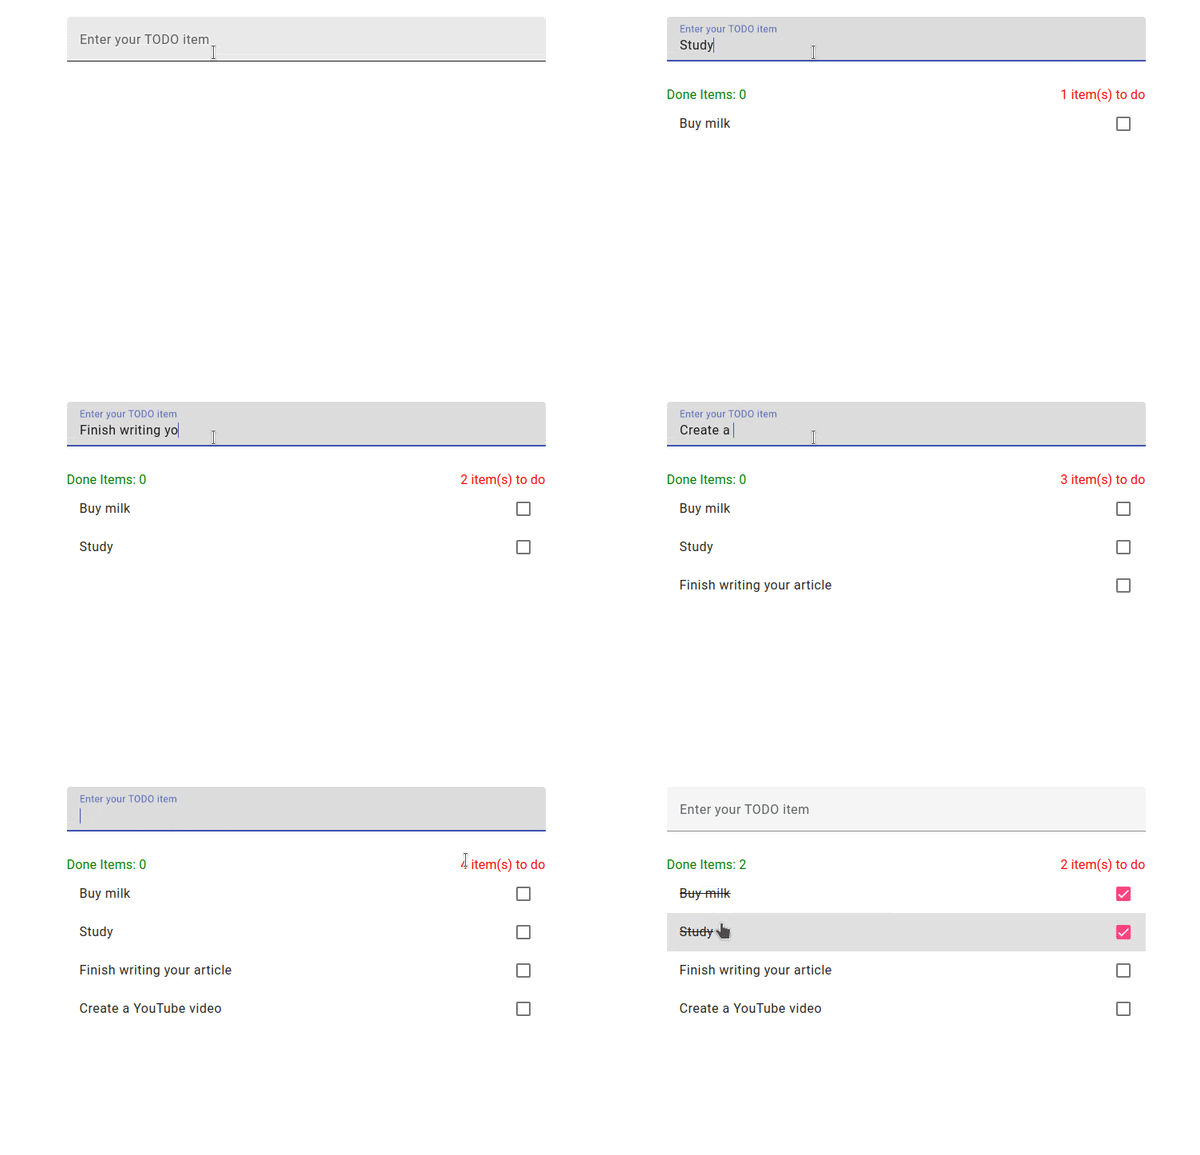
We're going to build a simple TODO application, as shown in the video below.
1) Installation
npm install @ngxs/store --save2) Register NGXS in app.module.ts
import { NgModule } from "@angular/core";
import { NgxsModule } from "@ngxs/store";
import { AppComponent } from "./app.component";

@NgModule({
  declarations: [AppComponent],
  imports: [NgxsModule.forRoot([])],
  bootstrap: [AppComponent],
})
export class AppModule {}
The imports array includes NgxsModule.forRoot([]), where we'll register the state we're about to create.
3) Create the State and Define the Model
First, define the model for each TODO item. Based on the video, we need a title, a status (active or not), and an id for uniqueness.
export interface TodoModel {
  id: number;
  title: string;
  isActive: boolean;
}
That's the item model, but we also need a type for the state structure itself.
export interface TodoStateModel {
  items: TodoModel[];
}
This means all TODO items will be stored in the items property of the state.
We've wired up the module and created the models. Next, let's create the state.
import { Injectable } from "@angular/core";
import { State } from "@ngxs/store";
import { TodoStateModel } from "./todo-state.model";

@State<TodoStateModel>({
  name: "todo",
  defaults: {
    items: [],
  },
})
@Injectable()
export class TodoState {}
The state is a class decorated with @State, where we specify the state's name and its defaults.
- The name helps distinguish this state slice from others.
- The defaults define the initial state when the application starts.
4) Define the Actions
Looking at the TODO app in the video, we need actions to create a TODO item and to toggle its status (true/false).
import { TodoModel } from "./todo-state.model";

export class AddTodo {
  static readonly type = "[Todo] Add todo";
  constructor(public title: string) {}
}

export class ChangeStatus {
  static readonly type = "[Todo] Change status";
  constructor(public readonly todoItem: TodoModel, public readonly status: boolean) {}
}
Each action is a class with a type serving as its unique identifier and a constructor for its arguments. Remember how we think of actions as events? The constructor parameters are like the event's arguments.
5) Dispatch the Actions
<form autocomplete="off" (ngSubmit)="add()">
  <mat-form-field appearance="fill">
    <mat-label>Enter your TODO item</mat-label>
    <input name="title" matInput [(ngModel)]="newTitle" />
  </mat-form-field>
</form>
import { Component } from "@angular/core";
import { Store } from "@ngxs/store";
import { AddTodo } from "./store/todo.actions";
@Component({
selector: "app-root",
templateUrl: "./app.component.html",
styleUrls: ["./app.component.scss"],
})
export class AppComponent {
newTitle: string;
constructor(private store: Store) {}
add() {
this.store.dispatch(new AddTodo(this.newTitle));
this.newTitle = "";
}
}When the form is submitted, the add() method dispatches an action via the store. The component is responsible for dispatching the action with its arguments—it isn't responsible for directly mutating the TODO items (Single Responsibility Principle). The expected result (items becoming length + 1) should be handled in the todo.state.ts.
6) Handle the Actions
import { Injectable } from "@angular/core";
import { Action, State, StateContext } from "@ngxs/store";
import { TodoModel, TodoStateModel } from "./todo-state.model";
import { AddTodo } from "./todo.actions";

@State<TodoStateModel>({
  name: "todo",
  defaults: {
    items: [],
  },
})
@Injectable()
export class TodoState {
  @Action(AddTodo)
  addTodo(ctx: StateContext<TodoStateModel>, action: AddTodo) {
    const state = ctx.getState();

    const newItem: TodoModel = {
      id: Math.floor(Math.random() * 1000),
      title: action.title,
      isActive: true,
    };

    ctx.setState({
      ...state,
      items: [...state.items, newItem],
    });
  }
}
We've created the addTodo method and decorated it with @Action. This is how we connect an action to a handler. When the AddTodo action is dispatched, the store calls this method, providing it with:
- The state context (ctx), which allows us to read and modify the state.
- The action itself, which carries the payload (event arguments).
When handling actions, we typically keep the existing state intact and only change what's necessary, which is why we use spread operators.
ctx.setState({
      ...state,
      items: [...state.items, newItem],
    });
At this stage, our state should be accumulating items. Let's add selectors to retrieve them.
7) Create the Selectors
Based on the animated gif, we need to display the items list, the count of done items, and the list of active items. We'll create three selectors.
import { Selector } from "@ngxs/store";
import { TodoStateModel } from "./todo-state.model";
import { TodoState } from "./todo.state";

export class TodoSelectors {
  @Selector([TodoState])
  static items(state: TodoStateModel) {
    return state.items;
  }

  @Selector([TodoState])
  static doneItems(state: TodoStateModel) {
    return state.items.filter((it) => !it.isActive);
  }

  @Selector([TodoState])
  static activeItems(state: TodoStateModel) {
    return state.items.filter((it) => it.isActive);
  }
}
We have three static methods, each decorated with @Selector. The store passes the state model (as defined in the array) as an argument to these methods.
The items selector simply returns state.items.
For the other two, we filter state.items based on whether isActive is true or false.
Importantly, the object returned is a read-only slice of the state. We cannot mutate the state through it. Since NGXS follows CQRS, reads and writes are separate, so selectors are strictly for data retrieval.
Note: NGXS selectors support the memoization pattern.
8) Use Selectors in the Component
import { Component } from "@angular/core";
import { Select, Store } from "@ngxs/store";
import { Observable } from "rxjs";
import { TodoModel } from "./store/todo-state.model";
import { AddTodo } from "./store/todo.actions";
import { TodoSelectors } from "./store/todo.selectors";

@Component({
  selector: "app-root",
  templateUrl: "./app.component.html",
  styleUrls: ["./app.component.scss"],
})
export class AppComponent {
  @Select(TodoSelectors.items)
  items$: Observable<TodoModel[]>;

  @Select(TodoSelectors.activeItems)
  activeItems$: Observable<TodoModel[]>;

  @Select(TodoSelectors.doneItems)
  doneItems$: Observable<TodoModel[]>;

  newTitle: string;

  constructor(private store: Store) {}

  add() {
    this.store.dispatch(new AddTodo(this.newTitle));
    this.newTitle = "";
  }
}
We have three selectors, so we need three class properties. Each is decorated with @Select, referencing the corresponding static method.
The activeItems$ and doneItems$ flows aren't fully complete yet, as we haven't implemented the logic to mark items as done. I'll provide a link to the complete code below. Try building it yourself first, then compare with the solution.
NGXS with Lazy Modules
Earlier, we touched on state slices. To recap, a state is an object, and each nested object within it is a slice. We've created the todo slice, holding all TODOs in its items property.
{
 todo: {
   items: []
  }
}
Now, what if we need more slices, or we need to use a slice in a lazily loaded module?
The logic and code remain the same; the only difference is how we register the state module.
@NgModule({
  imports: [NgxsModule.forFeature([LazyState])]
})
export class LazyModule {}
Notice that we use NgxsModule.forFeature() instead of NgxsModule.forRoot().
Wrapping Up
Thank you for reading this far! I hope this article has shown you how straightforward NGXS is to use and why having a state management library is valuable for your application.
There's a lot more you can accomplish with NGXS. I highly recommend checking out the official documentation at https://www.ngxs.io/.