
Source Code and Live Demos
To make the Initial Load Optimization workflow easier to follow, each improvement step is captured in its own commit. The complete source code is available in this Git repository:
You can also inspect the live demo applications here:
For those who want to verify the numbers themselves, the Google PageSpeed Insights tests used for measuring Initial Load Performance are linked below:
The demonstration app is the Flight App, a compact and straightforward Angular application. To produce realistic timings, we intentionally included links to large CSS files (Bootstrap) and a heavy chart library (AnyChart), with the latter being lazy-loaded.
Don't expect any record-breaking performance numbers here—the goal is simply to illustrate the gains from adding SSR, Prerendering, and Client Hydration.
The Baseline: Client Side Rendering
Our starting point is a nginx container serving the Angular application named performance.
# Stage 0, Node.js, install deps & build the app
FROM node:16-alpine as builder

# set working directory
RUN mkdir -p /usr/src/app
WORKDIR /usr/src/app

# add app
COPY . /usr/src/app

# install deps and cli
RUN npm install
RUN npm install -g @angular/cli

# add .bin to $PATH
ENV PATH /usr/src/app/node_modules/.bin:$PATH

# build app
RUN ng build

# Stage 1, nginx, copy & serve app
FROM nginx:alpine

COPY --from=builder /usr/src/app/dist/performance/browser /usr/share/nginx/html/
COPY nginx.conf /etc/nginx/conf.d/default.conf
Keep in mind that this Dockerfile assumes Angular Universal is already configured, so the built app sits in a subdirectory called browser.
To activate gzip compression in nginx, the default nginx.conf needs adjustments. Be sure to include every mime-type your application relies on.
server {
    gzip on;
    gzip_types      application/javascript font/woff image/jpg image/png image/webp image/x-icon text/css text/plain;
    gzip_proxied    no-cache no-store private expired auth;
    gzip_min_length 1024;

    server_name localhost;
    listen      80;
    root        /usr/share/nginx/html;
    index       index.html;

    location / {
        try_files $uri $uri/ /index.html;
    }
}
Because the Flight App is served over https, the Flight API must also be accessed through its secure endpoint.
-  url = 'http://www.angular.at/api/flight';
-  // url = 'https://demo.angulararchitects.io/api/Flight';
+  // url = 'http://www.angular.at/api/flight';
+  url = 'https://demo.angulararchitects.io/api/Flight';
Now let's run the first Google PageSpeed Insights evaluation:
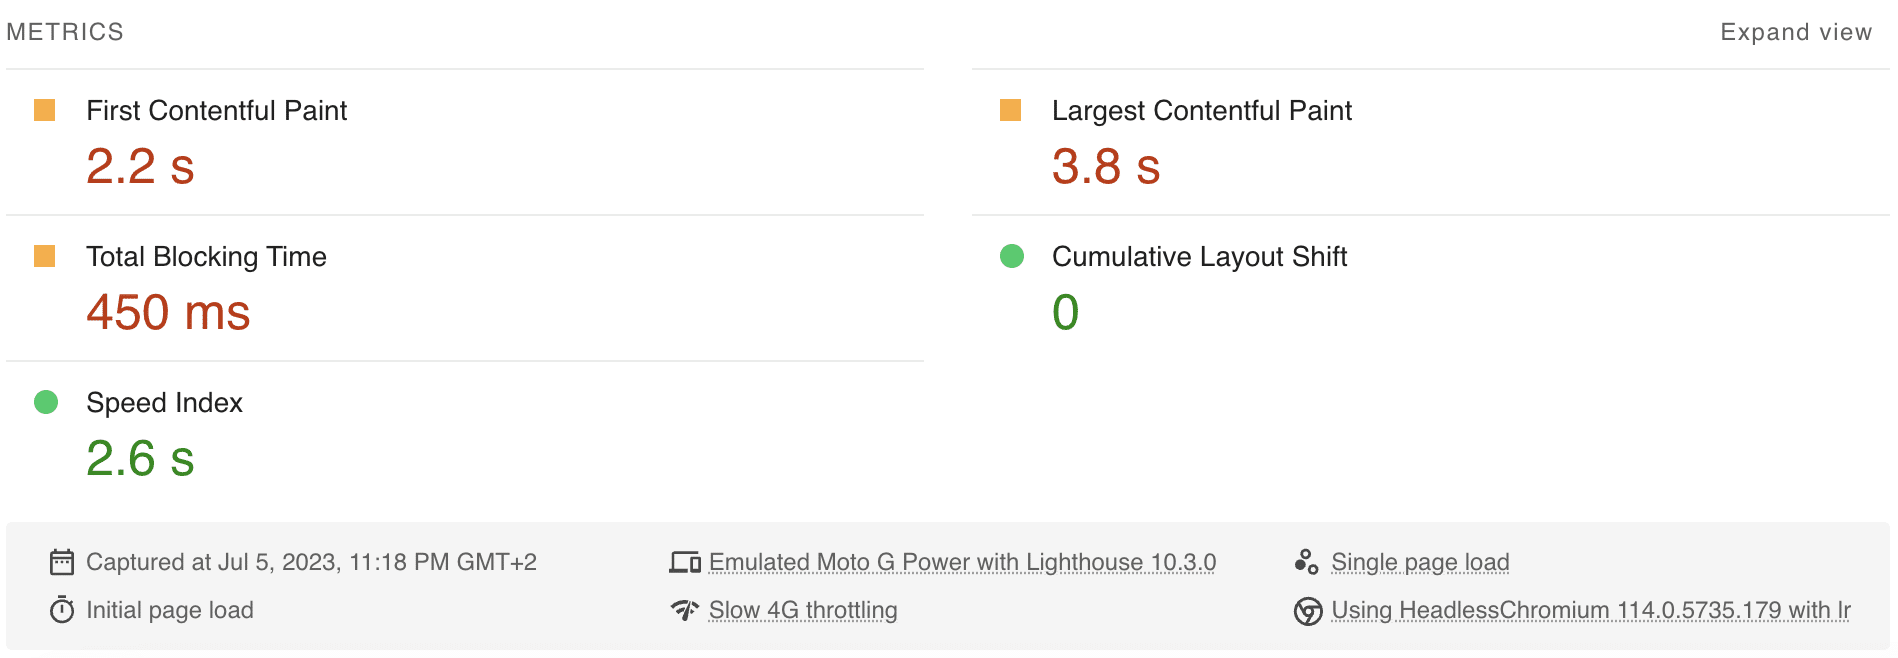
The baseline scenario displays FCP at 2.2s and LCP at 3.8s, with no CLS detected.
Step 1 — Adding Server Side Rendering
The first move is to install Angular Universal to bring SSR capabilities into the project:
ng add @nguniversal/express-engineThis command pulls in the necessary dependencies and generates all configuration files required for SSR mode:
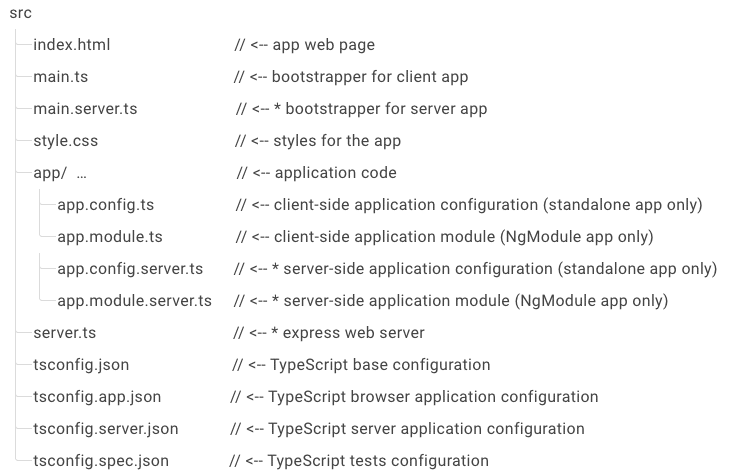
Next, we switch the hosting setup to a Node.js container.
A Node.js runtime is required because it allows the page to be rendered on the server.
# Stage 0, Node.js, install deps, build & run the app
FROM node:16-alpine as builder

# set working directory
RUN mkdir -p /usr/src/app
WORKDIR /usr/src/app

# add app
COPY . /usr/src/app

# install deps and cli
RUN npm install
RUN npm install -g @angular/cli

# add .bin to $PATH
ENV PATH /usr/src/app/node_modules/.bin:$PATH

# build app & server
RUN ng build
RUN ng run performance:server

# build default port
EXPOSE 4000

# start server
CMD ["node", "/usr/src/app/dist/performance/server/main.js"]
To avoid guessing the hashed main.js filename, we disable hashing in the angular.json configuration:
"outputHashing": "none",For gzip compression, we first install the compression npm package:
npm i compression --save
npm i @types/compression --save-dev
Then, we modify the server.ts file accordingly:
-  server.engine('html', ngExpressEngine({
-    bootstrap: AppServerModule
-  }));
+  server.engine(
+    'html',
+    ngExpressEngine({
+      bootstrap: AppServerModule
+    })
+  );
+
+  // Compress all HTTP responses
+  server.use(compression());
Let's see what changes with SSR:
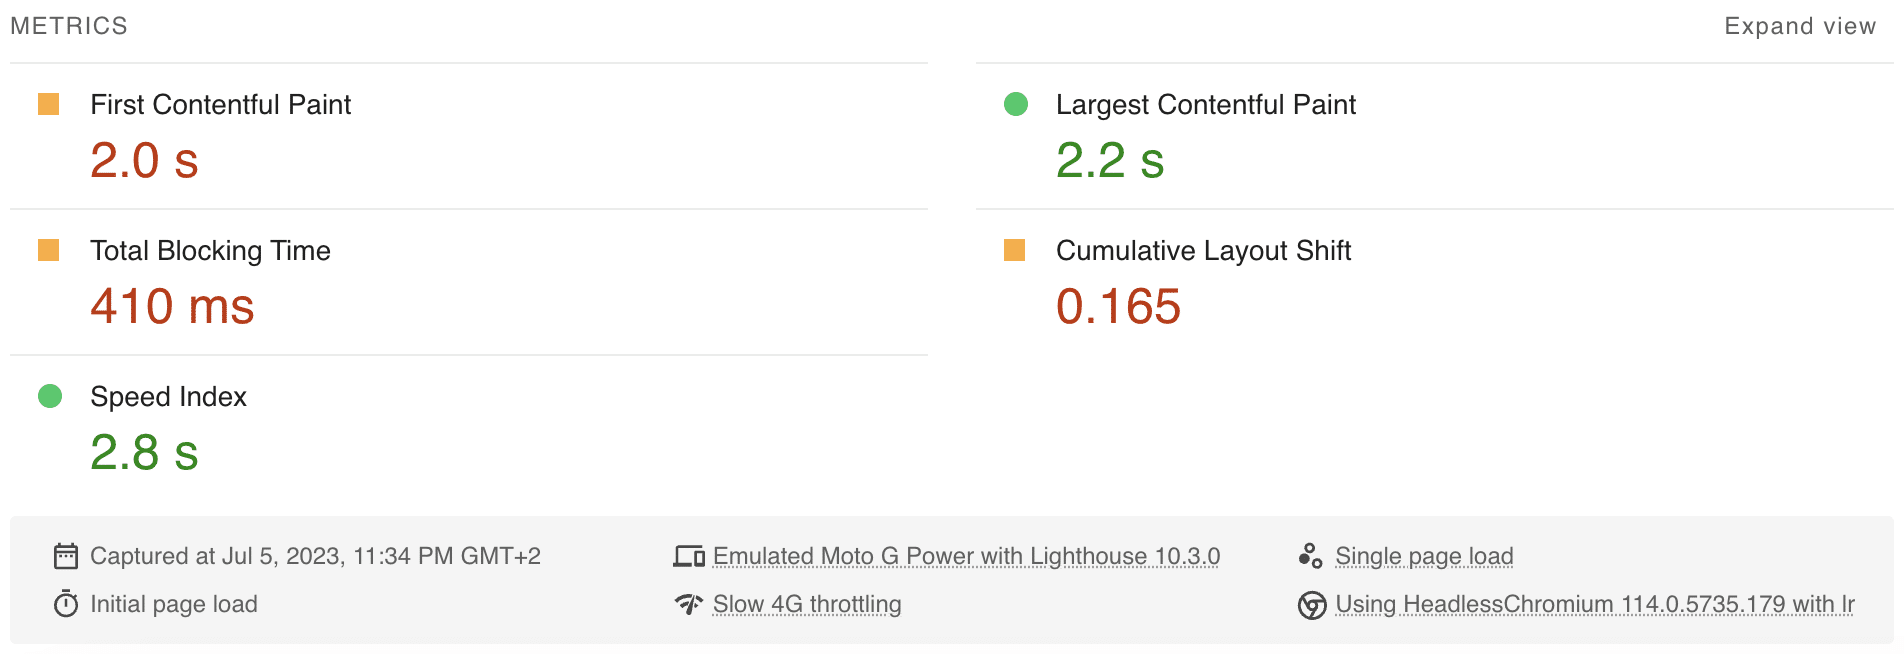
The server-rendered version improves FCP to 2.0s (-0.2s) and LCP to 2.2s (-1.6s). However, a CLS of 0.165 appears because the client re-renders the page. While the improvement over CSR is clear, the layout shift is a downside. We can do better!
Step 2 — Prerendering Routes
Route prerendering lets the backend pre-generate specific routes and store them in a static cache on the server. Instead of rendering on the fly, these pages are served straight from the cache. If your app is already routed through a CDN like CloudFlare that caches pages globally, this step might be unnecessary.
In your Dockerfile, insert the following line after the build step and before the server starts:
# build app, prerender & run server
RUN ng build
RUN ng run performance:prerender
RUN ng run performance:server
In the angular.json, you define which routes are to be prerendered:
"prerender": {
  "builder": "@nguniversal/builders:prerender",
    "options": {
      "routes": ["/", "/home", "/flight-booking/flight-search", "/flight-booking/charts"]
    },
Alternatively, a text file listing the static pages can also be used:
RUN ng run performance:prerender --routes-file routes.txtWhat do the numbers look like with prerendering?
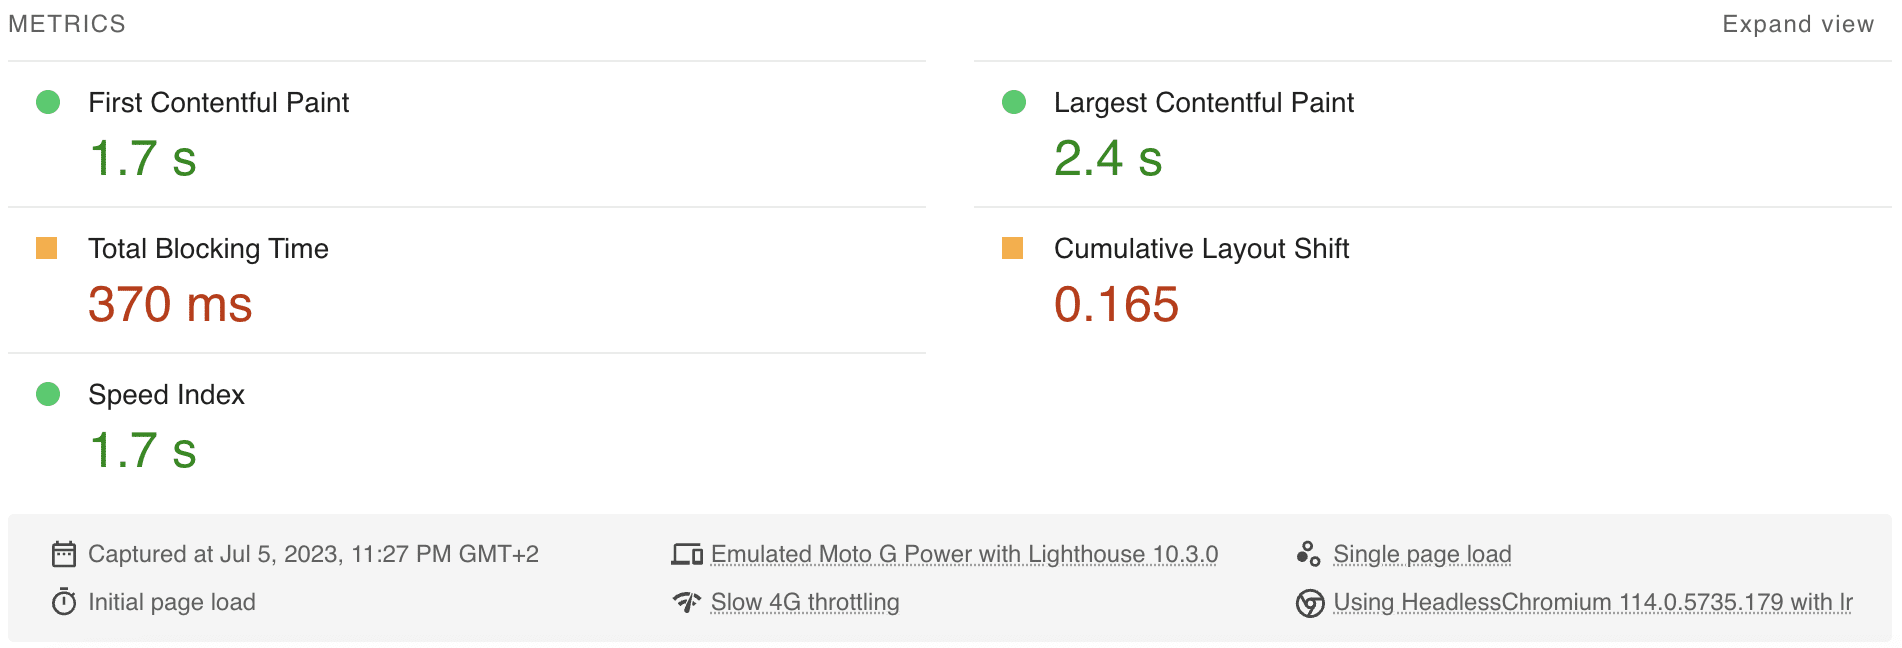
The prerendered SSR version reaches FCP at 1.7s (-0.5s) and LCP at 2.4s (-1.4s). The CLS of 0.165 remains due to client-side re-rendering. Relative to plain SSR, the gain is modest, mainly because the Flight App is simple and server rendering is quick.
Step 3 — Enabling Non-Destructive Hydration
Activating Non-Destructive Hydration in Angular is straightforward: just add the provider to the AppModule. This only works when importing from code>@angular/platform-browser</code at version 16 or higher.
// app.module.ts
@NgModule({
  providers: [
    [...],
    provideClientHydration()
  ],
})
export class AppModule {}
For stand-alone bootstrapping, the provider goes into the ApplicationConfig instead.
// app.config.ts
export const appConfig: ApplicationConfig = {
  providers: [
    [...],
    provideClientHydration(),
  ]
};
Here are the final results:
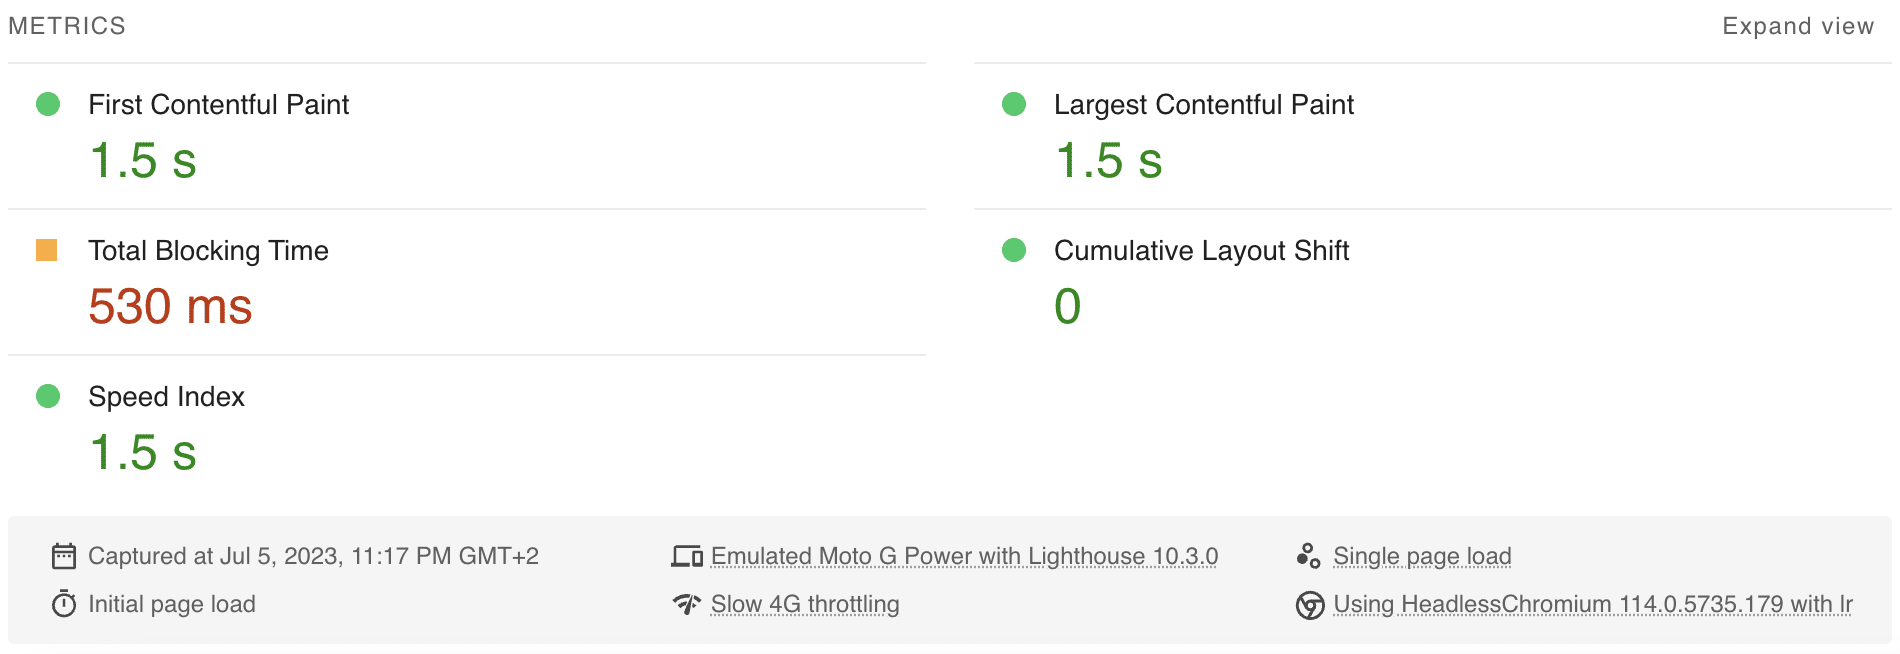
With SSR combined with Client Hydration, FCP drops to 1.5s (-0.7s) and LCP to 1.5s (-2.3s). There is zero CLS. The performance is exceptional, and we eliminate layout shifts entirely because the existing DOM is reused instead of rebuilt.
Performance Deep Dive Workshop
For those aiming to master Angular Performance, we offer a dedicated workshop available in both English and German:
- Performance Workshop 🚀
- Best Practices Workshop 📈 (covering performance topics)
- Accessibility Workshop ♿
Wrapping Up
Server Side Rendering stands out as a powerful method for cutting Initial Load times and creating a smoother user journey. Angular V16's Non-Destructive Hydration pairs nicely with SSR by turning static server-rendered HTML into a fully interactive view on the client without a full re-render (and the associated repaint).
Merging the strengths of SSR and Hydration means your Angular apps start faster, feel more responsive, and rank better in search results. The Angular team is also poised to bring even richer Hydration capabilities in upcoming releases.
The walkthrough above shows how little effort it takes to get Angular SSR with Hydration running and how dramatically Initial Load Performance improves. If your Angular app is reachable by users on the web, introducing SSR and Hydration should be a priority.
This post was authored by Alexander Thalhammer. Follow him on Linkedin, X, or giThub.