Part 1: Foundations - Basic Resource Fetching
Angular’s resource() method offers a clean approach to managing asynchronous data loading. Let’s begin with the simplest case: retrieving weather information through the resource API. This initial example lays the groundwork for more sophisticated patterns.
We’ll build a basic component that defines a resource for data retrieval and includes a button to re-fetch the data on demand. In addition, we’ll display the loading indicator and the fetched weather details once they arrive.
The initial component code is as follows:
import { Component, resource } from '@angular/core';

interface WeatherData {
  temperature: number;
  condition: string;
  icon: string;
}

@Component({
  selector: 'app-weather-info',
  template: `
    <div class="card bg-base-200 w-96 shadow-xl mx-auto">
      <div class="card-body flex flex-col items-center gap-4">
        <button
          class="btn btn-block btn-primary btn-outline"
          (click)="weatherResource.reload()"
        >
          Get Weather Info
        </button>
        @if (weatherResource.isLoading()) {
          <span class="loading loading-spinner loading-lg"></span>
        } @else if (weatherResource.value()) {
          <img
            [src]="weatherResource.value()?.icon"
            class="w-20 object-fit"
            alt="weather icon"
          />
          <p class="text-2xl">
            Temperature: {{ weatherResource.value()?.temperature }}
          </p>
          <p class="text-xl">
            Condition: {{ weatherResource.value()?.condition }}
          </p>
        }
      </div>
    </div>
  `,
})
export class WeatherInfoComponent {
  weatherResource = resource<WeatherData, string>({
    loader: async ({ abortSignal }) => {
      const response = await new Promise<Response>((resolve) => {
        setTimeout(() => {
          fetch('assets/weather.json', { signal: abortSignal }).then((r) =>
            resolve(r)
          );
        }, 1500);
      });
      if (!response.ok) {
        throw new Error('Could not fetch data');
      }
      const data = await response.json();
      return data as WeatherData;
    },
  });
}

What’s happening:
- Imports: The
Componentandresourcesymbols are brought in from@angular/core. - Types: The
WeatherDatainterface mirrors the expected shape of the JSON payload. - Component Properties:
weatherResource: AResourceinstance that oversees the async data operation. The outcome of callingresource()is stored here.
- Setting Up
weatherResource:- The
resource()function initializesweatherResourceduring component construction. This action dispatches the initial HTTP request via the loader. - The
loaderis specified as an async function. It mimics a network call by reading fromassets/weather.jsonafter a 1.5-second pause usingsetTimeout, and accepts anabortSignalfor cancellation support. - If the network response indicates failure, an error is thrown, which the
resource()method captures. - On success, the loaded data is returned.
- The
- Template:
- A button invokes the
weatherResource.reload()method. This action re-executes the loader and refreshes the data. - The markup relies on
@ifblocks and the resource’sisLoading()andvalue()methods to conditionally render either a spinner or the weather report.
- A button invokes the
Essential points:
- The
resource()API streamlines async operations by monitoring loading status, capturing errors, and exposing the result once completed. - Reactivity is built in; the template updates automatically as the resource’s state evolves.
- We use
weatherResource.reload()to trigger a fresh data retrieval.
Part 2: Deferred Resource Loading
In the previous example, the resource started fetching right away upon component creation. But what if this initial request should be postponed until a user action occurs? By employing the request option, you can dictate when the resource’s loader fires, thereby enabling delayed or conditional loading.
Let’s adapt the prior example by adding a weatherRequestState signal. This signal acts as a gatekeeper, deciding whether the loader should run. As a result, resource loading happens only in response to user-triggered events.
Here’s the revised code:
import { Component, resource, signal } from '@angular/core';

interface WeatherData {
  temperature: number;
  condition: string;
  icon: string;
}

type WeatherRequestState = 'idle' | 'ready';

@Component({
  selector: 'app-weather-info',
  template: `
    <div class="card bg-base-200 w-96 shadow-xl mx-auto">
      <div class="card-body flex flex-col items-center gap-4">
        <button class="btn btn-block btn-primary btn-outline" (click)="getWeatherInfo()">
          Fetch Weather
        </button>
        @if (weatherResource.isLoading()) {
          <span class="loading loading-spinner loading-lg"></span>
        } @else if (weatherResource.value()) {
          <img
            [src]="weatherResource.value()?.icon"
            class="w-20 object-fit"
            alt="weather icon"
          />
          <p class="text-2xl">
            Temperature: {{ weatherResource.value()?.temperature }}
          </p>
          <p class="text-xl">
            Condition: {{ weatherResource.value()?.condition }}
          </p>
        }
      </div>
    </div>
  `,
})
export class WeatherInfoComponent {
  weatherRequestState = signal<WeatherRequestState>('idle');
  weatherResource = resource<WeatherData, WeatherRequestState | undefined>({
    request: () => {
      if (this.weatherRequestState() === 'idle') {
        return undefined;
      }
      return this.weatherRequestState();
    },
    loader: async ({ abortSignal }) => {
      const response = await new Promise<Response>((resolve) => {
        setTimeout(() => {
          fetch('assets/weather.json', { signal: abortSignal }).then((r) =>
            resolve(r)
          );
        }, 1500);
      });
      if (!response.ok) {
        throw new Error('Could not fetch data');
      }
      const data = await response.json();
      return data as WeatherData;
    },
  });

  getWeatherInfo() {
    if (this.weatherRequestState() !== 'ready') {
      this.weatherRequestState.set('ready');
    } else {
      this.weatherResource.reload();
    }
  }
}

Modifications:
- A
weatherRequestStatesignal now regulates loading. Its permitted values are'idle'or'ready'. - The resource’s
requestis defined as a function that returns the current signal value, orundefinedwhen the state is'idle'. - The
loaderexecutes solely when therequestfunction yields'ready'. - The
getWeatherInfo()routine verifies the state: if it’s'idle', it flips the signal to'ready'; otherwise, it invokesweatherResource.reload()for a refresh.
Essential points:
- The
requestattribute enables on-demand loading, ensuring the resource is fetched only when truly necessary. - Loader execution is contingent on the
requestfunction returning a non-undefinedvalue.
Part 3: Graceful Error Management
Network requests can fail, so handling errors gracefully is critical. Let’s enhance the application to incorporate error handling and simulate a failed data request.
A new button will be added to trigger a request that intentionally ends in an error. This will showcase how to surface error messages to the user.
The code is updated as follows:
import { Component, resource, signal } from '@angular/core';
interface WeatherData {
  temperature: number;
  condition: string;
  icon: string;
}

type WeatherRequestState = 'idle' | 'ready' | 'simulateError';

@Component({
  selector: 'app-weather-info',
  template: `
    <div class="card bg-base-200 w-96 shadow-xl mx-auto">
      <div class="card-body flex flex-col items-center gap-4">
        <button class="btn btn-block btn-primary btn-outline" (click)="getWeatherInfo()">
          Fetch Weather
        </button>
        <button
          class="btn btn-block btn-error btn-outline"
          (click)="getWeatherInfoWithError()"
        >
          Get Weather Info with error
        </button>
        @if (weatherResource.isLoading()) {
          <span class="loading loading-spinner loading-lg"></span>
        } @else if (weatherResource.error()) {
          <div role="alert" class="alert alert-error">
            <svg>...</svg>
            <span>{{ weatherResource.error() }}</span>
          </div>
        } @else if (weatherResource.value()) {
          <img
            [src]="weatherResource.value()?.icon"
            class="w-20 object-fit"
            alt="weather icon"
          />
          <p class="text-2xl">
            Temperature: {{ weatherResource.value()?.temperature }}
          </p>
          <p class="text-xl">
            Condition: {{ weatherResource.value()?.condition }}
          </p>
        }
      </div>
    </div>
  `,
})
export class WeatherInfoComponent {
  weatherRequestState = signal<WeatherRequestState>('idle');
  weatherResource = resource<WeatherData, WeatherRequestState | undefined>({
    request: () => {
      if (this.weatherRequestState() === 'idle') {
        return undefined;
      }
      return this.weatherRequestState();
    },
    loader: async ({ abortSignal, request: requestState }) => {
      const response = await new Promise<Response>((resolve) => {
        setTimeout(() => {
          fetch('assets/weather.json', { signal: abortSignal }).then((r) =>
            resolve(r)
          );
        }, 1500);
      });
      if (!response.ok) {
        throw new Error('Could not fetch data');
      }
      if (requestState === 'simulateError') {
        throw new Error('Something went wrong');
      }
      const data = await response.json();
      return data as WeatherData;
    },
  });

  getWeatherInfo() {
    if (this.weatherRequestState() !== 'ready') {
      this.weatherRequestState.set('ready');
    } else {
      this.weatherResource.reload();
    }
  }

  getWeatherInfoWithError() {
    this.weatherRequestState.set('simulateError');
  }
}

Modifications:
- The
WeatherRequestStatetype now includes asimulateErrorvalue. - The
weatherRequestStatesignal is used to indicate when the loader should fake an error. - Within the
loader, a check is performed: if the request state equals'simulateError', a new error is thrown. - A dedicated
getWeatherInfoWithErrormethod is introduced; it assignssimulateErrorto the signal, which in turn triggers a load that fails. - The template now renders any error using
weatherResource.error().
Essential points:
- The
weatherRequestStatesignal governs both the initial load initiation and the simulation of loader errors. - Errors thrown inside the
loaderare caught byresource()and exposed through theerror()signal. - Displaying the error message in the template is achieved via
weatherResource.error().
Part 4: Adaptive Resource Selection (Multi-City Scenario)
Now we’ll introduce more dynamic behavior by letting users switch between single and multi-city modes. When the mode changes, we’ll alter how the resource gathers data, leveraging the request option to steer the fetching process.
A toggle control and a dropdown menu will be implemented, giving users the ability to pick a city when operating in multi-city mode.
The full component code is shown below:
import { Component, resource, signal } from '@angular/core';
import { FormsModule } from '@angular/forms';

type City = 'Stockholm' | 'Milan';

interface WeatherData {
  temperature: number;
  condition: string;
  icon: string;
  city?: City;
}

type WeatherRequestState = 'idle' | 'ready' | 'simulateError';

type WeatherResourceConfig = {
  requestState: WeatherRequestState;
  isMultiCityMode: boolean;
  selectedCity: City;
};

@Component({
  selector: 'app-weather-info',
  imports: [FormsModule],
  template: `
    <div class="card bg-base-200 w-96 shadow-xl mx-auto">
      <div class="card-body flex flex-col items-center gap-4">
        <div class="form-control w-full">
          <label class="label cursor-pointer">
            <span class="label-text">Multicity</span>
            <input
              (ngModelChange)="getWeatherInfo()"
              [(ngModel)]="isMultiCityMode"
              type="checkbox"
              class="toggle toggle-primary"
            />
          </label>
        </div>
        @if (isMultiCityMode()) {
          <select [(ngModel)]="selectedCity" class="select select-primary w-full">
            @for(city of cities; track city) {
            <option [value]="city">{{ city }}</option>
            }
          </select>
        } @else {
          <button
            class="btn btn-block btn-primary btn-outline"
            (click)="getWeatherInfo()"
          >
            Get Weather Info
          </button>
        }
        <button
          class="btn btn-block btn-error btn-outline"
          (click)="getWeatherInfoWithError()"
        >
          Get Weather Info with error
        </button>
        @if (weatherResource.isLoading()) {
          <span class="loading loading-spinner loading-lg"></span>
        } @else if (weatherResource.error()) {
          <div role="alert" class="alert alert-error">
            <svg>...</svg>
            <span>{{ weatherResource.error() }}</span>
          </div>
        } @else if (weatherResource.value()) {
          <img
            [src]="weatherResource.value()?.icon"
            class="w-20 object-fit"
            alt="weather icon"
          />
          <p class="text-2xl">
            Temperature: {{ weatherResource.value()?.temperature }}
          </p>
          <p class="text-xl">
            Condition: {{ weatherResource.value()?.condition }}
          </p>
        }
      </div>
    </div>
  `,
})
export class WeatherInfoComponent {
  weatherRequestState = signal<WeatherRequestState>('idle');
  isMultiCityMode = signal<boolean>(false);
  cities: City[] = ['Stockholm', 'Milan'];
  selectedCity = signal<City>(this.cities[0]);
  weatherResource = resource<
    WeatherData | undefined,
    WeatherResourceConfig | undefined
  >({
    request: () => {
      if (this.weatherRequestState() === 'idle') {
        return undefined;
      }
      return {
        requestState: this.weatherRequestState(),
        isMultiCityMode: this.isMultiCityMode(),
        selectedCity: this.selectedCity(),
      };
    },
    loader: async ({ abortSignal, request }) => {
      if (!request) {
        return undefined;
      }
      const { requestState, isMultiCityMode, selectedCity } = request;
      const response = await new Promise<Response>((resolve) => {
        setTimeout(() => {
          const url = isMultiCityMode
            ? 'assets/weather-multi.json'
            : 'assets/weather.json';
          fetch(url, { signal: abortSignal }).then((r) => resolve(r));
        }, 1500);
      });
      if (!response.ok) {
        throw new Error('Could not fetch data');
      }
      if (requestState === 'simulateError') {
        throw new Error('Something went wrong');
      }
      const data = await response.json();
      if (isMultiCityMode) {
        const weatherInfo = (data as WeatherData[]).find(
          (info) => info.city === selectedCity
        );
        if (!weatherInfo) {
          throw new Error('Weather info not found');
        }
        return weatherInfo;
      }
      return data as WeatherData;
    },
  });

  getWeatherInfo() {
    if (this.weatherRequestState() !== 'ready') {
      this.weatherRequestState.set('ready');
    } else {
      this.weatherResource.reload();
    }
  }

  getWeatherInfoWithError() {
    this.weatherRequestState.set('simulateError');
  }
}
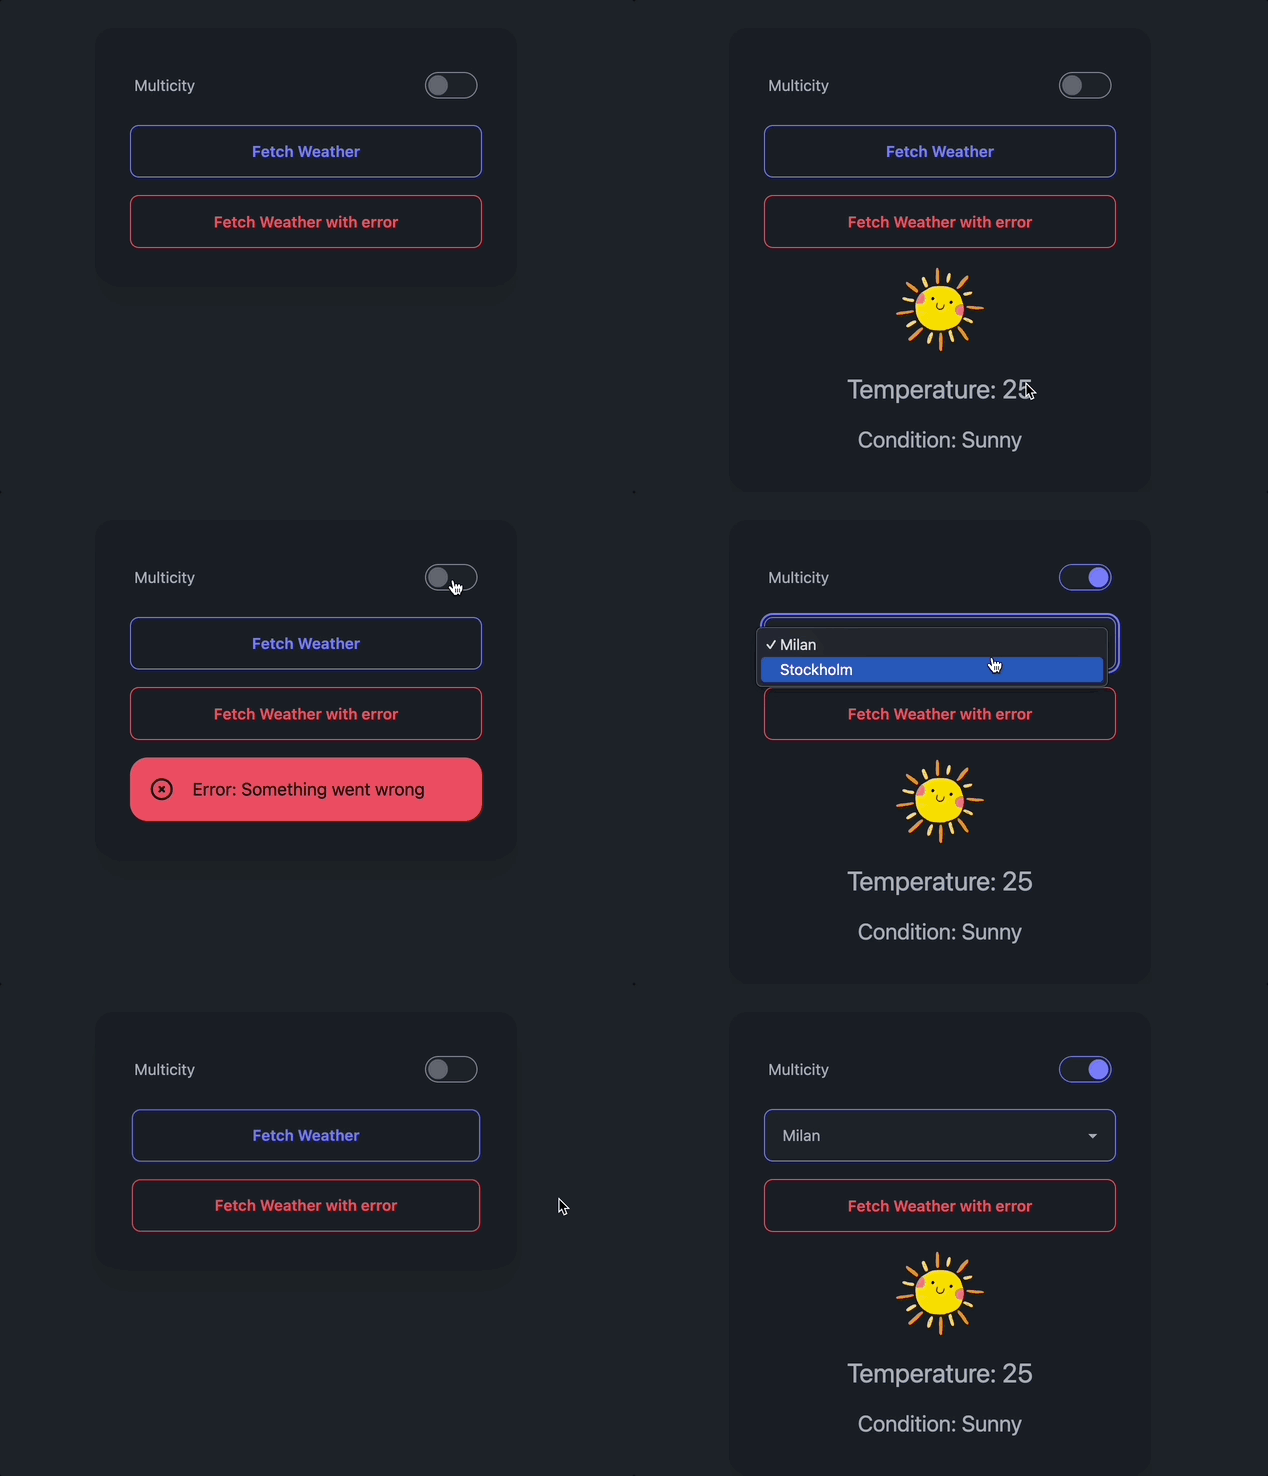
Modifications:
FormsModule: This is imported to enablengModeltwo-way binding on the toggle and the select element.citiesandselectedCity: A static array of cities is defined, along with aselectedCitysignal to track the user’s choice.isMultiCityMode: A signal that records whether the multi-city feature is active.- The
requestoption is expanded to passweatherRequestState,isMultiCityMode, andselectedCityinto the loader. - Template:
- A toggle is provided to flip between single and multi-city modes.
- When multi-city mode is active, a select dropdown appears, enabling city selection.
getWeatherInfoMethod: This function checks the current mode and proceeds to setweatherRequestStatetoreadyor invoke a reload accordingly.getWeatherInfoWithError()Method: AssignssimulateErrorto the signal, causing a load that results in an error while in single mode.- The
loadernow pulls different datasets depending onisMultiCityMode. For multi-city, it retrieves data fromweather-multi.jsonand filters entries by the selected city.
Essential points:
- Data loading is now directed through the
weatherRequestStatesignal, enabling on-demand resource initialization. - The
requestattribute serves as a channel to transmit additional context to the loader. - With the value from
request, the loader can manage various scenarios: standard loading, errors, single-city, and multi-city behavior.
Final Thoughts
Throughout this step-by-step walkthrough, we’ve demonstrated how to apply Angular’s resource() method for data retrieval, error handling, and dynamic switching between fetch approaches. Starting with simple examples, we’ve progressively covered complex cases and shown how to exert fine-grained control over when resources load. We’ve also examined how the request attribute can relay extra information to the loader, enhancing the adaptability of our data operations.
Important Consideration: The provided examples are intended solely for demonstrating the
resourceAPI’s capabilities. In real-world applications, it’s advisable to encapsulate HTTP calls within dedicated Angular services and implement error management in a more comprehensive, centralized fashion. Moreover, avoid embedding intentional error simulations directly in component code.
Related Content
Note: promotional links are listed below...
- New to Angular? Access my free 90-minute Angular Crash Course (highly rated ❤️)
- For an in-depth, project-based learning experience (over 90 projects), explore the Angular Cookbook.
- If you wish to master Angular signals, consider my book “Modern Angular: Mastering Signals”, which I am currently writing.
I trust this guide proves beneficial to your Angular progress.
Happy coding!