export class SelectorComponent {
  selected: string;

  @Input()
  options: string[];
  @Output()
  selectionChanged = new EventEmitter<string>();

  selectOption(option: string) {
    this.selected = option;
    this.selectionChanged.emit(option);
  }
}

// selector.component.ts
So far, the component interface is straightforward and uncluttered.
<div dropdown>
  <button dropdownToggle>{{selected || 'Select'}}</button>
  <ul dropdownMenu>
    <li *ngFor="let option of options" (click)="selectOption(option)">
      {{option}}
    </li>
  </ul>
</div>

<!-- selector.component.html -->
With this setup, the first client can easily pick their preferred shark.
<app-selector [options]="sharks"></app-selector>

<!-- client-one.component.html -->
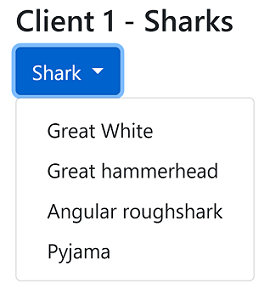
The original selector works with plain strings.
Feature: Customise Option Text
The second client, also a shark enthusiast, wants the Latin name displayed alongside each option. One possible tweak is to introduce a display callback as an Input to alter the rendered text. This approach is generally discouraged.
@Input()
displayFunc: (string) => string = x => x;

// selector.component.ts
<li *ngFor="let option of options">
  <!-- Pass the option through the display callback -->
  {{displayFunc(option)}}
</li>

<!-- selector.component.html -->
<app-selector [options]="sharks" [displayFunc]="appendLatin">
</app-selector>

<!-- client-two.component.html -->
Keep in mind: this is not the recommended path
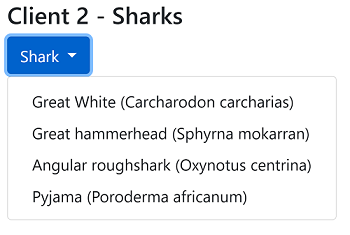
A display callback modifies the visible text only.
Feature: Safe To Swim Icon
The first client now wants an icon to indicate whether a shark is safe to swim with. They supply a large icon library that we must integrate. How do we handle this?
Unlike the previous request, which only changed textual content, this one requires structural modifications to the HTML template.
Wrong approach using *ngIf
Without relying on ngTemplateOutlet, we might resort to *ngIf plus another callback to fetch an icon name for each shark.
<li *ngFor="let option of options">
  <!-- Introducing the icon into our selector -->
  <c1-icon *ngIf="getIconFunc(option)" [name]="getIconFunc(option)" />

  {{displayFunc(option)}}
</li>

<!-- selector.component.html -->
If no icon callback is supplied, the default returns undefined, which hides the icon via ngIf. This way, other clients won't see any icons.
@Input()
getIconFunc: (string) => string = x => undefined;

// selector.component.ts
<app-selector [options]="sharks" [getIconFunc]="getIconFunc">
</app-selector>

<!-- client-one.component.html -->
This approach works and lets them achieve the desired view, but it is far from ideal.
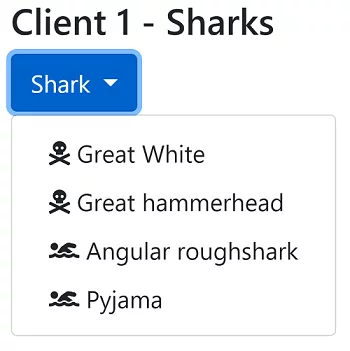
A less-than-optimal solution using ngIf
Unhappy Client due to Icon dependency
In the previous change, we introduced a dependency on the first client's icon package. That's a serious problem! Other clients would be forced to install an extra library just to compile their apps, even though they will never use it.
You might think forking the component and maintaining separate versions per client is the answer. While that could quickly satisfy the second client, it leaves you supporting multiple dropdown selectors. Not an ideal situation for any developer!
What about using ng-content?
Angular offers <ng-content> for content projection. Perhaps we could swap the icon in the template with a <ng-content> slot, letting the first client project their icon into the selector. This would eliminate the icon dependency.
<li *ngFor="let option of options">
  <!-- Removed: <c1-icon [name]="swimIcon(option)" /> -->
  <ng-content></ng-content>
  {{displayFunc(option)}}
</li>

<!-- selector.component.html -->
<app-selector [options]="sharks">
  <c1-icon [name]="swimIcon(????)" />
</app-selector>

<!-- client-one.component.html -->
Although this looks promising, it won't function as expected. The icon would only appear for the final item in the list. Without named slots, you can only project content into one place. There's no straightforward way to name slots dynamically for each list item.
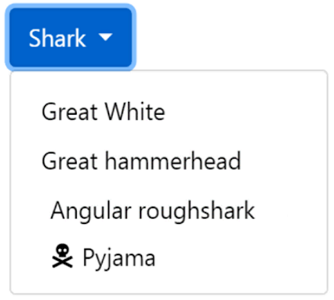
ng-content fails for this scenario
The core problem is that <ng-content> has no awareness of the context where it is rendered. It doesn't know which shark option it belongs to, making it impossible to customize content based on the dropdown value.
If only there was a way to project a template that also understands its local context. That's exactly where ngTemplateOutlet steps in!
NgTemplateOutlet
ngTemplateOutlet serves as a placeholder to render a template while supplying that template with context. In our case, we want a template slot for each dropdown option, with the shark as the context.
The official Angular documentation for ngTemplateOutlet is currently sparse. This issue has been opened, and community ideas for better demonstrations are already circulating.
Defining a Template
Before leveraging ngTemplateOutlet, we need to define a template using <ng-template>. The template body is whatever sits inside the <ng-template> element.
<ng-template #myTemplate>
  <div>Hello template</div>
</ng-template>
To reference the template, we give it a name using the # syntax. Adding #myTemplate to the element lets us grab a reference via the name myTemplate. The type of myTemplate is TemplateRef.
Rendering a Template
The contents of a <ng-template> element are not rendered in the browser automatically. To actually see the template body, we must pass the template reference to a ngTemplateOutlet.
<!-- Define our template -->
<ng-template #myTemplate> World! </ng-template>

Hello
<!-- Render the template in this outlet -->
<ng-container [ngTemplateOutlet]="myTemplate"></ng-container>
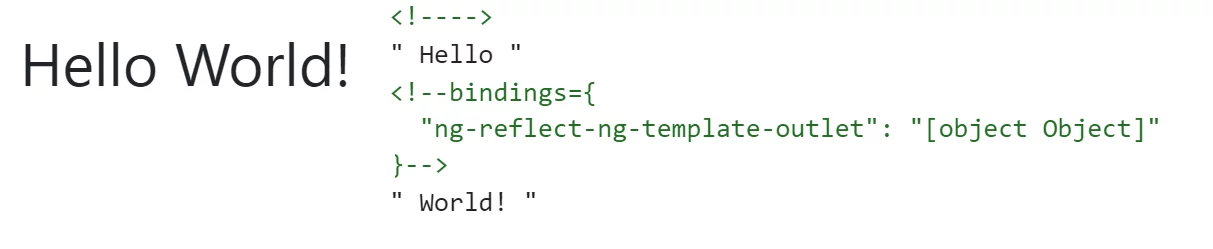
The visible output from our template and outlet
Together, ng-template and ngTemplateOutlet allow us to define reusable templates, which is already a robust feature—but we're only scratching the surface!
Supplying the Template Context
We can elevate templates further by providing a context. This lets us pass data into the template, which in our case is the shark for the current option. To supply context, we use [ngTemplateOutletContext].
Here, we pass each dropdown option into optionTemplate. This allows the option template to render different values for every item. We also set the current index to the idx property, which can be handy for styling purposes.
<li *ngFor="let item of items; index as i">
  <!-- Setting the option as the $implicit property of our context along with the row index -->
  <ng-container
    [ngTemplateOutlet]="optionTemplate"
    [ngTemplateOutletContext]="{ $implicit: option, idx: i }"
  ></ng-container>
</li>

<!-- selector.component.html -->
The shorthand syntax below works as well.
<!-- Alternative syntax -->
<ng-container
  *ngTemplateOutlet="optionTemplate; context:{ $implicit: option, idx: i }"
></ng-container>
Using the Context in your template
To access the context inside our template, we use let-* syntax to declare template input variables. To bind the $implicit property to a variable called option, we add let-option to the template. The variable name is flexible—let-item or let-shark would also map to the $implicit context property.
This lets us define a template outside the selector component while still accessing the current option, just as if the template were written directly inside the dropdown!
<ng-template #optionTemplate let-option let-position="idx">
  {{ position }} : {{option}}
</ng-template>

<!-- client-one.component.html -->
For other context properties, we need to be explicit. To bind the idx value to a variable called position, we use let-position=idx. Alternatively, let-id=idx would name it id.
Note that we must know the exact property name when extracting context values other than $implicit. The $implicit property is convenient because users don't need to remember its name and can write less code.
Library authors: please document the structure of your context! Currently, there is no auto-complete or type checking for template input variables.
Using template input variables, we can blend state from where the template is defined with the context supplied where it's instantiated. This opens up incredible possibilities!
Solving our feature requests
We can now satisfy both conflicting client demands with a single selector. To recap, the first client wanted custom icons, while the second justifiably wanted to avoid that dependency.
Setup the template outlet in our component
To support templates inside app-selector, we swap the display function and icon element for a ng-container with a ngTemplateOutlet. This outlet will use the user's optionTemplate if provided, or fall back to our defaultTemplate.
<li *ngFor="let option of options; index as i">
  <!-- Define a default template -->
  <ng-template #defaultTemplate let-option>{{ option }}</ng-template>

  <ng-container
    [ngTemplateOutlet]="optionTemplate || defaultTemplate"
    [ngTemplateOutletContext]="{ $implicit: option, index: i}"
  >
  </ng-container>
</li>

<!-- selector.component.html -->
Default templates are an excellent way to introduce
ngTemplateOutletinto an existing component retroactively.
We must remember to set up the context so the template can display the current option. We assign the option to $implicit and also expose the current row index.
The component accepts the optionTemplate through an Input.
@Input()
optionTemplate: TemplateRef<any>;

// selector.component.ts
@ContentChildis another way to pass a template into your component. This requires the template to be defined inside<app-selector>, which might be preferable with many Input properties. However, it makes sharing templates across component instances harder. See this Stackblitz for an example.
Define the client template
Now we can define a custom template in the first client's codebase. Using the template input variable, we ensure the correct icon is displayed for each shark.
<ng-template #sharkTemplate let-shark>
  <c1-icon name="{{ getIconFunc(shark) }}" />
  {{ shark }}
</ng-template>

<!-- Pass sharkTemplate to our selector via an Input -->
<app-selector
  [options]="sharks"
  [optionTemplate]="sharkTemplate"
></app-selector>

<!-- client-one.component.html -->
We pass the template by reference into the component via the optionTemplate @Input.
The result is a shark selector that meets the first client's needs while keeping the icon dependency out of other clients' bundles.
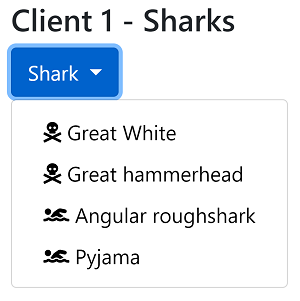
Customised selector using template outlet
Tractors instead of sharks
Just when we thought we were done, the second client reveals they've moved on from sharks and now love tractors! They want a dropdown for tractors complete with images and buttons.
The wonderful part is we can deliver exactly what they want without touching any selector code. That's the real power of ngTemplateOutlet.
We simply update the template in the second client's codebase for tractors and pass it in.
<ng-template #tractorTemplate let-tractor>
  <label>{{ tractor.name }}</label>
  <img src="{{ tractor.img }}" />
  <button>Buy Now!</button>
</ng-template>

<!-- No change to selector for brand new dropdown style -->
<app-selector
  [options]="tractors"
  [optionTemplate]="tractorTemplate"
></app-selector>

<!-- client-two.component.html -->
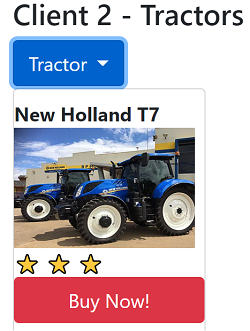
Same selector, entirely different client template
Final Selector Code
By leveraging ngTemplateOutlet, we separate the selector's core logic from user customizations. This lets us keep a minimal component API without limiting our clients' creativity.
export class SelectorComponent<T> {
  @Input()
  options: T[];
  @Input("optionTemplate")
  optionTemplateRef?: TemplateRef<any>;

  @Output()
  selectionChanged = new EventEmitter<T>();
}

// selector.component.ts
<li *ngFor="let option of options; index as i">
  <ng-template #defaultTemplate let-option>{{ option }}</ng-template>

  <ng-container
    [ngTemplateOutlet]="optionTemplate || defaultTemplate"
    [ngTemplateOutletContext]="{ $implicit: option, index: i}"
  >
  </ng-container>
</li>

<!-- selector.component.html -->
Conclusion
I hope this article helps you use ngTemplateOutlet to support template customizations in your own components! I also hope you now have a deeper appreciation for how your favorite component libraries use ngTemplateOutlet to enable customization.
Further Reading
I've covered a single use case here. If you enjoyed this, I highly recommend Alex Inkin's article Agnostic components in Angular, which takes the concept even further.
Live Example
Experiment with the live example on Stackblitz or clone the repo StephenCooper/ngTemplateOutlets from GitHub.
If you prefer videos, you can watch my presentation at Angular Connect 2019.