
Getting Started
What happens when we take on a project that is running smoothly in production, but the underlying technology is considered outdated and we'd like to swap it out? In some cases, discarding the old project and starting fresh is an option. However, when the project is substantial and generates revenue, that approach may not be feasible. The 'strangler pattern' offers a solution.
This approach involves progressively rebuilding an existing system from within, substituting and extending its features with a new technology stack rather than the incumbent one. As time goes on, the share of these 'new' capabilities increases, allowing us to reduce the amount of legacy code while the system remains operational throughout the transition. I encountered this scenario while developing an administrative application at Unilink, and in this piece, I'll discuss how I implemented micro frontends using Angular.
Preliminary Steps
The initial phase of integrating the new part of the system involved crafting several new views for the current application. To tackle this, I opted for micro frontends built on Web Components. Each new view functioned as a separate micro-application, yet they shared a lot of code. Therefore, they were all developed within a single repository to take advantage of rapid creation and modification of shared components. The ultimate goal was to evolve into a standalone SPA application once enough functionality had been implemented in Angular.
The Nx tool was my choice for establishing the monorepo. In the Angular context, it enhances the CLI with extra capabilities and modifies the default settings of a newly scaffolded Angular project.
Here are some notable distinctions between a project created with NX and one generated with the standard CLI:
- eslint is configured for static code analysis
- Prettier is set up for consistent code formatting
- Jest replaces Jasmine and Karma for unit testing
- cypress is included for e2e testing
It's also possible to generate a project without these specific dependencies.
The monorepo strategy involves storing the code for numerous libraries and projects in one place. NX supports two forms of monorepos – the integrated monorepo and the package-based monorepo – which can be used together. The integrated type prioritizes performance and maintainability, while the package-based one offers more flexibility and simplicity.
A key command that Nx introduces is `affected`, which pinpoints all libraries and projects within the monorepo that have been modified relative to a previous or specified point in git history. You can run any task, such as lint, tests, or build, on each item in this list. Additionally, NX caches previously executed commands in memory and facilitates cache sharing across multiple machines via NX Cloud.
Web Components enable the creation of custom HTML tags. These tags can encapsulate an entire (or nearly entire) Angular application, and this is where the Angular Elements library comes into play. Each view or feature can be isolated within its own micro-application. However, Angular within Web Components has a significant constraint: it lacks support for RouterModule. For navigation between different screens, alternative solutions are necessary. For more details on Angular Elements, refer to: https://wp.angular.love/en/2021/01/12/angular-elements-2/
Structuring the Codebase into Libraries
Nx offers a range of 'presets' that dictate the folder structure. By applying the preset for Angular, you'll see two primary directories emerge: `apps` and `libs`.
Apps – This folder contains all the applications that can be built or served. Their configurations are pulled into a modified `angular.json` file, which imports them from the `project.json` files of each individual app. These applications don't have to be Angular-based.
Libs – This holds the libraries or modules that the applications depend on. Their definitions are also incorporated into the `angular.json` file, while the specific configuration resides in the `project.json` file within the respective library's folder. A library isn't a complete application by itself. It can be built and published to a repository like NPM or a private Verdaccio, or it can be used directly in the codebase. Nx simplifies the import of library files through short, aliased paths, which are configured in the `tsconfig.base.json` file.
The bulk of our application's logic should ideally live in the `libs` folder. This approach allows us to construct applications by pulling in the necessary modules from various libraries.
This modular assembly is particularly handy when you need to reuse a specific feature across multiple applications. The entire piece of functionality is bundled into one library. It can then be integrated into a legacy system as a Web Component. Alternatively, a separate, new application can be built alongside, utilizing routing to display the same view, complemented by other features from different libraries.
Organizing Applications by Domains
How do we manage all this complexity without losing our way?
A common strategy is to categorize libraries based on business areas and also by architectural layers. We can refer to a business area as a domain – for instance, training, payments, orders, or a shared UI library. Each domain can then be sub-divided into various layers. One possible layer structure is proposed by Manfred Steier in his article: https://www.angulararchitects.io/en/aktuelles/tactical-domain-driven-design-with-monorepos/.
- Api
- Feature
- UI
- Domain
- Util
For deeper insights into layering and maintaining clean code, I suggest reviewing the NX documentation (https://nx.dev/recipes/other/tag-multiple-dimensions#tag-in-multiple-dimensions and https://blog.nrwl.io/mastering-the-project-boundaries-in-nx-f095852f5bf4 ) as well as Manfred's series. In this tutorial, I'll demonstrate how to use one feature in two different applications without diving deep into the specifics of domain and layer organization.
Setting Up the Initial Micro-Application
Initializing the Nx Workspace
npx create-nx-workspace@latestAn interactive prompt will walk us through several configuration choices:
✔ Workspace name (e.g., org name)     · new-system
? What to create in the new workspace …
apps              [an empty workspace with no plugins with a layout that works best for building apps]
npm               [an empty workspace with no plugins set up to publish npm packages (similar to yarn workspaces)]
ts                [an empty workspace with the JS/TS plugin preinstalled]
react             [a workspace with a single React application]
angular           [a workspace with a single Angular application]
next.js           [a workspace with a single Next.js application]
nest              [a workspace with a single Nest application]
express           [a workspace with a single Express application]
web components    [a workspace with a single app built using web components]
react-native      [a workspace with a single React Native application]
react-express     [a workspace with a full stack application (React + Express)]
angular-nest      [a workspace with a full stack application (Angular + Nest)]
We'll choose `angular` as the framework and the relevant configuration for our new workspace.
✔ Application name                    · invoices
✔ Default stylesheet format           · scss
The final question in the workspace creation wizard will be about
Set up distributed caching using Nx Cloud (It's free and doesn't require registration.)Nx provides the ability to leverage a cloud-based cache for executed commands (lint, test, build). This enhances performance for scripts, as tasks with no code changes can reuse previously built artifacts.
Our first application has been successfully generated. It becomes the default app that runs when the `npm start` command is executed without extra arguments. To modify this default, you can change the "defaultProject" property in the `nx.json` file.
"defaultProject": "invoices"For our project, we want each application screen (view) to reside in its own library. So, let's proceed to add a new library that will act as a view within the micro-application serving as the Web Component.
Creating the Feature Library
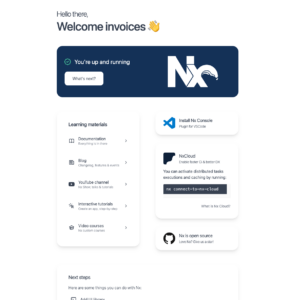
The application that will serve as the container for our view is already in place. Now, let's create the library that holds the actual view content.
nx generate lib feature-invoices –directory billingThe generator selection prompt will appear.
? Which generator would you like to use? …
@nrwl/angular:library
@nrwl/workspace:library

None of the above
Choose `@nrwl/angular:library` from the list.
A `billing` directory will be created under `libs`, containing the new library. The `billing` folder here is a convention to group libraries by business domain – you can name it to reflect any other domain. The `feature` label is also a convention, useful for organizing code into layers and making them easily identifiable within the project structure.
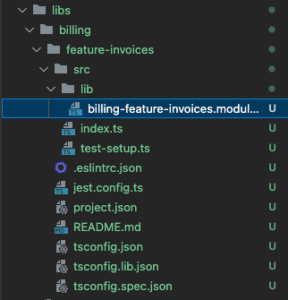
An essential file to review is `index.ts`, which exports the library's public API, making its components accessible to other parts of the workspace.
Let's now add an Angular component to this library, which will form our view. We can utilize the CLI or a generator plugin like Nx Console.
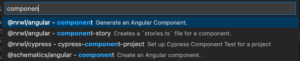
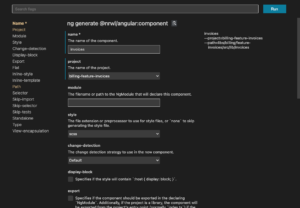
Be sure to add the new component to the `exports` array within its module's configuration. This makes the component available for use after importing the `BillingFeatureInvoicesModule`.
@NgModule({
 imports: [CommonModule],
 declarations: [InvoicesComponent],
 exports: [InvoicesComponent],
})
export class BillingFeatureInvoicesModule {}
Next, we can import the module from our library into the previously created application. Open `app.module.ts` in the `invoices` application and add the feature module to its imports.
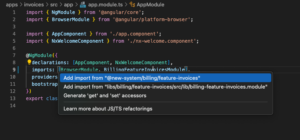
When typing the module name in the import and letting the IDE auto-import, VS Code will offer two paths. If you pick the absolute path (the second one), eslint will immediately flag it in red. This is a rule introduced by Nx to guard against non-alias imports. Choose the first option instead, which uses the neat, npm-standard alias path.
import { BillingFeatureInvoicesModule } from '@new-system/billing/feature-invoices';To view all available path aliases, check the `nx.json` file in the project's root directory.
Now, let's add the component to the template in `app.component.html`.
<new-system-invoices></new-system-invoices>Adjusting the Component Tag
The default selector for the `Invoices` component doesn't clearly indicate its purpose within the application. Let's update the HTML selector in the `InvoicesComponent` file to `feature-invoices`.
import {Component } from '@angular/core';


@Component({
 selector: 'billing-feature-invoices',
 templateUrl: './invoices.component.html',
})
export class InvoicesComponent {}
The IDE will likely show an eslint warning about this:
The selector should start with one of these prefixes: "new-system" (https://angular.io/guide/styleguide#style-02-07)eslint@angular-eslint/component-selectorWe need to modify the selector prefix rule defined for this specific library. Navigate to the `.eslintrc.json` file located in the `libs/billing/feature-invoices` directory and adjust its configuration:
{
 "extends": ["../../../.eslintrc.json"],
 "ignorePatterns": ["!**/*"],
 "overrides": [
   {
     "files": ["*.ts"],
     "extends": [
       "plugin:@nrwl/nx/angular",
       "plugin:@angular-eslint/template/process-inline-templates"
     ],
     "rules": {
       "@angular-eslint/directive-selector": [
         "error",
         {
           "type": "attribute",
           "prefix": "feature",
           "style": "camelCase"
         }
       ],
       "@angular-eslint/component-selector": [
         "error",
         {
           "type": "element",
           "prefix": "feature",
           "style": "kebab-case"
         }
       ]
     }
   },
   {
     "files": ["*.html"],
     "extends": ["plugin:@nrwl/nx/angular-template"],
     "rules": {}
   }
 ]
}
Using a generic `feature` prefix might not be ideal – it could be misleading since not every component in this library will necessarily be a feature. A better choice might be a prefix aligned with the domain name it belongs to, for example, `billing`. Let's update the eslint configuration accordingly, change our component's selector to `billing-invoices`, and reflect this new tag in the host application's template.
{
 "extends": ["../../../.eslintrc.json"],
 "ignorePatterns": ["!**/*"],
 "overrides": [
   {
     "files": ["*.ts"],
     "extends": [
       "plugin:@nrwl/nx/angular",
       "plugin:@angular-eslint/template/process-inline-templates"
     ],
     "rules": {
       "@angular-eslint/directive-selector": [
         "error",
         {
           "type": "attribute",
           "prefix": "billing",
           "style": "camelCase"
         }
       ],
       "@angular-eslint/component-selector": [
         "error",
         {
           "type": "element",
           "prefix": "billing",
           "style": "kebab-case"
         }
       ]
     }
   },
   {
     "files": ["*.html"],
     "extends": ["plugin:@nrwl/nx/angular-template"],
     "rules": {}
   }
 ]
}
import { ChangeDetectionStrategy, Component } from '@angular/core';


@Component({
 selector: 'billing-feature-invoices',
 templateUrl: './invoices.component.html',
 changeDetection: ChangeDetectionStrategy.OnPush,
})
export class InvoicesComponent {}<billing-feature-invoices></billing-feature-invoices>Turning a micro-application into a Web Component
The app's job is narrow: bring in the feature module and supply the required setup. To compile it as a Web Component, a handful of tweaks to the default generated files are needed. The steps outlined at https://wp.angular.love/en/2021/01/12/angular-elements-2/ serve as our guide.
First, we install the two required packages:
ng add @angular/elementsNg add is not natively supported by Nx
Instead, we recommend running `npm install @angular/elements && npx nx g @angular/elements:ng-add
Nx extends Angular's CLI by adding its own logic under the hood, but not every feature is covered. That’s why we adopt the script suggested in the referenced post:
npm install @angular/elements
npm i @webcomponents/webcomponentsjs // krótsza wersja npm install
Next, we adjust the module and component belonging to the invoices app.
apps/invoices/src/app/app.module.ts
@NgModule({
 declarations: [AppComponent],
 imports: [BrowserModule, BillingFeatureInvoicesModule],
 bootstrap: [AppComponent],
})
export class AppModule {
 constructor(injector: Injector) {
   const el = createCustomElement(InvoicesComponent, { injector: injector });
   customElements.define('new-system-invoices', el);
 }
}
apps/invoices/src/app/app.component.ts
import { Component, OnInit } from '@angular/core';


@Component({
 selector: 'new-system-root',
 template: `<div id="container"></div>`,
 styleUrls: ['./app.component.scss'],
})
export class AppComponent implements OnInit {
 ngOnInit() {
   document.querySelector('#container')!.innerHTML =
     '<new-system-invoices></new-system-invoices>';
 }
}
Compiling the Web Component
We fire up the dev server to confirm everything runs:
npm start invoicesAll good. The tricky part appears when we want both: serve the invoices app normally and also bundle it as a Web Component.
Following the referenced article, we drop the `bootstrap` entry from the AppModule decorator to enable micro-app builds.
@NgModule({
 declarations: [AppComponent],
 imports: [BrowserModule, BillingFeatureInvoicesModule],
})
export class AppModule {
 constructor(injector: Injector) {
   const el = createCustomElement(InvoicesComponent, { injector: injector });
   customElements.define('new-system-invoices', el);
 }


 ngDoBootstrap() {}
}
The UI at localhost:4200 goes blank. Time to bring it back.
It's safe to assume that the Web Component build only happens in a production setup, while development keeps the classic bootstrapping path. So we turn to the `production` flag found in the `environment.ts` file.
The `ngDoBootstrap` hook runs regardless of whether we compile to a Web Component or a regular app, so that's where we place the branching logic to decide the running mode.
Let's update both the module and the main component:
apps/invoices/src/app/app.module.ts
const APPLICATION_TAG = 'new-system-invoices';


@NgModule({
 declarations: [AppComponent],
 imports: [BrowserModule, BillingFeatureInvoicesModule],
})
export class AppModule implements DoBootstrap {
 constructor(
   private _injector: Injector,
   private _applicationRef: ApplicationRef
 ) {}


 ngDoBootstrap(): void {
   if (environment.production) {
     try {
       // prevent 'has already been defined as a custom element' error
       if (customElements.get(APPLICATION_TAG)) {
         return;
       }


       // create custom elements from angular components
       const el = createCustomElement(AppComponent, {
         injector: this._injector,
       });
       // define in browser registry
       customElements.define(APPLICATION_TAG, el);
     } catch (err) {
       console.error(err);
     }
   } else {
     this._applicationRef.bootstrap(AppComponent);
   }
 }
}
apps/invoices/src/app/app.component.ts
@Component({
 selector: 'new-system-root',
 template: `<new-system-invoices></new-system-invoices>`,
 styleUrls: ['./app.component.scss'],
})
export class Ap
After saving, our application should be visible again.
What exactly happens inside ngDoBootstrap?
First, we look at the `production` flag in the environment file. If it's true, we verify that no other component has already registered itself under the same custom HTML tag — a useful safeguard when the same component appears in multiple places within a static HTML page. Then we craft an Angular Element by supplying the right parameters and declare it under the chosen tag. When the flag is false, we fall back to bootstrapping AppComponent into the Angular app.
Now let's confirm the app behaves as a Web Component. As described in Łukasz's article, we run the build command and then merge the output files into one bundle.
ng build --prod --output-hashing=none
cat dist/apps/invoices/runtime.js dist/apps/invoices/polyfills.js dist/apps/invoices/main.js > distjs dist/apps/invoices/main.js > dist/apps/invoices.js
After that, we reference the Web Component from a static HTML file:
<body>
   <script src="../dist/apps/invoices.js"></script>
   <h1>Static</h1>
   <new-system-invoices></new-system-invoices>
 </body>
 </h
A deeper dive into Angular Elements is available in the blog post: https://wp.angular.love/en/2021/01/12/angular-elements-2/
Integrating the new feature module into the SPA
To spin up another app inside the Nx workspace, we run:
nx generate app application-with-routingWhen the CLI prompts us in the terminal, we answer `y`:
✔ Would you like to configure routing for this application? (y/N) · true
The apps folder now contains two applications. Both (and any others) can run side by side from the same workspace. We simply invoke the script:
npm start application-with-routing – –port 4201 –oSince port 4200 is already taken, we can explicitly specify another port for the new app. Alternatively, we could let the CLI pick an open port automatically, but that would result in a different port on each run.
Now we bring the new feature into the main app.module.ts, this time via routing configuration.
@NgModule({
 declarations: [AppComponent],
 imports: [
   BrowserModule,
   RouterModule.forRoot(
     [
       {
         path: '',
         component: InvoicesComponent,
       },
     ],
     { initialNavigation: 'enabledBlocking' }
   ),
 ],
 providers: [],
 bootstrap: [AppComponent],
})
export class AppModule {}
This time the IDE won't auto-suggest the import path. Keep in mind that any files meant to be public from the library must be listed in the library's index.ts file.
libs/billing/feature-invoices/src/index.ts
export * from './lib/billing-feature-invoices.module';
export { InvoicesComponent } from './lib/invoices/invoices.component';
Next, we import the component in app.module.ts. The routing setup shown here is intentionally minimal. A more robust approach would involve a dedicated Shell library to hold routing rules for the whole billing domain. If you'd like to see how that's done, drop a comment below.
Opening the localhost address on the chosen port should now display the same feature that's served from the micro app on port 4200.
Web Components: trade-offs
Adopting micro frontends as Web Components comes with both benefits and trade-offs. Let’s start with the drawbacks:
- bundle size – even with optimisations, keeping micro-app builds small remains a challenge (lazy-loading web-components can help ease the pain),
- no internal routing – router-outlets don't work inside a web-component because the app isn't tied to browser URLs. Such a micro frontend depends on the host's navigation; instead of routerLinks, we can resort to plain anchor tags,
- DevOps overhead may creep in – as the number of libraries grows, so does build time. Linting, testing, and building the whole project can stretch into minutes or worse. The monorepo will need CI/CD improvements, such as the `affected` command and caching.
On the plus side:
- we can introduce new capabilities incrementally while keeping the legacy system in maintenance mode,
- when sessions live in cookies, the Web Component doesn't need its own auth layer. Everything runs under the parent app's context, which effectively lends its session,
- moving from a Legacy system to an SPA is fairly smooth once feature coverage is sufficient. A separate shell application can take over routing, auth, and other cross-cutting concerns that the Web Components didn't have to deal with.
Wrap-up
The micro frontend pattern isn't only for big, distributed teams. It also fits incremental modernisation of an existing system. Splitting the app into modules makes the codebase easier to manage, but it's not a magic bullet for code complexity. With good practices in place, new features can be delivered faster thanks to better code reuse across modules and projects.
P.S. About those large bundle sizes: right now, our micro app—which merely renders the text `invoices works!`—comes in at 226 kB. That's way too heavy! If lightweight is a priority, consider building web components without a framework. Google Material v3, for instance, takes that route (https://m3.material.io/develop/web).