Wrapping Up the SSR Side Effects: A Closer Look
Let's continue where we left off. You can find the context here covering the first part.
This time, we’re turning our attention to the initialNavigation flag within the Angular Router, and how the server and client exchange data without stepping on each other's toes.
Communicating Between Server and Client
It's a common hurdle: you’ve fetched your data on the server, but the client app needs to know that state without fetching it again. This is precisely the kind of problem TransferState is meant to solve. The official docs describe it as:
“A key value store that is transferred from the application on the server side to the application on the client side.”
To use it, you need the ServerTransferStateModule on the server and BrowserTransferStateModule on the client. With those in place, you're ready to pass values across the boundary. Let’s look at the simplest concept: a component that displays a random color.
@Component({
  selector: 'app-random-color’',
  template: `<div [ngStyle]=”{elStyle}”>Color</div>`,
  styleUrls: ['./random-color.component.scss']
})
export class RandomColorComponent implements OnInit {

 elStyle={};

  ngOnInit(): void {
      this.elStyle.color=this.generateRandomColor();
  }

 private generateRandomColor(): string {
      const color = ((1 << 24) * Math.random() | 0).toString(16);
      return `#${color}`;
  }
}
This basic implementation has a classic problem: the server renders one color, and the client gets a completely different one upon bootstrapping. To fix this mismatch, you’d use TransferState to carry that server-side color over:
export class RandomColorComponent implements OnInit {

  elStyle={};

  private readonly colorKey = makeStateKey<string>('random_color');

  constructor(@Inject(PLATFORM_ID) private readonly platformId: any,
              private readonly transferState: TransferState) {

  ngOnInit(): void {
    if (isPlatformServer(this.platformId)) {
      this.elStyle.color = this.generateRandomColor();
      this.transferState.set(this.colorKey, this.random);
    } else {
      this.elStyle.color = this.transferState.get(this.colorKey, this.generateRandomColor());
    }
  }
...
}
So, what exactly is happening here? First, we’ve injected the application's platform ID and the TransferState service. A key is generated with makeStateKey, which gives us a typed token. In this case, it's a string type representing 'random_color'. On the server, the color is generated and placed into TransferState. When the client boots, it calls the get method with that same key. If the key isn't found, it falls back on the provided default value. It’s a lot of backstory, but the actual application of it is quite straightforward.
The use cases are broad. In some of my projects, I’ve stored user location data derived from the request headers. However, its most frequent job is to cache HTTP responses to avoid duplicate server calls on the client. There's a ready-made solution for caching HTTP requests you don't have to build from hand.
The data gets into the browser via a script tag that Angular creates in the DOM:

The ID of that script is derived from the argument passed to BrowserModule.withServerTransition({appId: 'serverApp'}).
“Where’s My View?” – The Consequences of the Initial Navigation Flag
If you’ve used SSR, you’ve likely seen the root routing module’s config change, particularly those flags like enabledBlocking.
@NgModule({
  imports: [RouterModule.forRoot(routes, {
    initialNavigation: enabledBlocking
  })],
  exports: [RouterModule]
})
export class AppRoutingModule {
}
Why is this flag so vital? At its core, it determines the sequence: do we bootstrap the Angular application and then handle routing events, or do we pause bootstrapping until the router has finished its initial run? Reviewing the documentation gives us some direction:
'enabledNonBlocking’ – (default) The initial navigation starts after the root component has been created. The bootstrap is not blocked on the completion of the initial navigation.
This is the standard flow for pure client-side apps. You can visualize it like this:
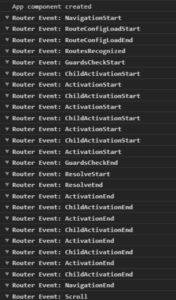
Notice that the component bootstrapping happens first, then routing acts on the URL.
Then there's:
'disabled' – The initial navigation is not performed. The location listener is set up before the root component gets created.
This one gives you full manual control. You can start the router whenever you’re ready for your app’s unique setup. Something like ngx-translate-router relies on this flexibility.
Finally, the one you’ll use most with SSR:
'enabledBlocking' – The initial navigation starts before the root component is created. The bootstrap is blocked until the initial navigation is complete. This value is required for server-side rendering to work.
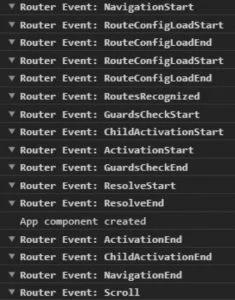
This means the router runs before components are created. This sequencing is deliberate in SSR, helping to prevent a common visitor-facing issue: a flash of the server-rendered UI followed by a flicker while lazy-loaded chunks arrive. The logic here is to prevent that jarring shift where you see one component from the server and then a completely different one once the client takes over.
But, there’s a catch. If you block the bootstrap until routing gets the green light, you might hit a moment where a component you depend on hasn't been spun up yet. This is particularly relevant within microfrontends, which we touched on in the preceding part. The scenario: you need to pass a guard in the router, but the guard checks whether you’ve authenticated through an iframe loaded inside your app-component. If that component isn't mounted yet, the iframe can't appear, and your guard blocks all navigation. As a result, any deep link into the app will hang—the bootstrapping can’t start since the route guard sees no auth. You end up with a circular waiting game. Here are a few ways to break that cycle:
- A dedicated login page: The simplest route is to build a separate page and a linked service. It works but forces a detour for the user.
- Try
enabledNonBlocking: It can solve your issue, but be prepared for potential flickering and odd scroll positions for the user–a bit user-hostile, in my view. - Use Custom Elements: On a microfrontend pattern, you’re able to isolate your auth widget out of the main Angular app’s lifecycle. It sits outside the wait chain. The guard can flag it and wait for a callback. This solution is elegant but brings its own setup complexity.
- Leverage a Server Guard with TransferState: This is the most pragmatic path forward, reusing the same mechanism we discussed above. It works by a process of elimination:
- After the server’s router guard runs, you store the intended URL in
TransferState. - During that router pass on the client boot, you check for this key. If it’s present, navigate to a “waiting room” route. Now the guard has passed, and Angular proceeds.
- Inside that “waiting room”, the app can see the original URL in the state, clear it, and reload you back to where you initially wanted to be. The transition from server to client is seamless.
@Injectable({
  providedIn: 'root'
})

export class SsrRedirectGuard implements CanActivate {

  constructor(
    @Inject(PLATFORM_ID) private readonly platformId: unknown,
    private readonly router: Router,
    private readonly transferState: TransferState
  ) {}

  canActivate(route: ActivatedRouteSnapshot, state: RouterStateSnapshot): boolean | UrlTree {
    const ssrBlockedUrl = this.router.parseUrl(`/${ROUTE_SLUGS.ssrAuth}`);
    if (isPlatformServer(this.platformId)) {
      this.transferState.set(ssrRedirectStateKey, state.url);
      return ssrBlockedUrl;
    } else {
      return this.transferState.hasKey(ssrRedirectStateKey) ? ssrBlockedUrl : true;
    }
  }
}@Component({
selector: app-ssr-redirect',
template: '<app-loader></app-loader>',
styles: [],
changeDetection: ChangeDetectionStrategy.OnPush
})
export class SsrRedirectComponent implements OnInit {
constructor(@Inject(PLATFORM_ID) private readonly platformId: unknown,
private readonly transferState: TransferState, private readonly router: Router) {
}
ngOnInit(): void {
if (isPlatformBrowser(this.platformId) && this.transferState.hasKey(ssrRedirectStateKey)) {
const url = this.transferState.get(ssrRedirectStateKey, null);
this.transferState.remove(ssrRedirectStateKey);
this.router.navigateByUrl(url);
}
}
}It requires a bit of engineering legwork and might sound intricate, but it’s a solid approach. The experience remains unbroken for the user, there’s no flicker, and you didn’t have to invest in the more involved custom elements methodology.
Identifying this root cause is often the hardest part of the debugging session. What feels like a dead end is often simply the initial state interacting with your app’s structure in a way that isn’t obvious until you’ve been burned by it. This isn't something you can easily search for an “SO” answer to, so you need a deep understanding of your framework’s startup pattern.
Summary
We’ve peeled back a few layers of these subtle aspects of SSR. Finding info on TransferState usually comes quick for any developer. Unearthing the dark corners of the initial state—and how your app’s structure crumbles when it applies it—takes a bit more digging. Keep a lookout, as the next installment will look at more universal internal tips and tricks that can help both the server and client side of your app.