
By definition, the Critical Rendering Path is simply the sequence of steps that occur between the moment your browser receives an HTML page and the moment it begins constructing the visual output for users. Optimizing these browser operations is essential during this process.
The Document Object Model
To start, every webpage contains a Document Object Model, commonly abbreviated as DOM. This is an object-based representation of the parsed HTML page. Once the HTML is parsed, a DOM tree is constructed, which consists of objects.
Let’s start our discussion with a basic HTML snippet. The code below contains three sections: a header, a main area, and a footer. This might be the simplest HTML you could render in a browser. The stylesheet “style.css” is an external file used to format the page.
<html>
  <head>
  <link rel="stylesheet" href="style.css">
  <title>101 Javascript Critical Rendering Path</title>
  <body>
    <header>
      <h1>The Rendering Path</h1>
      <p>Every step during the rendering of a HTML page, forms the path.</p>
    </header>
    <main>
         <h1>You need a dom tree</h1>
         <p>Have you ever come across the concepts behind a DOM Tree?</p>
    </main>
    <footer>
         <small>Thank you for reading!</small>
    </footer>
  </body>
  </head>
</html>
When the browser parses the HTML above and builds the DOM tree structure, the result looks like this.
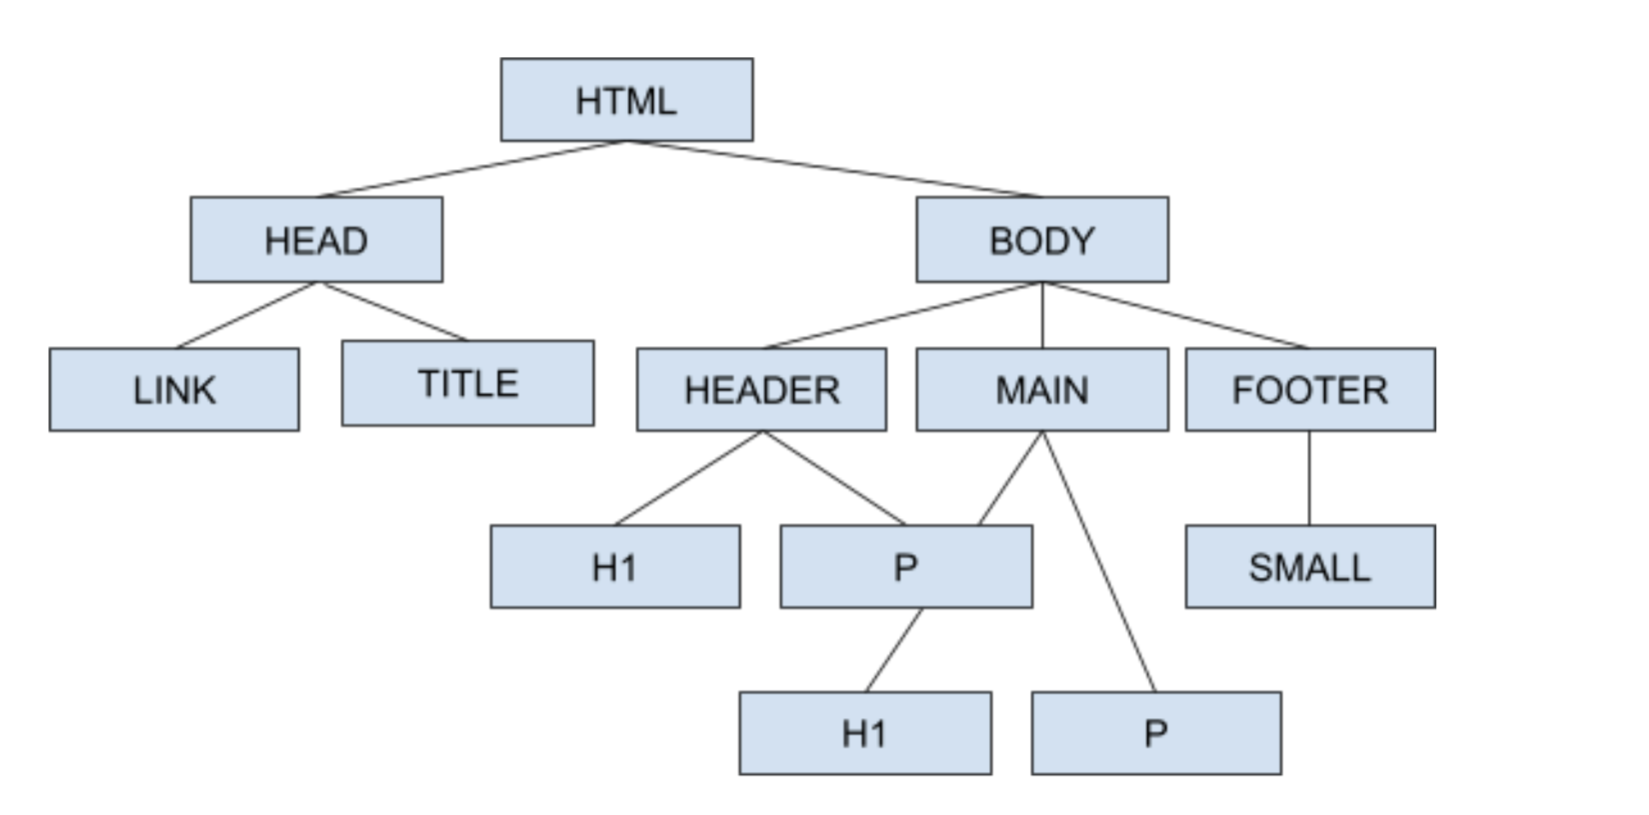
Parsing the HTML above requires a certain amount of time from the browser. Writing clean, semantic markup helps reduce the parsing time needed.
CSSOM Tree
Next in line is the CSSOM tree, which stands for the CSS Object Model. Similar to the DOM, the CSS Object Model is also an object-based tree structure. It manages the styles that apply to the DOM tree. Styles can be either inherited or explicitly declared in general.
header{
   background-color: white;
   color: black;
}
p{
   font-weight:400;
}
h1{
   font-size:72px;
}
small{
   text-align:left
}
Given the CSS declaration above, your CSSOM tree will look like the following.
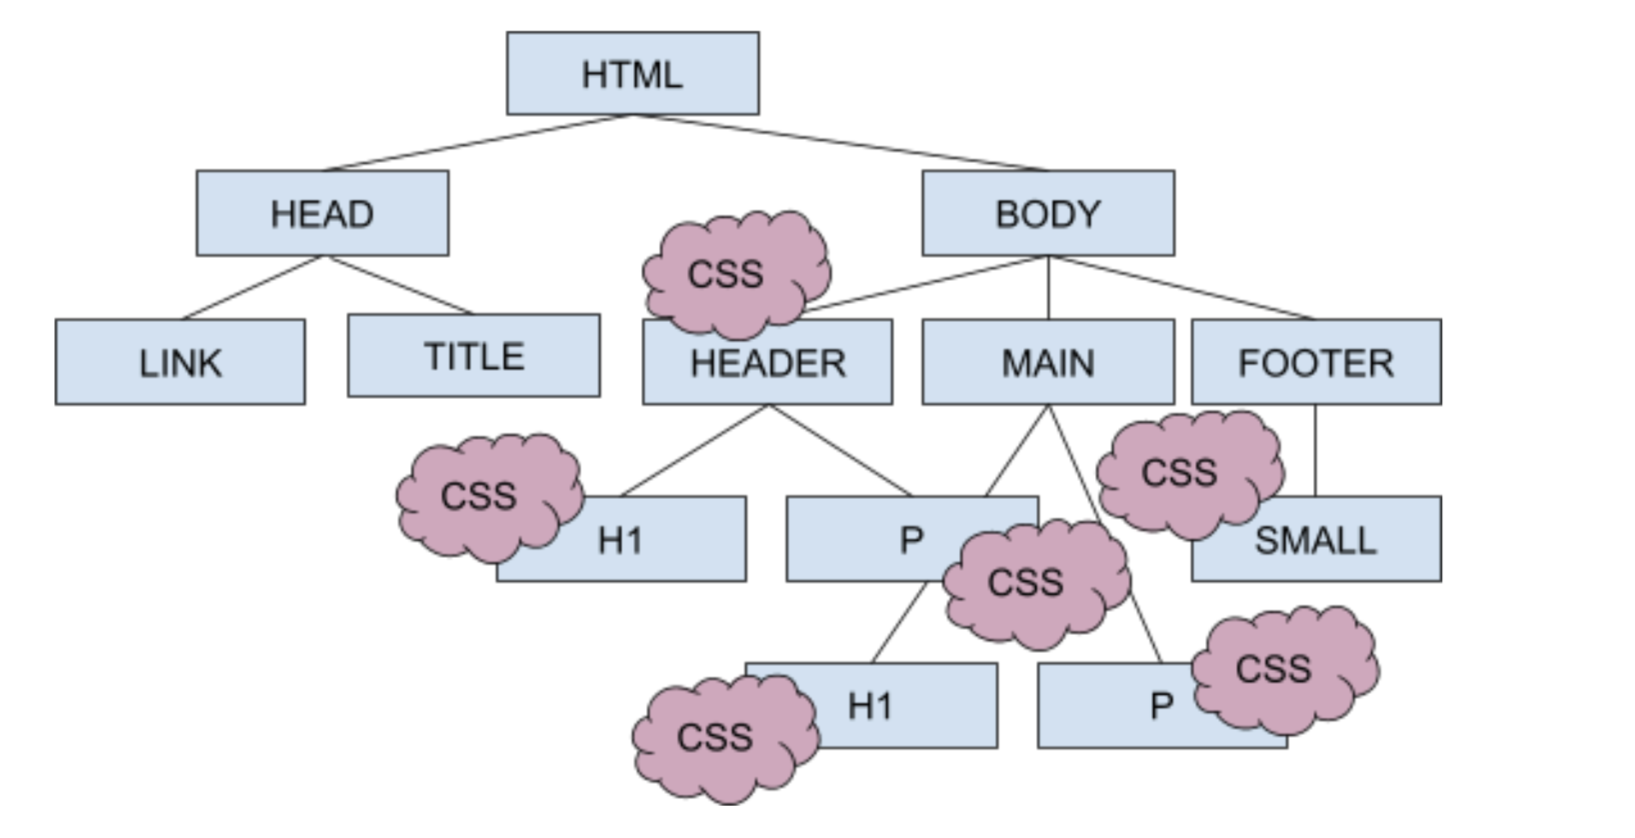
Generally speaking, CSS is considered a render-blocking resource.
What does Render-Blocking mean? A rendering-blocking resource prevents the browser from rendering the DOM tree until that resource has been fully loaded. CSS falls into this category because the tree cannot be painted until the CSS finishes loading. In the past, CSS came from a single source. Nowadays, developers use various strategies to split CSS files and deliver only the critical styles early in the rendering phase.
Executing JavaScript
Moving on, JavaScript is used to manipulate the Document Object Model. You might think of cases like popups or carousels that interact with the DOM. The issue arises when these interactions become slow and lengthen the overall load time of your website. This is why JavaScript is often labeled as a "Parser Blocking" resource.
What is Parser Blocking? The browser halts execution and DOM construction when JavaScript code is downloaded and executed. After the JavaScript finishes running, DOM construction resumes.
"This is why JavaScript is an expensive resource"
Let's examine some practical examples
The following demo shows a simple HTML snippet that displays text and an image. As you can see, the full page appeared in roughly 40ms. Even with the image, the display time remained low. Images are not classified as critical resources for the first paint. Remember, the critical rendering path focuses on HTML, CSS and Javascript. Although we aim for quick image display, images will not block initial rendering.
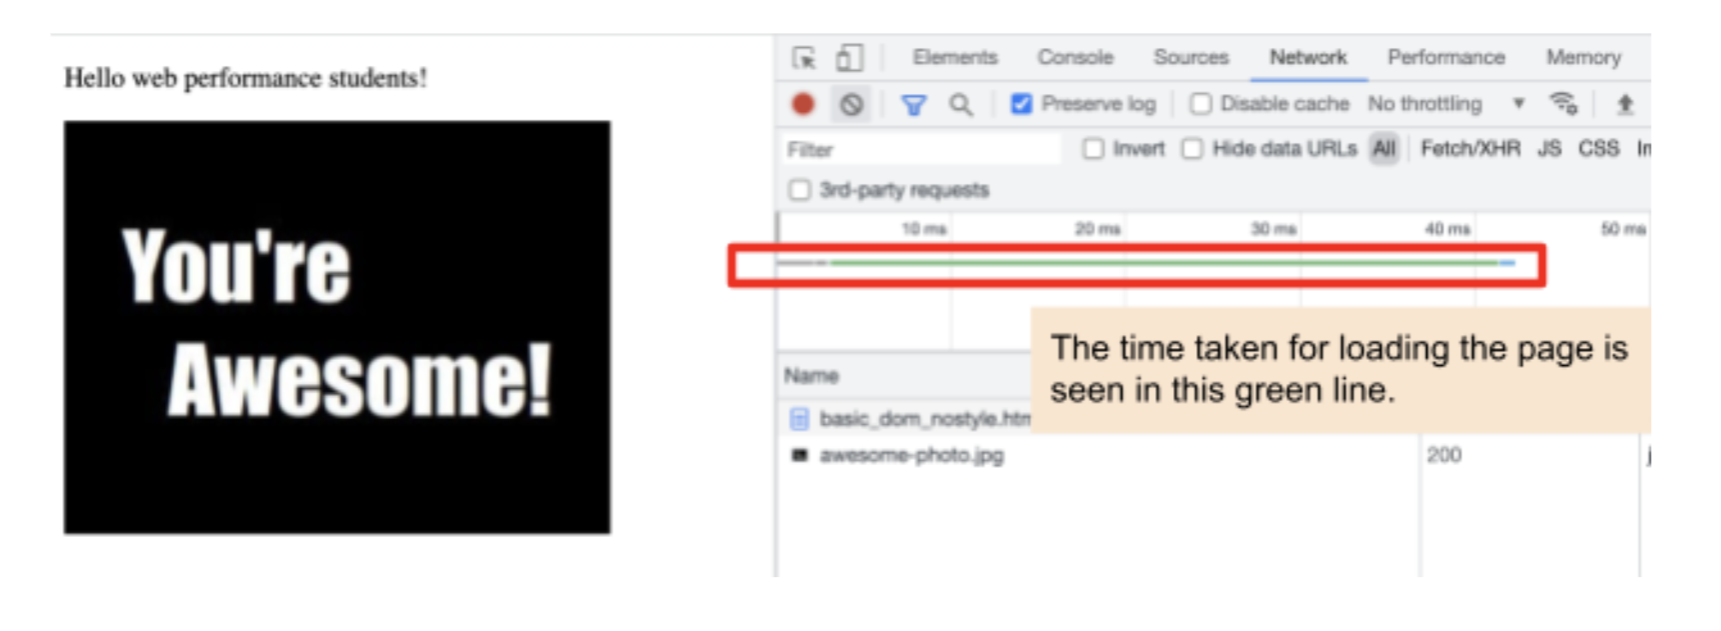
Now let's add CSS to the snippet.
An extra request becomes apparent here. Although the HTML file loads quickly, the total processing and display time grew nearly tenfold. Why does this happen?
- Plain HTML requires minimal fetching and parsing. However, adding a CSS file means a CSSOM (like the one mentioned above) must be constructed. Both the HTML DOM and the CSSOM need to be built, which takes additional time.
- If the script contains JavaScript, the
domContentLoadedevent won't fire. This is because JavaScript may query the CSSOM, meaning the CSS file must be fully downloaded and parsed before any JavaScript runs.
Note: domContentLoaded triggers when the HTML DOM is fully parsed and loaded. This event does not wait for images, subframes, or even stylesheets to finish loading. Its sole purpose is to detect when the document is ready. You can attach events on the window interface to check whether the DOM has been parsed and loaded. Your event listener would look like this:
window.addEventListener('DOMContentLoaded', (event) => {
  console.log('DOM Content Loaded Event');
});
- Even switching the external JavaScript file to an inline script won't change performance significantly. The construction of the CSSOM still needs to happen. For external scripts, a recommended solution is adding "async". This attribute unblocks the parser. More details on async will come later.

Let's Clarify the Terminology
Before tackling the problem, it's important to understand the correct terms used in the Critical Rendering Path.
- Critical Resource: Any resource that could block the page rendering.
- Critical Path Length: The total count of round trips needed to retrieve all critical resources that build the page.
- Critical Bytes: The total byte count transferred while completing and building the page.
In our first example with only HTML, those values were:
- 1 Critical Resource
- 1 Round Trip
- 192 Bytes of data
In the second example with HTML and external CSS, the values became:
- 2 Critical Resources
- 2 Round Trips
- 400 Bytes of data
Optimizing the Critical Rendering Path in any framework or in plain HTML+CSS+Javascript requires working on these metrics and improving them.
- Keeping the number of critical resources low is essential. Fewer resources mean less work for the CPU and the browser.
- The link between download time and resource size is direct and unavoidable. Larger resources extend the critical path length, resulting in more round trips to fetch them.
- Finally, critical bytes should be minimized wherever possible. If possible, convert destined bytes into non-critical resources or remove them entirely. When bytes must be part of the critical blocking resource, optimize the transfer through compression.
How to Reduce Render-Blocking CSS Resources
Every webpage has content above the initial scroll position (the fold) and content below it. Content displayed before the fold needs careful mapping. Ensure that the styles for pre-fold content are loaded early—these are considered critical styles. Other styles can load later. This approach increases your page speed and removes unnecessary render-blocking styles.
Let's see how render-blocking resources work in a real example and how minor adjustments can significantly improve your code.
How to Reduce Parser Blocking Resources
Lazy Loading
The main approach to loading is "Lazy Loading". Websites like Amazon and Facebook are content-heavy. How do they manage to load smoothly? As you scroll, new content appears without any lag. They achieve this through Lazy Loading. Media, CSS, JavaScript, images, and even HTML can all be loaded lazily. Limiting the amount of content loaded at any given moment improves your Critical Rendering Path Score.
- Consider having an overlay on your page.
- Don't load the overlay's CSS, JavaScript, and HTML during page load.
- Instead, attach an event listener to a button, and load the script only when the user clicks it.
- Utilize Webpack to achieve this functionality.
Here are some methods to implement Lazy Loading in pure JavaScript.
Let's start with images and iframes. How do you lazy load non-critical images? Or how do you load images only visible after user interaction? The native loading attribute on <img> and <iframe> tags handles this. When the browser encounters this attribute, it delays loading of the iframe and image. The syntax for obtaining this behavior is:
<img src="image.png" loading="lazy">
<iframe src="tutorial.html" loading="lazy" />
Note: Lazy loading via loading=lazy shouldn't be used for images inside the initial visible viewport. Only apply it to images located below the fold.
In browsers where loading=lazy is unavailable, IntersectionObserver is a viable alternative. This interface relies on the Intersection Observer API. The API defines a root and sets visibility ratio thresholds for each element relative to that root. When an element enters the viewport, it loads. Here's a basic snippet to illustrate this API.
- We observe all elements that have the class ".lazy".
- When elements with class ".lazy" are visible in the viewport, the intersection ratio rises above zero. If the Intersection Ratio is zero or negative, the target remains outside the view, and no action is required.
- Next, a predetermined series of operations executes on these elements.
var intersectionObserver = new IntersectionObserver(function(entries) {
  if (entries[0].intersectionRatio <= 0) return;

  //intersection ratio is above zero
  console.log('Loading Lazy Items');
});
// start observing
intersectionObserver.observe(document.querySelector('.lazy));
Async, Defer, Preload
Note: Async and Defer are attributes meant for external scripts.
Using Async allows the browser to continue other tasks while downloading a JavaScript resource. Once the download finishes, the resource executes immediately.
- JavaScript downloads asynchronously.
- Execution of other scripts pauses temporarily.
- DOM rendering proceeds in parallel.
- DOM rendering halts only during script execution.
- The async attribute addresses render-blocking JavaScript concerns.
"If a resource isn't important, skip it entirely—don't even use async"

Example:
<p>...content before scripts...</p>

<script>
  document.addEventListener('DOMContentLoaded', () => alert("DOM ready!"));
</script>

<script async src=""></script>

<!-- will be visible after the above script is completely executed –>
<p>...content after scripts...</p>
Using Defer downloads the JavaScript resource while the HTML renders. However, execution is postponed until the HTML finishes rendering completely, rather than running immediately after download.
- Defer takes things beyond async
- Script execution waits until rendering finishes.
- Defer makes your JavaScript resource completely non-render-blocking

Example:
<p>...content before script...</p>

<script defer src=""></script>

<!-- this content will be visible immediately -->
<p>...content after script...</p>
Preload is applied to files that aren't directly referenced in the HTML but become necessary when rendering or parsing JavaScript or CSS files. With Preload, the browser fetches the resource, and execution begins as soon as it's available.
- Use Preload thoughtfully. The browser will download the files even if they're not needed on your page.
- Excessive preloads will decrease your page's speed.
- Using too many preloads diminishes the inherent priority of each preloaded file.
- Preload only files required for above-the-fold content. This will improve your Google PageSpeed Insight Score.
- Preload files discovered during rendering of another file. For instance, a font face is referenced within a CSS file, and its necessity becomes known only after parsing that CSS. Downloading the font beforehand boosts site speed.
- Preload is exclusively used with the
<link>tag.
Examples of Preload
<link rel="preload" href="style.css" as="style">
<link rel="preload" href="main.js" as="script">
Write Vanilla JS and avoid 3rd party scripts
Vanilla JS translates directly into Performance and Accessibility gains. For a specific use case, you don't need everything a 3rd party solution offers. Those libraries often address a broad set of problems. Depending on heavy libraries to solve simple issues creates a performance dent in your code.
Research by the WebAIM team discovered that around a million top websites use frameworks with significant accessibility problems. If user experience matters to you, consider writing in Vanilla JS.
The goal isn't to abandon frameworks for 100% fresh code. The goal is to use helper functions and small, targeted plugins.
Caching and Controlling Content Expiry
When a page relies on the same assets repeatedly, fetching them on every visit becomes wasteful — effectively equivalent to loading the entire site each time. Caching breaks this cycle. By assigning expiration metadata in the response headers, the browser can reuse cached copies and only revalidate or re-download when the cache becomes stale.
For caching to work in any frontend code, the browser checks four key HTTP response headers:
- ETag
- Cache-Control
- Last-Modified
- Expires
ETag, short for Entity Tag, is a validation token in string form. The browser uses it to determine whether a request can be fulfilled from cache or must hit the network. When the resource remains unchanged, the server responds with the same hash token and no body — this is the familiar 304 response code. If the resource is stale, the body contains the latest data.
Cache-Control gives the application control over the browser's caching policy for a particular request. Four options are available: no-cache, no-store, private, or public.
Last-Modified works similarly to ETag but relies on the request's Last-Modified header. The timestamp of the last modification helps the client decide whether a fresh request is necessary.
Expires remains one of the most common fields for determining data validity. Applications should always serve data that hasn't reached its expiration date. Once the specified date passes, the resource is considered invalid.
In vanilla JavaScript, service workers give you full control over whether data should be loaded fresh or served from cache. Suppose I have two files: styles.css and script.js. Rather than loading them outright, a service worker can decide whether the files need to be fetched anew or whether cached versions suffice. We have a deeper, more comprehensive post on Progressive Web Pages and Service Workers coming soon (stay tuned).
/*Install gets executed when the user launches the single page application for *the first time
*/

self.addEventListener('install', function(event) {
  event.waitUntil(
    caches.open(cacheName).then(function(cache) {
      return cache.addAll(
        [
          'styles.css',
          'script.js'
        ]
      );
    })
  );
});

//When a user performs an operation
document.querySelector('.lazy').addEventListener('click', function(event) {
  event.preventDefault();
  caches.open('lazy_posts’).then(function(cache) {
    fetch('/get-article’).then(function(response) {
      return response;
    }).then(function(urls) {
      cache.addAll(urls);
    });
  });
});

//When there is a network response
self.addEventListener('fetch', function(event) {
  event.respondWith(
    caches.open('lazy_posts').then(function(cache) {
      return cache.match(event.request).then(function (response) {
        return response
      });
    })
  );
});
Now, Let's Look at React
That was a lot of theory — but you made it through. By now, you should understand what the critical rendering path is and how your code influences the performance of your web application. In this section, we'll explore how to handle performance and keep the critical rendering path as short as possible. Our framework of choice for the upcoming examples is React. The optimization techniques fall into two stages: one focused on the period before the application loads, and another for optimizing after the application has rendered.
Stage One
Let's create a simple application with:
- Header
- Sidebar
- Footer
In our setup, the sidebar should only appear when the user is logged in. Webpack is an excellent tool for code splitting. When code splitting is enabled, you can take advantage of React Lazy — either from App.js or directly in the Route component.
What is lazy loading? Simply put, it's the practice of breaking code into logical pieces that load only when the application actually needs them. The result is a lower overall bundle weight.
Take the Sidebar component, which should render only after login. There are several ways to improve application performance here. For starters, lazy loading can be injected into the Routes. In the example below, the code is split into three logical chunks, each loaded only when the corresponding route is visited. The DOM never considers Sidebar code as part of its "Critical Bytes" during the initial paint. The same lazy loading approach can be applied from the parent App.js component. The choice is up to the developer and their specific use case. Let's examine how lazy loading works from the parent component:
webpack-demo
|- package.json
|- package-lock.json
|- webpack.config.js
|- /dist
|- /src
 |- index.js
 |- Header.js
 |- Sidebar.js
 |- Footer.js
 |- loader.js
 |- route.js
|- /node_modules
import { Switch, browserHistory, BrowserRouter as Router, Route} from 'react-router-dom';
const Header = React.lazy( () => import('Header'));
const Footer = React.lazy( () => import(Footer));
const Sidebar = React.lazy( () => import(Sidebar));

const Routes = (props) => {
return isServerAvailable ? (
<Router history={browserHistory}>
           <Switch>
             <Route path="/" exact><Redirect to='/Header’ /></Route>
             <Route path="/sidebar" exact component={props => <Sidebar {...props} />} />
             <Route path="/footer" exact component={props => <Footer {...props} />} />
          </Switch>
</Router>
}
From App.js, the component can then be rendered conditionally. In the code below, Sidebar will not load if props.user is empty. The rendering logic is conditional — when the value of user.props changes, React and Webpack are notified, and the required chunk is fetched. However, during the initial render, with props.user empty, this code is never executed. If Sidebar happens to be a heavy component, that means initial loading becomes much smoother and faster. Why? Because it simply isn't loaded on the first visit. Conditional rendering can be applied across the entire application.
const Header = React.lazy( () => import('Header'));
const Footer = React.lazy( () => import(Footer));
const Sidebar = React.lazy( () => import(Sidebar));

function App (props) {
return(
<React.Fragment>
   <Header user = {props.user} />
   {props.user ? <Sidebar user = {props.user /> : null}
   <Footer/>
</React.Fragment>
)
}
Conditional rendering in React also allows components to load on demand — even by a simple button click. For example, if a user clicks login in the header, and that action triggers the sidebar to load, the code can be adjusted as shown here.
//Sidebar.js
export default () => {
  console.log('You can return the Sidebar component here!');
};
import _ from 'lodash';
function buildSidebar() {
   const element = document.createElement('div');
   const button = document.createElement('button');
   button.innerHTML = 'Login';
   element.innerHTML = _.join(['Loading Sidebar', 'webpack'], ' ');
   element.appendChild(button);
   button.onclick = e => import(/* webpackChunkName: "sidebar" */ './sidebar).then(module => {
     const sidebar = module.default;
     sidebar()
   });

   return element;
 }

document.body.appendChild(buildSidebar());
As a general rule, every lazy-loaded route or component should be wrapped inside a component called Suspense. Its role is to show fallback content while the lazy component is being fetched — anything from a spinner to a message explaining why the page hasn't painted yet. Let's update our Routes component to use Suspense.
import React, { Suspense } from 'react';
import { Switch, browserHistory, BrowserRouter as Router, Route} from 'react-router-dom';
Import Loader from ‘./loader.js’
const Header = React.lazy( () => import('Header'));
const Footer = React.lazy( () => import(Footer));
const Sidebar = React.lazy( () => import(Sidebar));

const Routes = (props) => {
return isServerAvailable ? (
<Router history={browserHistory}>
    <Suspense fallback={<Loader trigger={true} />}>
           <Switch>
             <Route path="/" exact><Redirect to='/Header’ /></Route>
             <Route path="/sidebar" exact component={props => <Sidebar {...props} />} />
             <Route path="/footer" exact component={props => <Footer {...props} />} />
      </Switch>
     </Suspense>
</Router>
}
Stage Two
Once the application is fully loaded, you still need to understand React's internals to push performance further. React operates with a Host Tree and Host Instances. The Host Tree is the DOM itself, and Host Instances represent individual nodes. React DOM bridges the gap between the host environment and your application. The smallest unit in the React DOM is a JavaScript object, and these objects are discarded whenever new ones are created. Why? Because they are highly immutable. On every change, React updates the Host Tree to align perfectly with the React DOM Tree. This process is called reconciliation.
Choosing the Right State Management Strategy
- Every change to the React DOM Tree forces the browser to reflow, which has a heavy impact on performance. Reconciliation keeps the number of re-renders in check. Similarly, React's state management helps prevent unnecessary re-renders. Consider the useState() hook as an example.
- For class components, the shouldComponentUpdate() lifecycle method is the right tool. Make it a habit to extend PureComponent, which already implements a shallow comparison of state and props. This dramatically reduces the chance of unwanted re-renders.
Leverage React.Memo
- React.Memo wraps components and memoizes their props. When a re-render is triggered, a shallow comparison is performed on the props. This technique is widely used for performance tuning.
function MyComponent(props) {}
function areEqual(prevProps, nextProps) {
  /*
  return true if passing nextProps to render would return
  the same result as passing prevProps to render,
  otherwise return false
  */
}
export default React.memo(MyComponent, areEqual);
- For functional components, rely on useCallback() and useMemo() .
Conclusion
Now that you understand the critical rendering path, take a closer look at the code you ship. Every line, every asset, and every file in your project adds to it. Also pay attention to the above-the-fold content — what a user sees first matters most. If you haven't applied these performance techniques yet, there's no better time than now to start. Performance plays a fundamental role in any web application. As complexity grows, every millisecond counts. That said, premature optimization can be harmful. Measure first, then optimize with intent.
Happy Coding!