Why Angular Can Run Anywhere
Angular was built from the ground up with portability in mind. This design choice lets developers run the same application code in a browser, on a server, inside a web worker, or even on mobile hardware.
Articles referenced throughout this series:
- Angular Platforms in depth. Part 1. What are Angular Platforms?
- Angular Platforms in depth. Part 2. Application bootstrap process
- Angular Platforms in depth. Part 3. Rendering Angular applications in Terminal
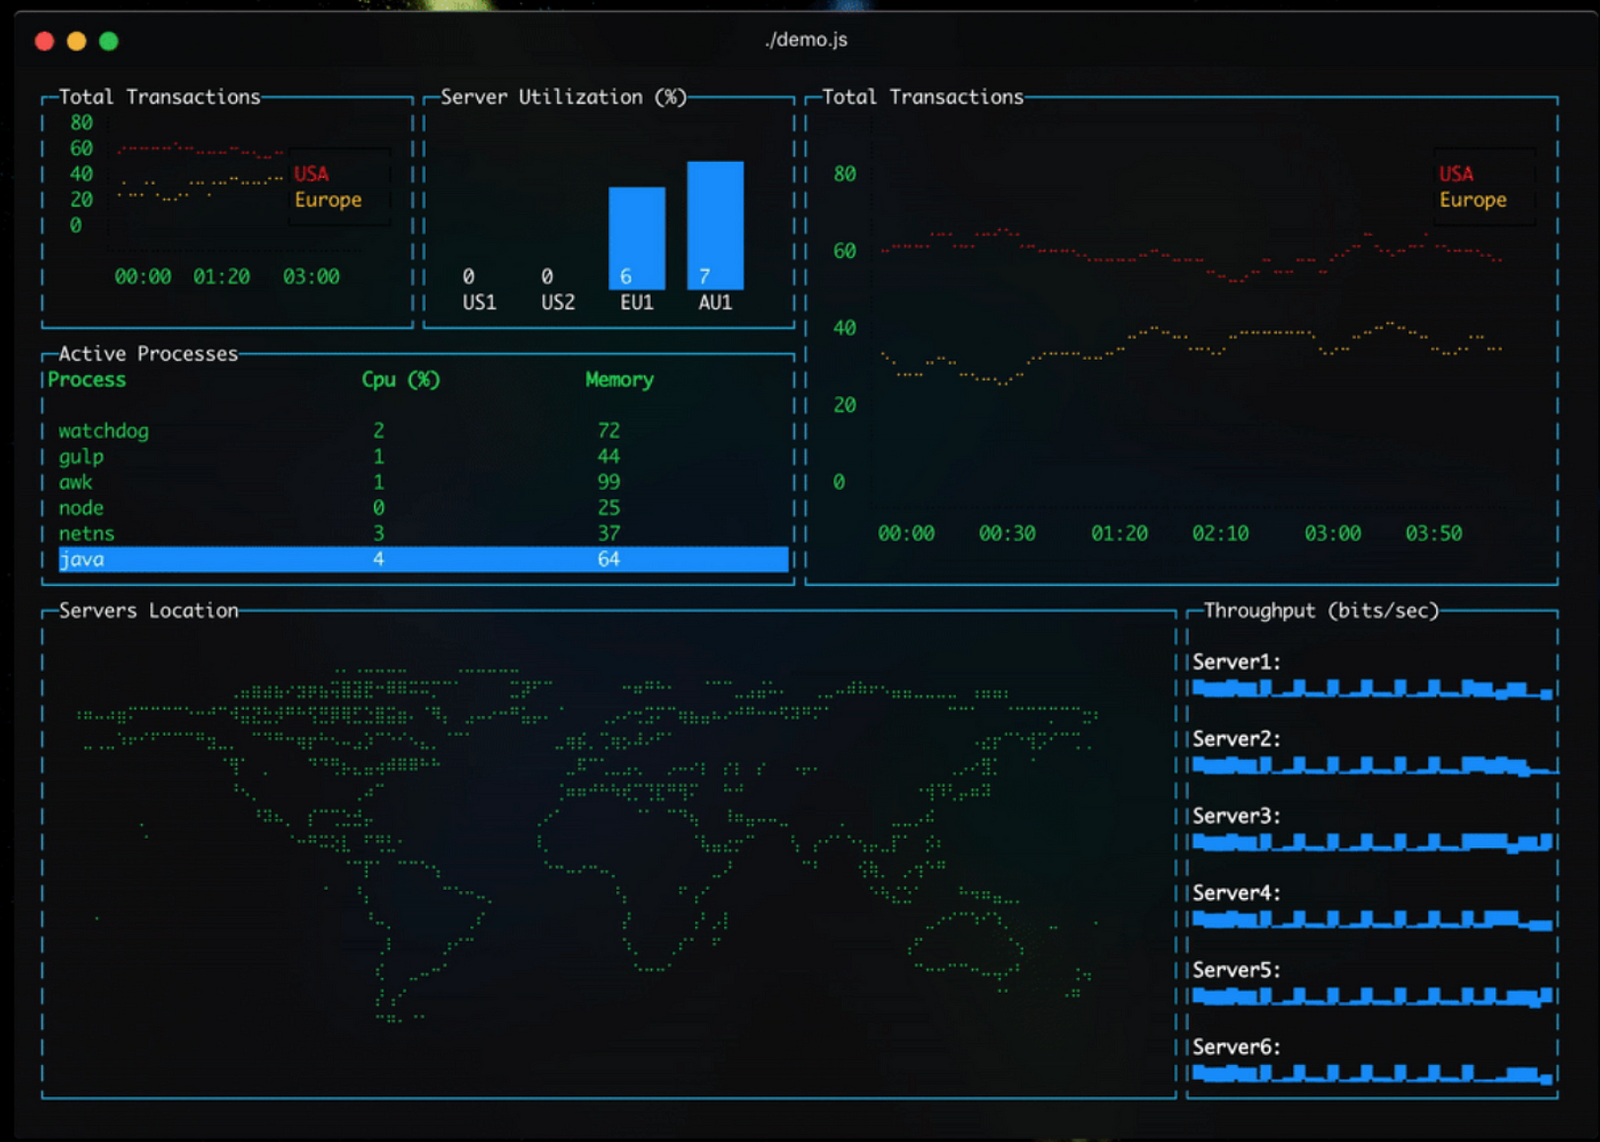
This is the closing piece in our deep dive into Angular platforms. Here, I'll walk you through the process of constructing a custom platform. Before diving in, it's a good idea to review how Angular platforms function under the hood, perhaps by revisiting the earlier parts of this series.
In the first article, I emphasized that Angular owes its portability to a high level of abstraction. A substantial portion of the framework consists of abstract contracts. Each platform—whether for the browser or elsewhere—supplies its own concrete implementation for these contracts. To build a platform for the terminal, our job is simply to provide those implementation details for Angular's core services.
Roadmap
- Understanding the Renderer
- Handling sanitization
- Dealing with errors
- Assembling the terminal module
- Setting up the terminal platform
- Creating a runnable terminal app
The Renderer Service
We begin with the most critical component: the renderer. Angular uses the Renderer abstraction to manipulate the view without knowing anything about the underlying environment. Since the renderer is an abstract contract, we must implement it ourselves to draw our app in the terminal using ASCII characters.
The immediate question is: how exactly do we render an app in a text-based console? The simplest route is finding a library that handles ASCII widget creation. I chose blessed, a node.js library offering a high-level terminal UI API in the spirit of curses. First, let's get the library and its type definitions installed:
npm install blessed @types/blessed
Since I've picked a specialized rendering library, my task is to create a bridge. The goal is to translate Angular's renderer API calls into actions that blessed can understand.
Angular's Renderer contract is roughly as follows:
export abstract class Renderer2 {

  abstract createElement(name: string, namespace?: string|null): any;

  abstract createText(value: string): any;

  abstract appendChild(parent: any, newChild: any): void;

  abstract addClass(el: any, name: string): void;

  abstract removeClass(el: any, name: string): void;

  // ...
}
The core duties include generating and destroying elements, manipulating classes and attributes, and attaching event listeners.
blessed, meanwhile, exposes its own surface area:
const blessed = require('blessed');

// Create blessed screen
const screen = blessed.screen();

// Create some elements
const box = blessed.box();
const table = blessed.table();

// Add elements on the screen
table.append(box);
screen.append(table);

// Display all changes
screen.render();
You'll notice blessed is a straightforward node.js module. It gives you a screen object alongside various UI components. In this context, Screen plays a role similar to document in the browser, acting as the top-level container and providing several utility methods.
Instantiating the Screen
Our first integration point is the screen itself. Let's create a dedicated Screen service that holds a reference to a blessed screen instance.
import { Injectable } from '@angular/core';

import * as blessed from 'blessed';
import { Widgets } from 'blessed';

@Injectable()
export class Screen {

  private screen: Widgets.Screen;

  constructor() {
    this.screen = blessed.screen({ smartCSR: true });
    this.setupExitListener();
  }

  selectRootElement(): Widgets.Screen {
    return this.screen;
  }

  private setupExitListener() {
    this.screen.key(['C-c'], () => process.exit(0));
  }
}
This implementation sets up the blessed scre en and arranges for the process to shut down when the user presses control+c, which is the normal exit signal for terminal programs. The call to process.exit is standard node.js; passing 0 signals a clean exit. This service also exposes selectRootElement, allowing an app to designate its root node.
Mapping Elements
Once we have a screen and a way to pick a root element, we need to handle element creation. As mentioned, blessed offers functions for creating components. Angular's renderer, however, uses a single createElement method. To reconcile this, I built an ElementsRegistry service that encapsulates element creation within one unified method:
import { Injectable } from '@angular/core';
import * as blessed from 'blessed';
import { Widgets } from 'blessed';

export type ElementFactory = (any) => Widgets.BoxElement;

export const elementsFactory: Map<string, ElementFactory> = new Map()
  .set('text', blessed.text)
  .set('box', blessed.box)
  .set('table', blessed.table)

@Injectable()
export class ElementsRegistry {

  createElement(name: string, options: any = {}): Widgets.BoxElement {
    let elementFactory: ElementFactory = elementsFactory.get(name);

    if (!elementFactory) {
      elementFactory = elementsFactory.get('box');
    }

    return elementFactory({ ...options, screen: this.screen });
  }
}
The ElementsRegistry exposes a single createElement function. It checks a mapping of known element names and returns a matching component instance. If no match is found, it defaults to box, which serves as the terminal equivalent of a browser's div.
Armed with these building blocks, we now have what it takes to construct the final renderer that will draw our UI in ASCII.
Putting the Renderer Together
Below is a basic renderer for the terminal.
export class TerminalRenderer implements Renderer2 {

  constructor(private screen: Screen, private elementsRegistry: ElementsRegistry) {
  }

  createElement(name: string, namespace?: string | null): any {
    return this.elementsRegistry.createElement(name);
  }

  createText(value: string): any {
    return this.elementsRegistry.createElement('text', { content: value });
  }

  selectRootElement(): Widgets.Screen {
    return this.screen.selectRootElement();
  }

  appendChild(parent: Widgets.BlessedElement, newChild: Widgets.BlessedElement): void {
    parent.append(newChild);
  }

  setAttribute(el: Widgets.BlessedElement, name: string, value: string, namespace?: string | null): void {
    el[name] = value;
  }

  setValue(node: Widgets.BlessedElement, value: string): void {
    node.setContent(value);
  }
}
I've implemented only a minimal subset of the renderer's required methods, leaving the rest as an exercise. In this example, the TerminalRenderer class implements Renderer2 and relies on the previously defined Screen and ElementsRegistry to build the interface.
Notice that TerminalRenderer itself is not marked with Injectable. Angular expects renderer instances to be created by a factory. Let's add one:
@Injectable()
export class TerminalRendererFactory implements RendererFactory2 {

  constructor(private screen: Screen, private elementsRegistry: ElementsRegistry)

  createRenderer(): Renderer2 {
    return new TerminalRenderer(this.screen, this.elementsRegistry);
  }
}
Here, TerminalRendererFactory implements RendererFactory2 and exposes a single createRenderer method that returns a new renderer instance with its dependencies attached.
At this point, we have a functional TerminalRenderer capable of painting Angular views in the console with ASCII art. But there's more to do. Let's keep going.
Making Values Safe
Angular relies on the Sanitizer system to clean values that could be harmful. This is an abstract class in the Angular core. In the browser, it shows up as DomSanitizer, whose purpose is to block XSS attacks by making values safe for DOM insertion.
For example, when you bind to an anchor's href, Angular sanitizes the incoming value to thwart attempts to smuggle in a javascript: URL. Occasionally, developers may intentionally want to skip this safety step, using one of the bypassSecurityTrust... methods to bind a dynamic javascript: string.
But in a terminal, there is no DOM. As a result, XSS attacks aren't a threat, and we can skip sanitization altogether. A no-op implementation is all Angular needs:
import { Sanitizer, SecurityContext } from '@angular/core';

export class TerminalSanitizer extends Sanitizer {
  sanitize(context: SecurityContext, value: string): string {
    return value;
  }
}
As you see, TerminalSanitizer simply passes back the value it receives, altering nothing.
Handling Errors in the Terminal
Proper error handling is essential for any application, including Angular apps. Angular offers a global ErrorHandler that captures unhandled exceptions. The default implementation logs to the browser's console. For a terminal environment, this falls short.
A key difference: in a web context, you can refresh the tab if the app hangs after an exception. That luxury doesn't exist in a terminal. Our custom handler should log the error and then bring the process to an end:
import { ErrorHandler, Injectable } from '@angular/core';

@Injectable()
export class TerminalErrorHandler implements ErrorHandler {

  handleError(error: Error): void {
    console.error(error.message, error.stack);
    process.exit(1);
  }
}
The custom ErrorHandler logs the issue and calls process.exit with code 1, indicating a failure occurred.
Creating the Terminal Module
Angular CLI projects typically include BrowserModule in their AppModule to run in the browser. That module provides numerous browser-specific services and re-exports CommonModule and ApplicationModule, which supply many crucial app-level providers. The terminal needs those providers too, so we'll build a TerminalModule that re-exports both foundational modules while also offering the services we've introduced.
import { CommonModule, ApplicationModule, ErrorHandler, NgModule, RendererFactory2 } from '@angular/core';

import { Screen } from './screen';
import { ElementsRegistry } from './elements-registry';
import { TerminalRendererFactory } from './renderer';
import { TerminalErrorHandler } from './error-handler';

@NgModule({
  exports: [CommonModule, ApplicationModule],
  providers: [
    Screen,
    ElementsRegistry,
    { provide: RendererFactory2, useClass: TerminalRendererFactory },
    { provide: ErrorHandler, useClass: TerminalErrorHandler },
  ],
})
export class TerminalModule {
}
Yet, some services must be available before application bootstrapping even starts. They can't be added through a module alone. To supply these early, we need to define a custom platform—which is our next step.
The Terminal Platform
import { COMPILER_OPTIONS, createPlatformFactory, Sanitizer } from '@angular/core';
import { ɵplatformCoreDynamic as platformCoreDynamic } from '@angular/platform-browser-dynamic';
import { DOCUMENT } from '@angular/common';
import { ElementSchemaRegistry } from '@angular/compiler';

import { TerminalSanitizer } from './sanitizer';


const COMMON_PROVIDERS = [
  { provide: DOCUMENT, useValue: {} },
  { provide: Sanitizer, useClass: TerminalSanitizer, deps: [] },
];

export const platformTerminalDynamic = createPlatformFactory(platformCoreDynamic,
  'terminalDynamic', COMMON_RPOVIDERS]);
We create the platform using the createPlatformFactory helper, which lets us build on the providers of platformCoreDynamic while adding terminal-specific ones.
With that finalized, we can move on to building an actual terminal-ready application.
Constructing a Terminal App
First up, generate a fresh Angular project with the CLI.
ng new AngularTerminalApp
Next, add TerminalModule to the AppModule's imports:
import { NgModule } from '@angular/core';
import { TerminalModule } from 'platform-terminal';

import { AppComponent } from './app.component';

@NgModule({
  declarations: [
    AppComponent,
  ],
  imports: [
    TerminalModule,
  ],
  bootstrap: [AppComponent],
})
export class AppModule {
}
With the module wired in, we set up the terminal platform:
import { platformTerminalDynamic } from 'platform-terminal';
import { enableProdMode } from '@angular/core';

import { AppModule } from './app/app.module';
import { environment } from './environments/environment';

if (environment.production) {
  enableProdMode();
}

platformTerminalDynamic().bootstrapModule(AppModule)
  .catch(err => console.error(err));
This snippet shows importing platformTerminal from our custom platform-terminal package. Then we use it to launch the AppModule.
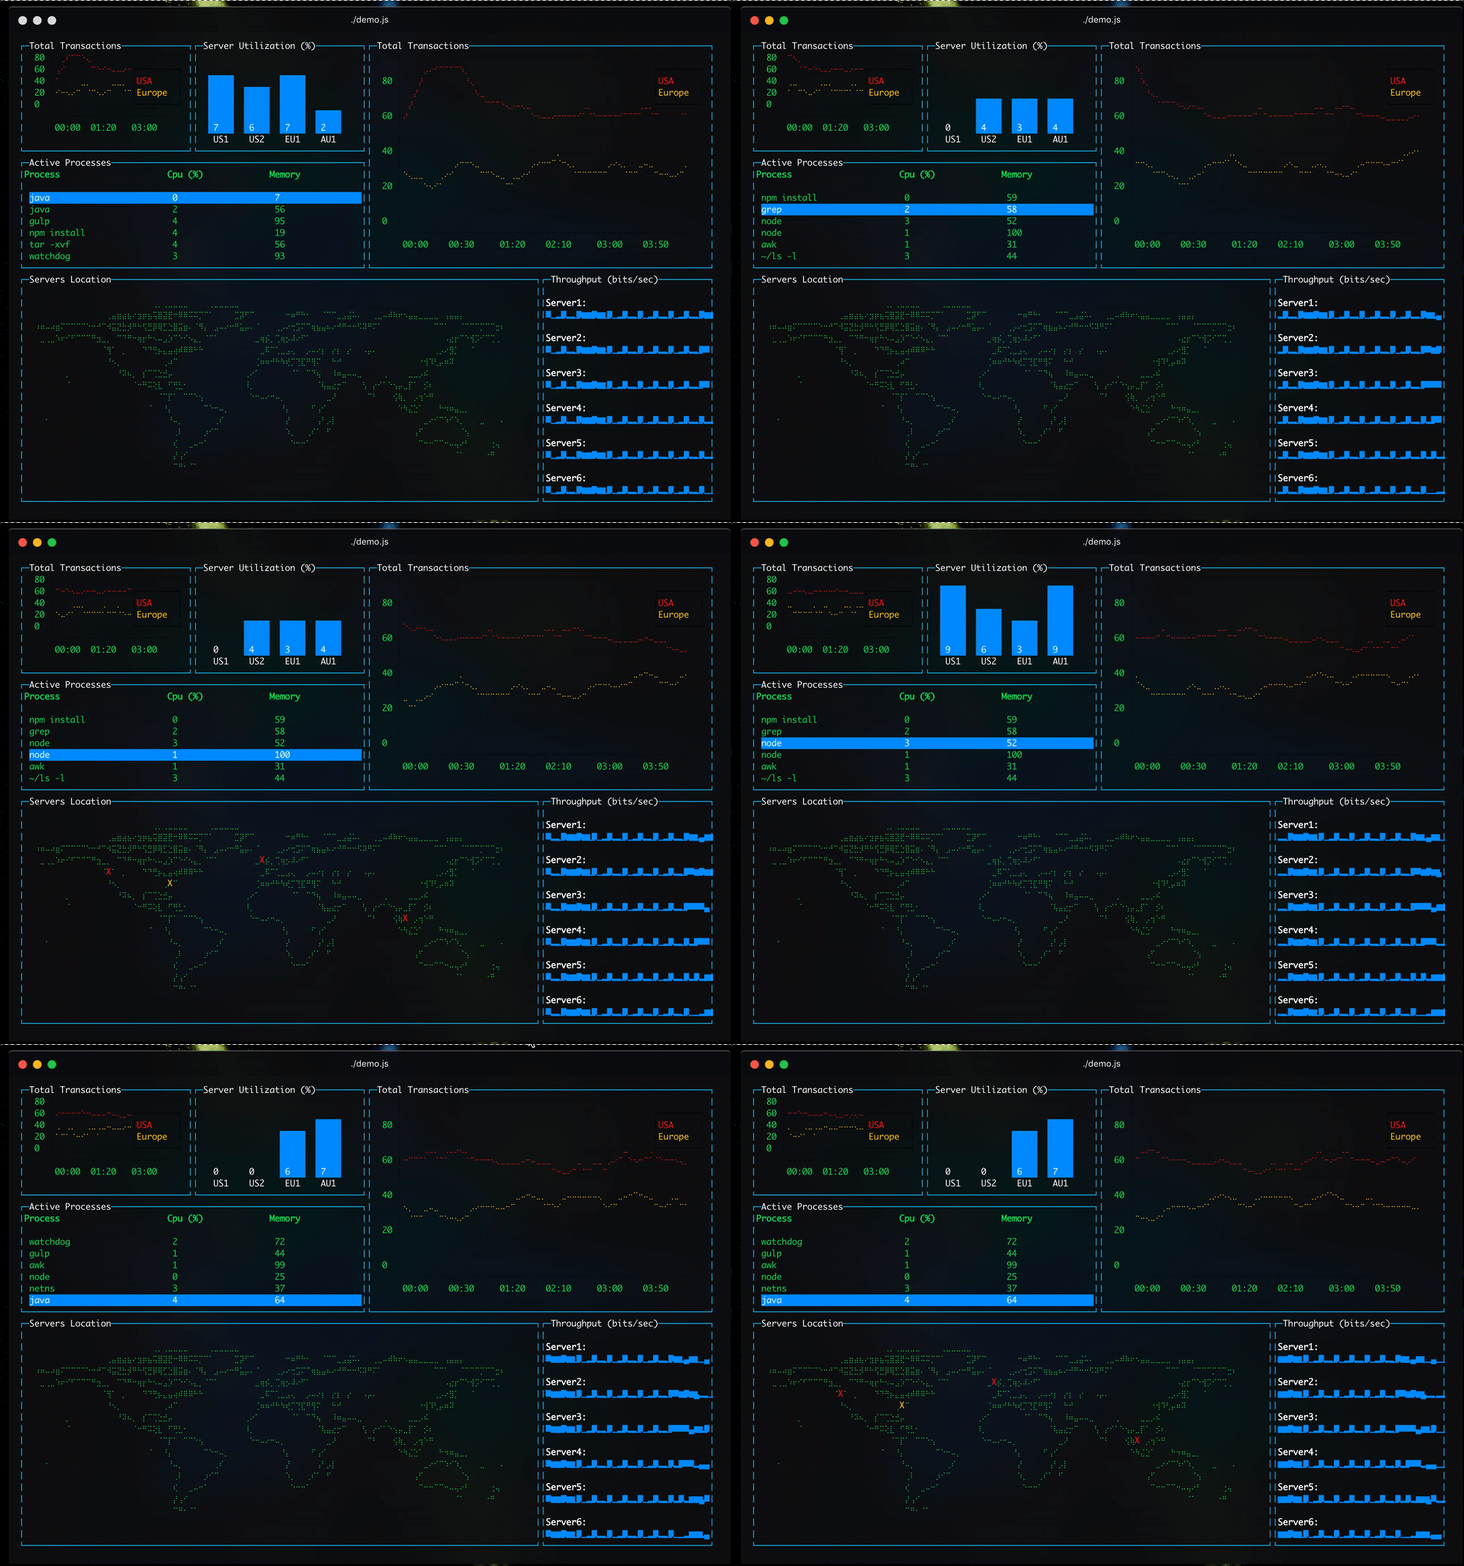
The only remaining part is defining an AppComponent that includes the desired layout:
import { ChangeDetectionStrategy, Component } from '@angular/core';

import { TransactionsService } from '../transactions.service';
import { SparklineService } from '../sparkline.service';
import { ServerUtilizationService } from '../server-utilization.service';
import { ProcessManagerService } from '../process-manager.service';

@Component({
  selector: 'app-component',
  template: `
    <grid rows="12" cols="12">
      <line
        [row]="0"
        [col]="0"
        [rowSpan]="3"
        [colSpan]="3"
        label="Total Transactions"
        [data]="transactions$ | async">
      </line>
      <bar
        [row]="0"
        [col]="3"
        [rowSpan]="3"
        [colSpan]="3"
        label="Server Utilization (%)"
        [barWidth]="4"
        [barSpacing]="6"
        [xOffset]="3"
        [maxHeight]="9"
        [data]="serversUtilization$ | async">
      </bar>
      <line
        [row]="0"
        [col]="6"
        [rowSpan]="6"
        [colSpan]="6"
        label="Total Transactions"
        [data]="transactions$ | async">
      </line>
      <table
        [row]="3"
        [col]="0"
        [rowSpan]="3"
        [colSpan]="6"
        fg="green"
        label="Active Processes"
        [keys]="true"
        [columnSpacing]="1"
        [columnWidth]="[28,20,20]"
        [data]="process$ |async">
      </table>
      <map
        [row]="6"
        [col]="0"
        [rowSpan]="6"
        [colSpan]="9"
        label="Servers Location">
      </map>
      <sparkline
        row="6"
        col="9"
        rowSpan="6"
        colSpan="3"
        label="Throughput (bits/sec)"
        [tags]="true"
        [style]="{ fg: 'blue', titleFg: 'white', border: {} }"
        [data]="sparkline$ | async">
      </sparkline>
    </grid>
  `,
  changeDetection: ChangeDetectionStrategy.OnPush,
})
export class AppComponent {
  transactions$ = this.transactionsService.transactions$;
  sparkline$ = this.sparklineService.sparkline$;
  serversUtilization$ = this.serversUtilization.serversUtilization$;
  process$ = this.processManager.process$;

  constructor(private transactionsService: TransactionsService,
              private sparklineService: SparklineService,
              private serversUtilization: ServerUtilizationService,
              private processManager: ProcessManagerService) {
  }
}
That component is intentionally simple, so there's no need for detailed comments.
Now we must compile the application. The Angular Compiler CLI handles that:
ngc -p tsconfig.json
The CLI emits the compiled output into a dist directory in the project root. We run the result as a normal node.js script:
node ./dist/main.js
And the final rendering looks like this:
Final Thoughts
You made it to the end. In this final installment, we examined Angular platforms, went through the creation of a bespoke platform, looked at key services and modules, and constructed a platform that draws Angular apps in the terminal using ASCII in the process.
You can find all the relevant source code for the terminal platform here: https://github.com/Tibing/platform-terminal
For a more thorough look at platforms, revisit the preceding parts:
- Angular Platforms in depth. Part 1. What are Angular Platforms?
- Angular Platforms in depth. Part 2. Application bootstrap process
- Angular Platforms in depth. Part 3. Rendering Angular applications in Terminal
For updates on future articles, feel free to follow me on twitter.