What Exactly Are Web Components?
Web Components bring the component model familiar from frameworks like React or Angular to the native web platform, independent of any particular framework. This means we can create reusable UI elements that work anywhere HTML works.
We're all accustomed to standard HTML tags such as div or span, which come with built-in behavior and can be placed anywhere in our markup. Web Components extend this idea, letting us define our own custom HTML elements using JavaScript. Here's a straightforward example of that concept in action, using nothing but vanilla JS.
class SpanWithText extends HTMLSpanElement {
    constructor() {
        super();
        this.innerText = `Hello, I am a Web Component!`;
    }
}
customElements.define('span-with-text', SpanWithText);
In this snippet, we're defining a class (similar to how we'd structure an Angular component) that extends HTMLElement — specifically HTMLSpanElement in this case. When this element gets instantiated, it automatically carries innerText set to __Hello, I am a Web Component__. So, placing this custom tag in the DOM immediately renders that text without any extra work.
<span-with-text></span-with-text>
Can Angular Play Along?
Naturally, the next thought is: can we package our existing Angular components as Web Components and deploy them in any environment? Thanks to @angular/elements, the answer is a definite yes.
The How-To
Let's start by initializing a fresh Angular project. We'll use a special flag to generate only the configuration files, skipping any boilerplate code like an AppModule or root component.
ng new web-components --createApplication=false
This leaves us with an empty Angular workspace. From there, we'll create our first Web Component within the project directory:
ng generate application FirstWebComponent --skipInstall=true
Use this flag to avoid reinstalling any dependencies.
This command generates a projects folder at the workspace root. Inside it, you'll find a FirstWebComponent directory containing the usual Angular app structure: main.ts, app.module, app.component, and so on. To leverage the Web Component functionality, we need to install the @angular/elements package:
ng add @angular/elements
This adds the library to our node_modules, giving us the tools to convert our components.
A key insight is that Angular components intended to be Web Components are no different from any other Angular component — nothing about their internal implementation needs to change. They can use all the same features and patterns as a standard component. All the necessary configuration happens at the module level; the components themselves are untouched. This means you can convert almost any existing component with minimal effort.
Next, we'll generate the Angular component that will serve as our Web Component:
ng generate component UIButton
Now, we need to tell Angular to treat this component as a custom element rather than a standard application component. This is managed during the module bootstrapping phase. We implement the ngDoBootstrap method on our AppModule and use the createCustomElement function from the @angular/elements package to register it.
import { BrowserModule } from '@angular/platform-browser';
import { NgModule, DoBootstrap, Injector } from '@angular/core';
import { createCustomElement } from '@angular/elements';

@NgModule({
  declarations: [
    UIButtonComponent,
  ],
  imports: [
    BrowserModule,
  ],
  entryComponents: [UIButtonComponent],
})
export class AppModule implements DoBootstrap {

  constructor(private injector: Injector) {
    const webComponent = createCustomElement(UIButtonComponent, {injector});
    customElements.define('ui-button', webComponent);
  }

  ngDoBootstrap() {}
 }
Several crucial points need highlighting:
- The
injectormust be passed to our Web Component manually. This is essential for ensuring that dependency injection functions correctly at runtime. - The component must be listed in the
entryComponentsarray, a requirement for the Web Component to be bootstrapped. createCustomElementis the function that actually transforms our Angular component into a Web Component. It's the result of this function that we pass tocustomElements.define, not the original component.- The selector defined on the Angular component is irrelevant. The name used to instantiate the element in external HTML is determined by the string provided to
customElements.define. In this example, it will be used as<ui-button></ui-button>. - The selector string passed to
customElements.definemust contain at least two words separated by a dash. This is a requirement from the Custom Elements API itself, designed to prevent collisions with native HTML tags.
With that in place, we can build our project:
ng build FirstWebComponent
Inside the dist folder after the build, we find:
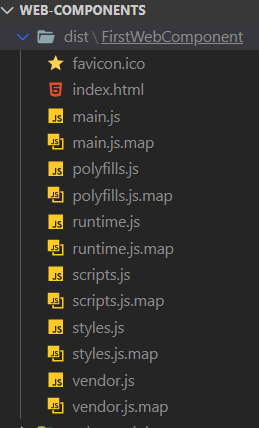
These are the output files from the build process
These files are what we need to incorporate into another application to use our Web Component. We can copy them over and include them in a few different ways:
- In a React app, we can install the polyfill and then import our files directly using standard
importstatements. The details are covered in a blog post from Vaadin. - In a plain HTML application, we simply include the generated files via script tags and then use the component as shown:
<html>
  <head>
    <script src="./built-files/polyfills.js"></script>
    <script src="./built-files/vendor.js"></script>
    <script src="./built-files/runtime.js"></script>
    <script src="./built-files/styles.js"></script>
    <script src="./built-files/scripts.js"></script>
  </head>
  <body>
    <ui-button></ui-button>
  </body>
</html>
3. If the target is another Angular app, building the component is unnecessary, as it's a standard Angular component that can be imported and used directly. However, if only the compiled files are available, we can add them to the scripts array in the target project's angular.json and include schemas: [CUSTOM_ELEMENTS_SCHEMA], in its app.module.ts.
The initial setup is quite straightforward. There are a couple of nuances to be aware of:
- When referencing inputs, the naming convention changes. We use camelCase in the Angular component, but to set these properties from external HTML, we must use kebab-case:
@Component({/* metadata */})
export class UIButtonComponent {
  @Input() shouldCountClicks = false;
}
<ui-button should-count-clicks="true"></ui-button>
2. For outputs, we listen to the emitted synthetic events using addEventListener. This is the only method, even in React; the familiar on<EventName={callback}> pattern won't work since these are synthetic events.
Internet Explorer: The Elephant in the Room
Everything works perfectly in a modern browser like Chrome. But what about IE, the perennial challenge for web developers? Opening our test app in IE, we see the button-with-counter is rendered. However, a deeper issue lurks. If the component has a feature that increments a counter on click, the counter won't update in IE. After some investigation, the root cause becomes clear: Angular's change detection does not function in Web Components when running on IE. Does this mean Web Components are a no-go for IE? Not necessarily. There's a simple workaround: we can implement a custom Change Detection Zone Strategy or use an existing one. A small package provides exactly what we need:
npm i elements-zone-strategy
And we adjust our app.module.ts:
import { BrowserModule } from '@angular/platform-browser';
import { NgModule, DoBootstrap, Injector } from '@angular/core';
import { createCustomElement } from '@angular/elements';

@NgModule({
  declarations: [
    UIButtonComponent,
  ],
  imports: [
    BrowserModule,
  ],
  entryComponents: [UIButtonComponent],
})
export class AppModule implements DoBootstrap {

  constructor(private injector: Injector) {
    const strategyFactory = new ElementZoneStrategyFactory(UIButtonComponent, injector);
    const webComponent = createCustomElement(UIButtonComponent, {injector, strategyFactory});
    customElements.define('log-activity', webComponent);
  }

  ngDoBootstrap() {}
 }
Here, we instantiate the ElementZoneStrategyFactory, which gives us a strategyFactory that we pass to the createCustomElement function, right alongside the injector.
After this change, opening the same component in IE reveals that it works! Change Detection now behaves correctly in IE.
A Word on Polyfills
Be prepared to spend time in the polyfills.ts file. A good practice is to customize it, loading only the polyfills your project actually requires rather than everything available.
Debugging Strategies
Debugging Angular Web Components can be challenging. There's no hot reload when it's running in a separate environment, which makes the usual development cycle difficult. A workaround is to temporarily modify the index.html file, replacing the standard app-root selector with the selector of your Web Component:
Then, run the app normally:
<!doctype html>
<html lang="en">
<head>
  <meta charset="utf-8">
  <title>UIButton</title>
  <base href="/">

  <meta name="viewport" content="width=device-width, initial-scale=1">
  <link rel="icon" type="image/x-icon" href="favicon.ico">
</head>
<body>
  <ui-button></ui-button>
</body>
</html>
ng serve UIButton
This creates a minimal Angular app centered around your component. The main advantage is that you get hot reloading back, which is a massive boost to productivity. The downside is that error messages can become less clear. For instance, a missing service provider would normally trigger a verbose StaticInjectorError in a regular Angular app. In this setup, you might just get a blank screen with no console errors — leading to a frustrating investigation.
Final Thoughts
This foundational approach gives us a working pipeline to build and use Angular components as Web Components. However, it's not a final, polished solution. For a smoother experience, we'd benefit from automation scripts to
- Generate new Web Components quickly
- Trigger the build process seamlessly
- Provide hot reloading support
In the next article, we'll dig into these scripts to make our development workflow much more enjoyable.