Introduction
This article demonstrates how to construct a generic menu component using Angular. The focus will be on the underlying logic rather than visual presentation details.
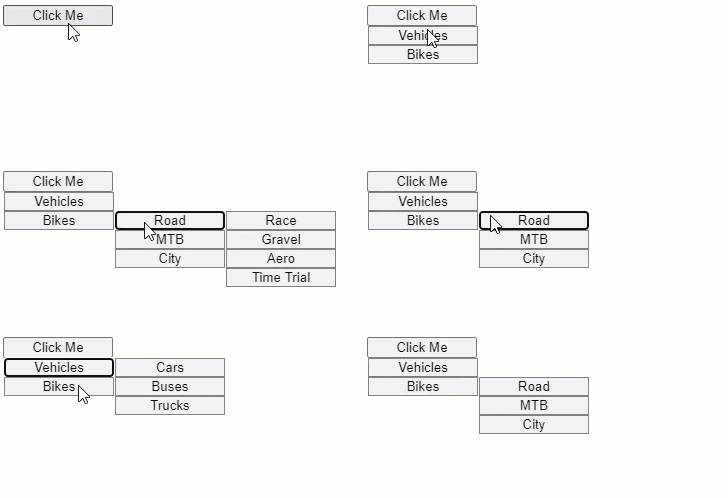
The objective is to build a menu whose items can be declared as shown below, enabling an arbitrary number of nested subtrees without manual nesting.
<app-menu-item [menuFor]="main">Click Me</app-menu-item>

<ng-template #main>
  <app-menu>
    <app-menu-item [menuFor]="vehicles">Vehicles</app-menu-item>
    <app-menu-item [menuFor]="bikes">Bikes</app-menu-item>
  </app-menu>
</ng-template>

<ng-template #vehicles>
  <app-menu>
    <app-menu-item>Cars</app-menu-item>
    <app-menu-item>Buses</app-menu-item>
    <app-menu-item>Trucks</app-menu-item>
  </app-menu>
</ng-template>

<ng-template #bikes>
  <app-menu>
    <app-menu-item>Road</app-menu-item>
    <app-menu-item>MTB</app-menu-item>
    <app-menu-item>City</app-menu-item>
  </app-menu>
</ng-template>
Initial Setup
We begin by scaffolding a new Angular application and creating a dedicated module that will contain all menu-related pieces. No routing is required during project generation, and standard CSS is sufficient.
ng new menu-demo-app
cd menu-demo-app
ng generate module menu
Next, we create two components: one acts as a wrapper for menu items at each tree level (MenuComponent), while the other represents an individual menu item (MenuItemComponent). The former serves as a container for the latter.
ng generate component menu/menu
ng generate component menu/menu-item
Both components must be declared and exported within MenuModule. The module configuration looks like this:
@NgModule({
  declarations: [MenuComponent, MenuItemComponent],
  exports: [MenuComponent, MenuItemComponent],
  imports: [CommonModule]
})
export class MenuModule {}
Styling the Container
The MenuComponent requires absolute positioning to avoid disrupting the normal document flow (indicated by the yellow rectangle in the figure below). Its display property should be set to inline-block so that nested menus appear beside their parent (the green rectangle showing the vehicles submenu to the right of the vehicles item).
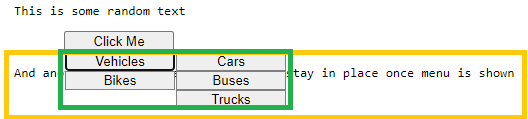
We use the HostBinding decorator to apply the necessary display and position styles to the host element:
export class MenuComponent {
  @HostBinding('style.display') public display = 'inline-block';
  @HostBinding('style.position') public position = 'absolute';

  //...

}
Content projection comes next. The <ng-content> tag acts as a placeholder that Angular replaces with whatever content appears between the component's opening and closing tags. For instance, <app-menu>Hello World</app-menu> renders "Hello World" inside the component.
<div class="menu">
  <ng-content></ng-content>
</div>
We wrap the projected content in a div and apply styling that arranges all menu items vertically in a single column.
.menu {
  display: flex;
  flex-direction: column;
}
Menu Item Component
Now we shift attention to MenuItemComponent. This component displays the item's content and, when necessary, triggers a nested menu on click. Again, projection via <ng-content> handles content insertion. Additionally, we use an <ng-container> tag as a placeholder for the nested submenu template that will be injected.
<button (click)="onClick()" class="button__container">
  <ng-content></ng-content>
</button>

<ng-container #viewContainerRef></ng-container>
Define a CSS class for the button container:
.button__container {
  min-width: 110px;
}
A template variable named viewContainerRef provides a reference to the container in the component class. An input property on MenuItemComponent links a parent item to its corresponding submenu. A CSS rule ensures all buttons share equal width. The click handler will render the template supplied via the menuFor input.
export class MenuItemComponent {
  @Input() public menuFor: TemplateRef<MenuComponent>;

  @ViewChild('viewContainerRef', { read: ViewContainerRef }) public viewContainerRef: ViewContainerRef;

  constructor() {}

  public onClick(): void {
    this.addTemplateToContainer(this.menuFor);
  }

  private addTemplateToContainer(template: TemplateRef<any>): void {
    this.viewContainerRef.createEmbeddedView(template);
  }

  // ...

}
The ViewContainerRef is a reference to a location where views can be attached. To embed the view passed through menuFor, we invoke createEmbeddedView, which performs the actual insertion into the container.
Verifying Functionality
At this stage, clicking a parent menu item should reveal a nested submenu. To test this, we need a playground. Add MenuModule to the imports array in AppModule:
@NgModule({
  declarations: [AppComponent],
  imports: [BrowserModule, MenuModule],
  providers: [],
  bootstrap: [AppComponent],
})
export class AppModule {}
Then replace the default content of AppComponent's template with our menu structure, defining several nested submenus:
<app-menu-item [menuFor]="main">Click Me</app-menu-item>

<ng-template #main>
  <app-menu>
    <app-menu-item [menuFor]="vehicles">Vehicles</app-menu-item>
    <app-menu-item [menuFor]="bikes">Bikes</app-menu-item>
  </app-menu>
</ng-template>

<ng-template #vehicles>
  <app-menu>
    <app-menu-item>Cars</app-menu-item>
    <app-menu-item>Buses</app-menu-item>
    <app-menu-item>Trucks</app-menu-item>
  </app-menu>
</ng-template>

<ng-template #bikes>
  <app-menu>
    <app-menu-item [menuFor]="roadBikes">Road</app-menu-item>
    <app-menu-item>MTB</app-menu-item>
    <app-menu-item>City</app-menu-item>
  </app-menu>
</ng-template>

<ng-template #roadBikes>
  <app-menu>
    <app-menu-item>Race</app-menu-item>
    <app-menu-item>Gravel</app-menu-item>
    <app-menu-item>Aero</app-menu-item>
    <app-menu-item>Time Trial</app-menu-item>
  </app-menu>
</ng-template>
Run ng serve and press Enter to observe the behavior. The result should resemble the illustration below:
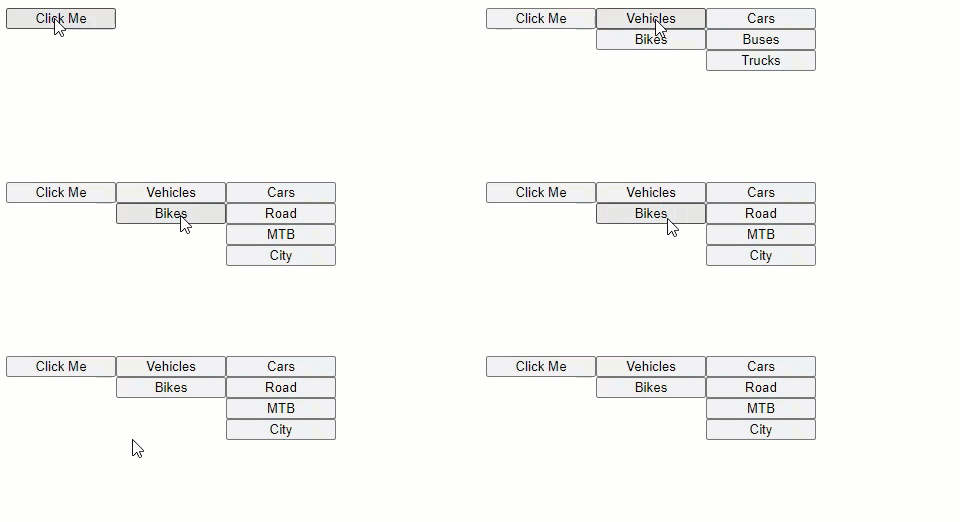
Several issues become apparent:
- The primary menu (vehicles and bikes) should appear beneath the
Click Mebutton, not elsewhere. - Clicking a menu item's button does not close the menu.
- An outside click should dismiss the menu entirely.
Positioning the Menu Component
The first issue concerns positioning. The MenuItemComponent needs to know whether it is the root of the entire menu tree or a leaf node. Different CSS classes apply depending on its position. To determine this, we inject an optional dependency representing the parent component. If no parent of type MenuComponent exists, the item is a root; otherwise, it's a leaf. We add two CSS classes accordingly:
.button__container {
  min-width: 110px;
}

.button__container--root {
  display: block;
}

.button__container--leaf {
  margin-left: 1px;
  display: inline-block;
  border: 1px solid grey;
}
A property getter then returns the appropriate class based on the component's location in the tree:
public get containerCssClass(): string {
  return this.isRoot()
    ? 'button__container--root'
    : 'button__container--leaf';
}

constructor( @Optional() private parent: MenuComponent ) {}

private isRoot(): boolean {
  return isNullOrUndefined(this.parent);
}
Finally, the menu item template must accept a dynamically bound CSS class. The updated template looks like this:
<button
  (click)="onClick()"
  [ngClass]="containerCssClass"
  class="button__container">
  <ng-content></ng-content>
</button>

<ng-container #viewContainerRef></ng-container>
Toggle Behavior on Click
The first problem is solved. Next, we address the toggle behavior: clicking Click Me shows the menu, but a second click should hide it—currently, the menu remains visible:
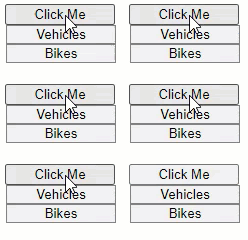
We check whether the view container already holds an embedded view. If so, we clear it. We modify the onClick handler and add two private methods:
public onClick(): void {
  if (this.containerIsEmpty()) {
    this.addTemplateToContainer(this.menuFor);
  } else {
    this.clearContainer();
  }
}

private containerIsEmpty(): boolean {
  return this.viewContainerRef.length === 0;
}

private clearContainer(): void {
  this.viewContainerRef.clear();
}
With this change, clicking Click Me toggles the menu. However, submenus still fail to close when clicking an adjacent parent item. Pay attention to clicks on Vehicles and Bikes in the GIF below—their submenus should disappear.
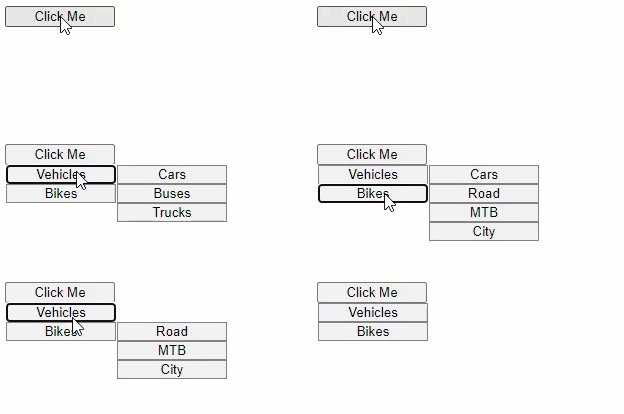
To fix this, MenuComponent must track which menu item triggered a submenu and be able to instruct that item to clear its container. We add the necessary methods, resulting in the following component:
export class MenuComponent {
  @HostBinding('style.display') public display = 'inline-block';
  @HostBinding('style.position') public position = 'absolute';

  private activeMenuItem: MenuItemComponent;

  constructor() {}

  public registerOpenedMenu(menuItem: MenuItemComponent): void {
    this.activeMenuItem = menuItem;
  }

  public closeOpenedMenuIfExists(): void {
    if (this.activeMenuItem) {
      this.activeMenuItem.clearContainer();
    }
  }
}
In MenuItemComponent, we change the clearContainer method's access modifier to public and register any opened submenu with the parent. In the click handler, we first dismiss any existing menu, then register the item that opened a new one. The updated handler, clickContainer, along with new private methods, looks like this:
public onClick(): void {
  if (this.containerIsEmpty()) {
    this.closeAlreadyOpenedMenuInTheSameSubtree();
    this.registerOpenedMenu();
    this.addTemplateToContainer(this.menuFor);
  } else {
    this.clearContainer();
  }
}

// access modifier changed
public clearContainer(): void {
  this.viewContainerRef.clear();
}

private closeAlreadyOpenedMenuInTheSameSubtree(): void {
  if (this.parent) {
    this.parent.closeOpenedMenuIfExists();
  }
}

private registerOpenedMenu(): void {
  if (this.parent) {
    this.parent.registerOpenedMenu(this);
  }
}
This adjustment ensures proper submenu behavior:
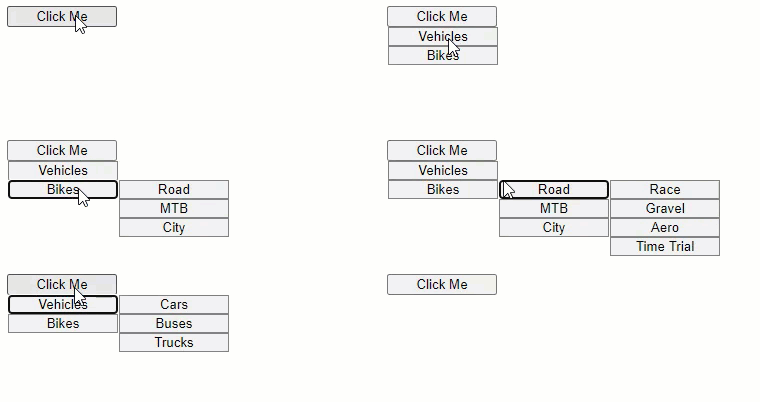
Handling Outside Clicks
Now we implement closing on outside clicks. We use the DOCUMENT injection token (from @angular/common) and the EventManager service (from @angular/platform-browser). The former locates the root menu element, while the latter attaches and removes event listeners. We inject both into MenuItemComponent's constructor, adding documentRef and eventManager parameters. A global click listener is attached when the menu opens and removed when it closes. addGlobalEventListener returns a cleanup function we store for later removal.
private removeGlobalEventListener: Function;

constructor(
  @Optional() private parent: MenuComponent,
  @Inject(DOCUMENT) private documentRef: Document,
  private eventManager: EventManager,
) {}

// ...

public onClick(): void {
  if (this.containerIsEmpty()) {
    // we add a handler for the root element
    this.addHandlersForRootElement();
    this.closeAlreadyOpenedMenuInTheSameSubtree();
    this.registerOpenedMenu();
    this.addTemplateToContainer(this.menuFor);
  } else {
    // and remove it in case we want to close the menu
    this.removeClickOutsideListener();

    this.clearContainer();
  }
}

// ...

private addHandlersForRootElement() {
  if (this.isRoot()) {
    this.addClickOutsideListener();
  }
}

private addClickOutsideListener(): void {
  this.removeGlobalEventListener = this.eventManager.addGlobalEventListener(
    'window',
    'click',
    this.closeMenuOnOutsideClick.bind(this)
  );
}

private removeClickOutsideListener(): void {
  if (this.removeGlobalEventListener) {
    this.removeGlobalEventListener();
  }
}

private closeMenuOnOutsideClick({ target }): void {
  // currently just a placeholder
  console.log('hello world');
}
When clicking a menu whose submenu is closed (empty container), we check if it's the root element; if so, we attach a click listener. Conversely, if the menu is already open and clicked again, we remove the listener before clearing the container.
With listeners attached, we detect outside clicks using querySelector to find the root menu. If the click target is outside, we remove the handler and broadcast a clear command via broadcastMenuClear, a method defined next.
// updated method
private closeMenuOnOutsideClick({ target }): void {
  const appMenuItem = this.documentRef.querySelector(
    'app-menu-item > app-menu'
  );
  if (appMenuItem && !appMenuItem.parentElement.contains(target)) {
    this.removeClickOutsideListener();
    this.broadcastMenuClear();
  }
}

private broadcastMenuClear(): void {
  // a placeholder
}
This method invokes a service responsible for notifying subscribers that the menu should close. Generate the service with ng generate service menu/menuState. Then expose an observable and define a method that emits the next value:
@Injectable({
  providedIn: 'root',
})
export class MenuStateService {
  public state$: Observable<void>;

  private _state = new Subject<any>();

  constructor() {
    this.state$ = this._state.asObservable();
  }

  public clearMenu(): void {
    this._state.next();
  }
}
Now we integrate the service into MenuItemComponent. Modify broadcastMenuClear to call clearMenu from the menu state service. This propagates the event, but no subscriber exists yet. Add a method, subscribeToClearMenuMessages, which subscribes to these messages and is invoked within addHandlersForRootElement.
constructor(
  @Optional() private parent: MenuComponent,
  @Inject(DOCUMENT) private documentRef: Document,
  private eventManager: EventManager,
  // new service injected below:
  private menuStateService: MenuStateService
) {}

// ...

// altered addHandlersForRootElement method
private addHandlersForRootElement() {
  if (this.isRoot()) {
    // we subscribe to menu state changes in here
    this.subscribeToClearMenuMessages();
    this.addClickOutsideListener();
  }
}

// ...

// updated method`s body
private broadcastMenuClear(): void {
  this.menuStateService.clearMenu();
}

// ...

private subscribeToClearMenuMessages(): void {
  this.menuStateService.state$.subscribe(() => {
    this.clearContainer();
  });
}
The menu is nearly complete. We still need to close it when a leaf is clicked. Update the click handler to account for this:
public onClick(): void {
  if (this.isLeaf()) {
    this.broadcastMenuClear();
  } else if (this.containerIsEmpty()) {
    this.addHandlersForRootElement();
    this.closeAlreadyOpenedMenuInTheSameSubtree();
    this.registerOpenedMenu();
    this.addTemplateToContainer(this.menuFor);
  } else {
    this.removeClickOutsideListener();
    this.clearContainer();
  }
}

// ...

private isLeaf(): boolean {
  return !this.isRoot() && !this.hasNestedSubMenu();
}

private hasNestedSubMenu(): boolean {
  return !!this.menuFor;
}
Finally, implement cleanup. Add ngOnDestroy to MenuItemComponent to remove the outside-click listener.
export class MenuItemComponent implements OnDestroy {

//...

// new private property
private menuStateSubscription: Subscription;

// ...

public ngOnDestroy(): void {
  this.removeClickOutsideListener();
  this.unsubscribe();
}

// ...

// updated subscribeToClearMenuMessages method
private subscribeToClearMenuMessages(): void {
  this.menuStateSubscription = this.menuStateService.state$.subscribe(() => {
    this.clearContainer();
  });
}

// added unsubscribe method
private unsubscribe(): void {
  if (this.menuStateSubscription) {
    this.menuStateSubscription.unsubscribe();
  }
}
Final Thoughts
Following all steps carefully, your menu should operate as demonstrated below:

This implementation serves as a solid foundation for a custom menu component. If reused, you'll likely want to enhance the CSS—currently, the styling is quite dated.
Throughout this tutorial, we examined several core Angular techniques: content projection for inserting HTML between component tags, dynamic view creation and insertion at a predefined location, and optional parent component injection to apply conditional styling.
Links to the complete source code on GitHub and a live demo on StackBlitz are provided below.