Choosing a Different Shade
This piece takes a slightly more cynical tone than usual—not out of pessimism, but out of honesty. There's a certain absurdity in how many serious projects skip basic quality gates like commit message standards and pre-push validation, only to see their CI pipelines collapse under the weight of preventable mistakes. The price of ignoring discipline at the commit level is paid later, in broken builds and burned hours.
Why Bother, Really?
Over the last several years, enforcing a commit message convention has become almost table stakes in serious engineering teams—not because convention for its own sake is fun, but because in a monorepo, a well-structured history is how you make sense of what happened, when, and why. When commits map cleanly to JIRA tickets, tracing a change back to a requirement or a bug report becomes a matter of seconds, not a scavenger hunt.
What surprises me, though, is how many mature projects still ship without fundamental guardrails. No automatic formatting, no pre-commit checks, no enforced tests before pushing. That's not just sloppiness—it's a slow leak. Compute costs money, CI minutes are precious, and every unnecessary pipeline failure is a tax on your velocity and your budget. Stopping bad code at the source isn't just prudent engineering—it's financial survival.
What We're Setting Out to Do
This article is a practical walkthrough to help you set up a monorepo that enforces commit hygiene at three levels:
- Commit messages arrive in a consistent, human-readable format.
- Those messages align with JIRA's expectations, so tickets and code remain traceable.
- Before a commit lands, the repository validates the state of the code—tests, linting, or whatever checks you define—and halts the operation if anything fails.
If all checks pass, additional work like building or testing can run locally via Nx, and only then is the commit authorized to proceed to the repository.
- Note #1: This guide leans conceptual. The code snippets you'll see are close to what your final configuration should look like, but the emphasis is on understanding how git hooks, Husky, and Nx interact rather than on copying blocks verbatim.
- Note #2: Working on a pet project? Jira and Bitbucket offer free-tier integrations that handle most of what you need.
- Note #3: A basic familiarity with the Nx framework helps, especially around how tasks are inferred and executed. I'll pull back the curtain enough that you won't be lost.
What You'll Need
Before anything else: put down the GUI commit tools. Tools like Sourcetree or the built-in git integrations in VSCode and similar editors handle simple commits fine, but they're not built to support the full range of hooks and validation layers we're about to put in place. You can still use them for browsing history or visualizing branches, but committing and pushing should happen through the terminal. Nx, combined with Commitizen and Husky, needs that control to do its job properly.
A Word on the Terminal
For macOS and Linux users, this section is skimmable—your native shells are fast, reliable, and familiar. Windows users deserve a bit more sympathy here. When you install Git for Windows, you get Git Bash as a side effect. It works, but it's not exactly a smooth ride. Git Bash can be excruciatingly slow at times, which makes for a frustrating experience when you're trying to move quickly.
If you're on Windows, consider something along the lines of oh-my-posh for PowerShell. It gives you a nice prompt with your current branch and other helpful status cues, but the real selling point is speed—it runs circles around Git Bash. The trade-off is that you'll need to pick up some PowerShell basics to navigate and run commands, but that's a small price for the performance gain.
Of course, if you're nostalgic for the old days, you can always fire up CMD and live dangerously. Just don't say I didn't warn you.
Wait—What About lint-staged?
It's true: lint-staged has become nearly synonymous with Husky on the internet. Everyone, it seems, swears by the combo. And honestly, it can catch issues—but only for the file types you explicitly configure. Add a new file extension tomorrow and you're back to chasing your tail, patching the barrel of a sinking ship with more tape.
With Nx, though, you can do things differently. Commands like nx format or nx affected -t format work across your entire monorepo, ensuring every file—regardless of type—is consistently formatted according to your project standards. That's not a patch; that's a real structural fix that addresses the root cause, not the symptom.

No need to reinvent the wheel if you can give the existing one better grip. That's the spirit here.
What We're Assuming
To keep things concrete, let's imagine a fairly standard setup: an Nx 19 monorepo using the traditional structure, with Angular 18. The workspace contains a main application called frontend and a shared library called ui. Git is managed with git flow to keep development and release work clearly separated.
Getting Started
Nx is more than a scaffolding tool—it's an orchestrator. With the right setup, it can run the same kinds of commands across different projects, using executors that come with their own packages and runtimes. That lets you do all the core tasks your project needs: build, run, test, and lint—regardless of the framework or language, as long as Nx supports it via theNx Plugins Registry.
One of the more recent and useful developments is Nx Crystal, which is the Nx team's push toward a leaner project.json. Nx can now infer task configurations automatically, reducing the bloat in your configuration files. This gets particularly valuable when you want tasks like testing or linting to run cleanly and be cached efficiently—a big time-saver when everything is already passing.
With that foundation in mind, let's roll up our sleeves.
Prepping the Plumbing
I won't lecture you on how Jira can either make you productive or drive you to distraction—but there's one part of the mechanics you need to know. Each project in Jira has a code, and most requests from your client get turned into tickets. A ticket is a serialized item within your project, and its identifier looks like this:
[project code]-[consecutive number]
Let's use a project with the code SOP. If we have a ticket that asks to integrate Nx with Commitizen and Husky, and it's assigned to us, it might have the number 0001. Its full ID would then be SOP-0001, and its title might read something like Goat like feature, with all the related documentation and objectives embedded in the ticket.
Jira often pairs with Bitbucket or GitHub to create feature branches straight from the board. Here's a strong piece of advice: don't start by manually creating the branch in your terminal. Let Jira do it through its Create Branch option—it's less error-prone, and the branch will match the conventions your team already uses.
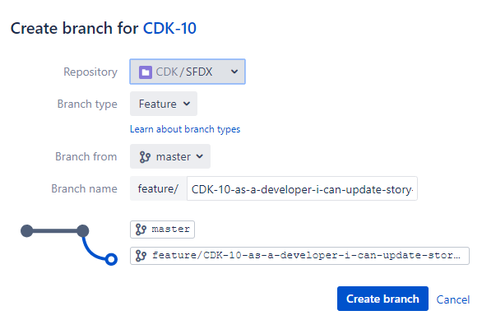
Once that branch exists, you can pull it from remote:
git fetch origingit pullgit checkout feature/SOP-0001-goat-like-feature
We're now working on feature/SOP-0001-goat-like-feature, which means we're ready to start tinkering with the actual plumbing of our commit workflow.
Installing Required Packages
We'll need three dependencies in your repository to make this all work:
For the package manager, we'll be using npm—simple and universally available.
npm i -D commitizen @digitalroute/cz-conventional-changelog-for-jira husky
With those dependencies installed, we can move on to configuring the various pieces we need.
Setting Up Husky
Husky needs to be initialized before anything else, so that's our first step. Run:
npx husky init
This creates a .husky folder containing the git hooks we need, ready to be customized.
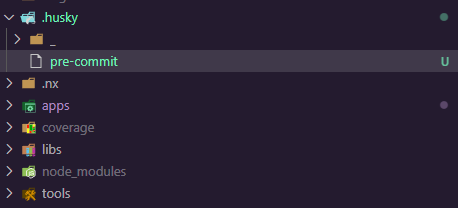
Now we're going to steer Husky in the direction we want by leveraging nx affected the right way.
Husky and Nx Commands
nx affected relies on git history to determine which projects have changed relative to the current commit. That’s the secret to its power and the reason I’ve abandoned lint-staged—nx affected handles formatting of the modified files automatically, without any extra effort.
Given that our development branch serves as the baseline and contains the most recent clean commit, we’ll point to it as the reference for detecting what’s affected:
npx nx affected -t lint format test --base=origin/develop --parallel=5
A single command accomplishes three essential tasks:
- Verifies that all affected files pass linting with the complete rule sets of their respective projects.
- Confirms that tests for the affected projects run without errors.
- Formats the affected files automatically.
All of this executes concurrently with up to 5 threads. I did warn you we’d push things, but 5 threads might be excessive for your hardware, so adjust the number to suit your machine. In a typical Nx repository setup, build and test tasks are cacheable by default. If you’ve only touched the ui library and left the frontend app untouched, this command will run lint, format, and test only for ui—the frontend app sees no changes from the previous commit on origin/develop, and its test pulls the same cached result.
The dangers lurking on caching
A warning for those who prefer to ignore sensible advice: I would strongly advise against caching lint and format, as it introduces several serious issues:
- Stale Results: Caching lint and format checks sounds convenient, but it’s a trap. Every time you modify code, you risk depending on obsolete outputs. As the codebase grows, those old cached results fail to catch new problems, leaving you blind to potential regressions.
- Inconsistent Code Quality: Caching allows substandard code to slip through. Code that violates current linting or formatting standards might be accepted without question, resulting in a codebase with uneven quality—some parts modern, others stuck in an older state.
- Performance Issues: Caching may look like a path to better performance, but it’s misleading. Over time, it can slow down CI checks as they process more files than necessary. Instead of improving efficiency, you bog the whole pipeline down with unnecessary overhead.
- Breaking Monorepo Principles: Monorepo development rests on rebuilding, retesting, and relinting only what’s actually affected. Caching undermines this by offering false confidence, ignoring the current repository state, and eroding the core principles that keep a monorepo efficient and reliable.
Now that you see why caching lint and format is a poor choice, let’s look at how husky complements Nx.
Command approaches for big and small projects
Open the pre-commit file inside the .husky directory and insert this command:
nx affected -t lint format test --base=origin/develop --parallel=5
That approach might suit smaller projects, but larger ones will face difficulties, especially with testing. What if the affected project contains just ONE component that needs verification? Do you really need to run the entire test suite for something that small? You have two choices:
Option 1: Run tests only for affected code: For this, you’ll need two separate commands:
nx affected -t test --onlyAffected --base=origin/develop --parallel=5
nx affected -t lint format --base=origin/develop --parallel=5
The crucial part is the --onlyAffected flag. When you pass --onlyAffected to nx affected -t test, Nx limits execution to just those projects directly influenced by your changes. This means it not only accounts for projects depending on the modified files but also ensures only the tests for the genuinely affected projects are executed.
or
Option 2: Defer testing to the CI: You could lint and format locally, then let the CI deal with tests. But keep in mind, testing is a heavy responsibility—skipping it comes with consequences.
Tweak as needed and save the file. Next, we’ll shift focus to setting up our commits with Commitizen and the cz-conventional-changelog-for-jira plugin.
Commitizen and cz-conventional-changelog-for-jira
This pairing is arguably the best way to structure your commits, because Commitizen on its own doesn’t provide the options needed to embed the Jira ticket in the message.
First, in your package.json, add a script called commit that handles the work:
{
    "scripts":{
        "commit" : "git add --all && git-cz"
    }
}
It’s straightforward: stage all changes and launch Commitizen.
For cz-conventional-changelog-for-jira, you have two paths: either expand your package.json with an extra config block, or create a .czrc file to add a separate configuration file to the repo.
If you prefer the package.json route, add the following:
{
  "scripts": {
    "commit": "git add --all && git-cz"
  },
+  "config": {
+    "commitizen": {
+      "path": "./node_modules/@digitalroute/cz-conventional-changelog-for-jira"
+    }
+  }
}
Alternatively, if you chose the .czrc file instead:
{
    "path": "./node_modules/@digitalroute/cz-conventional-changelog-for-jira"
}
Now, running npm run commit should yield something like this:
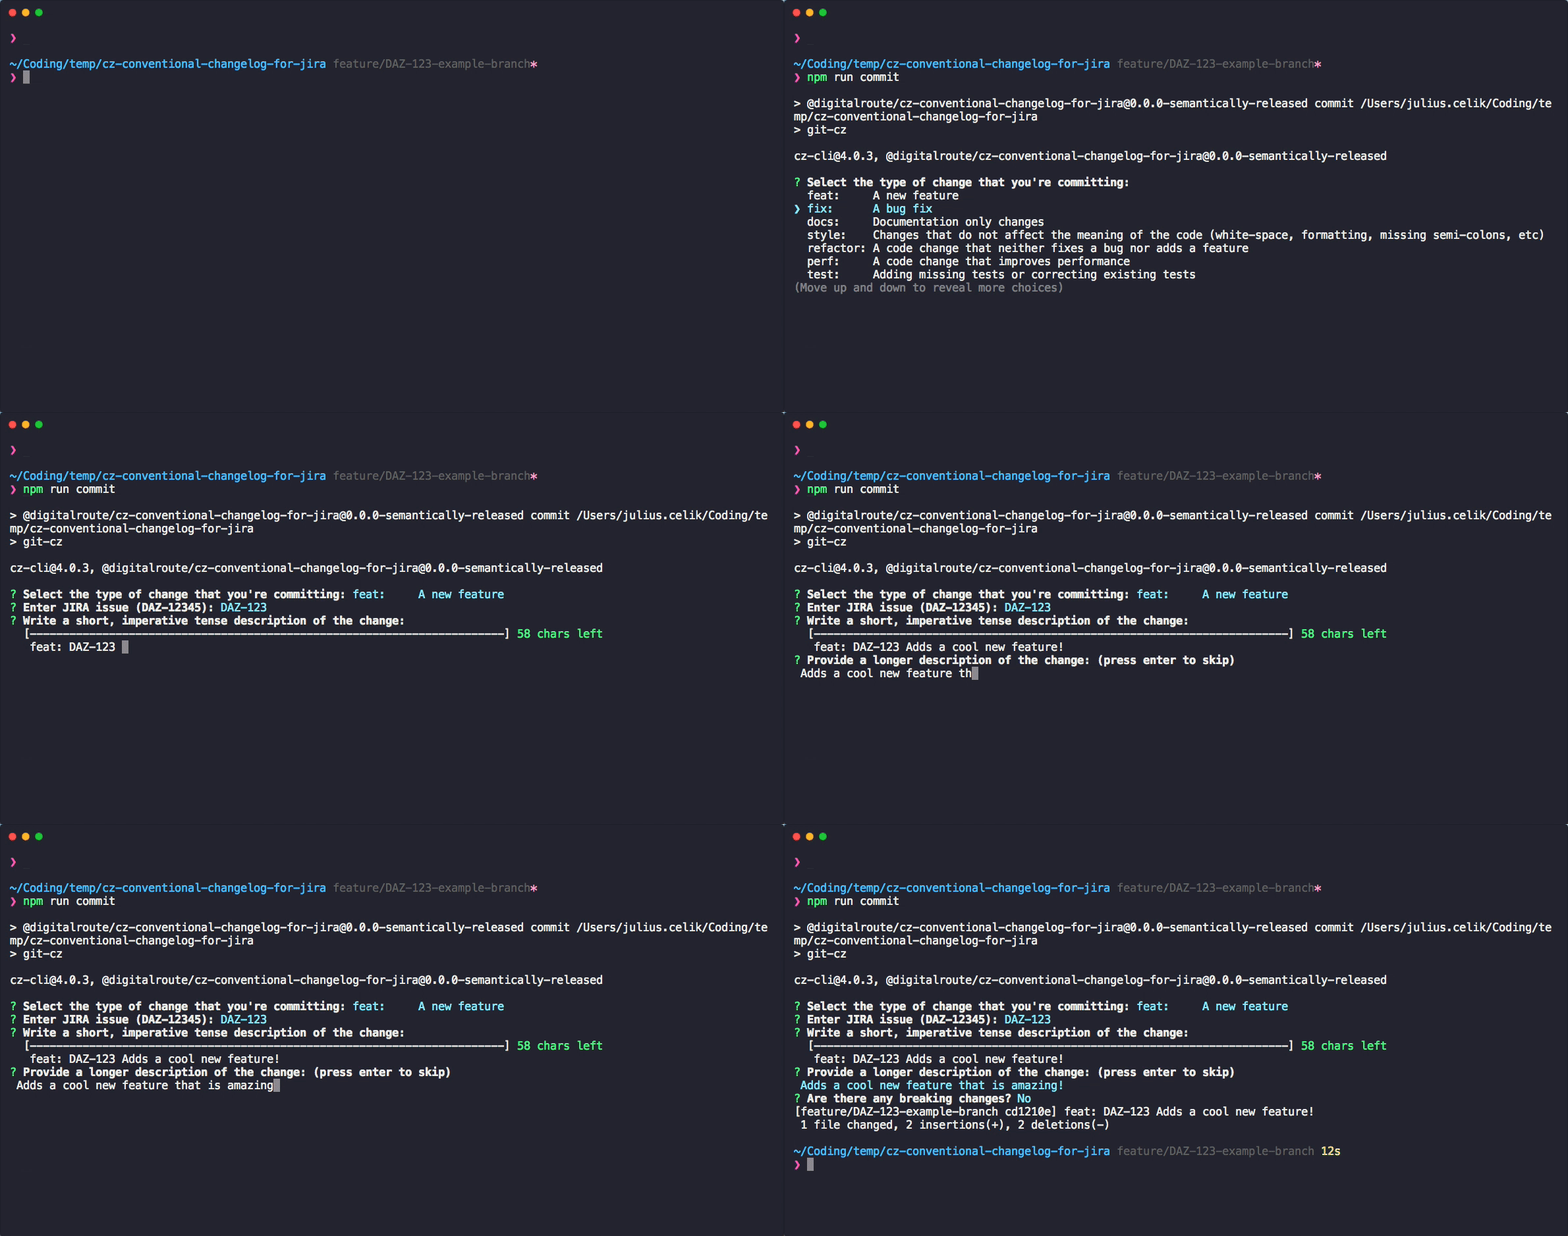
But hold on—don’t celebrate yet. There’s a good chance your CI or integration team has strict formatting rules for commit messages.
For instance, based on the demo above, your commit message might look like this:
SOP-0001 feat: Adds a cool feature
Yet what if your CI team demands a small tweak:
SOP-0001. feat: Adds a cool feature
Notice that (dot)? A single DOT can send your entire commit into disarray, with the CI team throwing you under the bus (trust me, I’ve been through it).
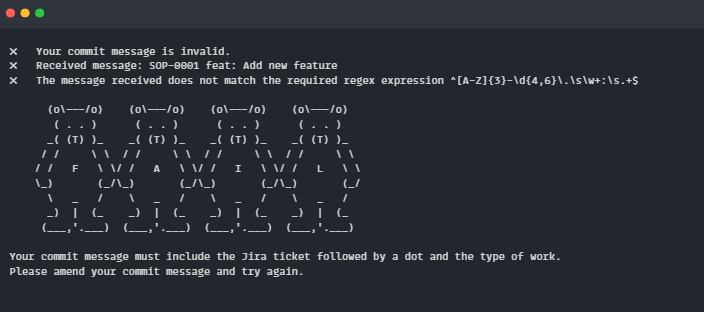
Yes, right in the ego. You’ll want to learn how to amend your commit with the correct format before you end up in an even worse predicament.
To avoid that dystopian scenario, we’ll assume you added the .czrc file to your repository. Fortunately, cz-conventional-changelog-for-jira offers a broad range of options to tailor messages properly. If you were diligent and read the whole documentation for cz-conventional-changelog-for-jira instead of skimming this article without a clear goal, you’d notice formatting settings that can get the message just right. The key option is jiraAppend, and the value we need is that annoying dot:
{
-    "path": "./node_modules/@digitalroute/cz-conventional-changelog-for-jira"
+    "path": "./node_modules/@digitalroute/cz-conventional-changelog-for-jira",
+    "jiraAppend": "."
}
Next time you run npm run commit, the message will align with whatever the CI team demands once you push. Now you can have the last laugh.
Let’s walk through it step by step, making sure everything goes smoothly:
Running npm run commit will open the Commitizen interface.
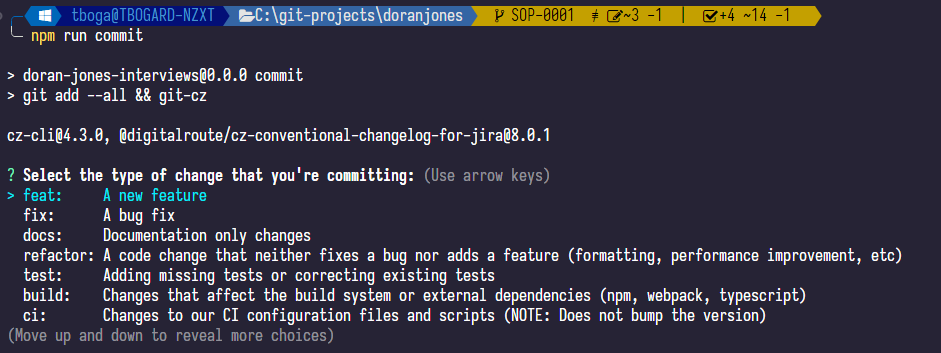
After selecting feat: a new feature, it will ask for the JIRA Issue. You’ll see our Jira Ticket SOP-0001 appear (note the dot appended per the .czrc configuration), and pressing enter will use it as the default ticket. You could input a different one, but that might invite the CI team to block your code and leave you doing everyone else’s work.
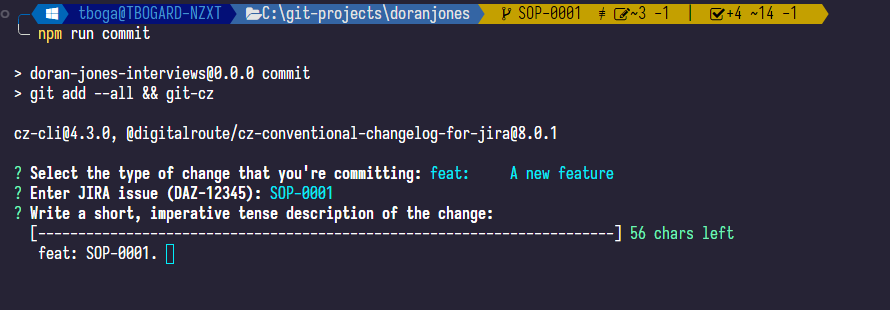
Then provide a description that fits your needs.
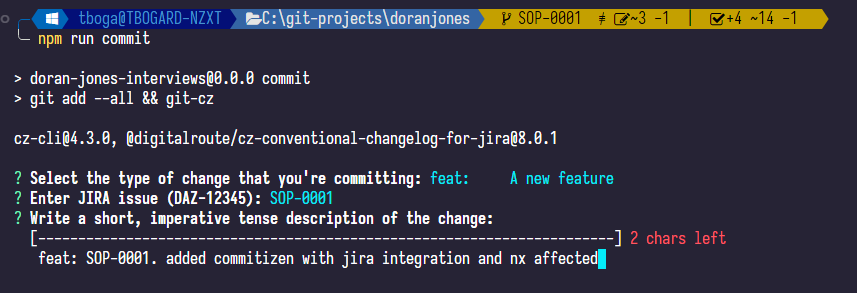
If more context is needed to explain your work, add it here; otherwise, press enter. The final prompt will ask about breaking changes.
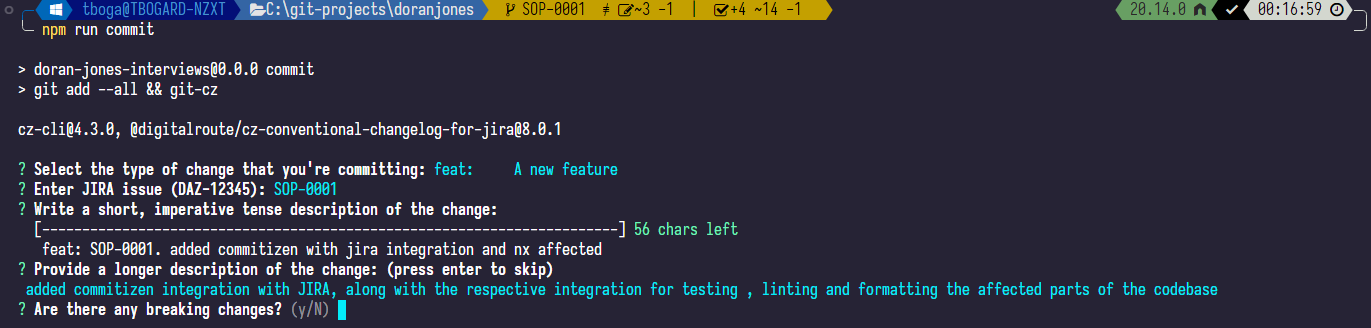
Once you press enter, you’ll see a preview of your message (which is exactly what you’ve been waiting for).
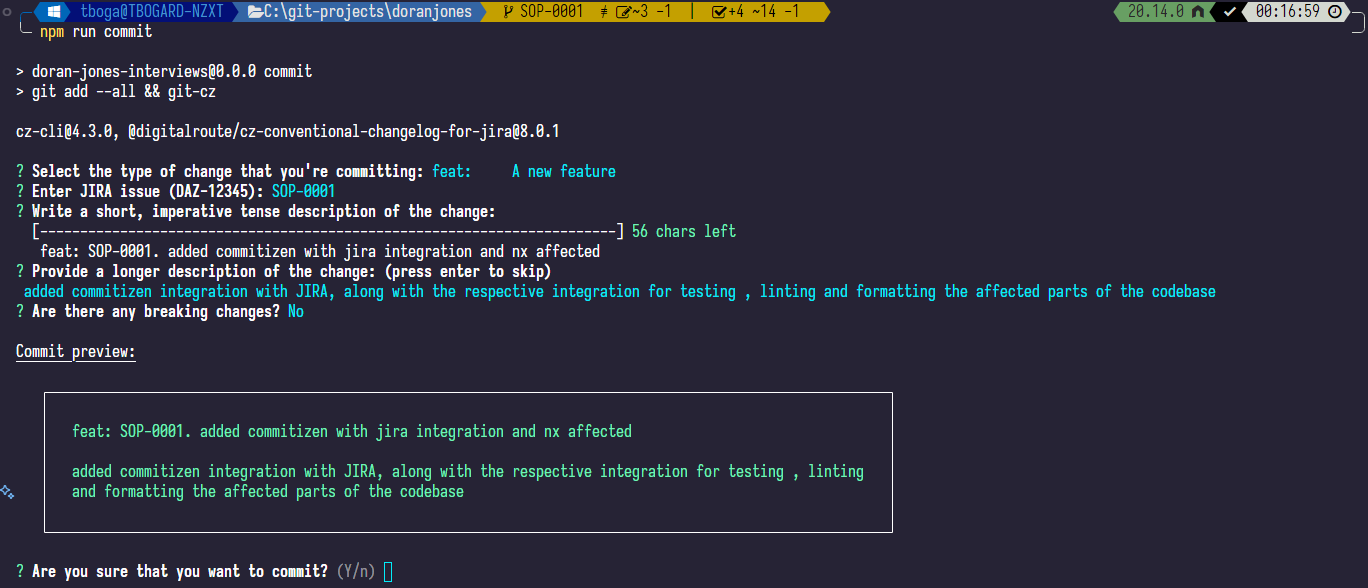
You can cancel the commit to make further adjustments, or press enter to finalize the commit message.
If you commit, every affected project will execute the required targets (lint, format, and test). If something fails, you’ll need to address it.
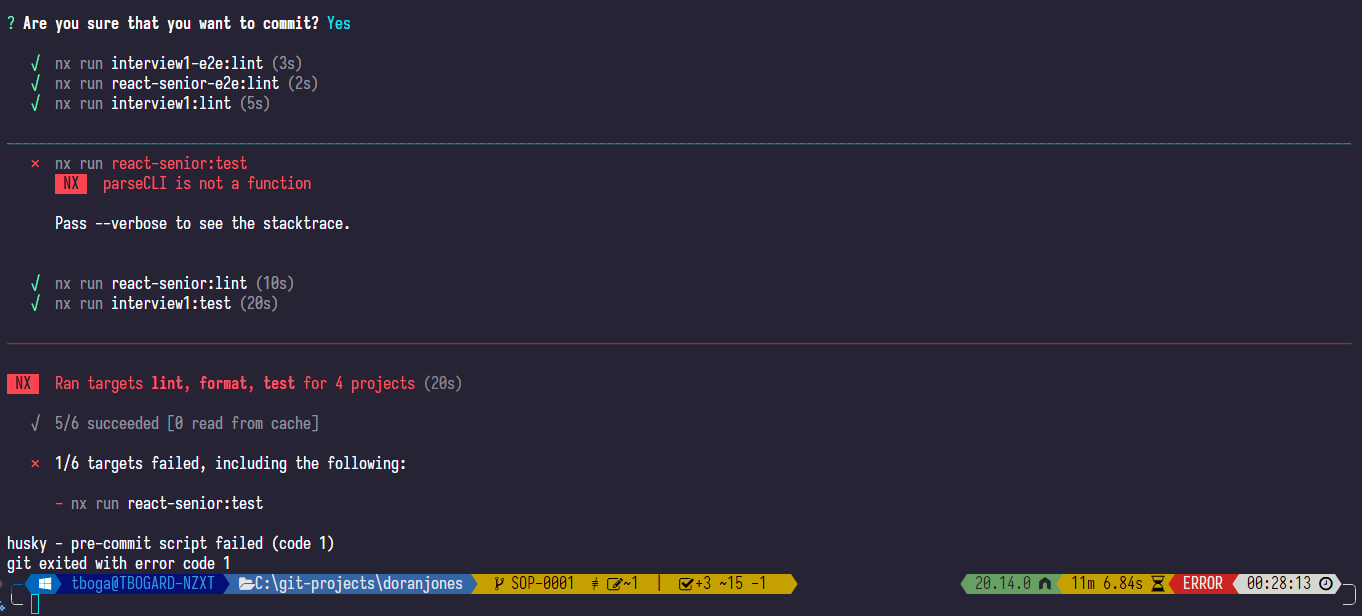
DO 👏 NOT 👏 STOP 👏 HUSKY 👏
Understand this: if the nx affected command fails, your code will be reverted to its state before the commit preparation. For large commits, DO NOT ATTEMPT TO PRESS CTRL + C, as your changes will be in a fragile intermediate state.
Under the hood, Husky uses git stash to store your staged changes for rollback if nx affected hits a problem. If you deliberately interrupt the process (say, because you spot a typo like "featre" instead of "feature" and panic sets in), SOMETIMES Husky won’t just ignore your changes—it might cast your hard work into limbo, turning hours of effort into a recovery nightmare. The first time that happened to me, I was beside myself. But if you enjoy living dangerously, Husky keeps a stash you can fall back on. LET HUSKY FINISH. YOU HAVE BEEN CLEARLY WARNED.
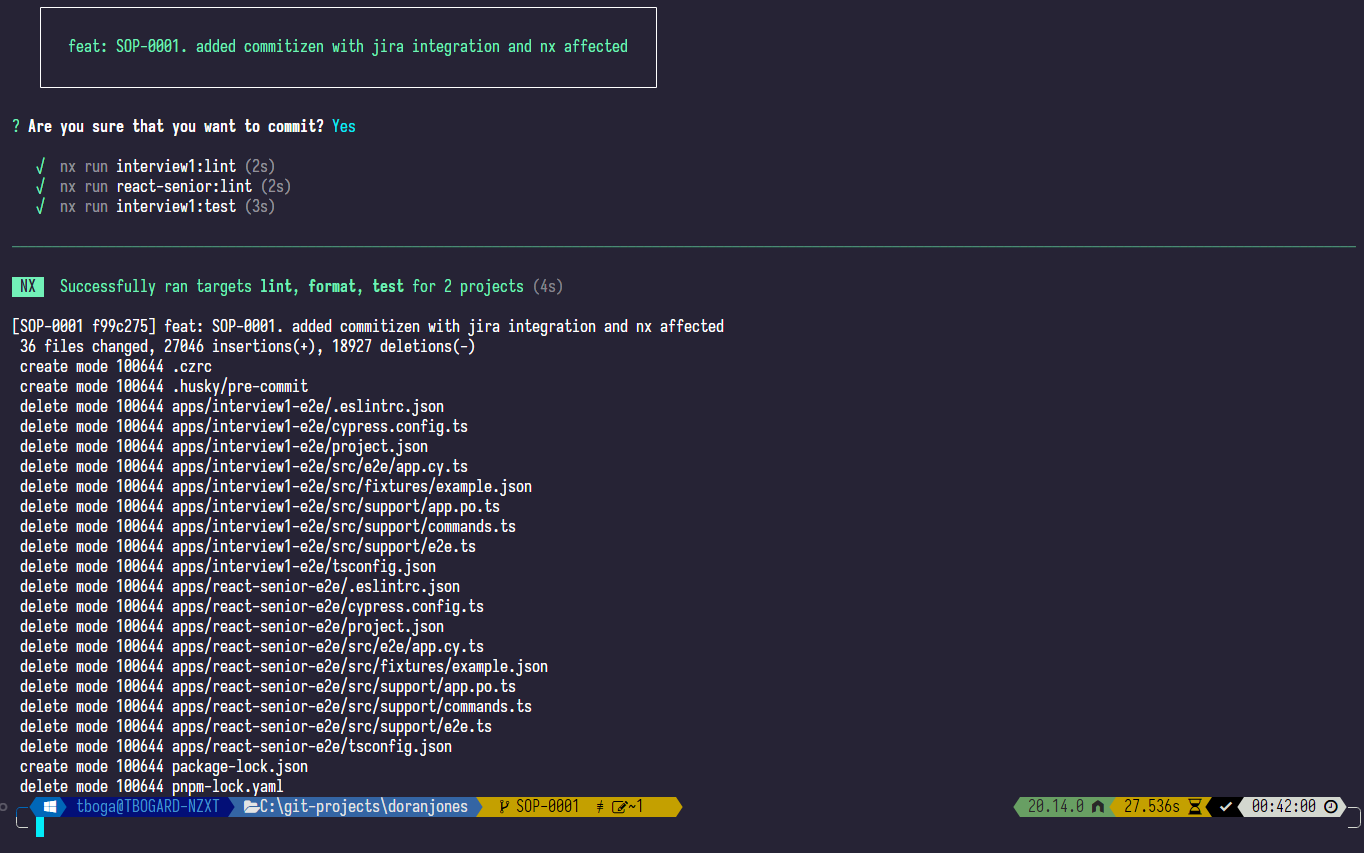
Success!!!
Few things are more rewarding than conquering a painful Jira ticket, with everything firing on all cylinders, leading to a clean commit and smooth nx affected execution, culminating in this glorious screen:
Conclusion
I hope this article was helpful. I’m happy to hear your feedback—and, naturally, your tales of herding developers into some structured process to keep everything moving.
Stay tuned for the next piece—it might be another chaotic story from software and architecture, or a fresh take on Angular’s newest features. Until I wake up from the next one, may your commits be tidy and your CI pipeline forgiving.