
Safe Approaches to Element Modification
When working with Angular, it's easy to fall back on standard JavaScript patterns for DOM traversal and updates. However, the framework provides more integrated tools for these tasks. Let’s explore the Angular-specific ways to handle element modification and structural changes, instead of relying on vanilla JavaScript.
DOM manipulation can be broadly separated into two main categories.
- Altering existing DOM elements.
- Altering the DOM tree structure.
Modifying DOM Elements
Common JavaScript methods for modifying elements include classList.add(), setAttribute(), and style.setProperty(). These are native browser APIs. In Angular, we have several strategies for achieving the same results, and we should evaluate them to find the most effective one.
Technique: 1
Core Concepts
- Template reference variables.
- ElementRef.
- @Viewchild/@Viewchildren.
- AfterViewInit.
Concept Definitions
- Template reference — A marker that acts as a handle to a specific element in the template.
- ElementRef — This class provides access to the underlying native DOM element. The
nativeElementproperty of this class grants access to all standard DOM element methods. - @Viewchild/@Viewchildren — These decorators are used to query and select one or multiple child elements from the component's view.
- AfterViewInit — This Lifecycle hook fires after Angular has fully initialized the component's view.
Code Example
@Component({
  selector: 'app-root',
  template: `<span #el>I am manoj.</span> <span>I am a web developer.</span>`,
  styles: [
    `
      [highlight] {
        background: green;
        color: white;
      }
    `,
  ],
})
export class AppComponent implements AfterViewInit {
  @ViewChild('el') span: ElementRef;

  ngAfterViewInit() {
    this.span.nativeElement.setAttribute('highlight', '');
  }
}
Procedural Breakdown
Step 1: We use a template reference variable combined with the @viewchild query to get a reference to the HTML element.
<span #el>I am manoj.</span> <span>I am a web developer.</span>
@ViewChild('el') span: ElementRef;
Step 2: The setAttribute method of the native DOM element is invoked to attach a new attribute.
this.span.nativeElement.setAttribute('highlight', '');
Result

The output shows the attribute has been added successfully.
While this approach works, it creates a dilemma. We are merging the component's presentation logic (data, arrays, iterations) with rendering logic (direct DOM access).
The general rule of thumb is that rendering logic, which involves directly modifying the DOM, belongs in a dedicated directive, not the main component.
We can establish a channel between the component and the directive using Data Binding to pass necessary data and instructions.
Let's look at a better way to handle this separation of concerns.
Technique: 2
In this approach, we will create a dedicated directive to encapsulate all the rendering logic, keeping the component focused on our presentation logic.
Core Concepts
- ElementRef
- @Input() — Decorator
- ngOnInit()
Concept Definitions
- ElementRef — Provides access to DOM elements.
- @Input() — A decorator used for data binding to facilitate communication between a component and a directive.
- ngOnInit() — A lifecycle hook that executes after Angular has instantiated the component/directive.
Code Example
Directive:
@Directive({
  selector: '[appHighlight]',
})
export class HighlightDirective implements OnInit {
  @Input() appHighlight;

  constructor(private element: ElementRef) {}

  ngOnInit() {
    this.element.nativeElement.setAttribute(this.appHighlight, '');
  }
}
Component:
@Component({
  selector: 'app-root',
  template: `<span [appHighlight]="'highlight'"
    >I am manoj.<span> <span>I am a web developer.</span></span></span
  >`,
  styles: [
    `
      [highlight] {
        background: green;
        color: white;
      }
    `,
  ],
})
export class AppComponent {}
Procedural Breakdown
Step 1: We inject the ElementRef service into the directive's constructor.
constructor( private element: ElementRef) {}
Step 2: Add an @Input decorator to the directive class.
@Input() appHighlight;
Step 3: In the ngOnInit() lifecycle hook, use the native element's setAttribute() method to add the desired attribute.
ngOnInit(){ this.element.nativeElement.setAttribute(this.appHighlight, '')}
Step 4: Finally, apply the directive to the target element in the component's template.
<span [appHighlight]="'highlight'">I am manoj.</span>
Result

The visual output is identical to the first method. The key difference lies in the code architecture: we have successfully moved the rendering logic from the component to a directive. This promotes code reusability and makes the logic more modular.
However, this method still relies on direct DOM access via the ElementRef class. Bypassing Angular's abstraction layer can potentially introduce security vulnerabilities, making the application more susceptible to XSS attacks if not handled carefully.
The ElementRef approach is pervasive in many codebases. A more secure and performant alternative is to let Angular handle direct DOM access for us. Let’s examine the next technique.
Technique: 3
Core Concepts
- Renderer
Concept Definitions
- Renderer — This service provides a safe, platform-independent way to interact with the DOM. Instead of manipulating the DOM directly, it acts as an intermediary. The renderer offers a set of methods for modifying elements without creating a direct dependency.
Here are some common Renderer2 methods:
- addClass()
- removeClass()
- setStyle()
- removeStyle()
- setProperty()
Code Example
constructor( private element: ElementRef,
private renderer: Renderer2) { }

ngOnInit(){
    this.renderer.setAttribute(this.element.nativeElement,this.appHighlight, '')
}
Procedural Breakdown
Step 1: Inject the renderer service into the directive's constructor.
constructor( private renderer: Renderer2) {}
Step 2: In the ngOnInit() lifecycle hook, use the renderer's setAttribute() method.
ngOnInit(){ this.renderer.setAttribute(this.element.nativeElement, this.appHighlight, '')}
Result

We get the same result, but now the DOM modification is done in a more secure, Angular-idiomatic way through the renderer.
Built-in attribute directives like
ngClassandngStylerely on the renderer to modify DOM elements.
Going forward, the Renderer should be our primary tool for element modification. It provides a proper and secure abstraction layer.
Modifying DOM Structure
When we need to add or remove entire elements, methods like createElement(), appendChild(), or removeChild() come to mind in vanilla JavaScript. Angular provides a more structural approach that integrates with its change detection system.
Removing a Child Component
Technique: 1
Core Concepts
- Template Reference
- ElementRef
- @ViewChildren()
- AfterViewChecked
- Renderer
- QueryList
Concept Definitions
- Template Reference — A reference pointing to a specific DOM element.
- ElementRef — Grants access to the DOM elements.
- @ViewChildren() — Returns a
QueryListof elements or directives matching the query from the view DOM. - AfterViewChecked — Called after Angular's default change detector has finished its cycle.
- Renderer — Ensures safer direct DOM access.
- QueryList — The return type for
@ViewChildren(). It holds a list of items, and Angular updates it dynamically whenever items are added or removed. It gets initialized just before thengAfterViewInit()hook.
Code Example
@Component({
  selector: 'app-parent',
  template: `<p>parent works!</p>
    <app-child #child></app-child>
    <button (click)="removeChild()">remove child</button>`,
  styleUrls: ['./parent.component.css'],
})
export class ParentComponent implements AfterViewChecked {
  @ViewChildren('child', { read: ElementRef }) childComp: QueryList<ElementRef>;

  constructor(private renderer: Renderer2, private host: ElementRef) {}

  ngAfterViewChecked() {
    console.log(this.childComp.length);
  }

  removeChild() {
    this.renderer.removeChild(
      this.host.nativeElement,
      this.childComp.first.nativeElement
    );
  }
}
Procedural Breakdown
- Use template references and
@ViewChildren()to obtain a reference to the HTML elements. - Inject
Renderer2andElementRefinto the constructor. - Use the renderer's
removeChild()method to detach the child component. - Reference the
ElementRefto get the parent host element.
Result
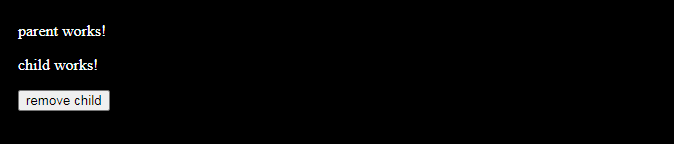
Initial State
After 'Remove Child' Button Clicked:

The child component has been successfully removed from the DOM.
Let's check the console output. The logs reveal a discrepancy.

Child Count
Question: The child component is gone from the DOM, but the count still shows 1. What is happening, and how do we fix this?
This is a critical observation. Let's understand why this mismatch occurs.
The Relationship Between DOM and Views
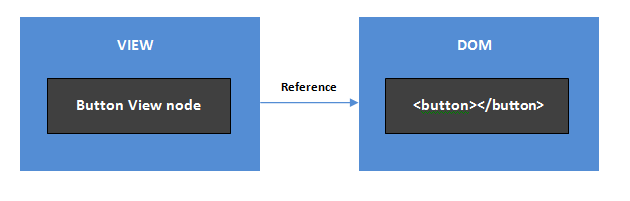
Angular View and DOM relationship
Angular operates on a concept called "views" which act as an abstract representation of the DOM. Each time a component is created, Angular establishes a corresponding view. Under the hood, a hierarchy of views is maintained, mirroring the components' hierarchy.
If we manually alter the DOM (like removing a node), the view hierarchy remains unchanged. This creates a potential problem: Angular's Change Detection runs based on this view hierarchy. If the view isn't updated, Angular will continue to include that deleted component in its change detection checks. For a single element this is a minor issue, but removing many components could lead to performance degradation.
View Container (viewContainerRef)
The View Container is the key to safely managing DOM structure changes in sync with Angular's change detection.
Available Methods
- insert()
- move()
- remove()
- createEmbeddedView()
Setting Up a View Container
While any DOM element can serve as a view container, the <ng-container> tag is the preferred choice. It’s an Angular-specific element that doesn't render an extra HTML tag on screen.
There are two main types of views in Angular:
- Embedded Views — These are always a part of a view container.
- Host Views — These are bound to a view container and can also operate standalone.
Let's see how to turn a DOM element into a view container.
Steps
Step 1: Add an ng-container tag to the template.
<ng-container #viewcontainer></ng-container>
Step 2: Add a viewchild query to select that element.
@ViewChild('viewcontainer', {'read': ViewContainerRef}) viewcontainer;
Here, ViewContainerRef is crucial; it's what turns the DOM node into a proper Angular view container.
Step 3: Create the view and insert it into the container.
Viewcontainer.createEmbeddedView(TemplateRef);
Creating a Template
Creating a template reference is very similar. Let's look at the steps.
Steps
Step 1: Add an ng-template tag to the template.
<ng-template #t></ng-template>
Step 2: Get a reference to it in the component class.
@ViewChild('t', {'read': TemplateRef}) template: Templateref;
Code Example
Template file:
<p>parent works!</p>
<ng-container #viewcontainer></ng-container>
<ng-template>
  <app-child #child></app-child>
</ng-template>
<button (click)="removeChild()">remove child</button>
Class File:
  @ViewChildren('child', {read: ElementRef})
  childComp:QueryList<ElementRef>
  @ViewChild('viewcontainer', {'read': ViewContainerRef}) viewcontainer;
  @ViewChild(TemplateRef) template: TemplateRef<null>;

  constructor(private renderer: Renderer2, private host: ElementRef) {}

  ngAfterViewChecked() {
    console.log("Child components count", this.childComp.length)
  }

  ngAfterViewInit(){
    this.viewcontainer.createEmbeddedView(this.template);
  }

  removeChild(){
    this.viewcontainer.remove();
  }
Solution: This approach directly addresses and fixes the earlier problem. When a DOM element is removed through a
viewContainerRef, Angular's view hierarchy is updated automatically.
Here's the corrected result:

Result
This confirms we've resolved the issue. Using viewContainerRef and templateRef ensures that the DOM and Angular's internal view model stay in sync.
Structural directives like
*ngIf,*ngFor, and*ngSwitchrely on view containers to modify the DOM structure.
Moving forward, we will use viewContainerRef and templateRef for any structural DOM changes.
Important Note
As with element modifications, structural logic can also be encapsulated within custom structural directives. This pattern, similar to *ngIf, provides excellent code reusability and promotes a clean architecture.
Remember: If Angular creates the DOM element, it also creates the corresponding view. If you use Jquery or vanilla JavaScript to create or remove DOM elements directly, Angular will remain unaware of these changes and change detection will not track or process those elements.
Wrapping Up
- Modify DOM elements — Leverage the
Rendererservice. - Modify DOM structure — Rely on
ViewContainerRefandTemplateRefclasses. - Encapsulate rendering logic in directives to promote code reusability.
- Avoid direct DOM manipulation with JavaScript or jQuery. Prefer using the framework’s built-in features.
With that, the concept of DOM manipulation in Angular should be clear. Feel free to share any questions or feedback in the comments below.
Further Reading
The insights presented here are based on Maxim Koretskyi’s ngConf talk.