Observing the Observers
An observer is a construct that continuously tracks a target and alerts when a change occurs.
The Observer API Family
Observer APIs provide a mechanism to monitor and react to various changes within an application. JavaScript offers several types of observers, each designed to track specific aspects:
- MutationObserver
- IntersectionObserver
- ResizeObserver
- PerformanceObserver
Mutation Observer
The Mutation Observer is dedicated to tracking the DOM tree, waiting for modifications to its structure or content.
This interface signals when there are changes to an element's attributes, text, or content. It also watches for the addition or removal of child nodes.
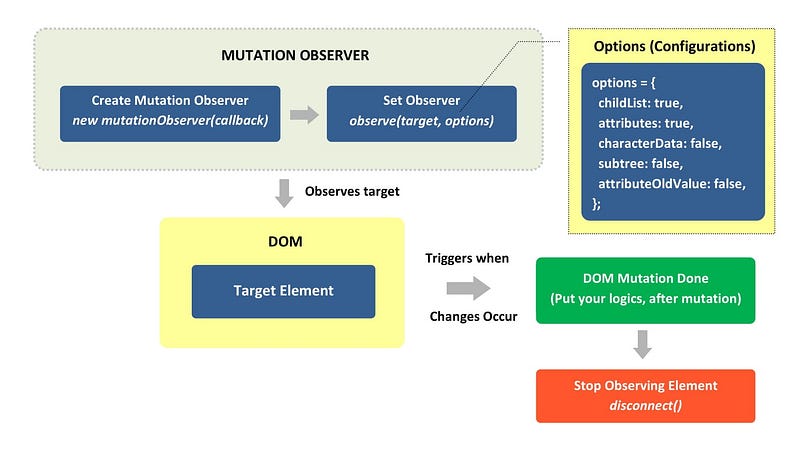
Mutation Observer flow diagram
Core Principles
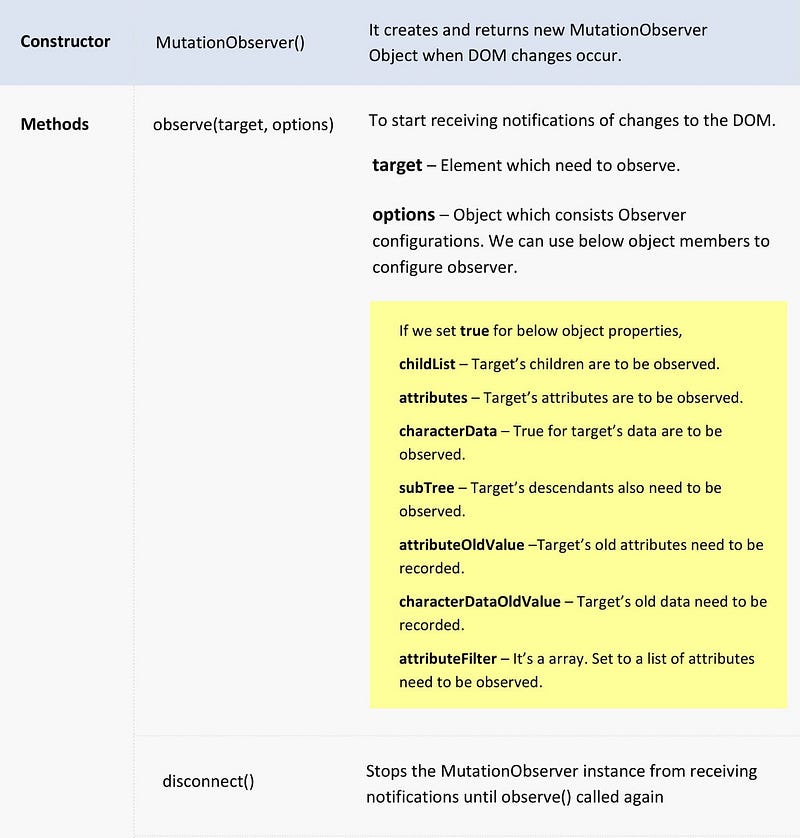
Key concepts for Mutation Observer
These are the fundamental principles of the Mutation Observer. While they may seem abstract initially, reviewing practical examples will clarify their usage.
Common Applications
- Implement instant Undo & Redo for DOM manipulations.
- Filter out unwanted elements, like third-party ads, from the DOM.
- Adjust element dimensions dynamically.
- Simplify debugging of third-party scripts by tracking element creation and property changes.
Use the Mutation Observer whenever you need to monitor for DOM modifications.
Let's examine the Undo & Redo use case in detail. Feel free to explore the other applications on your own—they are quite engaging.
Implementing Undo & Redo for DOM Elements
Mutation Observer example
Here's the source code, which is straightforward. The focus is on the observer logic; the rest is standard JavaScript. Let's break down the implementation.
Note: The Mutation Observer stores only the immediate past change, not a full history. Thus, this example will manage two list items. Be sure to click the connect button to activate the observer before testing.
Step 1: Set Up the Interface
Set up the basic UI logic from the provided CodePen example. Run the page; you'll see the following:
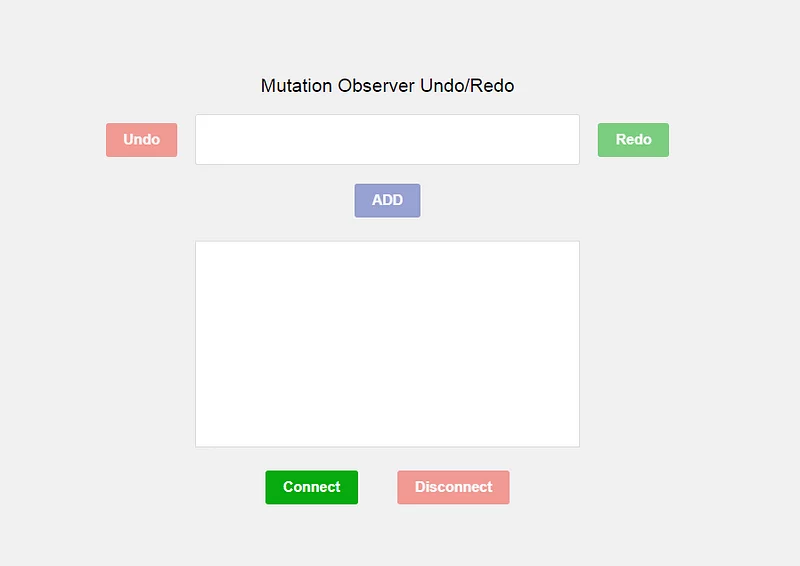
Initial UI for Mutation Observer demo
Step 2: Instantiate the Observer
Create a new Mutation Observer, then define its target element and configuration.
/* Mutation Observer Targets */
var target = document.querySelector('ol');
var inputTarget = document.querySelector('.editContent');

/* Mutation Observer Configuration */
var config = {
  childList: true
}

/*Mutation Observer Creation */
var Observer = new MutationObserver((mutationrecords) => {
  console.log(mutationrecords);
});

/* Start Mutation Observer for List */
Observer.observe(target, config);

/* Start Mutation Observer for input contentEditable div element */
Observer.observe(inputTarget, config);
We are setting up two observers: one for the ordered list and another for the contentEditable div (inputTarget).
We've assigned the target elements and a config object. The configuration can include multiple options; here, we only need childList.
If you're observing attribute changes, use the
attributeFilterproperty in the config. Observing all attributes can unnecessarily degrade performance.
Now, let's view the console output.
Console Output
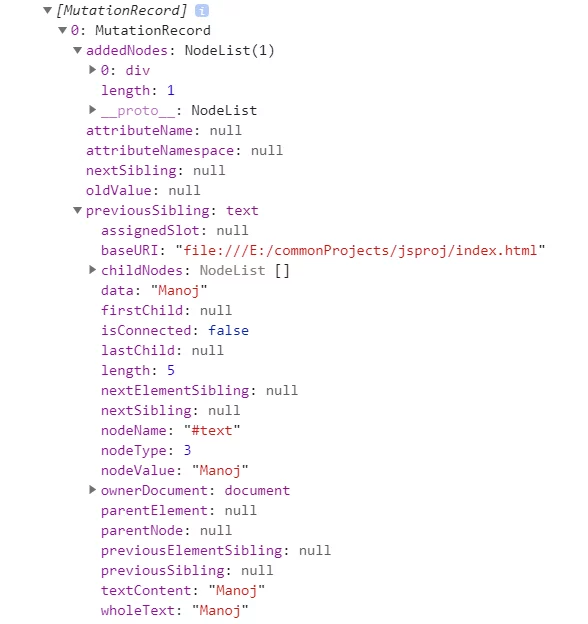
Console output from Mutation Observer
After typing 'Manoj' and clicking Add, the observer detects the DOM change and logs the output. This log is from the list observer, confirming that the addedNodes array has a length of one.
Similarly, a separate mutation record is generated when characters are removed from the input box (.editContent), though not shown here. The key difference is in the length of the addedNodes versus removedNodes arrays.
Step 3: Implement Undo/Redo in the Callback
/* Mutation Observer Creation */
var Observer = new MutationObserver((mutationrecords) => {
  /* Add callback logics here */
});

let connect = () =>{
  /* Start Mutation Observer for List */
  Observer.observe(target, config);

  /* Start Mutation Observer for input contentEditable div element */
  Observer.observe(inputTarget, config);
}

/* Disconnect Observer */
let disconnect = () =>{
  Observer.disconnect();
}
Whenever a button (Add, Undo, or Redo) is clicked, the observer's callback fires. We inject our logic there.
The observer provides data like
addedNodesandremovedNodes, which is sufficient to reconstruct the element's previous state.
Step 4: Stop the Observers
/* Disconnect Observer */
let disconnect = () =>{
  Observer.disconnect();
}
Always disconnect the observer when it's no longer needed, as it monitors the DOM continuously.
The
disconnect()method halts all observers at once. Multiple observers and complex callbacks can lead to performance bottlenecks, so be sure to clean up.
Final Result
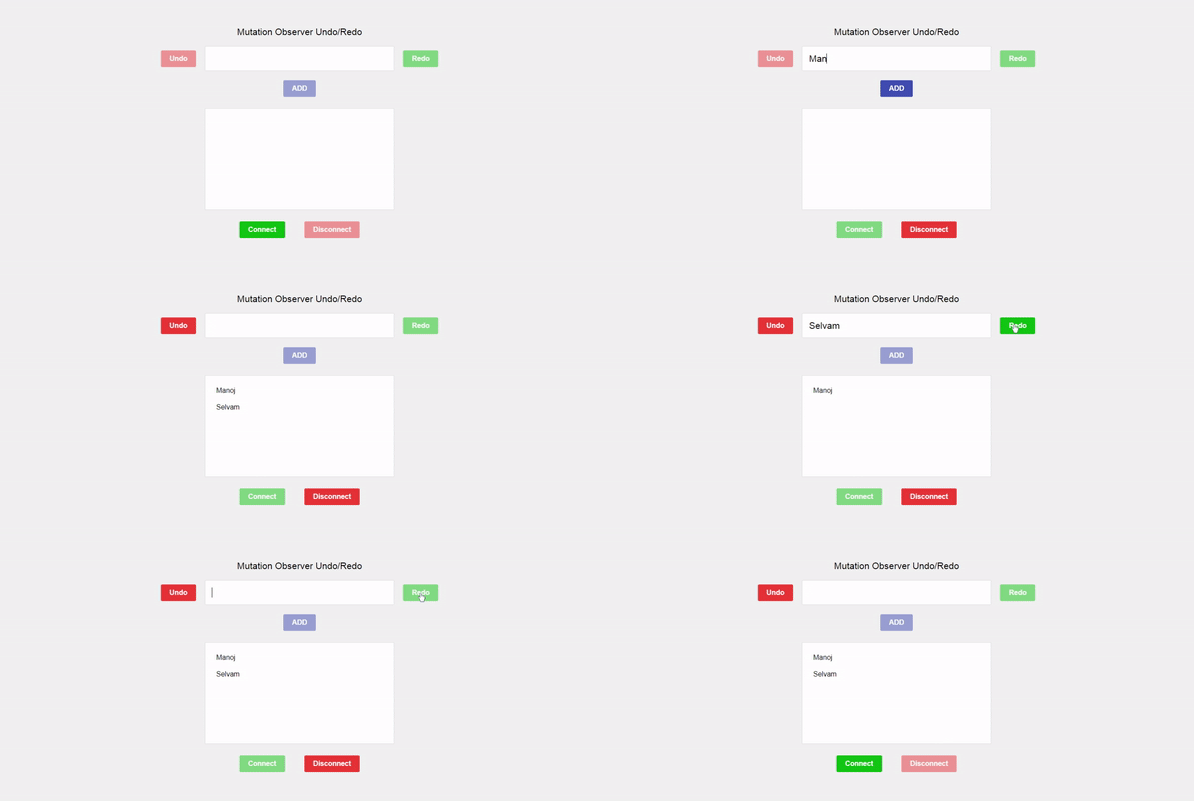
Final result of Undo/Redo demo
That's impressive, right? There are many other scenarios, such as tracking attribute changes or subtree mutations, that are equally simple and fascinating to explore.
Intersection Observer
The Intersection Observer API is our next topic and a personal favorite. This observer tracks the visibility and position of DOM elements relative to the viewport. You can manage element loading and animations based on these parameters. Let's take a closer look.
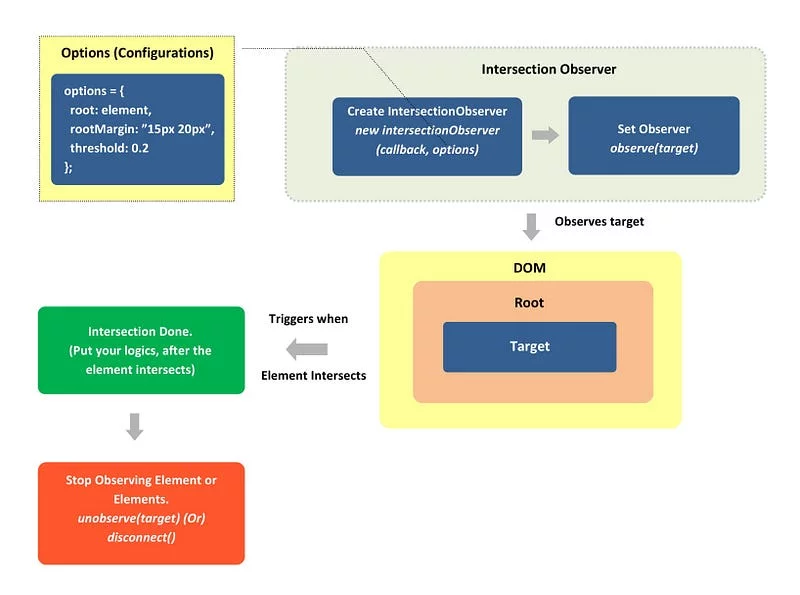
Intersection Observer flow diagram
Its methodology is similar to the Mutation Observer, as seen in the flow diagram. The main differences lie in the configuration options and available methods.
Core Principles
Here are the key concepts. They are minimal, and much of what we covered for the Mutation Observer applies here, making it easy to pick up.

Key concepts for Intersection Observer
Common Applications
- Lazy loading — Defer loading of images or content until they scroll into view.
- Infinite Scroll — Implement endless scrolling as the user reaches the bottom.
- Scroll-triggered Animations — Apply animations when elements enter the viewport.
- User Engagement Tracking — Monitor if a user is viewing an ad or article; pause timers when out of view.
- Media Autoplay — Play videos when they come into the viewport.
Use the Intersection Observer wherever you need to monitor element visibility and position.
For demonstration, let's explore scroll-triggered animations. This will provide a clear understanding of how it works.
Scroll-Triggered Animations
This is a foundational animation example. We'll review it step by step.
Step 1: Set Up the Interface
Set up the basic UI logic from the CodePen example and run it. The output will look like this:

Initial UI for Intersection Observer demo
Step 2: Create the Observer
Instantiate the observer, and then assign the target element and configuration.
var box = document.querySelector('.text'); //Target

var config = { // we can set config such as root, rootMargin, threshold.
    threshold: 1
}

var callback = (entries)=>{
 console.log(entries);
}

var observer = new IntersectionObserver(callback, config); //Create observer

let connect = () =>{
  observer.observe(box); //Start observer
}

let disconnect = () =>{
  observer.unobserve(box); //Stop observer
}
We've provided the target element and a config object, which supports multiple properties.
Now, let's check the console.
Console Output

Intersection Observer console output
The observer emits a record when the target intersects the viewport, providing details about position, the target element, and its intersection state, among other things.
Step 3: Add Animation Logic
var callback = (entries)=>{
   //Animation code logic comes here
}
The UI has connect and disconnect buttons. Clicking connect invokes the observe(target) method, starting the observer.
When the target enters the viewport, the callback executes. It's simple—it toggles the CSS class active to start or stop the animation.
Step 4: Stop the Observer
let disconnect = () =>{
  observer.unobserve(box); //Stop observer.
  observer.disconnect(); //Stop all observers.
}
This step is crucial. You can stop observing a specific element with the
unobserve()method, or usedisconnect()to stop all observers at once.
Final Result
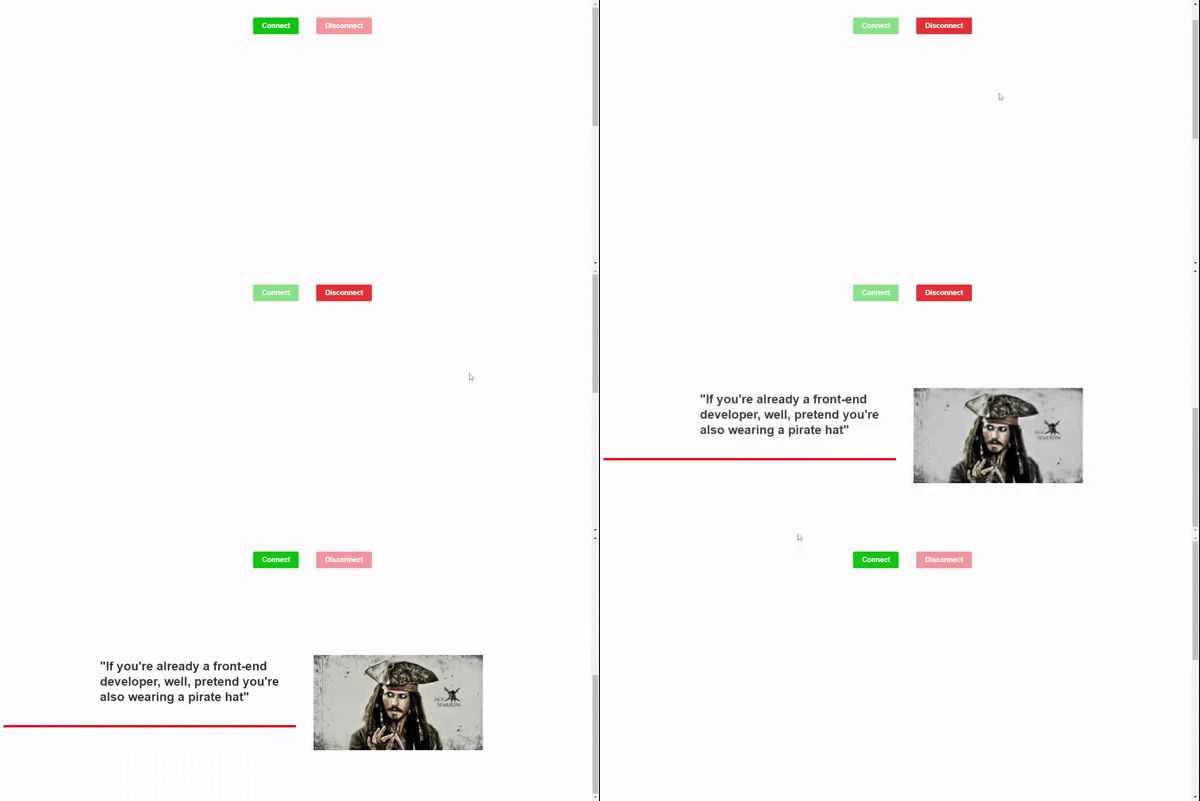
This looks great. There are other use cases to explore, each quite interesting.
Note: This effect is possible with the
onscrollevent, but doing so requires considerable code and complex logic. Scroll events fire on every scroll movement, which can lead to performance issues. Therefore, the Intersection Observer is the recommended solution.