
Reusing Layouts Across Angular Routes
In nearly every application I've encountered, multiple pages rely on a shared visual structure. Think of a typical dashboard with a persistent header, footer, and sidebar, where only the main content area changes. A natural instinct is to factor out these repeating elements and reuse them. After digging through Angular’s official docs, various tutorials, and my own trials, I found two practical ways to handle this. To make things concrete, let me introduce a sample project.
A Concrete Example
Imagine a small app with five routes: login, registration, dashboard, users, and account-settings. We’ll work with two distinct layouts. The first, which we’ll call layout 1, includes a footer and a content area. The second, layout 2, adds a header and a sidebar on top of the footer and content. For our scenario, the login and registration pages use layout 1, while the remaining three pages adopt layout 2.

Layout 1 — footer-only layout
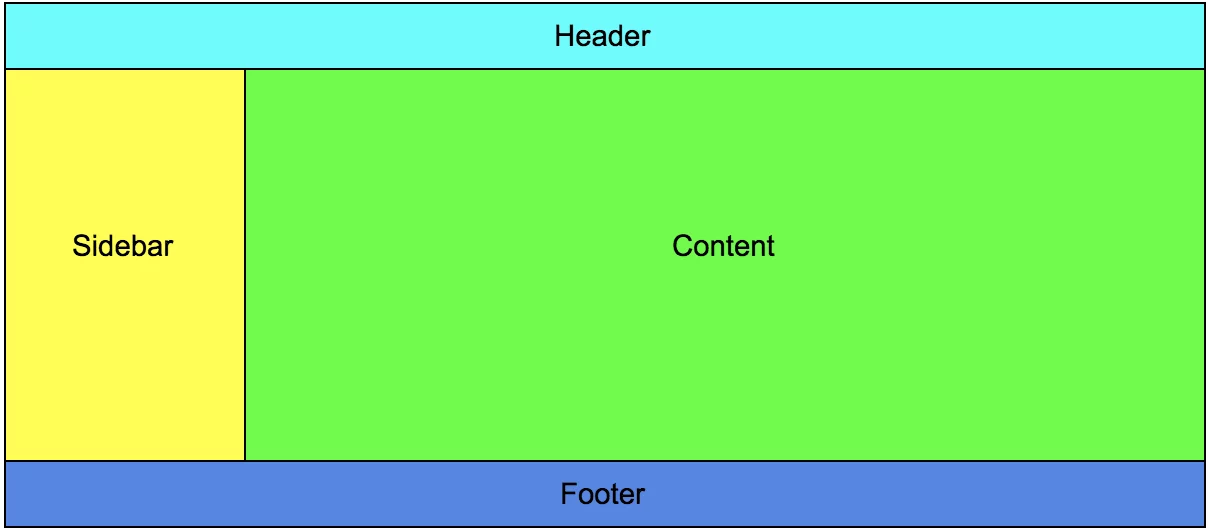
Layout 2 — primary layout
Finally, let’s treat each page as an independent feature within the app. Adopting a folder-per-feature structure, each feature gets its own Angular module along with a dedicated routing module.
First Strategy: Layout as a Parent Component
In this approach, we define a layout as a standalone component within its own module. We then reference it as the parent component in each feature’s routing configuration.
Start by stripping the root template (typically AppComponent) down to only a <router-outlet>:
<router-outlet></router-outlet>
Next, build a FooterOnlyLayoutComponent for the first layout. Its template looks like this:
<div class="content" fxFlex>
 <router-outlet></router-outlet>
</div>

<app-footer></app-footer>
To wire up the login page with this layout, the route needs to be defined as follows:
...

const routes: Routes = [
 {
   path: 'login',
   component: FooterOnlyLayoutComponent,
   children: [
     { path: '', component: LoginComponent },
   ]
 }
];

@NgModule({
 imports: [RouterModule.forChild(routes)],
 exports: [RouterModule]
})
export class LoginRoutingModule { }
Here’s what happens: when a user hits /login, Angular renders FooterOnlyLayoutComponent in the main outlet of AppComponent, and then injects LoginComponent into the nested router outlet within that layout. For the registration page, we simply mirror this route definition, swapping in the registration path and component.
For the second layout, create a MainLayoutComponent with this template:
<app-header fxLayout="column"></app-header>

<div fxLayout="row" fxFlex="100">
 <app-sidebar fxLayout="column" fxFlex="300px"></app-sidebar>
 <div class="content" fxLayout="column" fxFlex>
   <router-outlet></router-outlet>
 </div>
</div>

<app-footer fxLayout="column"></app-footer>
To attach this layout to the dashboard page, the route in the dashboard routing module is declared like so:
...
const routes: Routes = [
 {
   path: 'dashboard',
   component: MainLayoutComponent,
   children: [
     { path: '', component: DashboardComponent }
   ]
 }
];

@NgModule({
 imports: [RouterModule.forChild(routes)],
 exports: [RouterModule]
})
export class DashboardRoutingModule { }
Now, navigating to /dashboard will render MainLayoutComponent in the top-level outlet, with DashboardComponent nested inside it. Replicate this pattern for all other pages that should use this layout.
And just like that, you have reusable layouts across independent modules. Login and registration share FooterOnlyLayoutComponent, while dashboard, users, and account settings all pull from MainLayoutComponent.
The Catch
The main drawback here is that the layout gets needlessly destroyed and recreated with every route change. To see this in action, drop some console.log statements into the constructors of the layout, header, footer, and sidebar components. Navigate to /dashboard first, check the logs, then move to /users—you'll see the constructors fire twice.
Beyond the performance hit, this behavior adds friction when you need to retain any transient state across pages. For instance, if a user types a query into a search box in the header and then navigates away, that input is erased because the header is rebuilt from scratch. You could store the state elsewhere, but it’s unnecessary overhead.
Second Strategy: Leveraging Lazy-Loaded Modules
Here, the layout is placed in a dedicated module with its own routing, which we’ll name LayoutModule. The key shift is that all feature modules become lazy-loaded child routes nested inside this layout module.
Again, the root component template (AppComponent) only contains a <router-outlet>. The templates for FooterOnlyLayoutComponent and MainLayoutComponent stay identical to those from the first strategy.
Instead of importing feature modules directly into AppModule, we lazily load them from within LayoutRoutingModule:
…
const routes: Routes = [
 {
   path: '',
   redirectTo: '/dashboard',
   pathMatch: 'full'
 },
 {
   path: '',
   component: MainLayoutComponent,
   children: [
     { path: 'dashboard', loadChildren: '../dashboard/dashboard.module#DashboardModule' },
     { path: 'users', loadChildren: '../users/users.module#UsersModule' },
     { path: 'account-settings', loadChildren: '../account-settings/account-settings.module#AccountSettingsModule' },
   ]
 },
 {
   path: '',
   component: FooterOnlyLayoutComponent,
   children: [
     { path: 'login', loadChildren: '../login/login.module#LoginModule' },
     { path: 'registration', loadChildren: '../registration/registration.module#RegistrationModule' }
   ]
 },
];

@NgModule({
 imports: [RouterModule.forChild(routes)],
 exports: [RouterModule]
})
export class LayoutRoutingModule { }
At the feature level, each routing module simply declares an empty path with the desired component. The login routes would look like:
const routes: Routes = [
 { path: '', component: LoginComponent }
];
and for the dashboard:
const routes: Routes = [
 { path: '', component: DashboardComponent }
];
That covers the setup.
The result is the same—login and registration use FooterOnlyLayoutComponent, while the others rely on MainLayout—but this time, the layout pieces (header, footer, sidebar) aren’t torn down on every navigation. Drop in those console.log calls again, and you’ll see the layouts are only rebuilt when toggling between different layout types. Moving from /dashboard to /users preserves the layout, whereas hopping from /dashboard to /login forces a refresh.
Downsides
A minor annoyance is that all lazy-loaded modules and their base paths must be enumerated in LayoutRoutingModule, which can get unwieldy in bigger codebases. The larger concern is that this forces you into lazy loading, even when you’d rather avoid it. You might attempt to dodge this by specifying loadChildren like this:
...
const routes: Routes = [
 {
   path: '',
   redirectTo: '/dashboard',
   pathMatch: 'full'
 },
 {
   path: '',
   component: MainLayoutComponent,
   children: [
     { path: 'dashboard', loadChildren: () => DashboardModule },
     { path: 'users', loadChildren: () => UsersModule },
     { path: 'account-settings', loadChildren: () => AccountSettingsModule },
   ]
 },
 {
   path: '',
   component: FooterOnlyLayoutComponent,
   children: [
     { path: 'login', loadChildren: () => LoginModule },
     { path: 'registration', loadChildren: () => RegistrationModule }
   ]
 },
];

@NgModule({
 imports: [RouterModule.forChild(routes)],
 exports: [RouterModule]
})
export class LayoutRoutingModule { }
However, that trick only holds up without AOT compilation, which is a no-go for production (see the related issue).
Another workaround is to preload all lazy modules by setting a preload strategy in AppModule:
RouterModule.forRoot([], { preloadingStrategy: PreloadAllModules })
But doing so means the modules remain separate bundles, resulting in multiple files for the client to download—unlikely what you want if you aim for a single payload. Moreover, this isn’t ideal if you only intend to lazy load select modules; a custom preload strategy is possible, yet you’ll still get one file per module.
How AngularJS and UI-Router Tackled This
This challenge was far simpler with AngularJS paired with UI-Router, thanks to its named views. You’d start by declaring an abstract layout state:
$stateRegistry.register({
  name: 'layout',
  abstract: true,
  views: {
    '@': {
      templateUrl: 'layout.html',
    },
    'header@layout': {
      component: 'header'
    },
    'sidebar@layout': {
      component: 'sidebar'
    },
    'content@layout': {
      template: ''
    },
    'footer@layout': {
      component: 'footer'
    }
  }
});
followed by layout.html:
<div class="flex-column" ui-view="header"></div>
<div class="flex-row flex-100">
 <div class="flex-column" ui-view="sidebar"></div>
 <div class="flex-column flex" ui-view="content"></div>
</div>
<div class="flex-column" ui-view="footer"></app-footer>
When defining a state for an actual page, you designate the layout state as the parent and override the specific named view(s). The login state becomes:
$stateRegistry.register({
  parent: 'layout',
  name: 'login',
  url: '/login',
  views: {
    'content@layout': {
      component: 'login',
    },
    'header@layout': {
      component: ''
    },
    'sidebar@layout': {
      template: ''
    }
  }
});
and the dashboard state looks like:
$stateRegistry.register({
  parent: 'layout',
  name: 'dashboard',
  url: '/dashboard',
  views: {
    'content@layout': {
      component: 'dashboard',
    }
  }
});
Repeat this pattern for all remaining pages.
After setting this up, add a console.log to the $onDestroy hook of each component and start navigating. You’ll observe that the header, sidebar, and footer are never destroyed when toggling between /users and /dashboard. Even crossing over from a main-layout page to a footer-only-layout page keeps the footer intact.
Final Thoughts
While Angular’s router allows for some degree of layout reuse, both techniques described above feel somewhat clunky and forced. UI-Router handles it much more fluidly, even permitting shared components across distinct layouts, and React’s dynamic routing does similarly well.
If you’ve found a cleaner solution with Angular’s router, I’d love to hear about it in the comments below.
Update:
Third Strategy
Cheers to Alexander Carls and Lars Gyrup Brink Nielsen for their suggestions in the comments, which give us a third option that addresses all the earlier problems. The core idea: subscribe to router events and, on each NavigationEnd event, toggle visibility of layout components based on the current route. Here are two illustrations: