The mechanics of Angular code-splitting and shared components in lazy-loaded modules
If the Angular CLI build output feels intimidating, or you're simply curious about how the underlying code-splitting process works, this article is for you.
Code-splitting breaks your application into multiple bundles that can be fetched as needed. Done well, this technique can dramatically improve initial load times.
Table of contents
- Why does this matter?
- How Angular CLI splits code internally
- A basic Angular app with lazy modules
- Sharing components across lazy modules
- Final thoughts
Why does this matter?
Say you've just scaffolded a fresh Angular project. You've read plenty of guides on structuring your app, arranging folders, and — most critically — maintaining strong startup performance.
You chose Angular CLI and built a modular application packed with lazy-loaded feature modules. Naturally, you also set up a shared module for frequently used pipes, directives, and components.
Over time, you realize that when a new feature module needs something from another feature module, you tend to move that code into the shared module.
Your app keeps evolving, and eventually, startup time starts violating expectations — yours and, more importantly, your client's.
Now doubts creep in…
- If I place every pipe, directive, and component into one large shared module, then import that module in lazy-loaded modules (where only a couple of the exported features are used), won't I end up with duplicated, unused code in the build output?
- Conversely, if I split shared utilities across multiple shared modules and only import what each lazy module actually needs, does that shrink the final bundle size? Or does Angular already handle such optimizations out of the box?
Let's clear up the confusion.
What Angular CLI does behind the scenes
As everyone knows, the current Angular CLI relies on webpack for bundling. But webpack is also the engine responsible for code-splitting.
So let’s inspect how webpack accomplishes this.
Webpack 4 introduced SplitChunksPlugin, which lets you define rules for carving modules into chunks. Many developers find this configuration cryptic, yet it’s the most fascinating part of code-splitting.
However, before SplitChunksPlugin optimization kicks in, webpack already creates a chunk:
- for each entry point
Angular CLI defines these entry points:
main
polyfills
styles
These become chunks with identical names.
- for any module loaded dynamically (via
import()syntax which follows the ECMAScript dynamic import proposal)
Remember the loadChildren syntax? That is the cue for webpack to spawn a chunk.
Now let’s examine SplitChunksPlugin. It lives inside the optimization block of webpack.config.js.
Let’s check the Angular CLI source code and locate that configuration section:
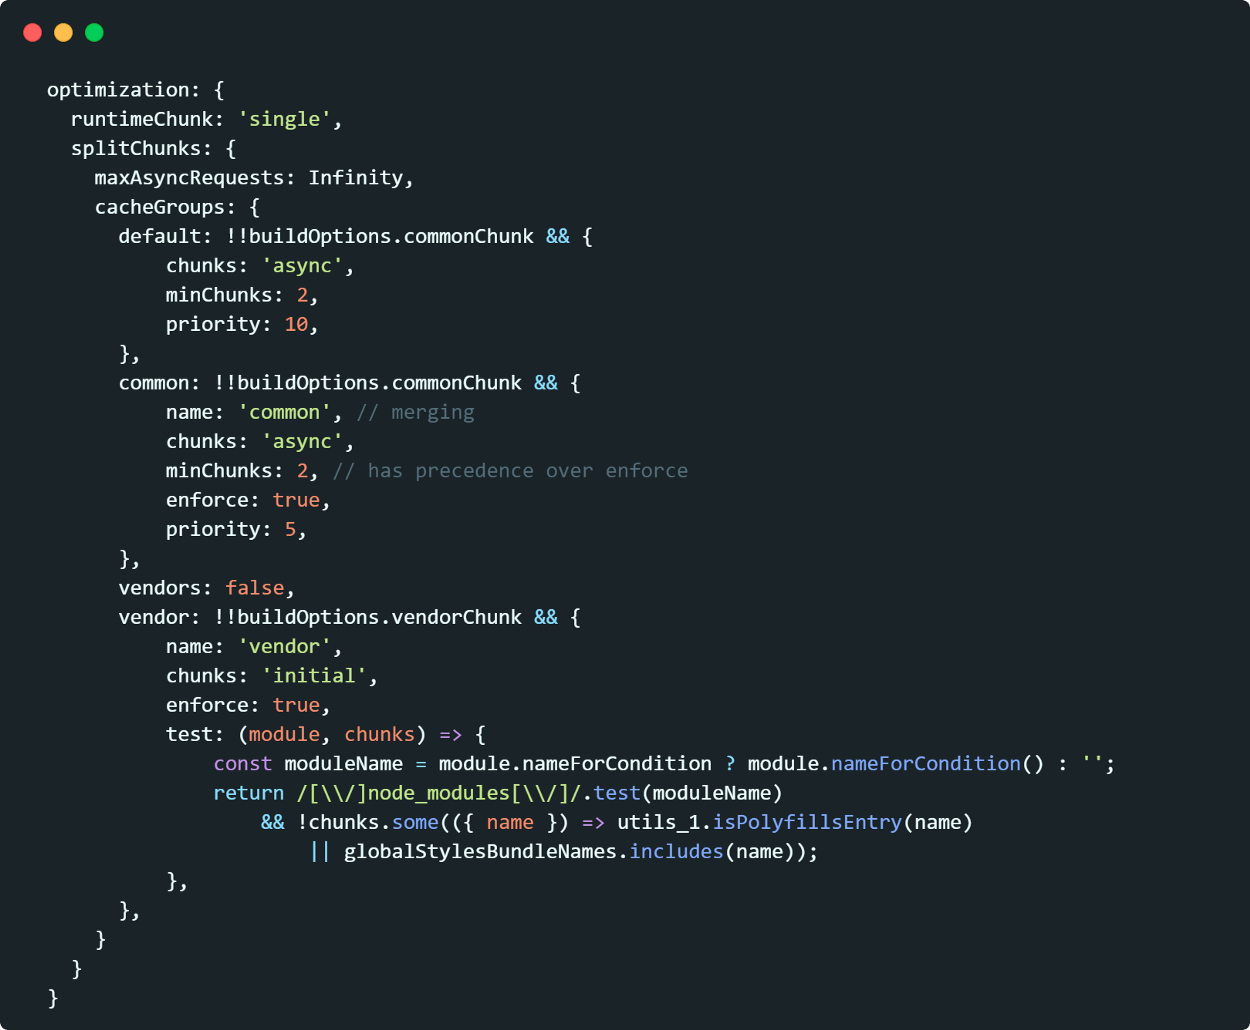
SplitChunksPlugin configuration in Angular CLI 8
We’ll concentrate on the cacheGroups option here — this is webpack’s “recipe” for producing separate chunks based on certain conditions.
cacheGroups is a simple object where the key is a group name. Conceptually, each cache group represents a candidate for creating a new chunk.
Each group supports many settings and can inherit options from the splitChunks level.
Let’s quickly review the options we saw in the Angular CLI configuration above:
chunksfilters modules between synchronous and asynchronous chunks. Possible values areinitial,async, orall. Theinitialvalue means modules are only included if they are imported inside synchronous chunks. Theasyncvalue means modules are only included when imported inside asynchronous chunks (this is the default).minChunksinstructs webpack to include modules in a chunk only when they’re shared between at least two chunks (the default is 1).nametells webpack what to call the new chunk. If you specify a string or a function that always returns the same string, all shared modules get merged into a single chunk.prioritydetermines which chunk wins when a module belongs to multiple chunk groups.enforcetells webpack to bypass minSize, minChunks, maxAsyncRequests, and maxInitialRequests options, always creating chunks for this cache group. One nuance: if any of those bypassed options appear at thecacheGrouplevel, that option will still be honored.testcontrols which modules this cache group selects. As we saw, Angular CLI uses this to move allnode_modulesdependencies into a dedicatedvendorchunk.minSizedefines the smallest allowed chunk size, in bytes, for issuing a new chunk. It wasn’t in the Angular CLI configuration, but it’s an important option you should know. (According to the source code, the default is 30kb in production and 10kb in development.)
Tip: although the webpack documentation lists defaults, you should check the webpack source to get the precise values.
Here’s the summary: Angular CLI routes a module to:
- the
vendorchunk if it originates from thenode_modulesfolder. - a
defaultchunk if that module is imported inside an async module and shared between at least two modules. Remember that several default chunks may appear simultaneously. Later I’ll explain how webpack builds names for these chunks. - the
commonchunk if that module is imported inside an async module and shared between at least two modules while missing out on the default chunk (thanks topriority) and regardless of chunk size (thanks to theenforceoption).
Enough theory — time to try it out.
A basic Angular app with lazy modules
To see how SplitChunksPlugin operates, we’ll build a simplified Angular application:
app
├── a(lazy)
│   └── a.component.ts
│   └── a.module.ts
│
├── ab
│   └── ab.component.ts
│   └── ab.module.ts
│
├── b(lazy)
│   └── b.component.ts
│   └── b.module.ts
│
└── c(lazy)
│   └── c.component.ts
│   └── c.module.ts
│
└── cd
│   └── cd.component.ts
│   └── cd.module.ts
│
└── d(lazy)
│   └── d.component.ts
│   └── d.module.ts
│
└── shared
│   └── shared.module.ts
│
└── app.component.ts
└── app.module.ts
Here a, b, c, and d are lazy modules, imported via the import() syntax.
Modules a and b use ab in their templates. Modules c and d use cd.
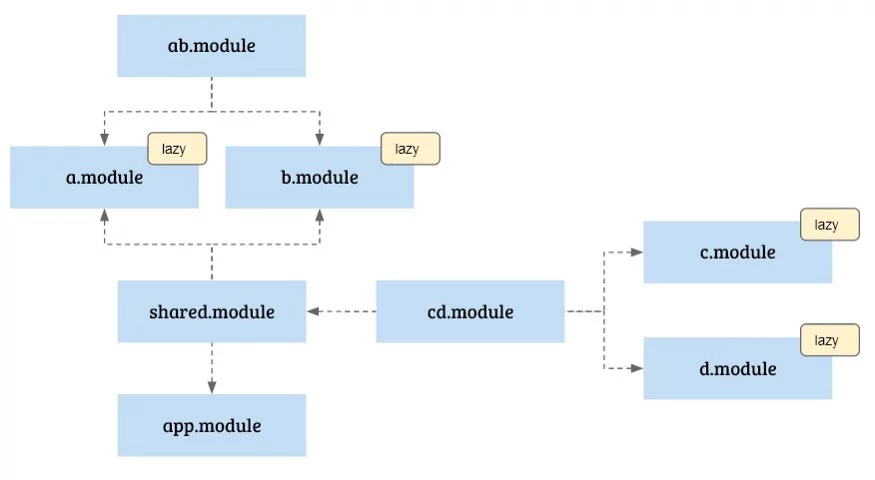
Dependencies between Angular modules
The key difference is that ab.module gets imported by both a.module and b.module, while cd.module gets imported by shared.module.
This setup mirrors the exact scenario we’re trying to demystify. Let’s figure out where ab and cd end up in the final output.
The algorithm
- SplitChunksPlugin begins by assigning an index to each previously generated chunk.
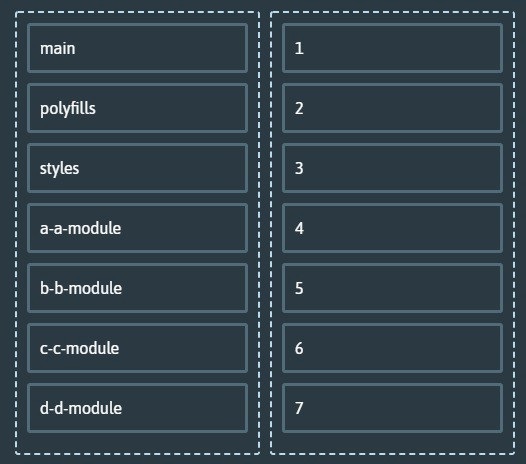
chunks by index
- Next, it iterates over every module in the compilation to populate the chunkSetsInGraph
Map. This dictionary tracks which chunks contain the same code.

chunkSetsInGraph
For instance, the row 1,2 main,polyfill indicates there’s at least one module present in both the main and polyfill chunks.
Because a and b rely on ab-module, the combination (4,5) also appears above.
- It goes through every module to determine if a new chunk can be formed for a given
cacheGroup.
3a) First, webpack checks whether a module qualifies for a specific cacheGroup using the cacheGroup.test property.
ab.module tests
default test undefined => ok
common test undefined => ok
vendor test function => false
Neither the default nor the common cache group defines a test property, so the module passes. The vendor cache group, however, uses a function that filters modules from the node_modules path.
cd.module undergoes the same checks.
3b) Next, webpack loops through all possible chunk combinations.
Each module knows which chunks it belongs to (via the module.chunksIterable property).
ab.module appears in two lazy chunks. That gives combinations (4), (5), and (4,5).
Meanwhile, cd.module lives only in the shared module, i.e., only the main chunk. So its sole combination is (1).
The plugin then filters combinations using the minChunk size:
if (chunkCombination.size < cacheGroup.minChunks) continue;
Since ab.module has the (4,5) combination, it passes this check. The same can’t be said for cd.module — so it stays inside the main chunk.
3c) One more filter applies: cacheGroup.chunks (initial, async, or all).
ab.module appears inside async (lazy) chunks, which is exactly what the default and common cache groups require. As a result, ab.module gets added to two potential new chunks (default and common).
I promised earlier, so here it is.
How webpack chooses a name for a SplitChunksPlugin chunk
A simplified version of this process looks like:

where:
groupNameis the cache group name (defaultin our case)~serves as thedefaultAutomaticNameDelimiterchunkNamesis the list of all chunk names in that set. It resembles afullPath, but uses a dash rather than a slash.
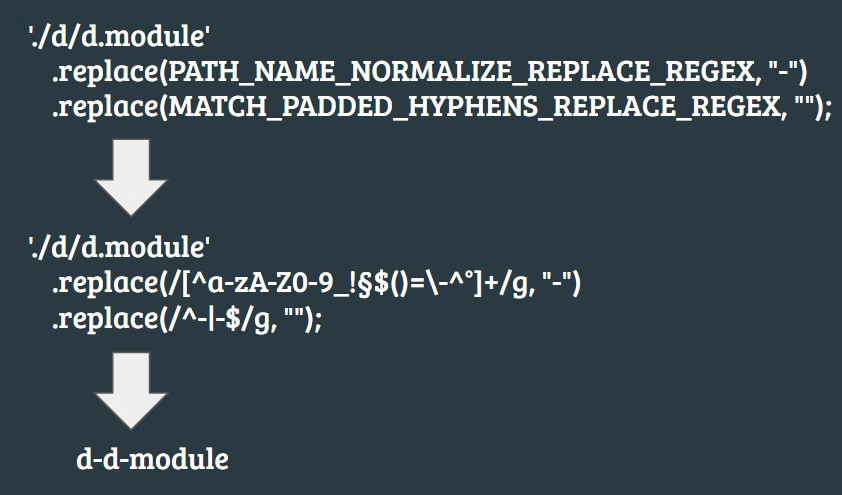
For example, d-d-module means there's a d.module file inside the d folder.
Given our earlier usage of import('./a/a.module') and import('./b/b.module'), we get:
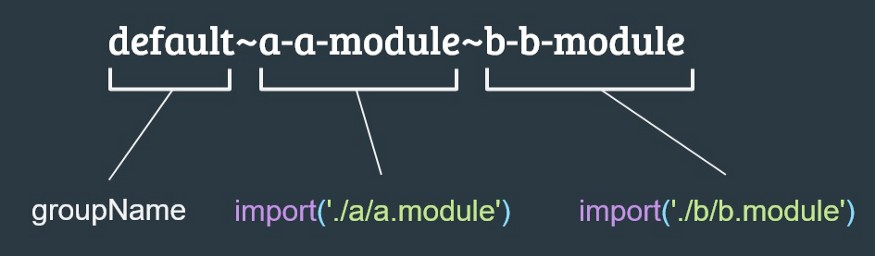
A relevant detail: once a chunk name hits 109 characters, webpack truncates it and appends a hash at the end.

Structure of a long chunk name spanning multiple lazy modules
We now have enough to fill chunksInfoMap — a map that records every candidate new chunk, the modules it should contain, and the current chunks holding those modules.

chunksInfoMap
Filtering the chunk candidates
SplitChunksPlugin walks through chunksInfoMap entries to identify the best match. What does that mean exactly?
The default cache group carries a priority of 10, which beats common (whose priority is 5). So default comes first.
Once other requirements are satisfied, webpack strips that chunk’s modules from every other entry in chunksInfoMap. If a candidate ends up with zero modules, it gets discarded.
Consequently, default~a-a-module~b-b-module takes precedence over the common chunk, which is removed because it contains the exact same modules.
The final step involves minor optimizations (like deduplication) and verifying constraints such as maxSize.
The full source of SplitChunksPlugin is available here.
We’ve seen that webpack generates chunks in three ways:
- for each entry point
- for dynamically loaded modules
- for shared code via SplitChunksPlugin
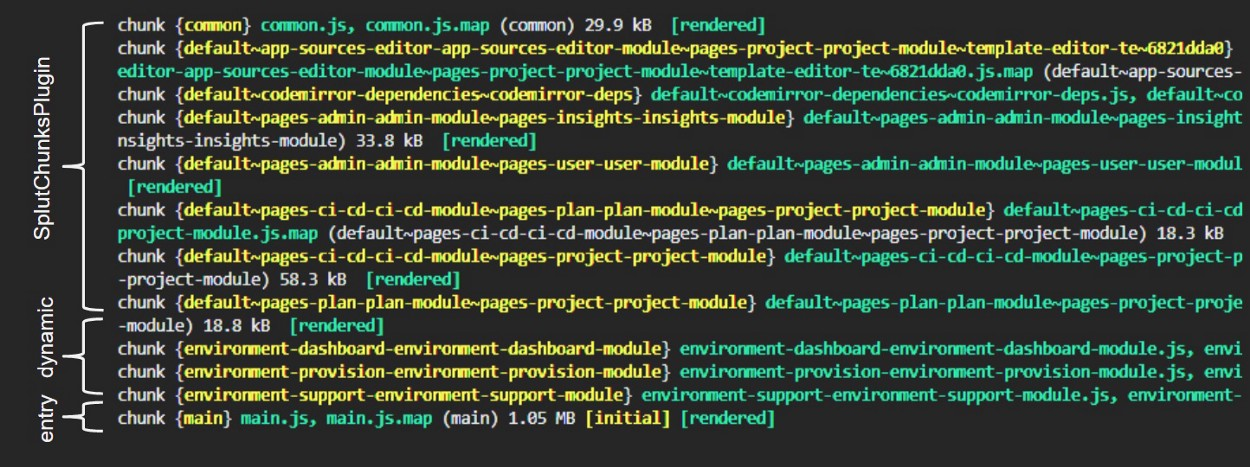
Angular CLI output classified by chunk type
Now let’s revisit our original concern about the optimal way to handle shared code.
Sharing components across lazy modules
In our small Angular app, webpack allocated a separate chunk for ab.module yet bundled cd.module into the main chunk.
Here are the crucial takeaways:
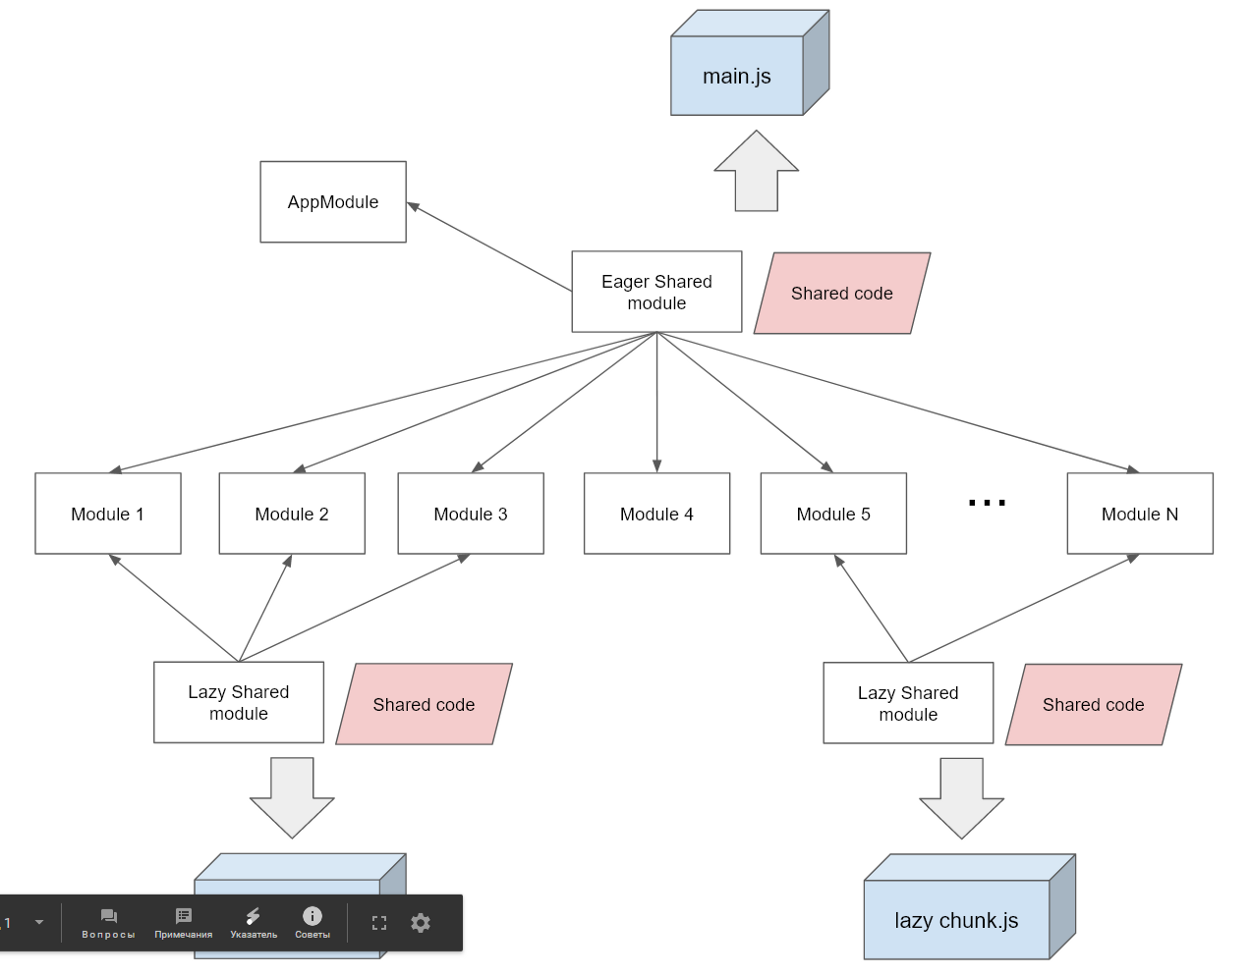
- If you place every shared pipe, directive, and component into one giant shared module and import it everywhere — including sync and async chunks — all that code ends up in the initial
mainchunk. If slow initial load time is your goal, that approach works. - If you split commonly used code across lazy-loaded modules instead, webpack will create a separate shared chunk that is only fetched when one of those lazy modules loads. This typically speeds up the initial load. Use this wisely, though — sometimes putting small code into one chunk beats the extra network round-trip for another request.
Conclusion
Hopefully, you now have a clearer grasp of Angular CLI’s output and can tell apart entry chunks, dynamic chunks, and chunks produced by SplitChunksPlugin.
Happy coding!