
Update:
Give Ivy jit mode a shot
https://alexzuza.github.io/ivy-jit-preview/ ?
Time to peek at what Angular has in store for us

Fan of Angular-In-Depth? Support us on Twitter!

**Disclaimer:**** this is just my personal exploration of the new Angular renderer**
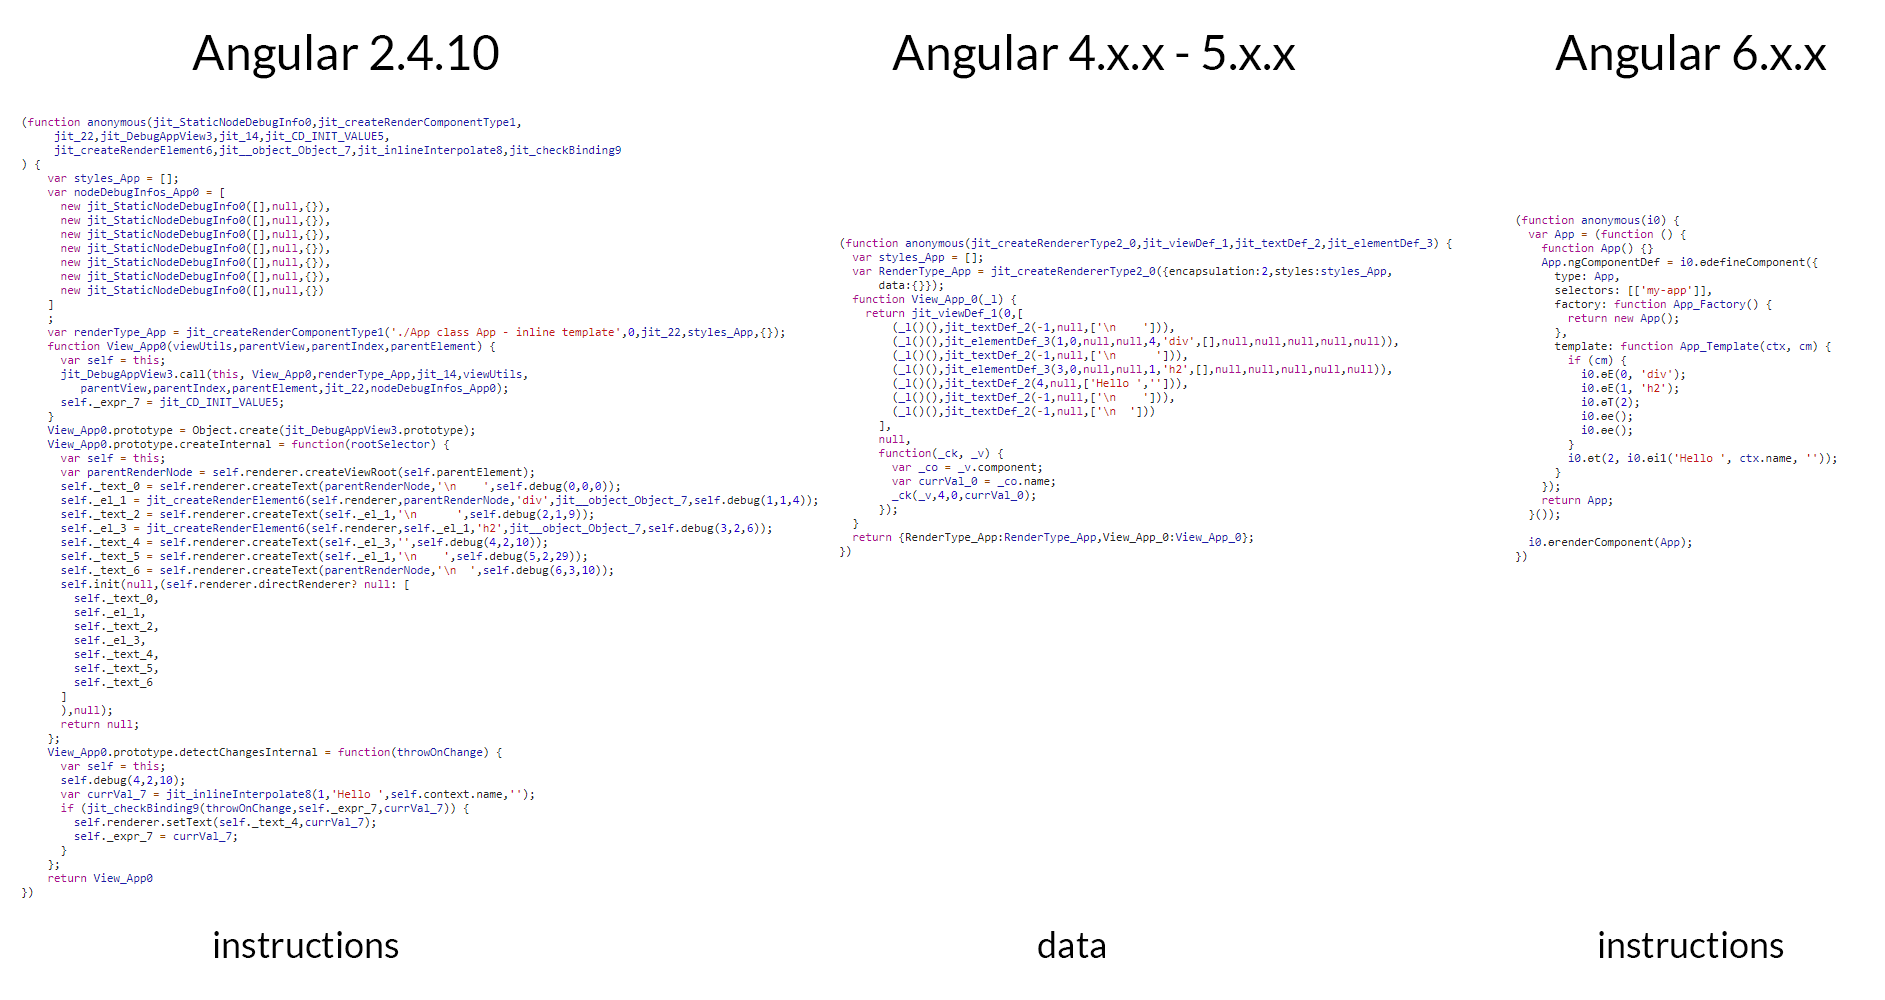
The Path of the Angular View Engine
Given that the fledgling Ivy renderer isn't fully fleshed out yet, there's plenty of curiosity about its inner workings and the shifts it will bring.
My aim here is to map out the Ivy change detection flow, highlight features that genuinely excite me, and craft a minimal application built on instruction-like primitives, mirroring Angular Ivy's approach, starting from zero.
First off, let's set up the application under examination:
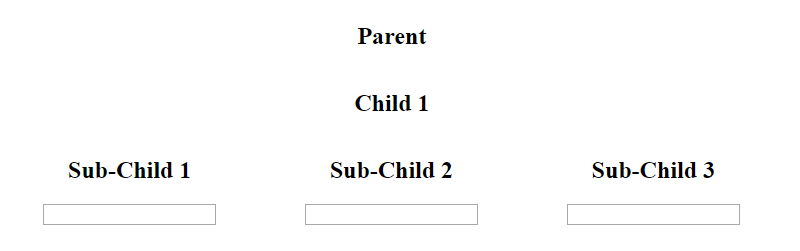
@Component({
  selector: 'my-app',
  template: `
   <h2>Parent</h2>
   <child [prop1]="x"></child>
  `
})
export class AppComponent {
  x = 1;
}
@Component({
  selector: 'child',
  template: `
   <h2>Child {{ prop1 }}</h2>
   <sub-child [item]="3"></sub-child>
   <sub-child *ngFor="let item of items" [item]="item"></sub-child>
  `
})
export class ChildComponent {
  @Input() prop1: number;

  items = [1, 2];
}
@Component({
  selector: 'sub-child',
  template: `
   <h2 (click)="clicked.emit()">Sub-Child {{ item }}</h2>
   <input (input)="text = $event.target.value">
   <p>{{ text }}</p>
  `
})
export class SubChildComponent {
  @Input() item: number;
  @Output() clicked = new EventEmitter();
  text: string;
I've put together a live demo to help grasp the mechanics beneath the surface:
https://alexzuza.github.io/ivy-cd/
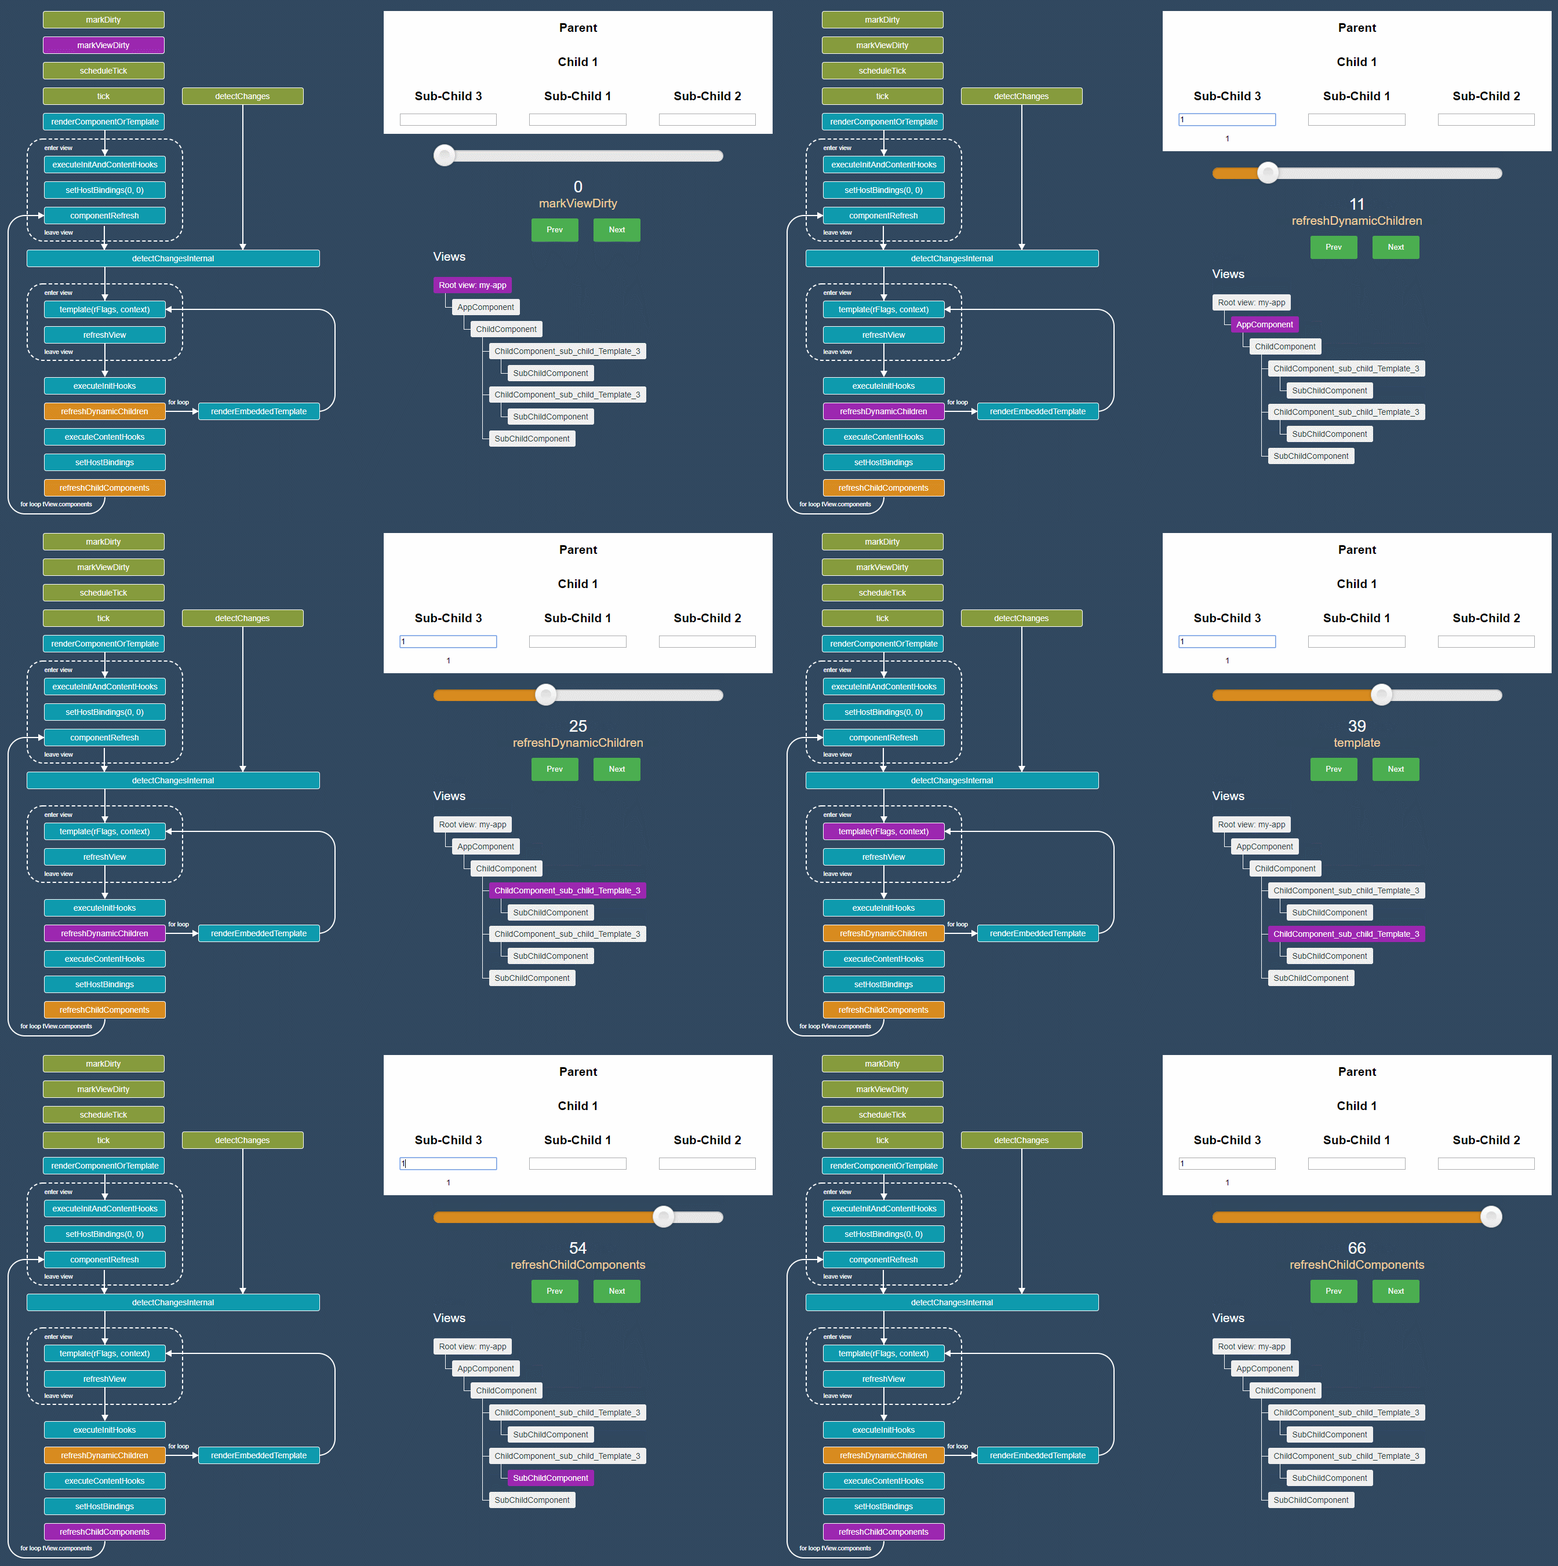
The demo makes use of the angular 6.0.1 aot compiler. Feel free to click any lifecycle block to jump to its definition.
To kick off change detection, simply enter text into one of the inputs situated below Sub-Child.
View
Naturally, the view stands as the core low-level abstraction in Angular.
For our scenario, the outcome resembles:
Root view
   |
   |___ AppComponent view
          |
          |__ ChildComponent view
                 |
                 |_ Embedded view
                 |       |
                 |       |_ SubChildComponent view
                 |
                 |_ Embedded view
                 |       |
                 |       |_ SubChildComponent view
                 |
                 |_ SubChildComponent view
A view is meant to depict a template, thus it carries data that mirrors the template’s structure.
Let’s examine the ChildComponent view. Its template is:
<h2>Child {{ prop1 }}</h2>
<sub-child [item]="3"></sub-child>
<sub-child *ngFor="let item of items" [item]="item"></sub-child>

<h2>Child {{ prop1 }}</h2>
<sub-child \[item\]="3"></sub-child
><sub-child \*ngFor="let item of items" \[item\]="item"></sub-child>
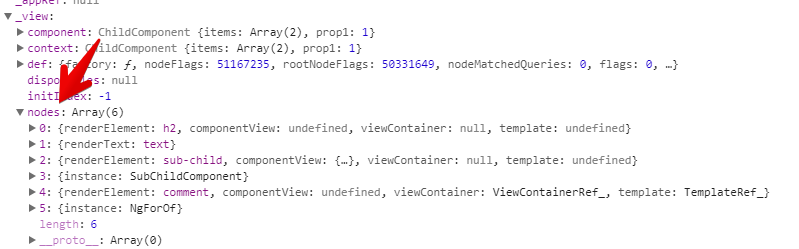
**Ivy generates LNodes** from instructions embedded in the ngComponentDef.template function, and **saves** them into the **data** array:
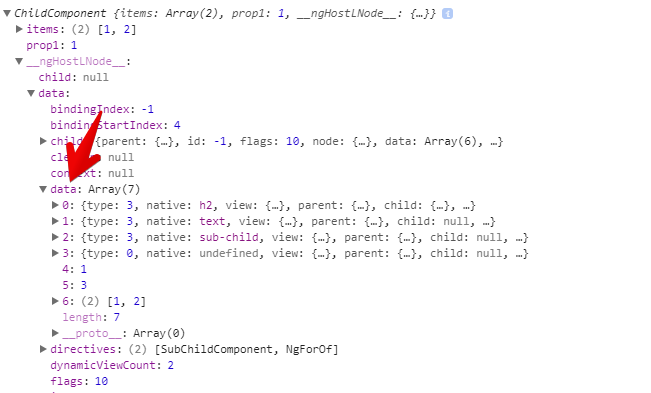
Alongside nodes, the fresh view packs bindings into the **data** array (check data[4], data[5], data[6] in the above figure). Every binding tied to a view is stored sequentially based on its template order, starting from bindingStartIndex.
Notice how the view instance is obtained from ChildComponent. **ComponentInstance.__ngHostLNode__**** holds a reference to the component's host node. (Injecting ChangeDetectorRef is another route)**
Thus, Angular establishes the root view first and drops the host element at index 0 in the data array
RootView
   data: [LNode]
             native: root component selector
then iterates over all components, populating the **data** array for each individual view.
Change detection
The familiar ChangeDetectorRef is essentially an abstract class featuring abstract methods such as detectChanges, markForCheck, and others.
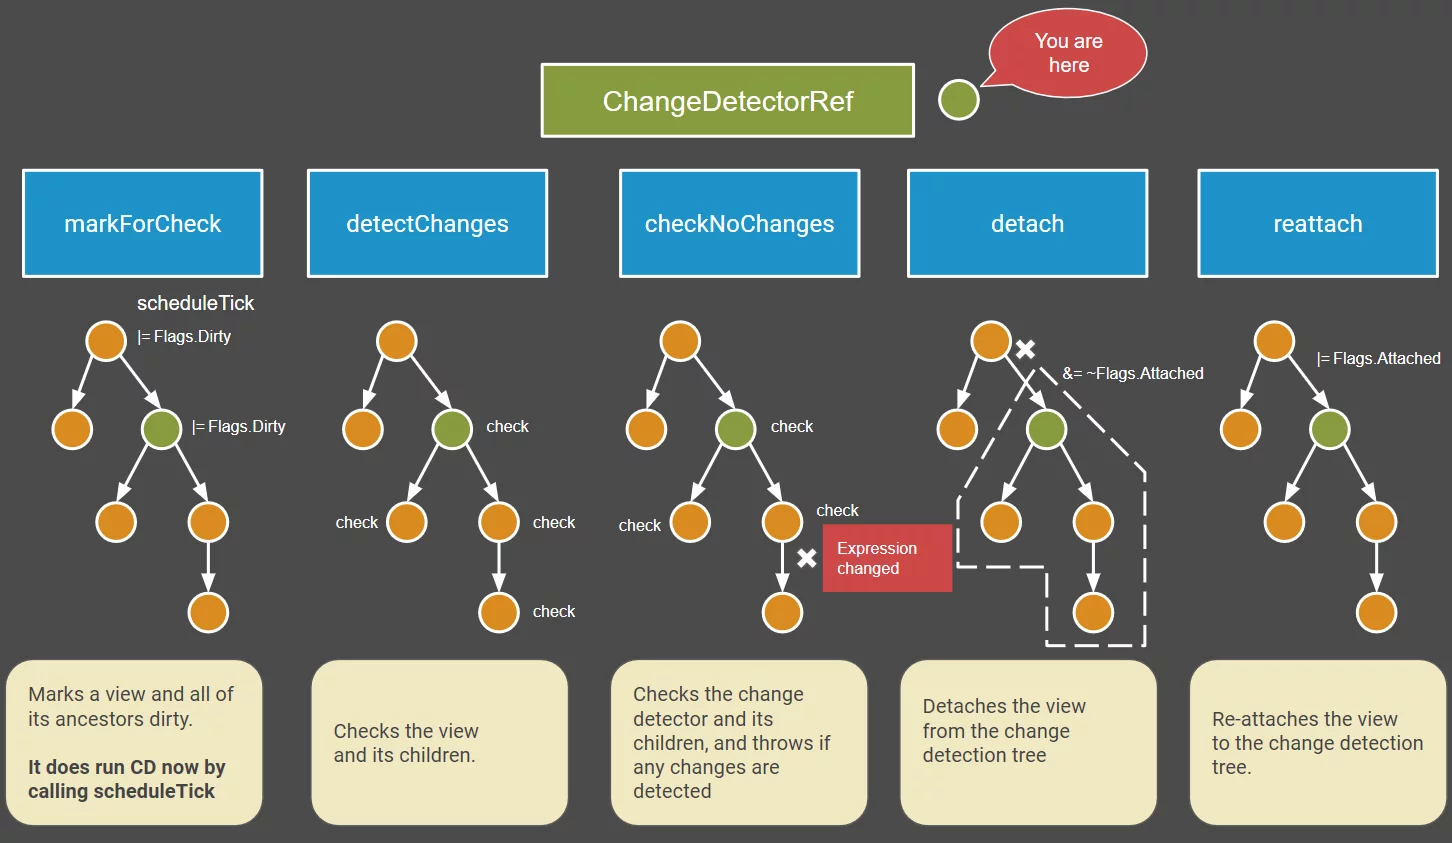
When this dependency is requested in a component constructor, what actually gets injected is a **ViewRef** instance, which extends the ChangeDetectorRef class.
Now, let's dive into the internal routines responsible for executing change detection in Ivy. A few are exposed via the public API (markViewDirty and detectChanges), but the rest remain uncertain to me.
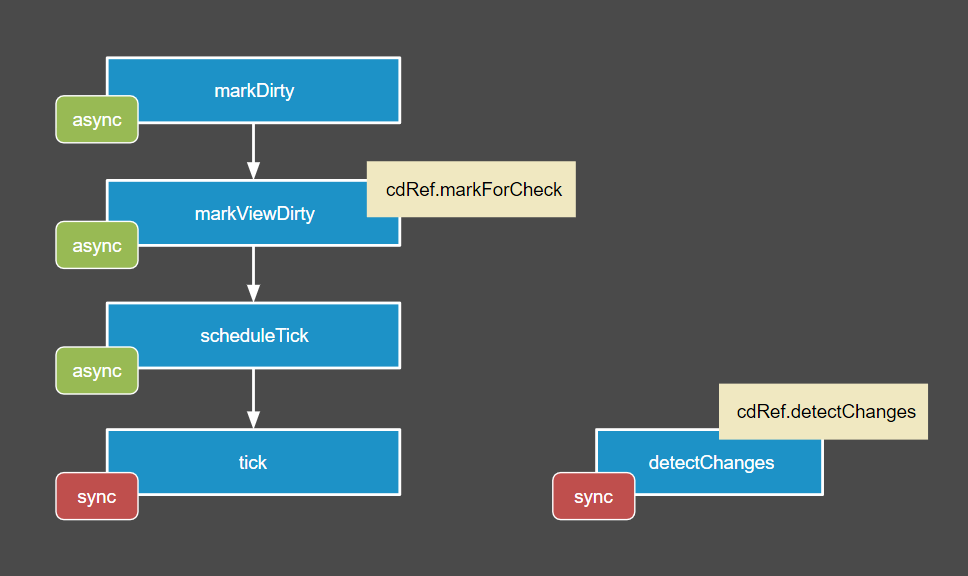
detectChanges
This method performs change detection synchronously for a given component and its child components.
Calling this function runs change detection synchronously on a component. Direct invocation is rarely necessary since the recommended approach is to call **use markDirty**and let the scheduler handle the actual change detection at a later point. This design stems from the fact that a single user interaction can invalidate many components, and running change detection synchronously for each one would be wasteful. A better strategy is to wait until all components are marked as dirty and then execute one unified change detection pass across them.
export function detectChanges<T>(component: T): void {
  const hostNode = _getComponentHostLElementNode(component);
  ngDevMode && assertNotNull(hostNode.data, 'Component host node should be attached to an LView');
  const componentIndex = hostNode.tNode !.flags >> TNodeFlags.DirectiveStartingIndexShift;
  const def = hostNode.view.tView.directives ![componentIndex] as ComponentDef<T>;
  detectChangesInternal(hostNode.data as LView, hostNode, def, component);
}
tick
This executes change detection across the entire application.
It functions like `detectChanges` but operates on the root component. Furthermore, `tick` runs lifecycle hooks and conditionally evaluates components based on their `ChangeDetectionStrategy` and whether they are dirty.
export function tick<T>(component: T): void {
  const rootView = getRootView(component);
  const rootComponent = (rootView.context as RootContext).component;
  const hostNode = _getComponentHostLElementNode(rootComponent);

  ngDevMode && assertNotNull(hostNode.data, 'Component host node should be attached to an LView');
  renderComponentOrTemplate(hostNode, rootView, rootComponent);
}
scheduleTick
This schedules change detection for the whole application. In contrast to tick, scheduleTick merges multiple invocations into a single change detection cycle. This is typically triggered indirectly when markDirty is called to signal that a view needs re-rendering.
export function scheduleTick<T>(rootContext: RootContext) {
  if (rootContext.clean == _CLEAN_PROMISE) {
    let res: null|((val: null) => void);
    rootContext.clean = new Promise<null>((r) => res = r);
    rootContext.scheduler(() => {
      tick(rootContext.component);
      res !(null);
      rootContext.clean = _CLEAN_PROMISE;
    });
  }
}
markViewDirty(markForCheck)
This flags the current view and all its parent views as dirty.
While in Angular 5 this operation simply traversed upward and enabled checks for all parent views, it's crucial to understand that now **markForCheck actively triggers a change detection cycle in Ivy!!!**
export function markViewDirty(view: LView): void { let currentView: LView|null = view; while (currentView.parent != null) { currentView.flags |= LViewFlags.Dirty; currentView = currentView.parent; } currentView.flags |= LViewFlags.Dirty; ngDevMode && assertNotNull(currentView !.context, 'rootContext'); scheduleTick(currentView !.context as RootContext);}
markDirty
This flags a component as dirty, indicating it needs change detection.
This action schedules a future change detection run for the component. If the component is already marked as dirty, calling this again has no effect. A single change detection can be scheduled per component tree. Moreover, components bootstrapped separately using `renderComponent` have their own independent schedulers.
export function markDirty<T>(component: T) {
  ngDevMode && assertNotNull(component, 'component');
  const lElementNode = _getComponentHostLElementNode(component);
  markViewDirty(lElementNode.view);
}
checkNoChanges
No new developments here:)
While debugging the new change detection mechanism, I discovered that **I had neglected to install zone.js** Surprisingly, everything functioned flawlessly without this dependency and without explicitly calling cdRef.detectChanges or tick. Why is that?
By design, Angular triggers change detection for onPush components only under specific conditions (also discussed in my stackoverflow answer).
These same rules are enforced in Ivy:
- **A change in one of the Input bindings** https://github.com/angular/angular/blob/43d62029f0e2da0150ba6f09fd8989ca6391a355/packages/core/src/render3/instructions.ts#L890
- **An event, bound within the component or its descendants, is triggered** https://github.com/angular/angular/blob/43d62029f0e2da0150ba6f09fd8989ca6391a355/packages/core/src/render3/instructions.ts#L1743
- **`markForCheck` is called manually** (which is now handled by the
markViewDirtyfunction, as we'll see later)
In my SubChildComponent, I have an `(input)` output binding. The second rule above causes **markForCheck** to be invoked. Given that this method, as we've established, actually initiates change detection, it becomes clear how this functions without zone.js.
**Is the "Expression has changed after it was checked" error still present?**
Rest assured, it remains:)
Change detection order
Since the announcement of Ivy, the Angular team has diligently worked to ensure the new engine respects the correct order of lifecycle hooks. This means the sequence of operations should remain consistent.
Max NgWizard K astutely observed in his article:
All the well-known operations are present. Yet, the order appears to have been modified. For example, it now seems Angular checks child components before processing embedded views. However, as there's no compiler output yet to test these assumptions, I can't be absolutely certain.
Let's revisit ChildComponent from my simple application.
<h2>Child {{ prop1 }}</h2>
<sub-child [item]="3"></sub-child>
<sub-child *ngFor="let item of items" [item]="item"></sub-child>
My intention was to place a standard sub-child component before those within an embedded view.
Now, let's observe this in action:
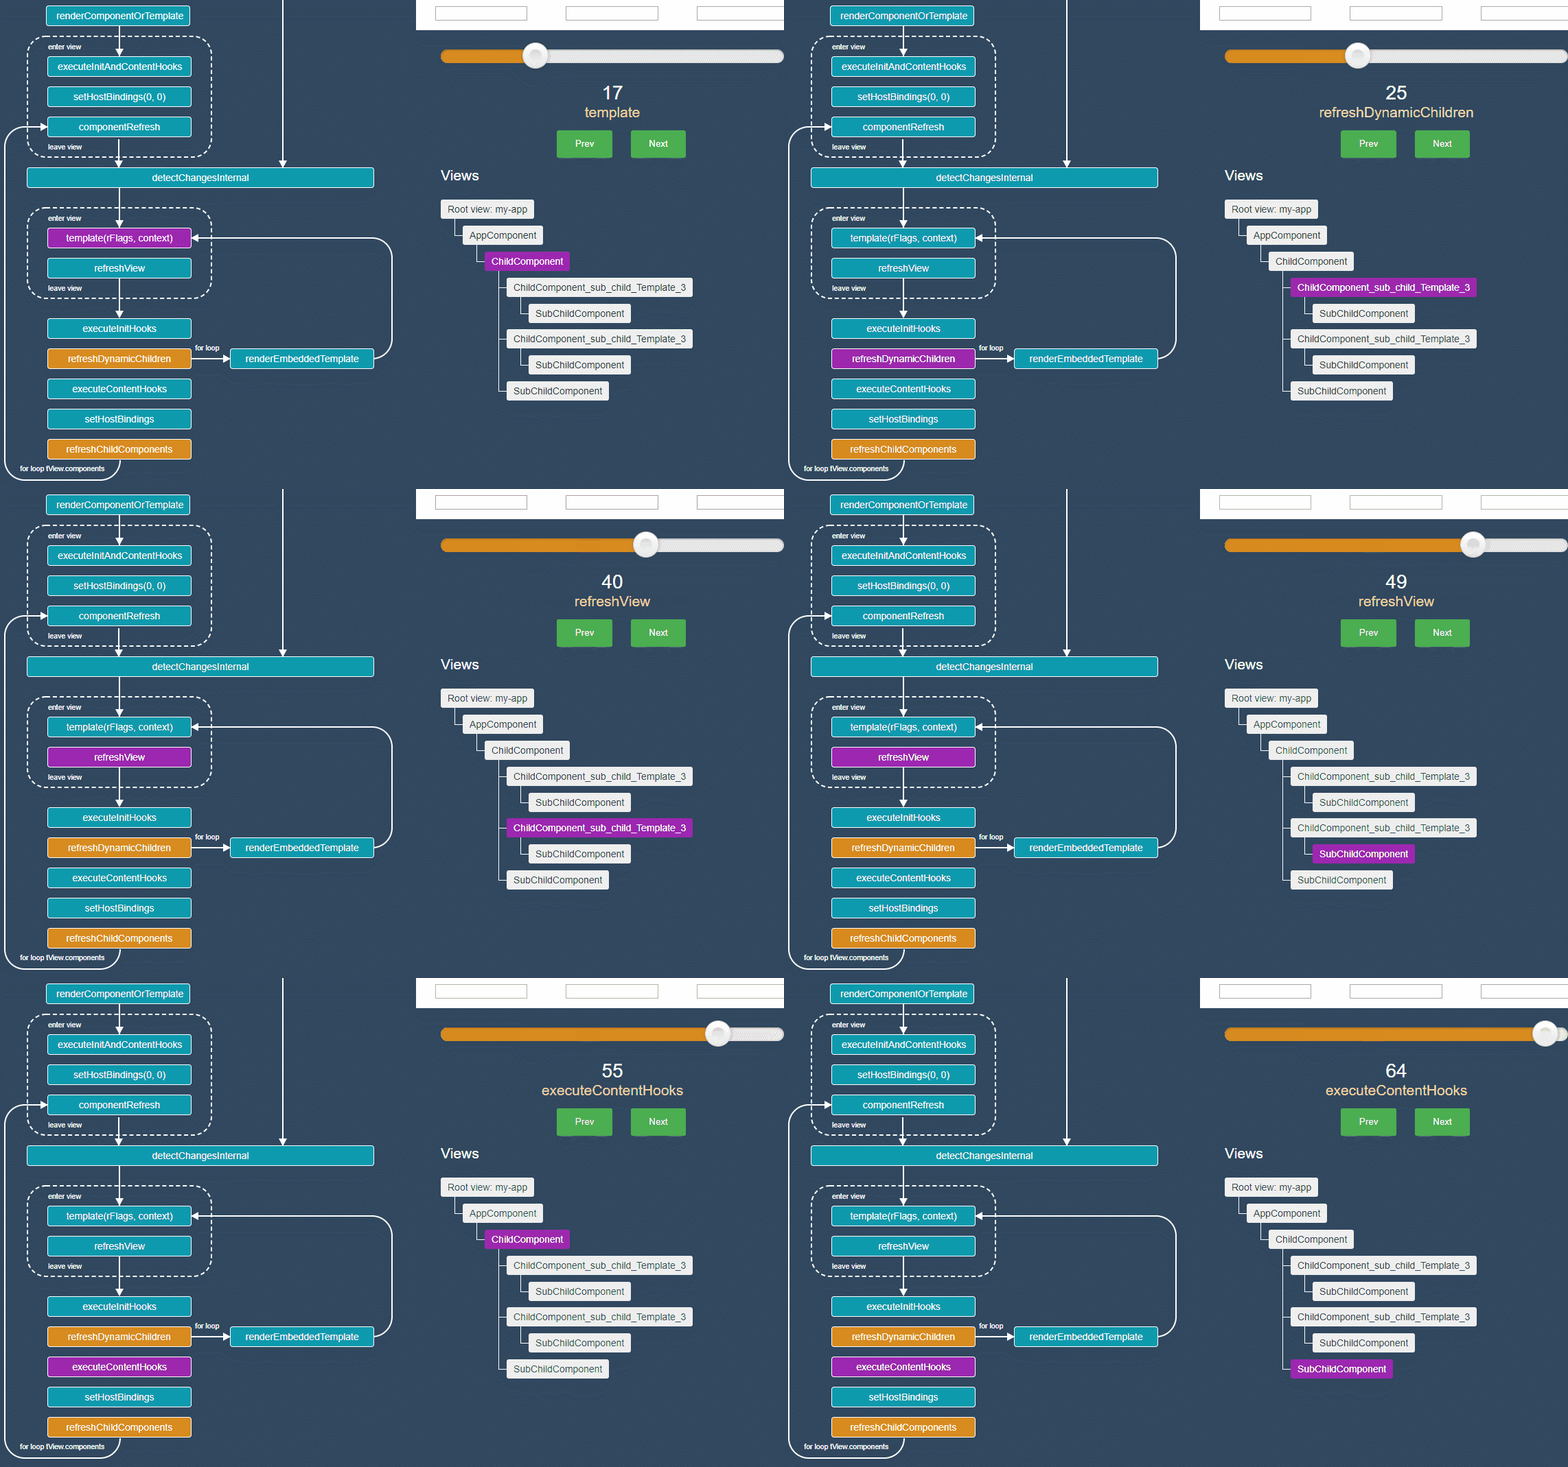
We can observe that Angular processes the embedded view first, followed by the regular component, which is consistent with the previous engine's behavior.
Interestingly, you can use the optional "run Angular compiler" button in my demo to test various other scenarios.
https://alexzuza.github.io/ivy-cd/
One-time string initialization
Consider a component that receives a color value as a string input. Now, what if we need to pass a constant string that will remain unchanged?
<comp color="#efefef"></comp>
This is known as one-time string initialization, and the angular documentation states:
Angular sets it and forgets about it.
To me, this implies Angular won't perform any further checks on this binding. However, in Angular 5, we can see it's checked during every change detection cycle within the updateDirectives call.
function updateDirectives(_ck,_v) {
   var currVal_0 = '#efefef';
  _ck(_v,1,0,currVal_0);
For more details, check out the excellent article “Getting to Know the @Attribute Decorator in Angular” on this topic by Netanel Basal
Now, let's examine how the new engine handles this:
var _c0 = ["color", "#efefef"];
AppComponent.ngComponentDef = i0.ɵdefineComponent({
  type: AppComponent,
  selectors: [["my-app"]],
  ...
  template: function AppComponent_Template(rf, ctx) {
    // create mode
      if (rf & 1) {
        i0.ɵE(0, "child", _c0); <========== used only in create mode
        i0.ɵe();
      }
      if (rf & 2) {
        ...
      }
  }
})
As depicted, the Angular compiler stores the constant outside the code used for component's creation and update logic, and **only references this value during the creation phase.**
Angular no longer creates text nodes for containers
**Update:**** https://github.com/angular/angular/pull/24346**
Even if you haven't delved deeply into how Angular's ViewContainer operates internally, you might have noticed the following pattern in your devtools:
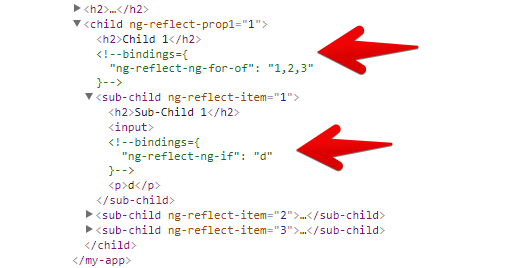
In production mode, we see only
<!—-->.
In contrast, here is what Ivy outputs:
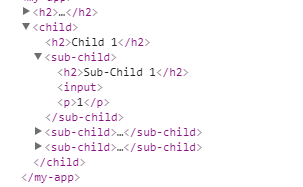
While I can't guarantee it with 100% certainty, it appears Ivy will yield a similar outcome once it's stable.
Consequently, the query in the code snippet below
@Component({
  ...,
  template: '<ng-template #foo></ng-template>'
})
class SomeComponent {
  @ViewChild('foo', {read: ElementRef}) query;
}
will return null since Angular
should no longer retrieve an ElementRef with a native element pointing to the comment DOM node from containers
Incremental DOM(IDOM) from scratch
Quite a while ago, Google introduced the incremental DOM library.
Its purpose is to construct DOM trees and facilitate dynamic updates. It wasn't meant for direct use, but rather as a compilation target for template engines. It seems that **Ivy shares some core concepts with the incremental DOM library**.
Let's build a simple application from the ground up to illustrate the IDOM rendering process. **Demo**
Our app will feature a counter and also display a user name that we type into an input field.
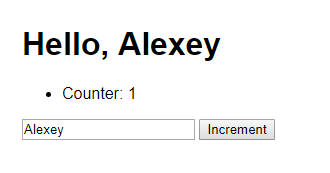
Let's assume we already have an <input> and a <button> element on our page:
<input type="text" value="Alexey" /> <button>Increment</button>
Our task is to render dynamic HTML that looks like this:
<h1>Hello, Alexey</h1>
<ul>
  <li>Counter: <span>1</span></li>
</ul>
To accomplish this, we'll write elementOpen, elementClose, and text "instructions" (I use this term because Ivy can be thought of as a special type of virtual CPU).
First, we need some helper functions to traverse the node tree:
// The current nodes being processed
let currentNode = null;
let currentParent = null;

function enterNode() {
  currentParent = currentNode;
  currentNode = null;
}
function nextNode() {
  currentNode = currentNode
    ? currentNode.nextSibling
    : currentParent.firstChild;
}
function exitNode() {
  currentNode = currentParent;
  currentParent = currentParent.parentNode;
}
Next, we'll define the instructions themselves:
function renderDOM(name) {
  const node =
    name === '#text'
      ? document.createTextNode('')
      : document.createElement(name);

  currentParent.insertBefore(node, currentNode);

  currentNode = node;

  return node;
}

function elementOpen(name) {
  nextNode();
  const node = renderDOM(name);
  enterNode();

  return currentParent;
}

function elementClose(node) {
  exitNode();

  return currentNode;
}

function text(value) {
  nextNode();
  const node = renderDOM('#text');

  node.data = value;

  return currentNode;
}
Essentially, these functions walk through the DOM nodes and insert a new node at the current position. The text instruction also sets the data property, allowing the browser to display the text value.
To allow our elements to maintain a state, let's introduce a NodeData structure:
const NODE_DATA_KEY = '__ID_Data__';

class NodeData {
  // key
  // attrs

  constructor(name) {
    this.name = name;
    this.text = null;
  }
}

function getData(node) {
  if (!node[NODE_DATA_KEY]) {
    node[NODE_DATA_KEY] = new NodeData(node.nodeName.toLowerCase());
  }

  return node[NODE_DATA_KEY];
}
Now, let's modify our renderDOM function so it avoids adding a new element to the DOM if one already exists at the current position:
const matches = function(matchNode, name/*, key */) {
  const data = getData(matchNode);
  return name === data.name // && key === data.key;
};

function renderDOM(name) {
  if (currentNode && matches(currentNode, name/*, key */)) {
    return currentNode;
  }

  ...
}
Take note of my /*, key */ comment. It's beneficial for our elements to have a key for identification. For more, see http://google.github.io/incremental-dom/#demos/using-keys
After that, let's add the logic for updating text nodes:
function text(value) {
  nextNode();
  const node = renderDOM('#text');

  // update
  // checks for text updates
  const data = getData(node);
  if (data.text !== value) {
    data.text = value;
    node.data = value;
  }
  // end update

  return currentNode;
}
We can apply the same pattern to element nodes.
Let's then create a patch function that accepts a **DOM element**, an update function, and some **data** that the function will consume:
function patch(node, fn, data) {
  currentNode = node;

  enterNode();
  fn(data);
  exitNode();
}
Finally, let's run our instructions:
function render(data) {
  elementOpen('h1');
  {
    text('Hello, ' + data.user);
  }
  elementClose('h1');
  elementOpen('ul');
  {
    elementOpen('li');
    {
      text('Counter: ');
      elementOpen('span');
      {
        text(data.counter);
      }
      elementClose('span');
    }
    elementClose('li');
  }

  elementClose('ul');
}

document.querySelector('button').addEventListener('click', () => {
  data.counter++;
  patch(document.body, render, data);
});
document.querySelector('input').addEventListener('input', (e) => {
  data.user = e.target.value;
  patch(document.body, render, data);
});

const data = {
  user: 'Alexey',
  counter: 1,
};

patch(document.body, render, data);
The result is available here
You can also verify with browser tools that only the text node with the changed content is updated:
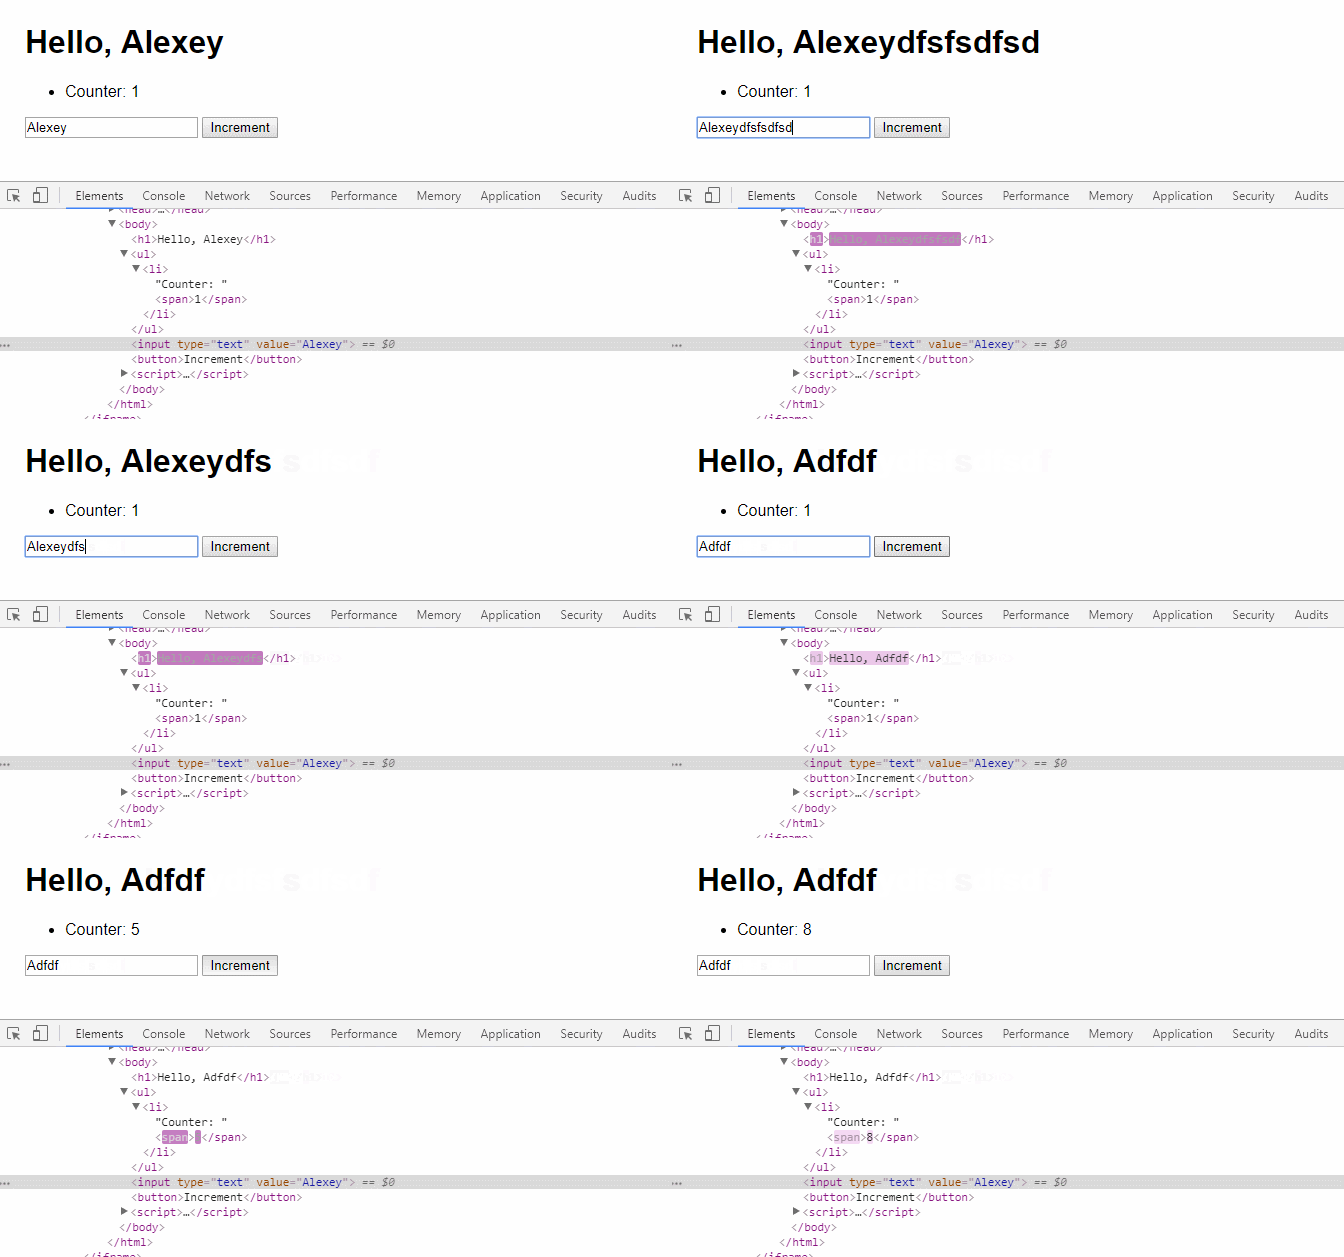
The fundamental principle of IDOM is **to leverage the real DOM itself to diff against new trees.**
That's all for now. Thank you for reading…