Incremental Builds – A First Look
Incremental builds focus on rebuilding only the parts of the repository that actually changed, which can significantly reduce build times. The repository is split into multiple applications to make this possible. As a result, only the application that was modified needs to be rebuilt, and the same logic applies when running tests.
You can add another application to a workspace with this command:
ng g app milesLibraries are the way to share code across different applications:
ng g lib authAll applications and libraries created this way live in the same workspace and repository, so there is no need to publish the libraries to npm:
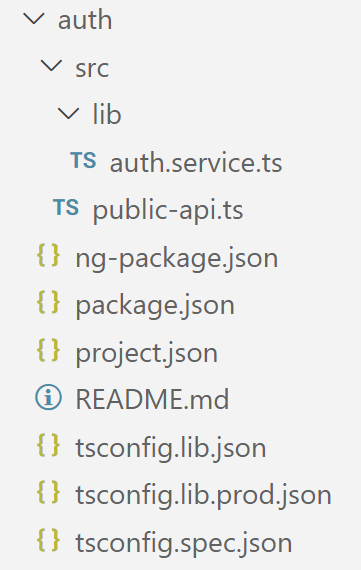
The file public-api.ts, which is sometimes named index.ts, serves a specific purpose. It is the library's public interface:
// public-api.ts

export * from "./lib/auth.service";
Everything exported here is accessible to other libraries and applications. Anything else is treated as an internal implementation detail. For other libraries and applications within the same workspace to use a library, a path mapping needs to be configured in the main tsconfig.json:
[…]
"paths": {
  "@demo/auth": [
    "auth/src/public-api.ts"
  ],
  […]
}
[…]
Running ng g lib sets up this path mapping automatically. However, the Angular CLI's implementation can point the mapping to the dist folder, which is the compiled output. This would mean the library has to be rebuilt after every change. To sidestep that tedious workflow, the mapping in the listing above points to the source version of the public API. The tool Nx, which we will look at shortly, handles this automatically, unlike the CLI.
Once the path mapping is in place, individual applications and libraries can import from the public API:
import { AuthService } from "@demo/auth";Nx: More Convenient and More Capable
The approach described above works, but it has a drawback: developers have to know which applications changed and manually trigger the right build command. A build server would also likely rebuild and test every application just to be safe.
A better solution is to let the tooling detect which applications were affected. One way to do this is by calculating a hash of all source files that contribute to an application. When that hash changes, it is a good indication that the application needs to be rebuilt or tested.
Nx is a widely used tool that supports this concept and offers many extra features. It works with Angular as well as other technologies like React and Node.js backends, and it integrates a range of tools commonly used in web development. These include testing frameworks like Jest, Cypress, and Playwright, the npm server verdaccio, and Storybook for interactive component documentation. Developers can start using these tools right away without any setup overhead.
For incremental builds, Nx relies on a build cache. Because Nx automatically analyzes dependencies between different parts of the codebase, these mechanisms generally do not require manual configuration. Angular developers will find Nx quite familiar: the Nx CLI works much like the Angular CLI. You just replace the ng command with nx, and most of the arguments remain the same (nx build, nx serve, nx g app, nx g lib, etc.). You install the Nx CLI via npm:
npm i -g nxTo set up a new Nx workspace, use this command:
npm init nx-workspace myWorkspaceNameThis command makes npm load a script that creates an Nx workspace with the current Nx version. There are also scripts for migrating an existing CLI workspace to Nx, but they do not always enable the full set of Nx features. In practice, we have found it more reliable to create a new Nx workspace and, if needed, copy the existing source code into it. As with the Angular CLI, the workspace can be divided into multiple applications and libraries:
nx g app appName

nx g lib libName
Running this command:
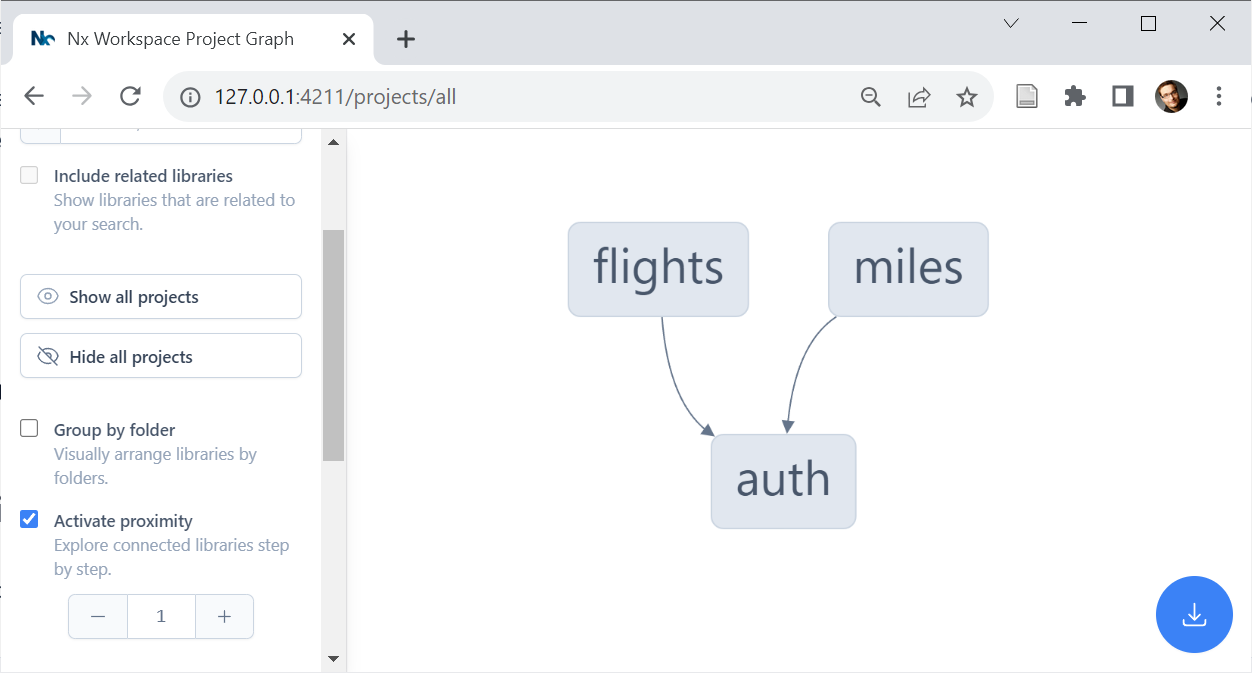
nx graphshows the dependencies between applications and libraries:
Incremental Builds with Nx
The same dependency graph that Nx uses for analysis is the foundation for the incremental builds that come out of the box. To build a specific project, you can use nx build:
nx build milesIf the source files that feed into the affected application are unchanged, you get the result from the local cache instantly. By default, that cache lives under node_modules/.cache/nx.
You can also tell Nx to rebuild specific projects or all of them:
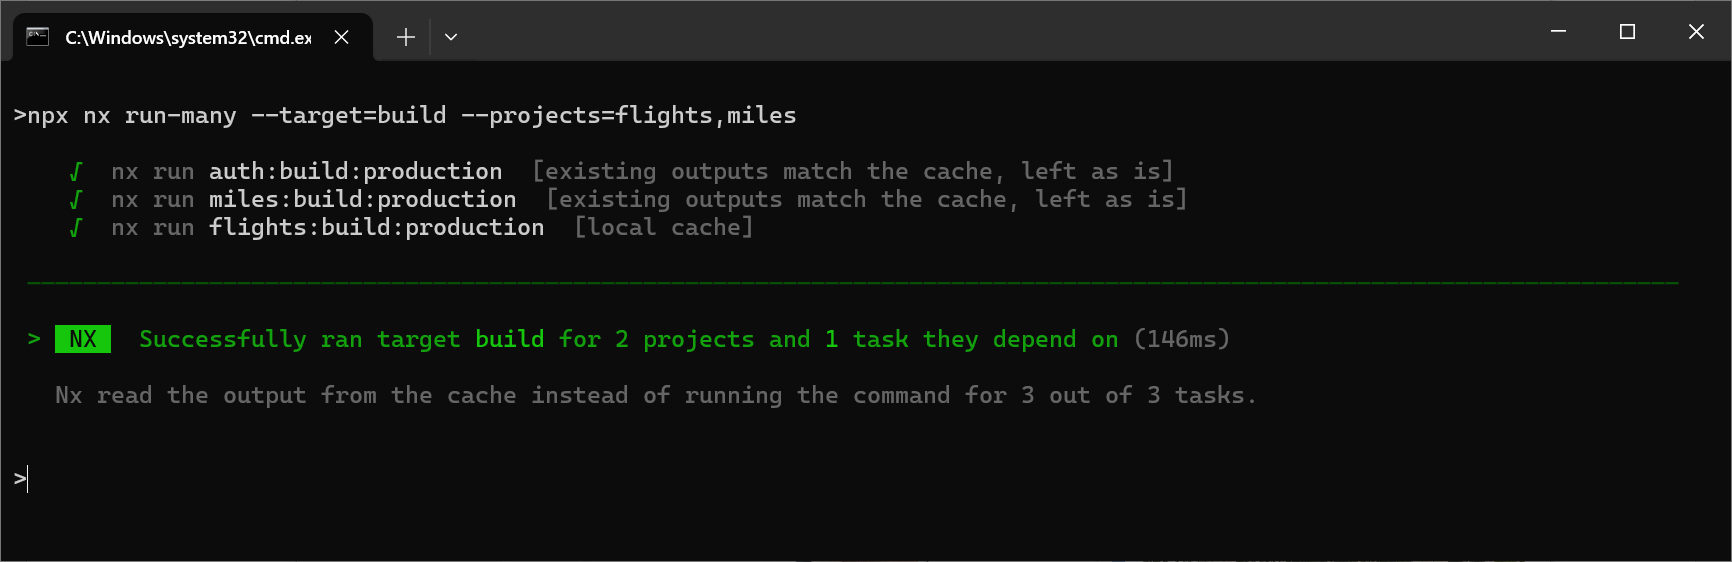
npx nx run-many --target=build --projects=flights,miles

npx nx run-many --target=build --all
In this case, Nx still uses the cache when the source files have not changed:
Unit tests, E2E tests, and linting can all be run incrementally in the same manner. Nx goes even further by caching these actions at the level of individual libraries. This improves performance when an application is split across several libraries.
In theory, the same could be done for nx build if the libraries are created as buildable (nx g lib myLib --buildable). However, experience shows that this rarely results in meaningful performance gains, and incremental application rebuilds are a better choice.
Side Note: Micro Frontends
The separately built applications can be brought together at runtime so that users experience them as one unified application. This uses techniques from the micro frontends world. Several other articles on this site cover that topic in depth.
Distributed Cache with Nx Cloud
Nx sets up a local cache by default. For a more advanced setup, you can use a distributed cache that the whole team and the build server can share. This way you benefit from builds that others have already completed. The Nx Cloud — a commercial add-on to the free Nx — provides such a cache. If using cloud providers is not an option for you, Nx Cloud can also be self-hosted.
Connecting an Nx workspace to the Nx Cloud takes just one command:
npx nx connect-to-nx-cloudTechnically, this enables the nx-cloud task runner in the nx.json file at the project root:
"tasksRunnerOptions": {
  "default": {
    "runner": "nx-cloud",
    "options": {
      "cacheableOperations": [
        "build",
        "test",
        "lint"
      ],
      "accessToken": "[…]"
    }
  }
},
A task runner is responsible for executing individual tasks, such as those behind nx build, nx lint, or nx test. The default runner caches the results of these tasks in the file system as described earlier. The nx-cloud task runner, on the other hand, delegates to an account in the Nx Cloud.
This design also makes it fairly easy to swap out the task runner and therefore change the caching strategy. Some open-source projects take advantage of this by offering task runners that use their own data sources, such as AWS (see here and here), GCP, Azure, or Minio. Thanks to Lars Gyrup Brink Nielsen for bringing these options to my attention.
One thing to keep in mind is that the task runner API is not public and may change between versions.
The task runner for Nx Cloud also requires an access token for configuration, as shown above. Commands such as nx build output a link to a dynamically provisioned cloud account. On first access, it is a good idea to create users to restrict access. That link also leads to a dashboard with information about the builds that have run:

Going Faster: Parallelization with Nx Cloud
To speed up the build process even more, Nx Cloud can parallelize individual build tasks. Here again, the dependency graph is key: Nx uses it to determine the order in which tasks must run and which ones can run in parallel.
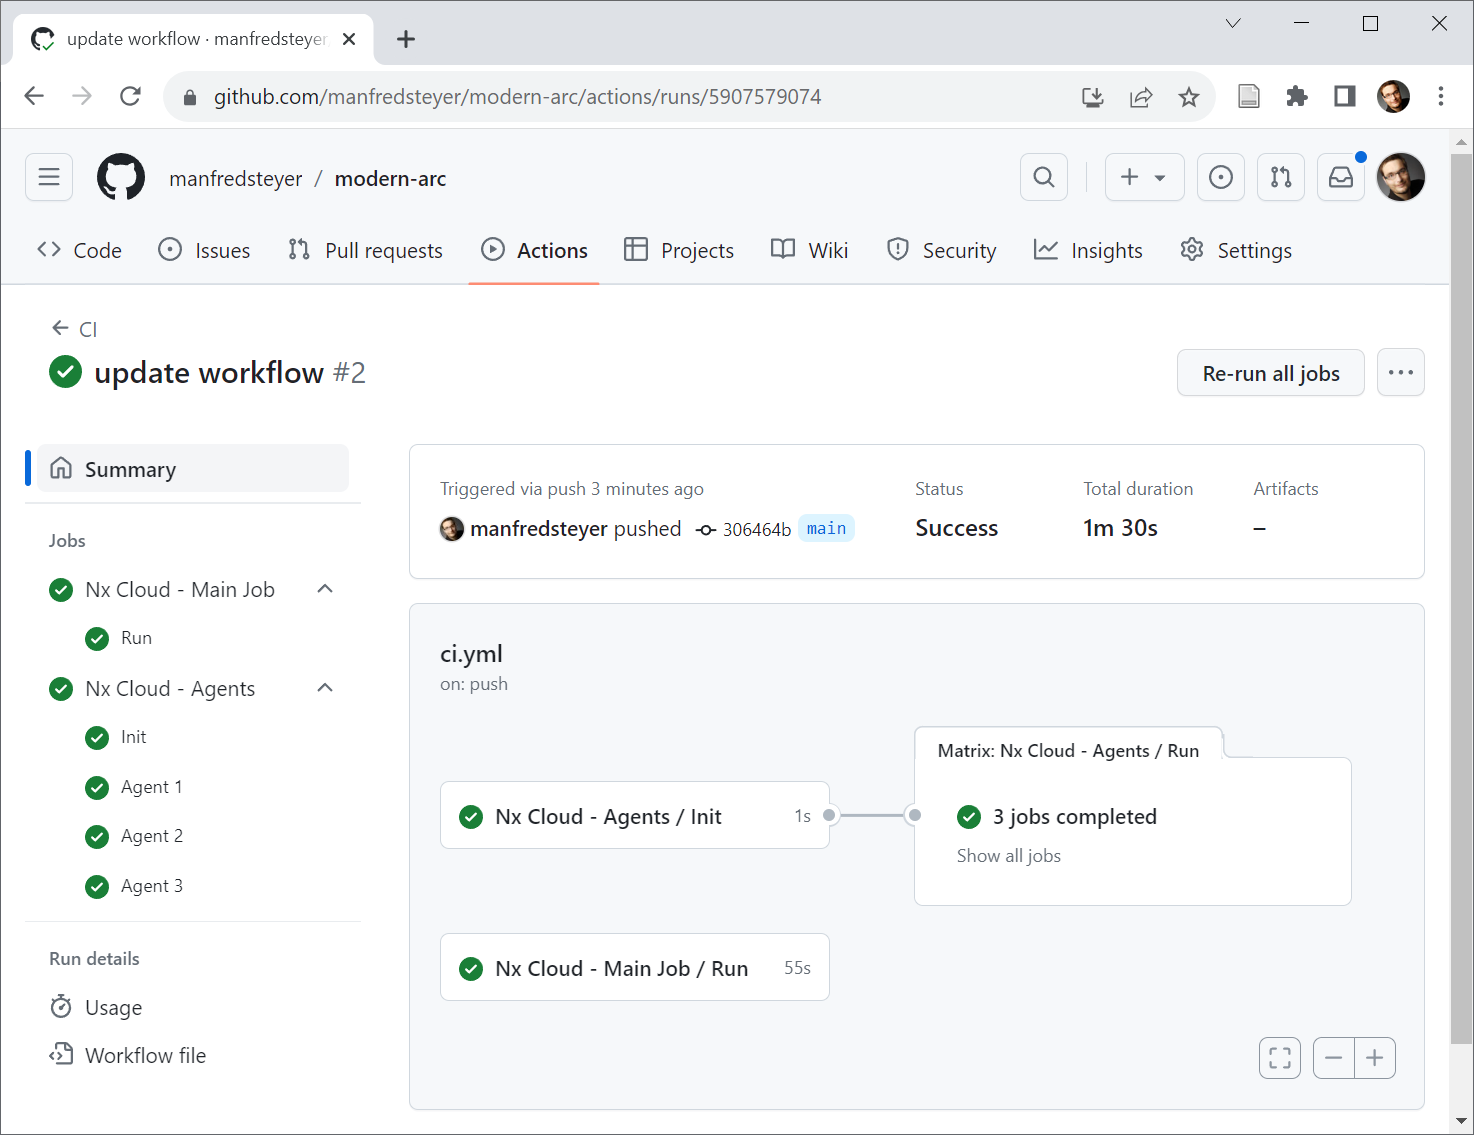
Parallelization uses different nodes in the cloud: a main node coordinates the work, while several worker nodes handle tasks concurrently. Nx can even generate build scripts that start these nodes and provide them with work. For instance, this command creates a workflow for GitHub:
nx generate @nx/workspace:ci-workflow --ci=githubThe same command also supports CircleCI (--ci=circleci) and Azure (--ci==azure). If you use a different environment, the generated workflows can still serve as a useful starting point. These scripts essentially define how many worker nodes you want and how many parallel processes each worker should run. The commands they trigger fall into three groups: sequential init-commands for initial setup, parallel-commands that run concurrently on the main node, and parallel-commands that workers execute in parallel on agents.
The scripts run whenever the main branch of the repository changes, whether through a direct push or by merging a pull request:
What's next? More on Architecture!
For more on Angular architectures at the enterprise scale, take a look at our free eBook (5th edition, 12 chapters):
- What criteria can we use to break a very large application into sub-domains?
- How do we ensure a solution stays maintainable for years or even decades?
- Which micro frontends options does Module Federation provide?
Feel free to download it here now!
Conclusion
Nx can dramatically speed up build tasks. This is largely thanks to incremental builds, which only rebuild or retest the parts of the application that have actually changed. The Nx Cloud adds further acceleration through its distributed cache, and it also enables parallelizing individual builds. Because Nx analyzes the codebase and understands the dependencies between applications and libraries, these features typically require little to no manual setup.