
Angular DI: Understanding the Ivy NodeInjector
This article takes a close look at the new Angular NodeInjector, which relies heavily on a bloom filter to resolve tokens. We'll explore:
- The internal structure of the NodeInjector
- How Angular constructs the bloom filter for the NodeInjector and where false positives can occur
- The resolution process used by NodeInjector to locate dependencies
Setting the Stage
The NodeInjector represents one of the two new injector types introduced with the Ivy renderer, the other being the R3Injector. Once the Ivy renderer becomes the default, these new injectors will take over.
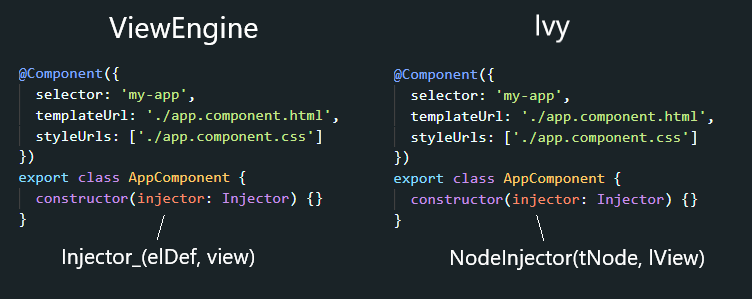
The NodeInjector is designed to replace the current Element injector (Injector_ shown above). By leveraging a bloom filter, it aims to reduce the memory footprint of Angular applications.
Let's start with a basic example application that we'll refer back to:
@Component({
  selector: 'my-app',
  template: `
   <div dirA>
     <div dirB>Hello Ivy</div>
   </div>
  `
})
export class AppComponent {}

@Directive({ selector: '[dirA]' })
export class DirA {}


@Directive({ selector: '[dirB]' })
export class DirB {
  constructor(private rootComp: AppComponent) {}
}
The application setup is straightforward. A root AppComponent hosts two nested div elements, and each of those elements has a directive applied to it.
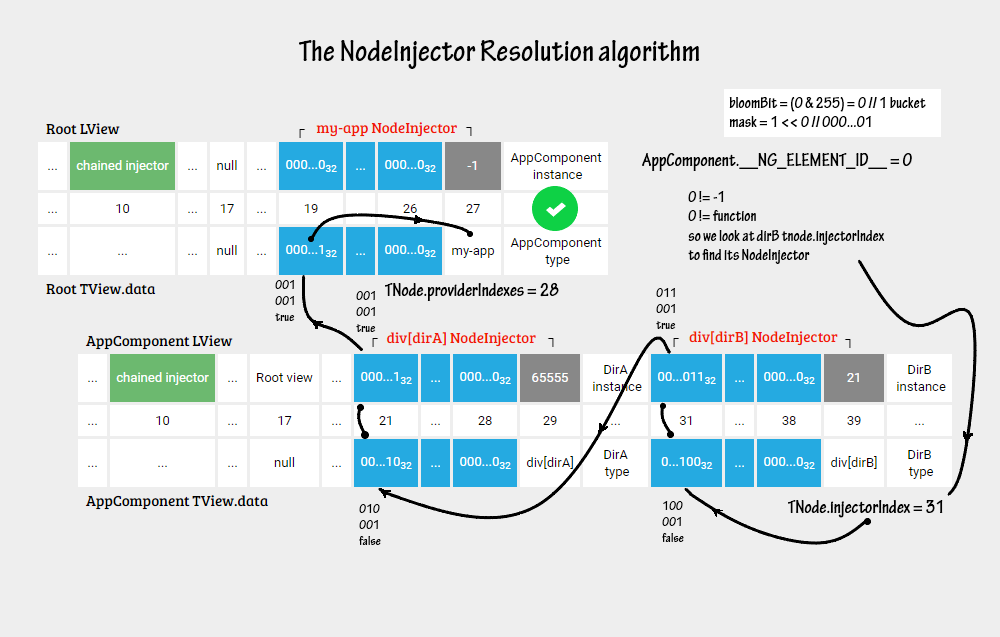
Our main objective is to understand the mechanism that allows DirB to retrieve an instance of the root AppComponent.
With that target in mind, let's dig in.
The View as a Template Blueprint
You're likely familiar with the concept of a view in Angular. In essence, it's an internal object that mirrors the structure of an Angular template.
Angular constructs a hierarchy of views, always starting with a synthetic root View that contains a single root element. This pattern holds true for both View Engine and the newer Ivy engine.
For its internal data, Ivy uses two primary arrays: LView and TView.data. The LView array holds runtime-specific data for a given template, while TView.data stores information that is common across all template instances.
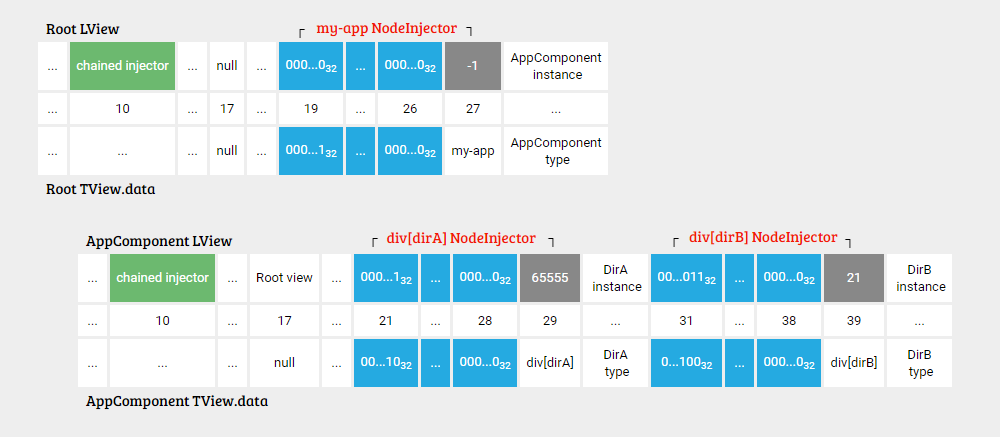
Furthermore, the Ivy renderer caches injection-related data for each node within these view arrays. Specifically, it sets aside dedicated slots in both the LView and TView.data arrays to accommodate two bloom filters per injector: one cumulative and one template-based. The number of bloom filters within a single view is proportional to the number of node injectors that view contains.
The following diagram illustrates this arrangement:
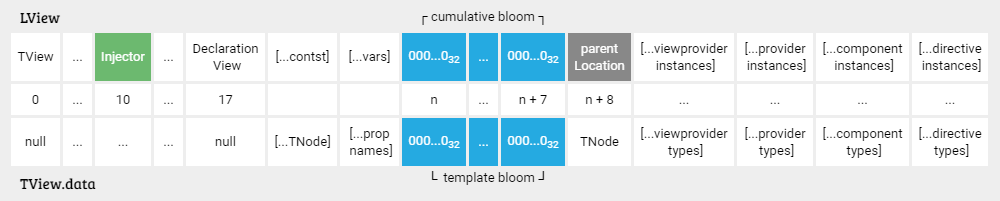
A few key points emerge from this illustration:
- An Ivy view consists of LView and TView.data arrays that begin with a header section (17 slots). This header holds the reference to the parent injector at index 10. This is the point where Angular's resolution mechanism escalates to the Module Injector.
- Both LView and TView.data can contain multiple bloom filters, each of which is 8 slots long (spanning indices [n, n + 7]). The count of these filters is directly tied to how many nodes have their own injector.
- Each bloom filter includes a reference to its parent bloom filter, stored within a "packed" parentLocation slot located at index (n + 8).
When I say "packed", I mean this slot doesn't just hold a parent injector index; it also packs in a ViewOffsetShift. This packing/unpacking is a typical use case for bitwise operations, allowing multiple values to be stored within a single integer.
- Angular stores all token definitions in TView.data and their corresponding instances in LView, allowing us to locate all providers by referencing the view.
Let's revisit our sample app to see the view hierarchy:
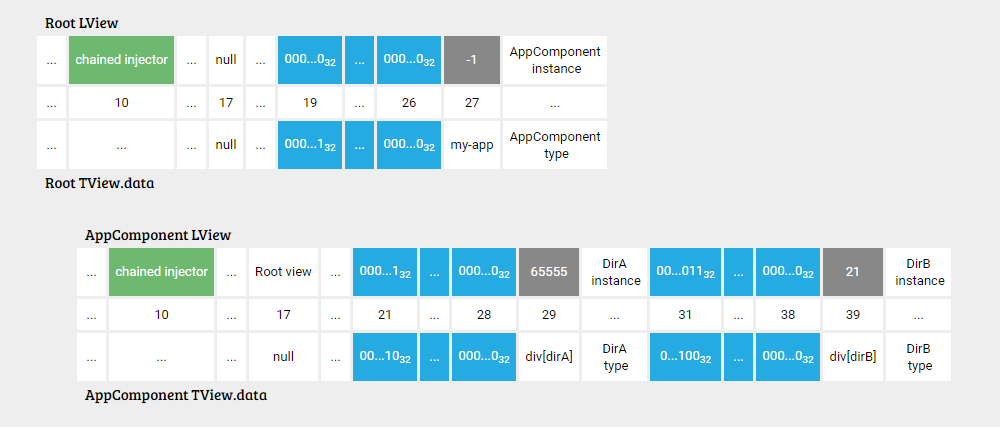
The structure is minimal. We have the root view, which contains a single bloom filter pair (cumulative and template). Beneath it is the AppComponent view, which holds two pairs of bloom filters: one associated with the div[dirA] element (at index 21) and another for the div[dirB] element (at index 31).
Now that we have a basic understanding of the view structure in Ivy, let's shift our focus to the bloom filter itself.
Template and Cumulative Bloom Filters
If you're unfamiliar with bloom filters, these articles provide excellent introductions: Probabilistic Data structures: Bloom filter and Bloom Filters by Example
Angular Ivy offers a distinctive take on the bloom filter.
The template bloom filter holds information about the tokens associated with the current node. This filter can be shared across different views via the TView.
Let's trace how this filter is assembled.
As noted in the "Bloom Filters by Example" article:
The foundation of a Bloom filter is a Bit Vector.
What, then, acts as the bit vector in Angular's implementation?
Ivy sets the bloom size to 256 bits. This vector is organized into 8 distinct buckets or parts.
              n                 ..              n + 7
00000000000000000000000000000000 .. 00000000000000000000000000000000
\____________32 bits___________/    \____________32 bits___________/
How does Angular hash elements into this filter?
First, Angular assigns a unique ID to a token the first time it's encountered. This is done by incrementing an integer counter and storing the result in the static __NG_ELEMENT_ID__ property:
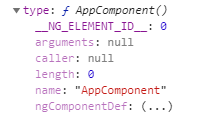
Note: our AppComponent receives ID 0, as the token generation starts from 0 and AppComponent is the first directive introduced into the injection system.
Once the ID is assigned, Angular fits it into the bloom size using the bitwise AND (&) operator, ensuring the result is always within the 0–255 range.
const BLOOM_SIZE = 256;
const BLOOM_MASK = BLOOM_SIZE - 1; // 255
/* it's like a remainder operator
*  so that all unique ids are modulo-ed
*  into a number between 0-255
*/
const bloomBit = id & BLOOM_MASK;
0 & 255    // 0
1 & 255    // 1
255 & 255  // 255
256 & 255  // 0
257 & 255  // 1
1000 & 255 // 232
Ivy then creates a mask based on this computed bloomBit:
const mask = 1 << bloomBit;
This mask is then placed into one of the 8 buckets, depending on the value of bloomBit:
// Use the raw bloomBit number to determine which bloom filter bucket we should check
// e.g: bf0 = [0 - 31], bf1 = [32 - 63], bf2 = [64 - 95], bf3 = [96 - 127], etc
const b7 = bloomBit & 0x80;
const b6 = bloomBit & 0x40;
const b5 = bloomBit & 0x20;
const tData = tView.data as number[];

if (b7) {
  b6 ? (b5 ? (tData[injectorIndex + 7] |= mask) : (tData[injectorIndex + 6] |= mask)) :
       (b5 ? (tData[injectorIndex + 5] |= mask) : (tData[injectorIndex + 4] |= mask));
} else {
  b6 ? (b5 ? (tData[injectorIndex + 3] |= mask) : (tData[injectorIndex + 2] |= mask)) :
       (b5 ? (tData[injectorIndex + 1] |= mask) : (tData[injectorIndex] |= mask));
}
For any possible ID, which is modulo-ed into a number between 0–255, we get the following consistent structure for the bloom filter:
                                   Ids 0-31
 1 bucket               00000000000000000000000000000000
                        \____________32 bits___________/
                                   Ids 32-63
 2 bucket               00000000000000000000000000000000
...
                                  Ids 224 - 255
 8 bucket               00000000000000000000000000000000
There's quite a bit going on here. Let's clarify.
Consider a directive defined like this:
@Directive({...})
class MyDirective {
  static __NG_ELEMENT_ID__ = 1;
}
This directive would produce the following bloom filter:
const bloomBit = 1 % 255 // 1
const mask = 1 << bloomBit;
             1 << 1 // 2
2..toString(2) // 10

1 bucket          00000000000000000000000000000010
....
8 bucket          00000000000000000000000000000000
How does Ivy determine if a given ID is present in the set?
Ivy constructs the same bit mask to target the same specific bit and then compares this mask against the appropriate bucket.
const bloomBit = 1 % 255 // 1
const mask = 1 << bloomBit;
             1 << 1 // 2
2..toString(2) // 10
               1 bucket
2 & 0b00000000000000000000000000000010
0b00000000000000000000000000000010
              &
0b00000000000000000000000000000010
              ||
0b00000000000000000000000000000010 = 2 = true
Now, let's move on to the cumulative bloom.
The cumulative bloom filter contains information about the current node's tokens, as well as those of all its ancestor nodes.
Essentially, it is the result of merging the parent's bloom filter with the current node's cumulative bloom filter.
This allows for a quick determination of whether a token exists among any parent injectors without requiring a walk through each level of the injector tree.
What is the NodeInjector?
Put simply, it's an injector that is associated with a specific node.
You can think of it like any other injector: a container for retrieving object instances as declared by providers. However, it's a unique kind of container.
Where does the NodeInjector store its providers?
Let's first look at its definition in the source code:
export class NodeInjector implements Injector {
  constructor(
      private _tNode: TElementNode|TContainerNode|TElementContainerNode|null,
      private _lView: LView) {}

  get(token: any, notFoundValue?: any): any {
    return getOrCreateInjectable(this._tNode, this._lView, token, undefined, notFoundValue);
  }
}
When compared to R3Injector:
export class R3Injector {
  private records = new Map<Type<any>|InjectionToken<any>, Record<any>>();
  ...
}
It's clear that the NodeInjector doesn't have a conventional key-value store that most injectors use to hold their data.
The NodeInjector is a simple object holding references to a TNode and an LView. The TNode can represent various elements like an element, ng-template, or ng-container. The NodeInjector finds the required provider by consulting data deposited in these TNode and LView structures.
Here's where our bloom filters become relevant. Angular assigns an injectorIndex property to the TNode to pinpoint the location of the bloom filter dedicated to this node.
Furthermore, as we learned, immediately after each bloom filter, Angular stores a parentLocation pointer in the LView array. This pointer facilitates traversing all injectors up the tree.
In summary, each NodeInjector occupies 9 contiguous slots in both the LView and TView.data arrays.
When does Angular create a NodeInjector?
It's a common misconception that this happens for every node in the template. This is not the case.
NodeInjectors are created under these specific conditions:
- The root component always gets a NodeInjector on the root view.
- Any tag that resolves to an Angular component or has a directive applied to it gets a NodeInjector.
- If a component or directive defines
providersorviewProviders, this also triggers the creation of a NodeInjector on that node if it doesn't already exist.
So, the rule is: any element with a directive or component applied creates a NodeInjector on its TNode.
This means all directives are automatically resolvable by the node injector.
Now we're ready to see how the NodeInjector resolves its dependencies.
The Resolution Process
As we've seen, the get method of the NodeInjector is quite simple:
export class NodeInjector implements Injector {
  constructor(
      private _tNode: TElementNode|TContainerNode|TElementContainerNode|null,
      private _lView: LView) {}

  get(token: any, notFoundValue?: any): any {
    return getOrCreateInjectable(this._tNode, this._lView, token, undefined, notFoundValue);
  }
}
The real work happens inside the getOrCreateInjectable method. There's a lot of code there, but let's break it down.
Imagine we're running injector.get(SomeClass):
- Angular first checks the
SomeClass.__NG_ELEMENT_ID__static property. - If that hash is -1, it's a special case where the NodeInjector instance itself is returned.
- If the hash is a factory function, we have another special case: the object is created by invoking that factory.
Angular assigns a factory function to the __NG_ELEMENT_ID__ property for these special object types: ChangeDetectorRef, ElementRef, TemplateRef, ViewContainerRef, Renderer2.
A notable detail is that these objects are not cached. For instance, calling injector.get(ChangeDetectorRef) twice will yield different instances: injector.get(ChangeDetectorRef) !== injector.get(ChangeDetectorRef).
4. If the hash is a number, we proceed as follows:
- We fetch the
injectorIndexfrom the TNode. - We consult the template bloom filter (located at
TView.data[injectorIndex]).
If the filter returns true, we perform a direct search for SomeClass among the node's dependencies. (The tNode.providerIndexes helps us pinpoint the token.)
If it returns false, we consult the cumulative bloom filter.
A hint of true here means we must traverse to the parent injector; otherwise, the search is handed off to the ModuleInjector.
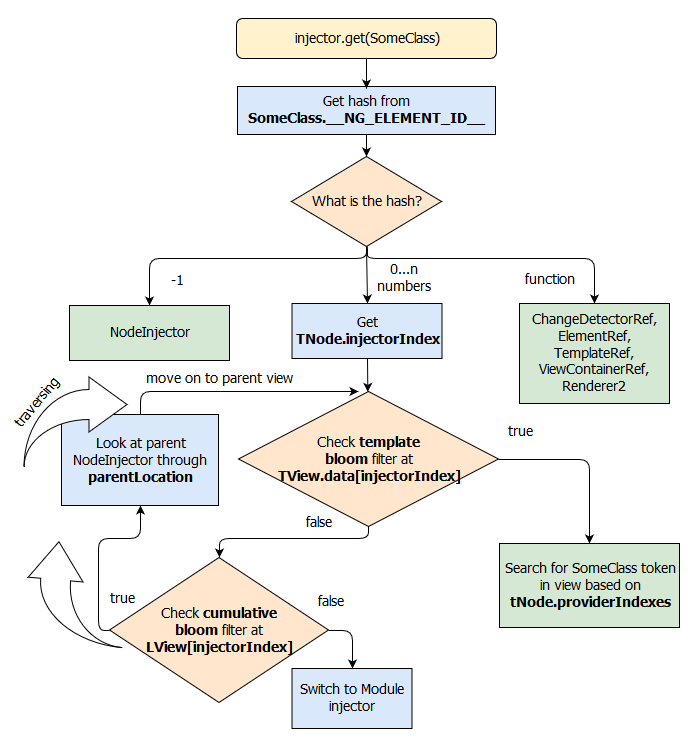
Visualizing the NodeInjector resolution algorithm
Let's see how our sample app resolves the root AppComponent:
Dealing with False Positives
One might wonder about scenarios where the bloom filter produces an incorrect hit, known as a false positive.
Since the bloom size is 256 bits, once the system has generated more than 255 IDs, the possibility of false positives emerges.
Here's a simple demonstration:
@Component({
  selector: 'my-app',
  template: `
   <div>
     <div dirB>Hello Ivy</div>
   </div>
  `
})
export class AppComponent {}

@Directive({ selector: '[dirA]' })
export class DirA {
  static __NG_ELEMENT_ID__ = 256;
}

@Directive({ selector: '[dirB]' })
export class DirB {
  constructor(private dirA: DirA) {}
}
In this example, AppComponent has an __NG_ELEMENT_ID__ of 0, while a hypothetical DirA has 256. Both numbers would hash to the same bit position, leading to a false positive result.
This false positive is harmless because when we search for the token directly on the view, we won't find it and will get null.
In short: the greater the number of directives and services, the higher the likelihood of encountering false positives.
Final Thoughts
We've reached the end of our exploration.
I hope this has clarified how the Ivy NodeInjector functions. If you want a deeper understanding, diving into the Angular source code is highly recommended—you'll undoubtedly uncover many useful patterns and best practices along the way.