Images are often a double-edged sword in web development: they add visual appeal but can also drag down load times. Angular’s NgOptimizedImage directive addresses this by streamlining the way images are served and rendered. With minimal configuration, this tool helps your application load images faster while preserving visual fidelity. Below, we’ll examine how this directive can improve your Angular app's responsiveness and overall user experience.
The Case for Image Optimization
Striking a balance between aesthetics and speed is key. Unoptimized images extend load times, which directly impacts Core Web Vitals, particularly Largest Contentful Paint (LCP)—a metric that tracks when the primary content becomes visible. A faster LCP benefits both UX and search rankings, and Angular’s NgOptimizedImage offers a straightforward path to achieving these gains without micromanaging every asset.
Initial Setup
To begin, bring NgOptimizedImage into your project from the @angular/common package. Import it in your standalone component or within your module's imports:
import { NgOptimizedImage } from '@angular/common';

@Component({
  // ...
  imports: [
    NgOptimizedImage,
    // ... other imports
  ],
  // ...
})
export class DemoComponent {}
With the import in place, you can immediately take advantage of the directive’s optimization capabilities.
Core Features of NgOptimizedImage
1. Automatic srcSet and sizes Handling
Delivering the correct image dimensions for various screen sizes is a common performance challenge. The directive simplifies this by auto-generating the srcSet attribute for you. You only need to define the layout hint via sizes.
Example:
<img
  ngSrc="angular.jpg"
  width="200"
  height="200"
  sizes="80vw"
/>
In this case, sizes="80vw" indicates the image should occupy 80% of the viewport width. Angular computes the appropriate srcSet entries, ensuring each device receives a correctly scaled version. This not only saves development time but also prevents wasteful downloads of oversized files.
2. Tailored Breakpoints with IMAGE_CONFIG
When your design calls for specific width constraints, you can define your own breakpoints. By providing an IMAGE_CONFIG token, you tell Angular to generate only the sizes your layout needs.
Example:
providers: [{
  provide: IMAGE_CONFIG,
  useValue: {
    breakpoints: [384, 640, 750]
  }
}]
With this configuration, Angular generates only the 384px, 640px, and 750px variants. This keeps the asset payload lean and reduces unnecessary network requests.
3. Boosting LCP with the priority Attribute
Large, above-the-fold elements often delay the LCP metric. The priority flag instructs Angular to treat an image as critical. It triggers a preload and also sets fetchpriority=high on the element. Furthermore, it enforces an eager loading strategy so the browser fetches the asset without hesitation.
Example:
<img
  ngSrc="hero.jpg"
  width="1200"
  height="600"
  priority
/>
For server-side rendering, Angular additionally injects a <link rel="preload"> tag for these images. This ensures that assets like hero banners are fetched as soon as the HTML is parsed.
4. fill Mode for Container-Based Layouts
When image dimensions are unknown—such as when they need to cover a container as a background—fill mode proves useful. It lets the image expand to fit its parent element without requiring explicit width and height.
Example:
<img ngSrc="background.jpg" fill/>
Ensure the parent element has a positioned context, such as position: relative, absolute, or fixed. This feature is well-suited for fluid, responsive designs where the exact size of an element isn't predetermined.
5. Effortless Lazy Loading
Reducing initial load time is simple with the loading="lazy" attribute. This tells the browser to wait until the image approaches the viewport before fetching it, which is particularly useful for content below the fold, like gallery thumbnails.
Example:
<img
  ngSrc="thumbnail.jpg"
  width="200"
  height="200"
  loading="lazy"
/>
Exercise caution, however. Deferring the load of an image that is prominent in the initial viewport can harm your LCP score. Reserve lazy loading for non-essential assets and ensure critical elements load eagerly.
6. Visual Feedback with Placeholders
Blank spaces during image load can be jarring. Using the placeholder input allows you to display a low-quality fallback or a Base64-encoded preview until the full-resolution asset arrives. This enhances perceived performance.
Example:
<img
  ngSrc="profile.jpg"
  width="200"
  height="200"
  placeholder
/>
For those opting for a Base64 string, there are simple ways to produce one:
-
Web utilities: Services like Base64-Image can encode your image file and give you the resulting string instantly.
-
Command line: Run the following command in your terminal to generate the encoded output:
base64 -i input-image.jpg
After obtaining the Base64 string, it can be placed directly in the HTML as the image source:
<img
  ngSrc="profile.jpg"
  width="200"
  height="200"
  placeholder="data:image/jpeg;base64,/9j/4AAQSk..."
/>
This approach prevents an empty space from appearing and allows for a smoother transition to the final visual.
If your assets are served through a CDN, you might be able to generate low-res placeholders automatically. Keep these preview files minimal—ideally under 4 KB—to avoid adding latency. The directive is strict about this and will raise an error if the placeholder exceeds the size limit, which helps keep your pages lightweight:
NG02965: The NgOptimizedImage directive (activated on an <img> element with the ngSrc="angular.jpg") has detected that the placeholder attribute is set to a data URL which is longer than 4000 characters. This is discouraged, as large inline placeholders directly increase the bundle size of Angular and hurt page
load performance. For better loading performance, generate a smaller data URL placeholder.
Leveraging CDNs for Enhanced Delivery
Combining NgOptimizedImage with a CDN can significantly shorten load times, as users retrieve assets from PoPs geographically closer to them. CDNs also cache images globally, which minimizes distance for data transfer and improves performance for a distributed audience.
In addition, many CDNs offer built-in compression, ensuring that images are delivered at the smallest possible size without sacrificing quality. Pairing this with the directive’s smart loading logic results in a fast and dependable user experience for a global user base.
Real-World Application
Let’s see the directive in action within a practical scenario. Suppose we are working on a gaming site dedicated to displaying game cover art.
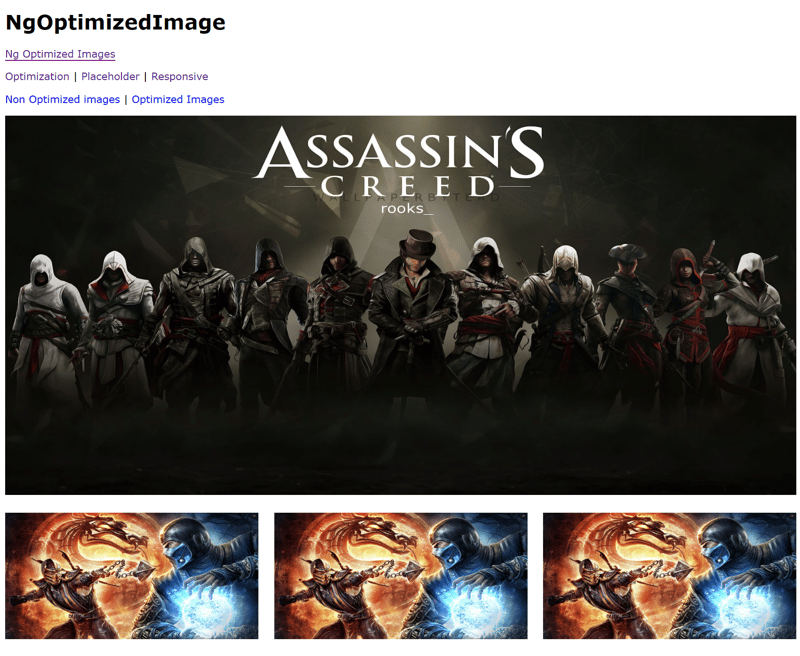
Here’s how the markup looks with a standard src attribute:
<img
  width="1250"
  height="600"
  src="https://via.assets.so/game.png?id=12"
  alt="Assassin's Creed Game Cover Art"
/>

<div style="...">
  @for (image of list; track $index) {
    <img
      src="https://via.assets.so/game.png?id=16"
      width="400"
      height="200"
      alt="Thumbnails Game Gallery"
    />
  }
</div>
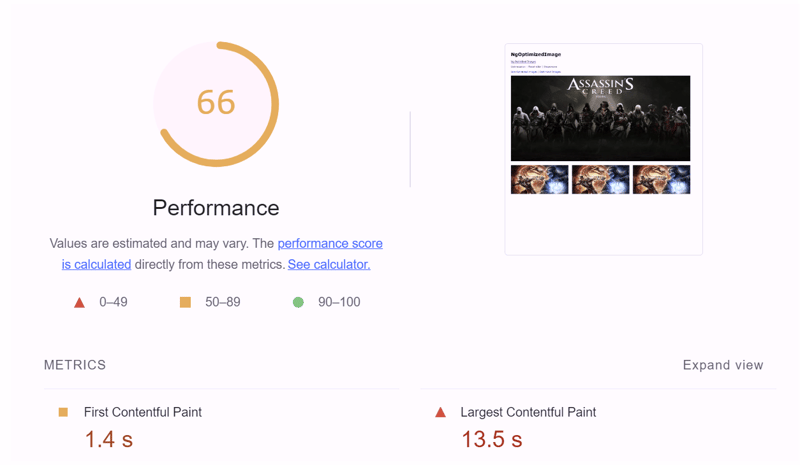
Running a Lighthouse audit on this page reveals an FCP of 1.4 seconds and a considerably slower LCP of 13.5 seconds—far from satisfactory.
By applying a few adjustments using NgOptimizedImage, those metrics improve substantially:
<img
  width="1250"
  height="600"
  src="game.png?id=12"
  ngSrcset="400w, 800w, 1250w"
  sizes="(max-width: 600px) 960px, 100vw"
  alt="Assassin's Creed Game Cover Art"
  priority
/>

<div style="...">
  @for (image of list; track $index) {
    <img
      width="400"
      height="200"
      [ngSrc]="game.png?id=16"
      ngSrcset="100w, 200w, 400w"
      sizes="(max-width: 600px) 200px, 400px"
      alt="Thumbnails Game Gallery"
      priority
    />
  }
</div>
**Note: It’s generally not wise to assign
priorityto every image rendered in a loop, particularly if some are positioned off-screen. It’s better to reservefetchpriority="high"for the elements currently within the viewport while applyingloading="lazy"to those that aren’t. This strategy helps balance performance and resource usage effectively.
To further enhance this, we can include a preconnect hint in the document's <head> to establish an early connection to the image server:
<link rel="preconnect" href="https://via.assets.so/">
And within the app’s configuration, we define a custom image loader to work with a CDN provider (e.g., Imgix):
const appConfig: ApplicationConfig = {
  providers: [provideImgixLoader('https://via.assets.so/')],
};
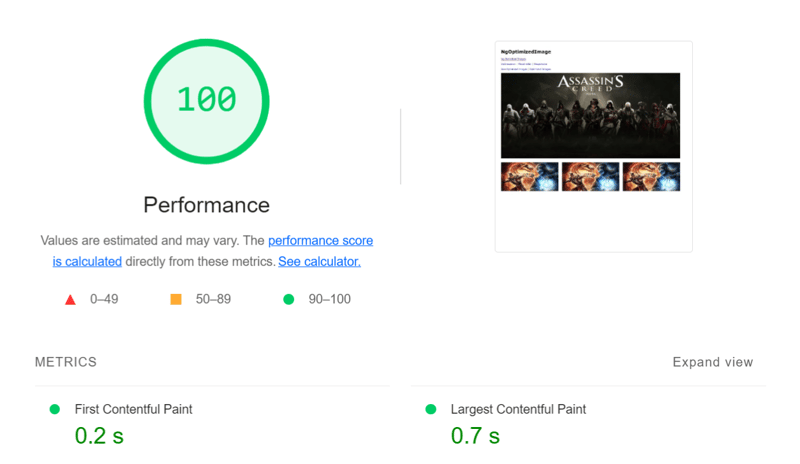
The outcome is dramatic: FCP drops to 0.2 seconds, and LCP improves to just 0.7 seconds. This clearly demonstrates the transformative impact the directive can have on your application's velocity and user satisfaction.
Final Thoughts
The NgOptimizedImage directive is a powerful ally in the quest for optimal web performance. From managing responsive breakpoints to enabling lazy loading and simplifying CDN integration, it covers many of the essential aspects of image optimization. Adopting these practices leads to a quicker, more polished app that your users will appreciate. Try integrating it into your next application to see the tangible benefits for yourself.