
Meta-Frameworks for Angular
Vue developers have long boasted about Nuxt, and React projects almost always lean on Next.js. For a while, Angular seemed to lack that meta-framework layer — until Brandon Roberts introduced AnalogJS, aiming to deliver those contemporary capabilities to the Angular ecosystem.
I'd encountered AnalogJS mentioned repeatedly, so as someone who works with Angular daily, I felt compelled to test it out. I rebuilt my personal site, eduardkrivanek.com (yes, that's a plug), migrating it from React 😱 to Angular 😎. But a straightforward blog-style site wasn't a sufficient challenge. I wanted to push Analog further and see whether it could hold up under the weight of a genuine full-stack application.
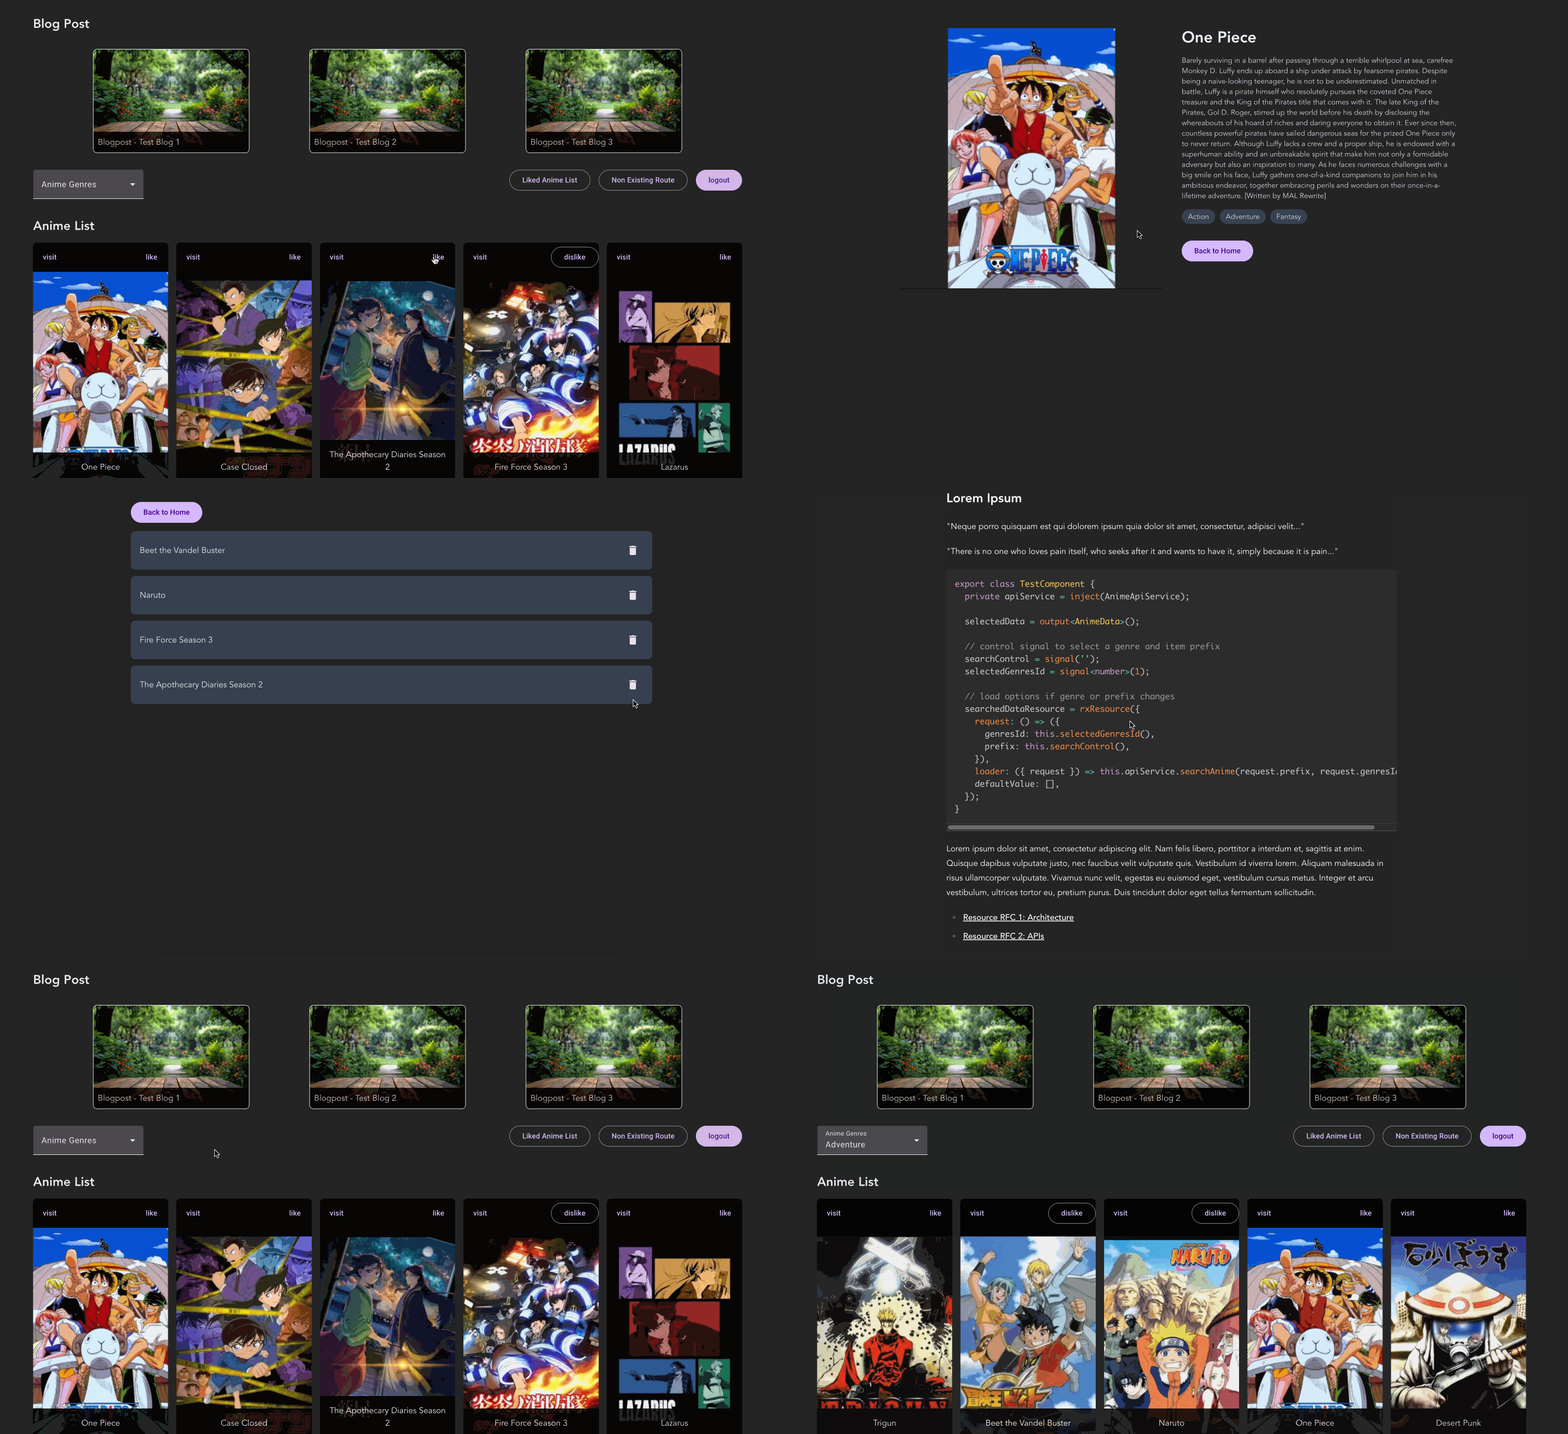
This piece will explore the various features Analog brings to the table by walking through the creation of an anime search application. Consider this a high-level overview of AnalogJS's toolkit. I'll touch on how this particular app was assembled, but for comprehensive guidance, the official documentation is your best bet. The full project lives on GitHub. This demonstration runs on Angular 19.2 with AnalogJS 1.15.1. Below is a preview of what we'll end up building.
Initial Setup
So what exactly is AnalogJS, and why might it matter to you? I'd argue it's definitely worth exploring under these circumstances:
- You need a full-stack application but prefer to skip the complexity of managing a separate backend and frontend
- You're focused on SSR/SSG-heavy pages and want that SEO boost
The capabilities AnalogJS provides (and what this post will dig into) include:
- File-based routing
- Route metadata
- API routes
- SSR + SSG rendering
- Form Actions
- Vite as the build tool (replacing Angular CLI)
- Markdown content support (comparable to Nuxt Content)
- Full-stack capabilities (API and frontend combined)
Kick off a new project using npm create analog@latest. If you're looking to move an existing app over, there's a migration guide available in their docs.
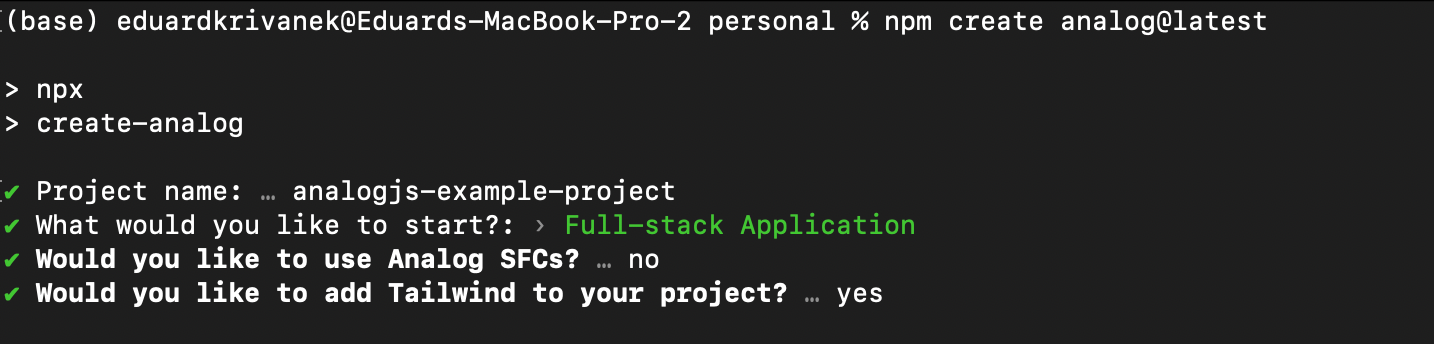
In my example, you'll see I chose not to use Analog's SFC — that "svelte-like" syntax — but that's purely a matter of preference. Additionally, for fresh projects, you could consider dropping zonje.js by following Angular's guidelines for optimal performance.
Routing Structure at a Glance
The demo app takes advantage of the full spectrum of routing features that Analog supports — static routes, dynamic routes, layout routes, and route groups. We'll examine each category more closely in the upcoming sections. For now, let's orient ourselves with the directory layout:
src/
└── app/
    └── pages/
		|── (anime)/
        │   ├── details.[animeId].page.ts
        │   ├── my-list.page.ts
        ├── (auth)/
        │   ├── login.page.ts
        │   ├── login.server.ts
        │   ├── register.page.ts
        │   └── register.server.ts
        ├── (blog)/
        │   └── [slug].page.ts
        ├── (auth).page.ts
        ├── [...page-not-found].page.ts
        ├── index.page.ts
Let's start with the primary index.page.ts, which is responsible for serving the root / route. Next, when a user ends up somewhere that doesn't exist, the [...page-not-found].page.ts component is designed to intercept any of those URLs. This acts as the wildcard (or **) route.
For handling authentication, we have the login and register pages tucked inside the (auth) folder. That folder name doesn't actually influence the URL structure; it simply helps organize related files. Alongside those pages, there's also a (auth).page.ts that forms a shared layout for the two routes within. The login.server.ts and register.server.ts files are responsible for handling form actions — we'll discuss those further along.
The blog portion relies on (blog)/[slug].page.ts, which matches addresses such as /blog1, /blog2, etc. This dynamic route exists to render our content articles.
When a user performs a search and selects an anime, they're taken to /details/123, where 123 corresponds to that anime's unique identifier. That page is publicly accessible and rendered on the server. For authenticated users, there's also the ability to curate a favorites list at /my-list. Given that this is a private area, it renders exclusively on the client side.
Diving Deeper into Routes
This section takes a closer look at the mechanics of each route type — how to extract route parameters, how rendering strategies are defined, and how to associate metadata.
Static Routes
A route falls into the static category when its filename omits square brackets []. In our setup, the paths / and /my-list are static and follow this shape (with considerably more complex templates in practice):
@Component({
  template: `<h2>Home Page</h2>`,
})
export default class HomePageComponent {}
One observation I made: selectors (selector: 'app-home') don't carry any weight when applied to page components. You can omit them entirely, and the component class name is equally irrelevant. We've used HomePageComponent here, but you could just as easily call it BananaComponent and the outcome would be identical. The real determinant is the file's positioning within the /app/pages hierarchy.
It's also worth remembering to prepend the `default` keyword when exporting your route component; forgetting this can trigger the NG04014: Invalid configuration of route '' error.
Dynamic Routes
Dynamic routes are identified by their filenames, which incorporate the route parameter within square brackets. Take our case, where hitting /details/123 activates the details.[animeId].page.ts component, which then fetches data based on that animeId parameter.
@Component({ template: `...` })
export default class AnimeDetailsPageComponent {
  private readonly route = inject(ActivatedRoute);
  private readonly animeApiService = inject(AnimeApiService);

  readonly animeDetails = rxResource({
    loader: () =>
      this.route.paramMap.pipe(
        map(params => params.get('animeId')),
        filter((animeId): animeId is string => !!animeId),
        switchMap(animeId => this.animeApiService.getAnimeById(animeId))
      ),
  });
}
Layout Routes
Layout routes emerge when you establish a parent file alongside a folder that shares its name. In this project, the (auth).page.ts serves as the parent, and the (auth) directory houses the login.page.ts and register.page.ts child pages. For the layout to function correctly, the parent component must include a router-outlet so that its subordinate routes have a place to render:
@Component({
  imports: [RouterOutlet, RouterLink],
  template: `
    <h2>Auth Layout</h2>

    <button type="button" routerLink="/login">login</button>
    <button type="button" routerLink="/register">register</button>

    <router-outlet />
   `,
})
export default class AuthLayoutComponent {}
Catch-All Routes
This route originates from [...page-not-found].page.ts, standing in for the ** wildcard. The snippet below comes directly from the official documentation:
import { Component } from '@angular/core';
import { RouterLink } from '@angular/router';
import { injectResponse } from '@analogjs/router/tokens';
import { RouteMeta } from '@analogjs/router';

export const routeMeta: RouteMeta = {
  title: 'Page Not Found',
  canActivate: [() => {
      const response = injectResponse();
      if (import.meta.env.SSR && response) {
        response.statusCode = 404;
        response.end();
      }
      return true;
  }],
};

@Component({
  imports: [RouterLink],
  template: `<a routerLink="/">Go Back Home</a>`,
})
export default class PageNotFoundComponent {}
With this routeMeta configuration, entering a URL that doesn't exist, like /nonexistingroute, would normally go through SSR processing by default. However, because of routeMeta, the server skips any rendering attempt for that path and instantly returns a 404 status. On the flip side, if someone tries to click their way to a bad route from within the application (e.g., by hitting a button), the system falls back to client-side rendering and presents a friendly "head back home" message.
Route Metadata
Beyond that, route metadata serves SEO purposes and refines how pages appear across social platforms. If that concept is unfamiliar, the MDN documentation on webpage metadata offers an excellent entry point. Here’s a brief illustration:
export const routeMeta: RouteMeta = {
  meta: [{
      name: 'author',
      content: 'Eduard Krivanek',
    },{
      property: 'og:title',
      content: 'Anime Search',
    },{
      property: 'og:description',
      content: 'Example App about anime search',
  }]};

@Component({ template: `` })
export default class HomeComponent {}
Rendering Strategy
By default, Analog applies SSR to generate content for every page. Additionally, Analog accommodates SSG, and you also have the option to disable both and use CSR completely. If you're weighing which approach fits best, the SSR vs CSR comparison provides useful guidance.
In this project, SSR is applied to the home page at /, because it pulls anime data immediately and gains from that initial server-side render. Conversely, /my-list sits behind an authentication barrier, so SEO isn't a priority. That naturally leads to the question: "Is SSR necessary here?" In my view, no. For pages that resemble a dashboard, CSR typically gets the job done without unnecessary overhead.
As for /login, /register, and the blog pages, they're relatively static content. That makes them strong candidates for SSG. To set this up, you'll need to modify the plugins array within your vite.config.ts file.
  plugins: [
    analog({
      prerender: {
        routes: async () => [
          '/login',
          '/register',
          {
            contentDir: 'src/content/blog',
            transform: file => {
              const slug = file.attributes?.['slug'] || file.name;
              return `/blog/${slug}`;
            },
          },
        ],
      },
      nitro: {
        routeRules: {
          '/my-list': { ssr: false },
        },
      },
    }),
  ],
Keep in mind that even if you choose SSR for certain pages, you can still employ @defer (on viewport){} to lazy-load child components — especially things like charts or anything tightly coupled to the DOM — so they only render on the client. For more details, check the defer syntax guide in Angular's docs.
Generating Content from Markdown
As someone who writes blog posts, having markdown content support in Analog is a feature I genuinely value. For our app, we intend to display three posts, each stored under /src/content/blog. The plan involves configuring routing, rendering the posts themselves, applying formatting, and even setting up dynamic route metadata.
The initial step is to modify src/app/app.config.ts to enable markdown file handling and incorporate a syntax highlighter. Your options are Prism or Shiki — both are solid choices. For this example, we're going with Prism.
import { ApplicationConfig } from '@angular/core';
import { provideContent, withMarkdownRenderer } from '@analogjs/content';
import { withPrismHighlighter } from '@analogjs/content/prism-highlighter';

export const appConfig: ApplicationConfig = {
  providers: [
    // ... other providers
    provideContent(withMarkdownRenderer(), withPrismHighlighter()),
  ],
};
When dealing with markdown files (located in the /src/content/blog directory), it's far more straightforward to maintain all articles in that single folder, rather than creating individual directories for each one. Before you can list out the blog entries, you'll likely want to enrich each file with some frontmatter metadata, like this:
---
title: 'Test Blog 1'
tags: angular, rxjs
order: 1
datePublished: 01.01.2024
coverImage: article-cover/background.jpg
---

## Lorem Ipsum

"Neque porro quisquam est qui dolorem..."
The content file list is accessible via the injectContentFiles function. This function accepts a filter argument where you specify the location of your content files — in our case, the /src/content/blog folder.
import { injectContentFiles } from '@analogjs/content';

@Component({
  imports: [RouterLink],
  template: `
    @for (post of posts; track post.attributes.title) {
      <div [routerLink]="['/blog', post.slug]">
        Blogpost - {{ post.attributes.title }}
      </div>
    }
`})
export default class HomeComponent {
  readonly posts = injectContentFiles<{
    title: string;
    tags: string;
    datePublished: string;
    coverImage: string;
  }>(files => files.filename.includes('/src/content/blog'));
}
The post.slug value corresponds directly to the name of the markdown file without its extension. So when a user clicks on test-blog-1.md, they'll be directed to /blog/test-blog-1, where the blog/[slug].page.ts route takes over and manages the rendering.
Within that blog/[slug].page.ts route, Analog equips you with the injectContent function and a MarkdownComponent. Together, they display the blog entry in a nicely formatted layout.
@Component({
  imports: [AsyncPipe, MarkdownComponent],
  template: `
    @if (post$ | async; as post) {
      <article class="prose prose-slate">
        <img [src]="post.attributes.coverImage" />
        <analog-markdown [content]="post.content" />
      </article>
    }
 `,
})
export default class BlogPostComponent {
  readonly post$ = injectContent<{
    title: string;
    tags: string;
    datePublished: string;
    coverImage: string;
  }>({
    param: 'slug',
    subdirectory: 'blog',
  });
}
At this stage, the markdown might be rendered, but without any styling applied. To remedy that, you'll need to import prismjs styles. If you're working with Tailwind, adding tailwindcss-typography is advisable for that extra polish (remember to apply the prose css class where your blogs are displayed). The exact tweaks to your style.css will depend on your Tailwind version (mine is 4+).
/* Tailwind directives  */
@import 'tailwindcss';

@import 'prismjs/plugins/toolbar/prism-toolbar.css';
/* check node_modules/prismjs/themes/ for the available themes */
@import 'prismjs/themes/prism-tomorrow';

/* highlight text for markdown */
@plugin "@tailwindcss/typography";
Finally, if your markdown is heavy on code blocks and you notice certain languages (such as SQL or GraphQL) aren't being highlighted properly, an update to vite.config.ts is required. Simply add those languages under content.prismOptions.additionalLangs, as shown here:
// vite.config.ts
export default defineConfig(({ mode }) => ({
  plugins: [
    analog({
      content: {
        prismOptions: {
          additionalLangs: ['yaml', 'sql', 'graphql', 'bash'],
        },
      },
      prerender: { /* ... */ },
      nitro: { { /* ... */ },
    }),
  ],
Meta Tags for Markdown Content
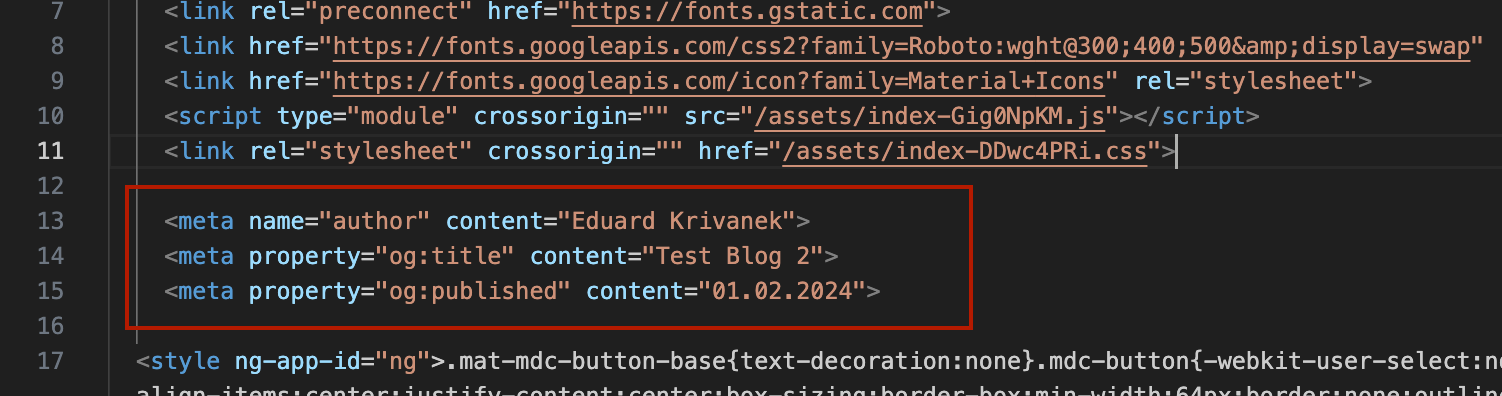
The blog/[slug].page.ts component serves as a generic loader for any markdown file found in /src/content/blog. However, we also want to inject some dynamic meta tags during the prerendering phase to enhance SEO.
For those seeking more depth, I'd point you to Brandon's example repository on GitHub. For our scenario, a more straightforward approach works just fine:
// src/app/pages/blog/[slug].page.ts
export const routeMeta: RouteMeta = {
  title: 'Blog Post',
  meta: route => {
    const file = injectContentFiles<{
      title: string;
      tags: string;
      datePublished: string;
      coverImage: string;
    }>().find(file => file.slug === route.params['slug'])!;

    return [{
        name: 'author',
        content: 'Eduard Krivanek',
      },{
        property: 'og:title',
        content: file.attributes.title,
      }, {
        property: 'og:published',
        content: file.attributes.datePublished,
      }];
  },
};

@Component({ template: `...`})
export default class BlogPostComponent { /* ... */ }
With this configuration, the appropriate meta tags will be inserted automatically into each prerendered blog page.
Creating API Endpoints
Every application needs a way to store and retrieve data. In this demo, I simulated the database, but the concept applies to real-world scenarios. A single singleton service (class) holds all the application data.
export class Database {
  static instance = new Database();

  storedData = {};

  async createUser(username: string) { /* .. */ }
  async addLikedAnime(username: string, anime: AnimeDetails) { /* .. */ }
  async removeLikedAnime(username: string, animeId: number) { /* .. */ }
}
You can access any method using Database.instance.XYZ. The goal here is to build an endpoint based on the HTTP request method. This endpoint will accept data, such as when a user adds an anime to their favorites list, and display it on the (anime)/my-list page.
To build the endpoint, we use the defineEventHandler function. This function goes into src/server/routes/api/anime/save-anime.post.ts, with the following implementation.
Pay attention to the .post suffix in save-anime.post.ts. This suffix instructs Analog to create a POST-only endpoint. If the suffix were removed and the file were named save-anime.ts, the endpoint would accept any HTTP method. In our case, restricting it to POST requests is intentional.
// src/server/routes/api/anime/save-anime.post.ts
import { createError, defineEventHandler, readBody } from 'h3';
import { AnimeDetails } from './../../../api/api.model';
import { Database } from './../../../database/database';

export default defineEventHandler(async event => {
  const body = await readBody(event)
  const id = parseInt(body?.id);
  const username = body?.username;

  // check if id is a number
  if (!Number.isInteger(id) || !username) {
    throw createError({
      statusCode: 400,
      statusMessage: 'Invalid input data',
    });
  }

  // fetch anime details from API
  const response = await fetch(`https://api.jikan.moe/v4/anime/${id}`);
  const anime = (await response.json()) as { data: AnimeDetails };

  // save anime to DB
  await Database.instance.addLikedAnime(username, anime.data);

  // return liked anime to the user
  return { data: anime.data };
});
For POST requests, readBody exposes the request payload. On a GET request, you would use getRouterParam instead. To communicate with this backend listener, use HttpClient and point it to the /api/anime/save-anime URL.
@Injectable({ providedIn: 'root' })
export class AnimeApiService {
  private readonly http = inject(HttpClient);

  saveAnime(id: number | string, username: string) {
    return this.http.post('/api/anime/save-anime', {
      id,
      username,
    });
  }
}
Securing API Routes
Analog provides server-side middleware for altering requests, issuing redirects, or verifying authentication. In our sample, middleware can guard all routes under /api/anime by checking whether the user is authenticated. Middleware executes in the order defined in the /server/middleware directory.
// /server/middleware/is-logged-in.ts
import { defineEventHandler, getHeader, getRequestURL, sendRedirect } from 'h3';

export default defineEventHandler(async event => {
  if (getRequestURL(event).pathname.includes('/api/anime')) {
    const authToken = getHeader(event, 'authToken');

    // check auth and redirect
    if (!authToken) {
      console.log('User not logged in, redirecting to login');
      sendRedirect(event, '/login', 401);
    }
  }
});
You could attach a header to each request or set up an interceptor for that purpose. Right now, though, hitting the /api/anime endpoint without the authToken will produce the following error message.

Handling Forms
Analog includes form actions, which let you manage form submissions directly, without a separate HTTP route for processing the data (as we did earlier). The logic lives right next to the file where the form is submitted.
The FormAction directive, imported from @analogjs/router, provides access to the onSuccess and onError event emitters on the <form> tag. To illustrate this, we’ll handle user sign-in through the (auth)/login.page.ts. The client-side component looks like this:
@Component({
  imports: [FormAction, /* .... */],
  template: `
    <form method="post"
          (onSuccess)="onSuccess($event)"
          (onError)="onError($event)">
      <mat-form-field>
        <mat-label>Username</mat-label>
        <input name="username" [formControl]="form.controls.username"/>
      </mat-form-field>

      <button [disabled]="form.invalid">Login</button>
    </form>
  `,
})
export default class LoginComponent {
  readonly form = new FormGroup({
    username: new FormControl('testname', {
      validators: [Validators.required],
    }),
  });

  onSuccess(data: unknown) {
    console.log('success', data as AuthUser);
  }

  onError(result?: unknown) {
    console.log('error', result);
  }
}
For form submission handling, a .server.ts file is placed alongside the .page.ts component. In our case, the folder layout is:
src/
└── app/
    └── pages/
        ├── (auth)/
        │   ├── login.page.ts
        │   └── login.server.ts
        │   └── register.page.ts
        │   └── register.server.ts
Inside login.server.ts, the logic might resemble this
import { fail, json, type PageServerAction } from '@analogjs/router/server/actions';
import { readFormData } from 'h3';
import { Database } from '../../../server/database/database';

export async function action({ event }: PageServerAction) {
  const body = await readFormData(event);
  const username = body.get('username') as string;

  if (!username) {
    return fail(422, { username: 'Username is required' });
  }

  if (!(await Database.instance.getUser(username))) {
    return fail(422, { username: 'Invalid username' });
  }

  return json({ type: 'success', token: 'XYZ', username: username });
}
One detail I noticed: the onSuccess callback fires when authentication succeeds, but the response type is always unknown. Trying to write onSuccess(data: AuthUser) {} results in an error: Argument of type 'unknown' is not assignable to parameter of type 'AuthUser'. You could validate the data with Zod, but as demonstrated, a simple manual cast to the proper type works fine.
In the LoginComponent, I used FormGroup to structure the form. But with form actions, that’s not actually required. You just need to render the form fields, give each one a unique name, and on submission the data is posted with method="post" to the form handler. The FormGroup was primarily helpful here for adding validators.
Closing Thoughts
Overall, working with Analog has been a positive experience. The docs are clear and comprehensive, covering everything you might need. And if something isn’t obvious, their Discord is a good place to ask questions or engage with the community.
The real question, though: would I pick Analog for a future project? At this point, it’s hard to picture the Angular team building a full-stack solution that surpasses Analog. Awareness is growing, so I don’t see it fading away.
If your project isn't a dashboard-heavy app—where most features sit behind auth and you’re avoiding a separate backend like NestJS—Analog is worth a serious look. It fits well for small to medium-size applications. For bigger projects, though? I’d check with the community on the Discord channel.
Thanks for reading. You can find the full Anime search example on GitHub. Feel free to leave your feedback, follow more of my posts on dev.to, or reach out on LinkedIn.