
Flexible by design
Hearing about compliant mechanisms for the first time left me genuinely fascinated. They are everywhere in everyday objects — backpack clasps, mouse buttons, flip-top shampoo caps — yet most of us never pause to consider what they actually are.
A compliant mechanism achieves its function through elastic deformation. In conventional engineering, flexibility in materials is usually treated as a shortcoming. Compliant mechanisms flip that assumption, using deformation as a way to transfer force and motion, rather than routing that motion through separate parts the way rigid body mechanisms do.

A comparison between compliant pliers and a traditional rigid-body design
Because the whole mechanism is a single piece, rather than an assembly of hinges, springs and pivots that add friction, wear and play, the motion is remarkably easy to anticipate.
The movement stays exact
That precision is no accident. Motion travels through flexible links that can neither stretch nor compress, so the part itself constantly self-corrects and guides the path.
This strikes me as a perfect analogy for declarative programming, in contrast with the imperative style where commands mutate state step by step — much like how hinges and joints pass forces along.
What follows is my take on writing Angular code. It is less a framework feature and more a set of instincts I have built up while working on a large UI component library for years.
Compliant components
Angular encourages a certain baseline of declarative code. Data binding, event wiring, and the observable model all push our style in that direction. For simple components the code reads like statements: you say what things are and how they depend on context, instead of giving a sequence of instructions that modify state. But complexity can quietly erode that quality. Components start to accumulate subscriptions, local state, and imperative calls that keep everything in sync — and syncing becomes the real battle.
The imperative mindset would put it as "if a vehicle is a fire truck, paint it red." The declarative formulation is simply "fire trucks are red." In Angular, that usually translates to a getter. In many cases the state of a component is effectively just its inputs; the rest follows by calculation. To sharpen the idea, let’s build a handful of components that lean into this thinking.
LineChart
At its heart this component is quite simple. You give it an array of tuples and it must produce an SVG path across those points in 2D space. The goal is to organize the component so its own code carries no imperative mutation of state. We can attach it directly to native SVG to reduce nesting:
@Component({
  selector: "svg[lineChart]",
  templateUrl: "./line-chart.template.html",
  styleUrls: ["./line-chart.style.less"],
  changeDetection: ChangeDetectionStrategy.OnPush,
  host: {
    preserveAspectRatio: "none"
  }
})
export class LineChartComponent {
On top of the data, we need to described the visible region. We could use the viewBox itself for that. But it is far friendlier to accept its components as separate inputs and synthesize the combined value with a getter:
  @HostBinding('attr.viewBox')
  get viewBox(): string {
    return `${this.x} ${this.y} ${this.width} ${this.height}`;
  }
To make the component a bit richer, let’s add a smoothing input as well. The template itself will hold just one path element:
<svg:path
  fill="none"
  stroke="currentColor"
  vector-effect="non-scaling-stroke"
  stroke-width="2"
  [attr.d]="d"
/>
We still need to compute the d attribute. A setter on the data input would work, but we may later want more elements hanging off the same data, such as a fill area or point hints. So we’ll expose it as a getter as well, and spare ourselves the bookkeeping:
  get d(): string {
    return this.data.reduce(
      (d, point, index) =>
        index ? `${d} ${draw(this.data, index, this.smoothing)}` : `M ${point}`,
      ""
    );
  }
That covers it. The actual drawing functions that produce the path are tangential and easily looked up. The full live example with source for every component we’re about to build appears later in the article.
Media directive
The next case is slightly advanced. We want to attach to media elements such as audio and video, controlling them with as little imperative wiring as possible. A directive is the natural home for that. The three items we care about are current time, volume, and playback state. Since native controls can also change these same properties, we want two-way bindings:
@Input()
currentTime = 0;

@Input()
paused = true;

@Input()
@HostBinding("volume")
volume = 1;

@Output()
readonly currentTimeChange = new EventEmitter<number>();

@Output()
readonly pausedChange = new EventEmitter<boolean>();

@Output()
readonly volumeChange = new EventEmitter<number>();

@HostListener("volumechange")
onVolumeChange() {
  this.volume = this.elementRef.nativeElement.volume;
  this.volumeChange.emit(this.volume);
}
Notice the @HostBinding on volume — that alone is quite enough to make it function. The situation with currentTime is trickier: it moves on its own during playback. A plain binding would bounce back and forth in a noisy loop. What we need instead is a setter that skips assignment when the value hasn't changed:
Input()
set currentTime(currentTime: number) {
  if (currentTime !== this.currentTime) {
    this.elementRef.nativeElement.currentTime = currentTime;
  }
}

get currentTime(): number {
  return this.elementRef.nativeElement.currentTime;
}

@HostListener("timeupdate")
@HostListener("seeking")
@HostListener("seeked")
onCurrentTimeChange() {
  this.currentTimeChange.emit(this.currentTime);
}
The paused input will then be converted to a getter/setter pair:
@Input()
set paused(paused: boolean) {
  if (paused) {
    this.elementRef.nativeElement.pause();
  } else {
    this.elementRef.nativeElement.play();
  }
}

get paused(): boolean {
  return this.elementRef.nativeElement.paused;
}
Leveraging that directive makes a video player component nearly trivial:
<video
  #video
  media
  class="video"
  [(currentTime)]="currentTime"
  [(paused)]="paused"
  (click)="toggleState()"
>
  <ng-content></ng-content>
</video>
<div class="controls">
  <button
    class="button"
    type="button"
    title="Play/Pause"
    (click)="toggleState()"
  >
    {{icon}}
  </button>
  <input
    class="progress"
    type="range"
    [max]="video.duration"
    [(ngModel)]="currentTime"
  >
</div>
Users can supply sources inside ng-content just as they would with a native video tag. The body of the player component is almost embarrassingly brief:
currentTime = 0;

paused = true;

get icon(): string {
  return this.paused ? "\u23F5" : "\u23F8";
}

toggleState() {
  this.paused = !this.paused;
}
Combo Box
With the declarative mindset in place, we can take on something more substantial. A combo box is considerably more involved, but rest assured — we will not write a single function longer than one line. Possibly a stray two-liner, but nothing wild.
For this section I’ll also lean on declarative
preventDefault, built on the ng-event-plugins library, which I covered in depth in this article.
We’ll lay out the template first. Custom form controls for Angular are a topic of their own, so instead we’ll wrap the component around a native input, leaving users in control of its full feature set:
<combo-box [items]="items">
  <input type="text" [(ngModel)]="value">
</combo-box>
The inner template borrows a label to focus the input when someone clicks the arrow. It is a slightly hacky trick — an accessible label can’t be added by simply wrapping our component — but it works well enough for this demonstration.
<label>
  <ng-content></ng-content>
  <div class="toggle" (mousedown.prevent)="toggle()"></div>
</label>
<div *ngIf="open" class="list" (mousedown.prevent)="noop()">
  <div
    *ngFor="let item of filteredItems; let index = index"
    class="item"
    [class.item_active]="isActive(index)"
    (click)="onClick(item)"
    (mouseenter)="onMouseEnter(index)"
  >
    {{item}}
  </div>
</div>
Blocking default behavior on mousedown keeps focus steady inside the input. The component exposes exactly one @Input: an array of strings used as suggestions. You might guess the internal state is the open flag controlling the dropdown, but it isn’t. The only state we track is the index of the suggestion currently highlighted. NaN marks the absence of selection, so the state stays within the number type. The open property is then just a getter checking whether any suggestion is selected:
get open(): boolean {
  return !isNaN(this.index);
}
The suggestion list must be narrowed according to what the user has typed. We obtain NgControl as an @ContentChild and read its value, using it to filter the provided array:
@ContentChild(NgControl)
private readonly control: NgControl;

get value(): string {
  return String(this.control.value);
}

get filteredItems(): readonly string[] {
  return this.items.filter(item =>
    item.toLowerCase().includes(this.value.toLowerCase())
  );
}
A getter for the active index can then clamp itself to the filtered suggestion count:
get clampedIndex(): number {
  return limit(this.index, this.filteredItems.length - 1);
}

function limit(value: number, max: number): number {
  return Math.max(Math.min(value || 0, max), 0);
}
Since that getter always stays inside the bounds of the available items, it is safe to use anywhere. With that in place, the event handlers from the template come together: clicking the arrow toggles the dropdown, selecting an item is handled separately, and hovering updates the current index:
onClick(item: string) {
  this.selectItem(item);
}

onMouseEnter(index: number) {
  this.index = index;
}

@HostListener('keydown.esc')
@HostListener('focusout')
close() {
  this.index = NaN;
}

toggle() {
  this.index = this.open ? NaN : 0;
}

private selectItem(value: string) {
  this.control.control.setValue(value);
  this.close();
}
Keyboard handling comes next: the arrow keys open the dropdown, Enter picks a selected suggestion, and a live update of the list happens as typing progresses:
@HostListener('keydown.arrowDown.prevent', ['1'])
@HostListener('keydown.arrowUp.prevent', ['-1'])
onArrow(delta: number) {
  this.index = this.open
    ? limit(
      this.clampedIndex + delta,
      this.filteredItems.length - 1
    )
    : 0;
}

@HostListener('keydown.enter.prevent')
onEnter() {
  this.selectItem(
    this.open
      ? this.filteredItems[this.clampedIndex]
      : this.value
  )
}

@HostListener('input')
onInput() {
  this.index = this.clampedIndex;
}
And that completes the piece. The combo box is now fully functional. Throughout its implementation we kept to declarative style, managing only a single slice of state ourselves. There is no imperative chorus of “open the dropdown.” Instead we described how the component should behave as a function of its known pieces — the underlying control value, the incoming suggestion list, and the focused suggestion. That is precisely the declarative approach.
In production, you would also care about accessibility. Adding ARIA attributes such as
aria-activedescendantlets screen readers track the active suggestion as well. Read more about the combobox pattern here and here.
Have you ever wondered why the AK-47 became so prominent over the decades? Its entire action consists of just eight moving parts. That simplicity makes it easy to produce, operate, and maintain. The same logic applies to software architecture. Fewer states to manage lead to more dependable code. A simple design is a robust design. Declarative code may not appear simple at first glance, but after some practice its elegance becomes hard to give up.
Performance
The usual concern quickly surfaces: if we recalculate everything repeatedly, won't performance suffer? You absolutely need OnPush change detection for this to work well. I have struggled to find a legitimate argument for the Default strategy, except possibly for a field error component — since Angular forms still lack a touched stream as of this writing.
To judge performance, we have to account for what the getters actually do. A simple string concatenation like the one used for viewBox runs at roughly a billion operations per second, and about 300 million even on a modest Android phone. So that is hardly a concern. Basic arithmetic is likewise negligible. The story changes once arrays and objects enter the picture. Iterating 100 items to find one takes roughly 15 million ops/sec on a desktop and drops by tenfold on mobile. Immutable operations that fabricate new array instances are costlier still. Filtering a 100-item array ends up around 3 million ops/sec on desktop, and a mere 300k on Android hardware. Working with immutable objects behaves similarly, due to how JavaScript engines handle them. You can verify these numbers yourself here. If compliant components are going to work, we must optimize them.
Let’s add a basic memoization pattern so we can avoid redundant recalculations. A decorator for pure methods, it records the arguments it was called with along with the latest result. When the same arguments come in again, it returns the remembered output.
export function Pure<T>(
  _target: Object,
  propertyKey: string,
  { enumerable, value }: TypedPropertyDescriptor<T>
): TypedPropertyDescriptor<T> {
  const original = value;

  return {
    enumerable,
    get(): T {
      let previousArgs: ReadonlyArray<unknown> = [];
      let previousResult: any;

      const patched = (...args: Array<unknown>) => {
        if (
          previousArgs.length === args.length &&
          args.every((arg, index) => arg === previousArgs[index])
        ) {
          return previousResult;
        }

        previousArgs = args;
        previousResult = original(...args);

        return previousResult;
      };

      Object.defineProperty(this, propertyKey, {
        value: patched
      });

      return patched as any;
    }
  };
}
This lets us refactor our components into a clean pairing between a getter and a pure method:
get filteredItems(): readonly string[] {
  return this.filter(this.items, this.value);
}

@Pure
private filter(items: readonly string[], value: string): readonly string[] {
  return items.filter(item =>
    item.toLowerCase().includes(value.toLowerCase())
  );
}
Let’s benchmark the approach. We’ll compare plain declarative style, declarative plus memoization, and imperative updates driven by ngOnChanges:
This StackBlitz renders a list of 1000 components with a button that cycles change detection through all of them. The imperative case is essentially a dry run: inputs stay identical and nothing occurs during the detection pass. The declarative components, meanwhile, carry several getters of varying cost — a logic check comparing a value to a threshold; a string concatenation; a computational getter bound through @HostBinding to a class; a short array iteration; and array and object producers. All of this runs 1000 times over, since each component has its own copies. The last group applies the @Pure decorator to both the array and the object operations. The figures below average a hundred change detection runs per column:
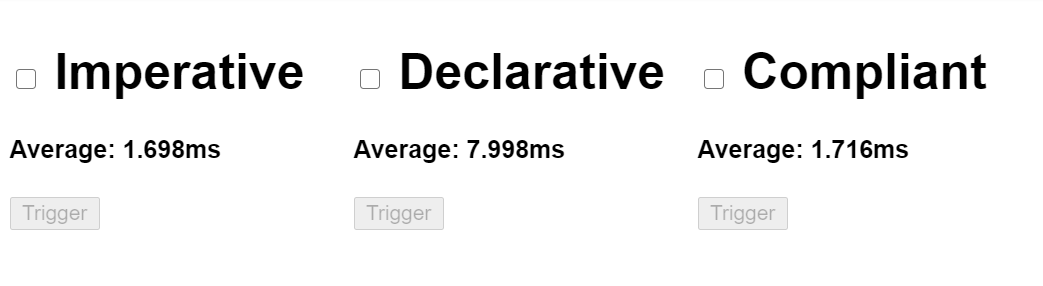
These are the same measurements on a smartphone:

On a desktop the difference is effectively noise. On a mid-tier Android device it lands somewhere around 10%. You could say 10% slower, sure. But there is another way to look at it. Even on a weak machine, with several thousand getters firing in the same cycle, we stay well within a single 60FPS frame — merely 1.5 milliseconds behind doing nothing at all, which is a nearly empty change detection pass. In practice, the heaviest costs of an application are in the DOM. Mutating the DOM is rarely the cheap part. The neat thing about browsers is they skip updates when the bound value has not changed, be it a class, a style, or an attribute. With a well thought out component tree, memoization in the right spots, and OnPush across the board, declarative code will never be what holds you back.
Closing Thoughts
Adopting this style of component design yields resilient, adaptable code. It does require a shift in mindset, but once the pattern clicks, the ease of authoring and maintaining such code becomes clear. You have to stay alert to avoid common mistakes; if you don't, you'll see performance degrade. Still, from what I've seen, the payoff is substantial — it has fundamentally reshaped how I approach front-end development. I've expanded on this topic in a brand-new chapter of our advanced Angular handbook at angular.institute, focusing on real-world tips and tricks. If that sounds interesting, head over there. You can also try out the examples from this discussion right here:
In my day job, I lead development of a proprietary UI kit at Tinkoff. Everything we ship follows the principles above. We're now open-sourcing it, and the foundation package is already live on GitHub as well as npm. It includes that pure decorator and a host of other handy low-level utilities to support building world-class Angular applications. Expect to see more on those in the near future — stay tuned!