AngularFire and the Art of Effortless Firebase Integration
Recently, I've spent considerable time building side projects with Google's Firebase, and I want to share what I've learned. The Firebase platform is robust, offering services that handle most application needs—from hosting and authentication to database and file storage. While you could create a Node Express setup or leverage Firebase Cloud Functions to build an API, there's a far more straightforward path: the AngularFire Library.
This article offers a high-level exploration of AngularFire and its underlying mechanics. I'll walk through a simple grocery list application I developed, demonstrating how AngularFire makes complex operations feel almost magical.
Before we dive in, this post assumes familiarity with Firebase applications and the Firebase console. For a deeper walkthrough, check out my post on RhythmAndBinary.com here and my Angular-In-Depth article on deployment here.
What is AngularFire
AngularFire serves as the official bridge between Angular and Firebase. At the time of writing, it supports connections to these Firebase services:
- Authentication
- File Storage
- Cloud Firestore (NoSQL Database)
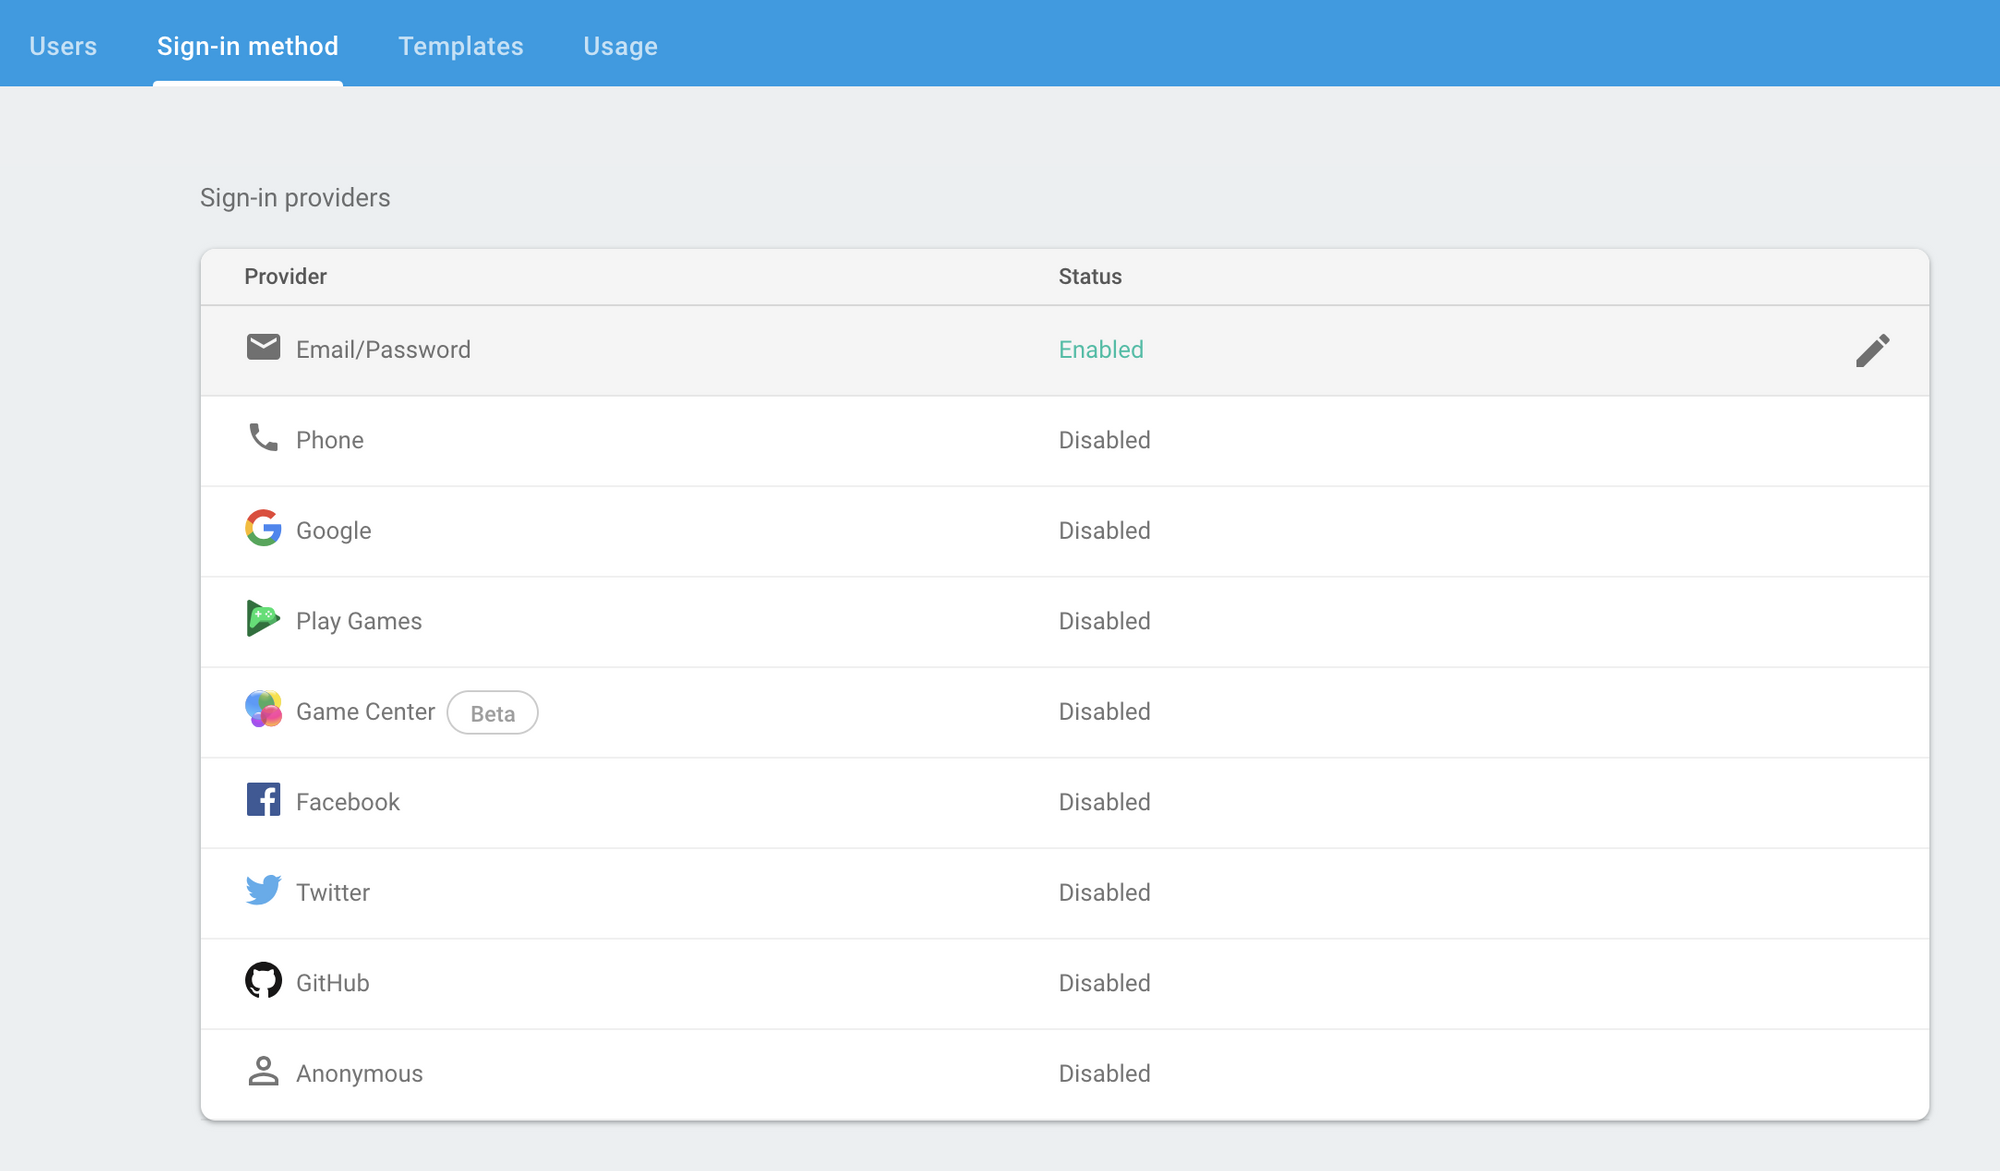
The Authentication Service enables OAuth through various providers. Once your Firebase App is configured, the console displays the available options as shown:
AngularFire delivers realtime updates via optimized observable streams. Underneath, it employs a custom protocol called "WebChannel" that handles real-time synchronization (more details available here). Additionally, action API endpoints integrate smoothly with NgRx if you choose to combine it with AngularFire.
The AngularFire README is comprehensive, covering everything from installation to code examples across services. You can find it here.
In the sections ahead, I'll focus on Authentication and Cloud Firestore. The File Storage feature is equally impressive and well-documented here.
The Firebase Groceries Application
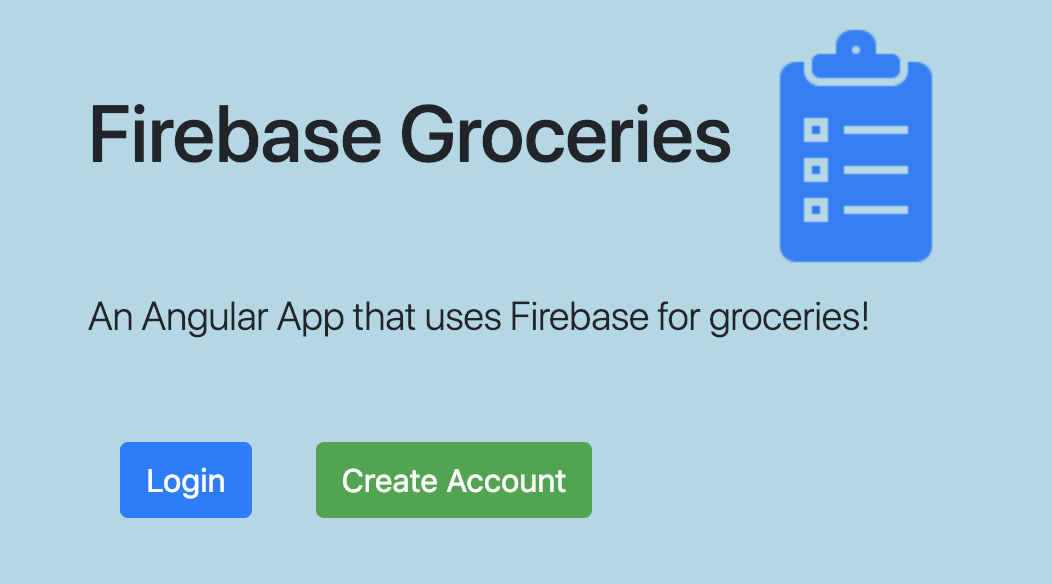
(screenshot of the grocery list app we're going to review)
To demonstrate AngularFire in action, I'll reference a basic grocery list app available here. You can also explore the source code on GitHub here.
The app is intentionally simple, featuring dialogs for account creation and login. Data stored in Cloud Firestore is keyed to user information specifically for enhanced security (details coming later).
This sample app contains just one component. All code snippets shown below come from the same grocery-list.component.ts and grocery-list.component.html files.
My focus will be on AngularFire Authentication and Cloud Firestore—how to connect these services and some insights into their internals that make everything work so seamlessly.
Getting Started with Authentication
Authentication is a universal requirement, though its complexity varies based on what you're protecting. Firebase simplifies this significantly with its Authentication service, eliminating the need for server-side provider implementation. Simply injecting the AngularFireAuth object into your app grants immediate access to Firebase's authentication capabilities.
Let's examine the code!
First, enable authentication in your Firebase project. Navigate to the Firebase console, select authentication, and activate it by choosing a sign-in method. Firebase supports multiple OAuth providers, including Google and Facebook. For my project, I opted for the standard email/password provider.
After enabling it (and adding the endpoint to your environment.ts file), you connect it to your project by injecting an AngularFireAuth instance into your component's constructor. Here's my implementation for the grocery list app:
constructor(public afs: AngularFirestore, public afAuth: AngularFireAuth) {
    this.afAuth.auth.onAuthStateChanged(user => {
      if (user) {
        // show email in welcome message
        this.email = user.email;
        // call method that selects when authenticated
        this.selectItems(user.uid);
      }
    });
  }
You'll notice I use onAuthStateChanged to verify if a user is logged in. This method returns an observable stream containing a user object. If the user is authenticated, this object will be defined. A basic if statement can determine login status—particularly useful when someone refreshes the page or navigates away and back. On component initialization, it checks authentication status and, if valid, loads data with this.selectItems(user.uid).
I'm also injecting AngularFirestore here, but we'll explore that later.
User Authentication with AngularFireAuth
The AngularFireAuth object includes a method for creating users easily. In my grocery list app, I implemented it like this:
createUser(email: string, password: string) {
    this.afAuth.auth.createUserWithEmailAndPassword(email, password)
      .then(() => {
          // on success hide form and store variables in login
          // and then call the login method
          this.showCreateUserInputForm = false;
          this.loginUser(email, password);
      })
      .catch((error) => {
        alert(error);
      });
  }
User creation happens through a straightforward call to afAuth.auth.createUserWithEmailAndPassword, passing only a username and password. The method returns a Promise object indicating success or error. AngularFireAuth automatically handles checks like unique usernames—the kind of boilerplate validation you'd normally write yourself.
The module also provides a login method for authenticating existing users. Here's my approach:
loginUser(email: string, password: string) {
    this.afAuth.auth.signInWithEmailAndPassword(email, password)
      .then(() => {
        // on success populate variables and select items
        this.selectItems(this.afAuth.auth.currentUser.uid);
      })
      .catch((error) => {
        alert(error);
      });
  }
After user creation, authentication occurs via afAuth.auth.signInWithEmailAndPassword. Similar to the creation method, you pass email and password. AngularFireAuth handles all verification logic, so you avoid writing conditional code for various scenarios. Even the error messages are clear enough to display directly to users.
Finally, when users are ready to leave, there's a signOut method. My implementation looks like this:
// async is not necessary here, just controlling the event loop
  async logoutUser() {
    await this.afAuth.auth.signOut()
      .catch(function(error) { alert(error); });

    this.email = '';
    this.password = '';
    this.showLoginUserInputForm = false;
    this.showCreateUserInputForm = false;
  }
Connecting Authentication to the Template
The component code works well, but what about the view?
One of AngularFire's strengths is that observable streams integrate naturally with the async pipe. Combined with *ngIf and *ngFor directives, your data displays without extensive manual work. No more flags or conditional checks—just bind directives to observables and let the framework manage visibility.
Let's start with the login dialog. I used the async pipe with AngularFireAuth as follows:
<div class="container">
  <div class="row add-item" *ngIf="afAuth.user | async as user; else showLogin">
    <div class="container">
      <div class="row">
        <div class="col-sm welcome-display">
          <h1>Welcome {{ email }}!</h1>
        </div>
          ...
Notice how *ngIf checks the user observable state using the async pipe, showing content only when authenticated. This single line handles all show/hide logic based on authentication status—previously requiring flags or custom dialog components. The observable streams from the Authentication service make this remarkably efficient.
Worth noting: Firebase offers a free pop-up for Google authentication, which you can implement following the documentation here.
The AngularFireAuth module has much more to offer, and I encourage reviewing the official documentation when you have time.
Understanding Cloud Firestore
Cloud Firestore is Firebase's NoSQL database, providing realtime data synchronization with near-instant updates. AngularFire connects database operations to dispatch events similar to NgRx, mimicking how reducers and data stores control state. The net effect is remote state control—updates push to Cloud Firestore and stream back to all consumers.
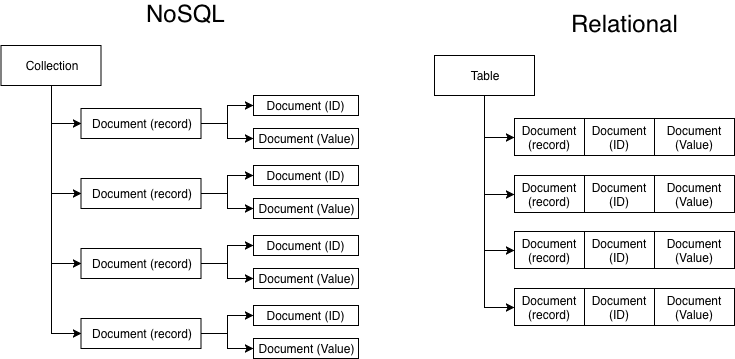
Data organization relies on documents and collections. Each NoSQL record is a "document" linked to others via key-value pairs—distinct from relational databases with columns and rows. In code, you create observable collection and document objects that stream database updates directly to your app. The console provides visual data inspection after creation.
My grocery list app uses documents, which needs some explanation. First, let me show a collection example. The AngularFire README demonstrates collection creation like this:
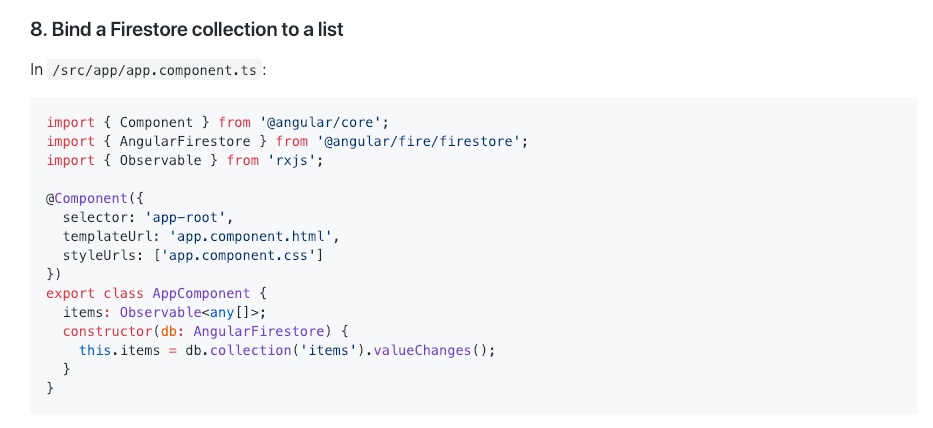
In this example, the items object is an observable that reacts to database changes in realtime through the valueChanges() stream. Redux-compatible code and websockets handle this under the hood.
The README continues, showing how the async pipe displays database information with *ngFor:
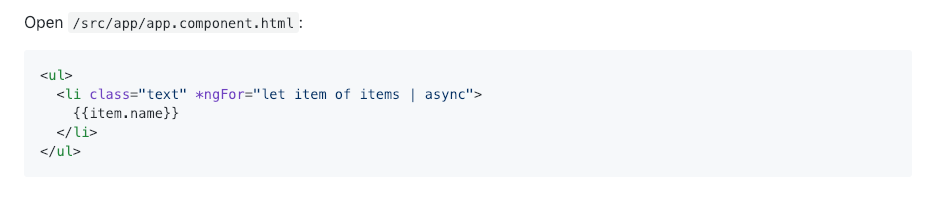
Because items is an observable stream, updates appear instantly in your application. This power comes from the websockets and state management handled for you.
Using Firestore Document Objects
For my grocery list app, I select a document first, then reference a nested collection. This adds complexity, but I did it intentionally by keying data on userIds (details later). Here's the implementation:
selectItems(uid: string) {
    this.groceryItemsDoc = this.afs.doc<Item>('user/' + uid);
    this.groceryItems = this.groceryItemsDoc.collection<GroceryItem>('GroceryItems').valueChanges();

    // turn on logging to see how requests are sent
    // this.groceryItemsDoc.collection<GroceryItem>('GroceryItems').auditTrail().subscribe(console.log);
  }
I first select a document keyed on the userId, then subscribe to the valueChanges() stream of the "GroceryItems" collection within it. This mirrors the README example, but with a nested structure. Here, valueChanges() applies specifically to the "GroceryItems" collection inside the authenticated user's document. I'll explain my reasoning shortly, but this approach is documented in the angularFire2 README here.
Standard CRUD operations with Cloud Firestore are straightforward. AngularFire provides set, update, and delete methods that dispatch changes directly to your app's database. These make basic operations simple, as shown in the addItem() and deleteItem() methods:
// async is not necessary here, but using it to control event loop
  async addItem() {
    const id = this.afs.createId();
    const groceryItem: GroceryItem = {
      value: this.createItem,
      id: id
    };

    await this.groceryItemsDoc.collection<GroceryItem>('GroceryItems').doc(id).set(groceryItem)
      .then(() => {
          // when successful clear input field value here
          this.createItem = '';
      })
      .catch((error) => {
        alert(error);
      });
  }

  // async is not necessary here, but using it to control event loop
  async deleteItem(groceryItem: GroceryItem) {
    await this.groceryItemsDoc.collection<GroceryItem>('GroceryItems').doc(groceryItem.id).delete()
      .catch((error) => { alert(error); });
  }
To call these methods, you need the target object and an id value that Cloud Firestore uses for record uniqueness. Each operation returns a promise, easily handled in code as shown above. For more details and examples, check the README here.
Observing Firestore Operations
I also subscribe to auditTrail to display read and write operations in the console. This illustrates how AngularFire's architecture resembles NgRx dispatches for state management. Enabling auditTrail offers visibility into how remote state is maintained with observables (note the add and removed entries):
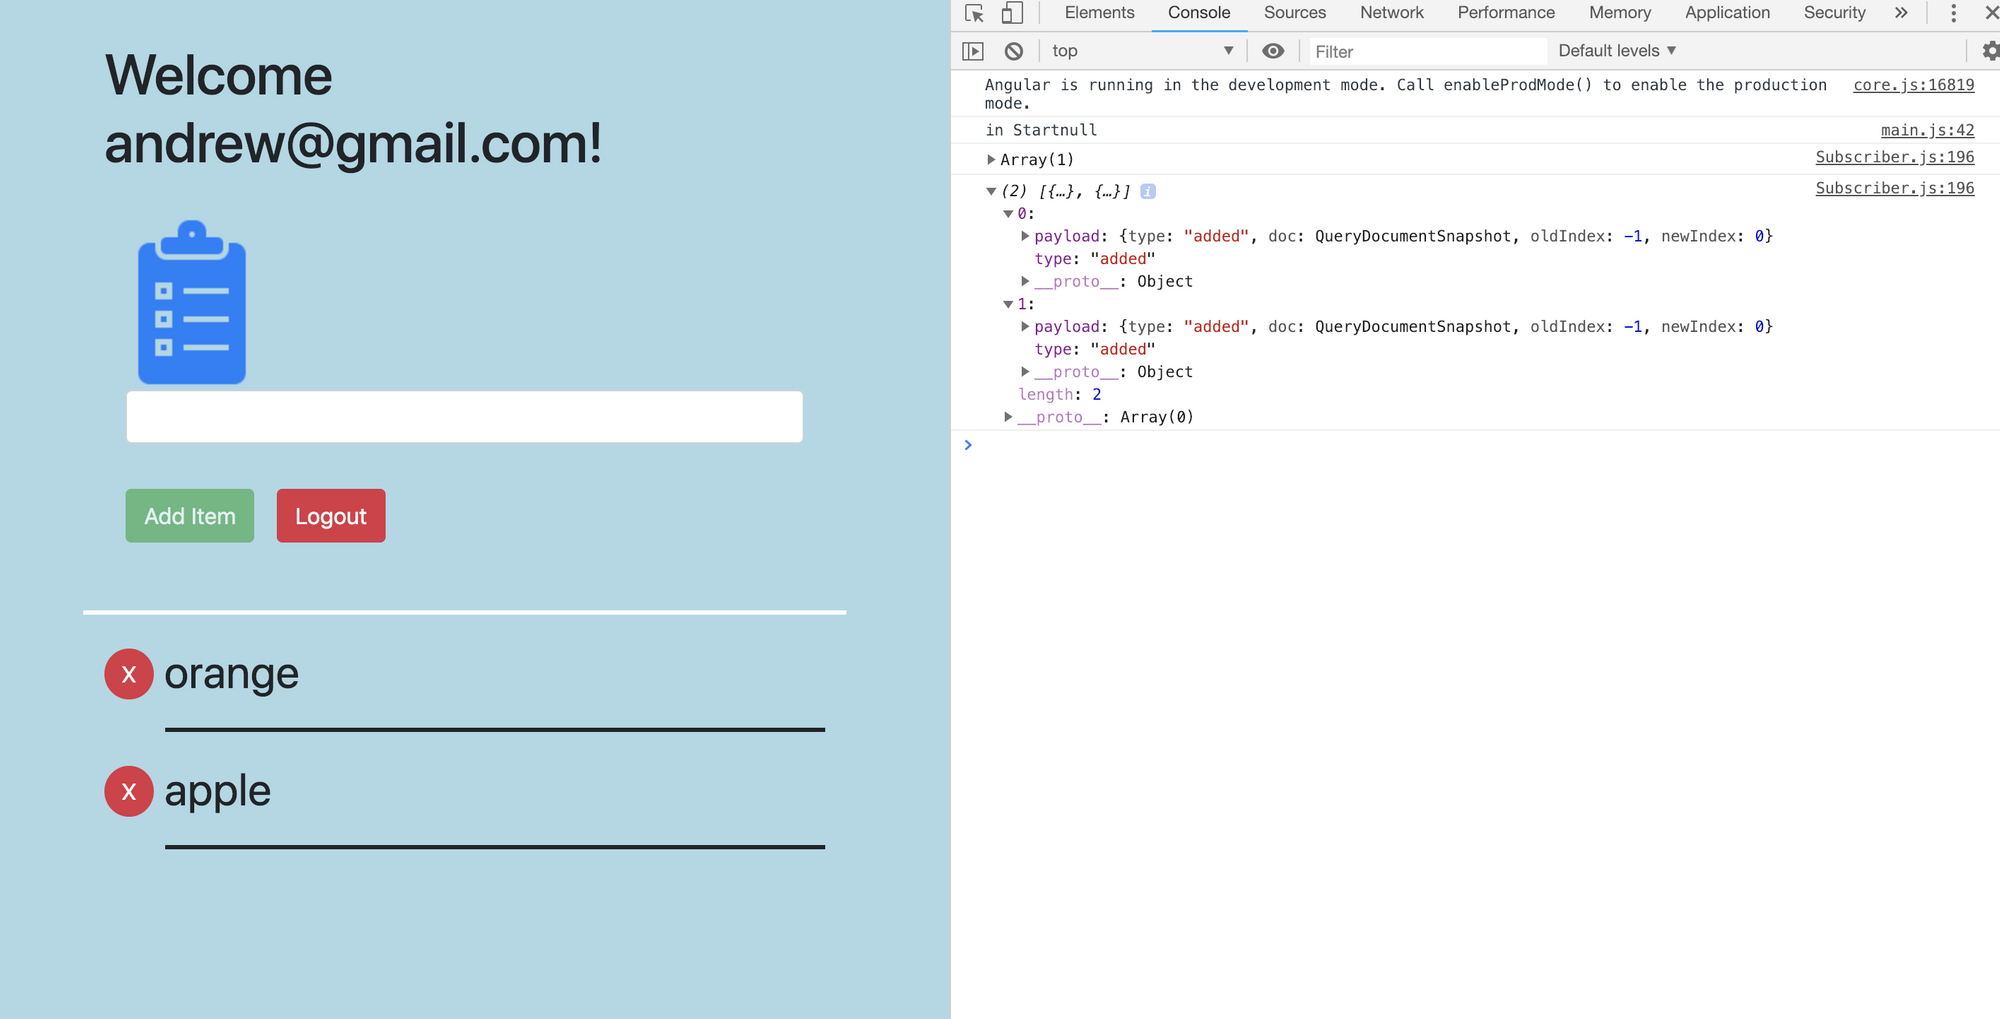
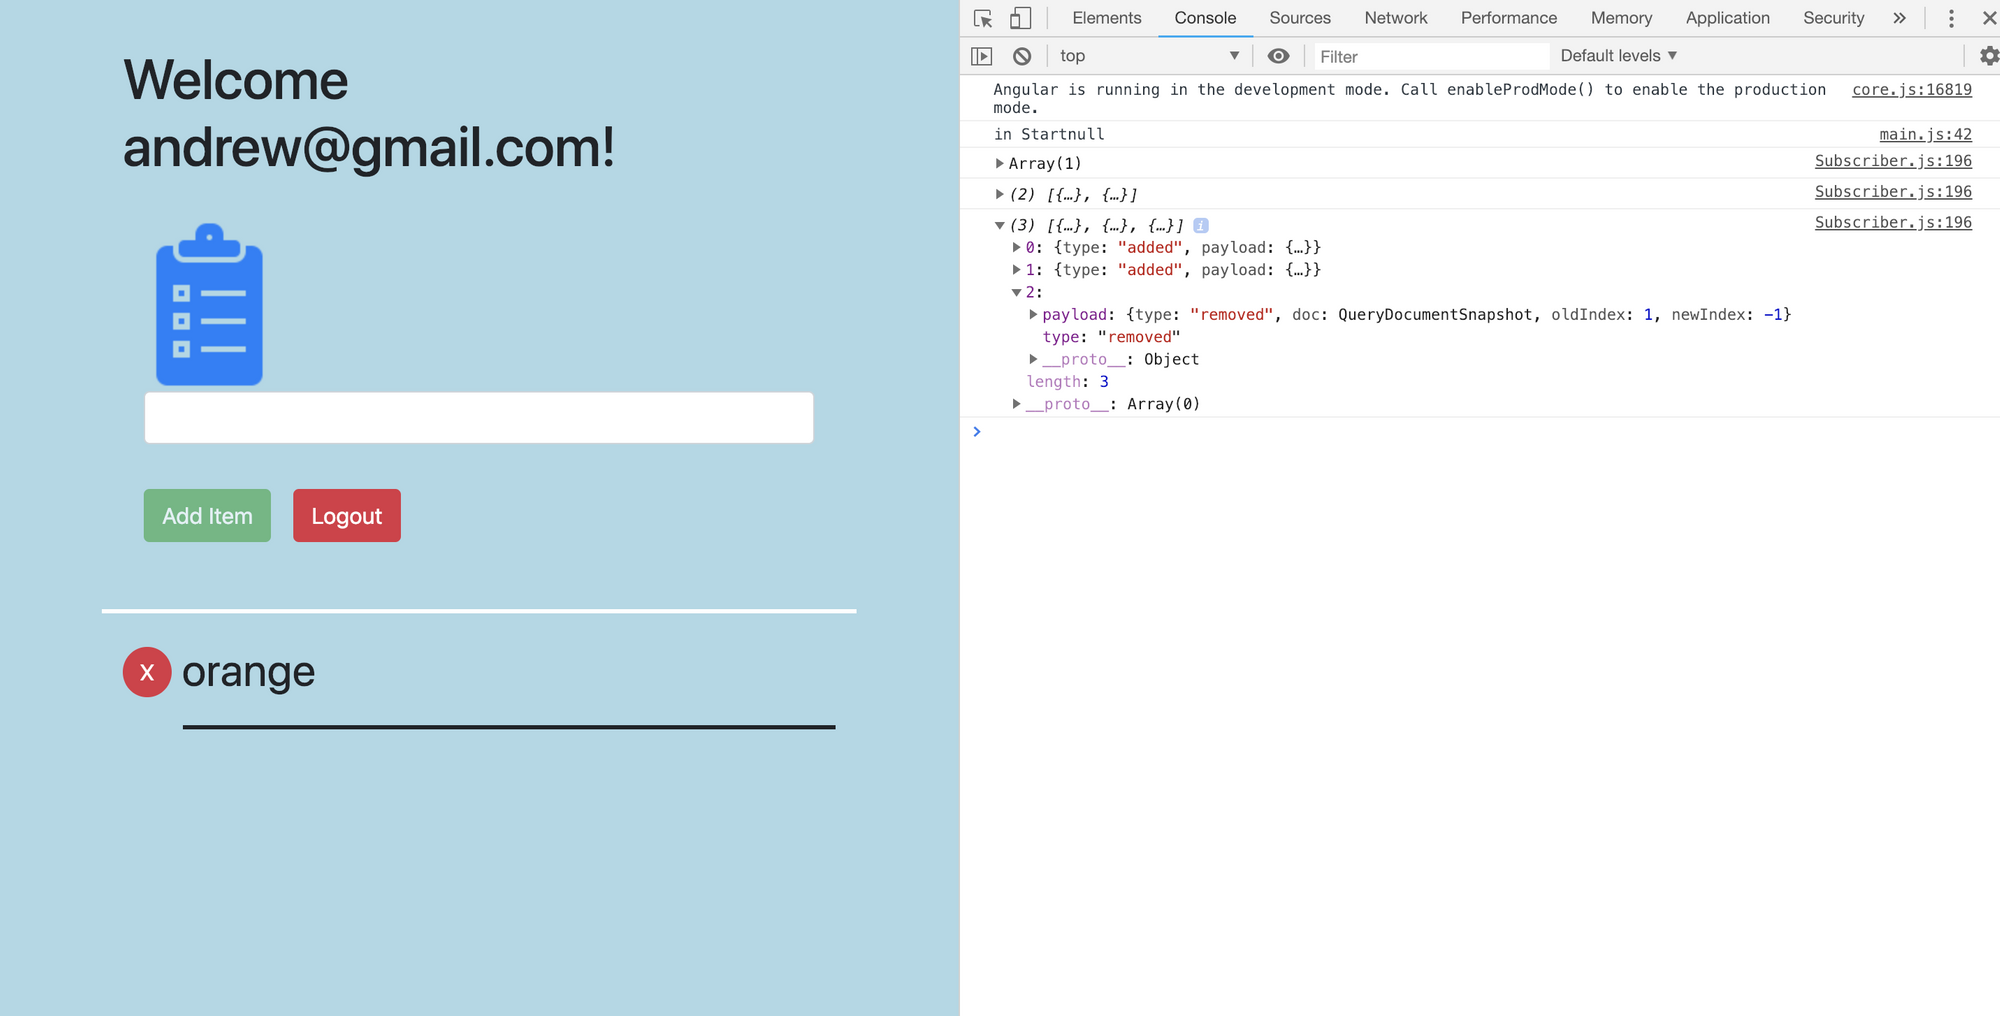
For displaying Firestore data in templates, you reference the observable just like with AngularFireAuth. Here's my approach:
...
      <div class="row display-item">
        <div class="col-sm">
          <div *ngFor="let groceryItem of groceryItems | async">
            <div class='grocery-display'>
              <div class="delete-button"><button type="button" class="btn btn-danger round-button" (click)="deleteItem(groceryItem)">X</button></div>
              <div class="grocery-item">
                <div class="name-display">{{ groceryItem.value }}</div>
              </div>
            </div>
          </div>
        </div>
      </div>
...
I'm referencing the valueChanges() observable here, maintaining the same binding capability with the async pipe. Data updates in realtime as remote state streams to the observable created by valueChanges(). There's also snapshotChanges(), which handles rendering scenarios. Learn more about snapshotChanges() here.
Security Considerations
Now, let me explain why I keyed data on userId in Cloud Firestore. Since the environment.ts file ships with your app and is publicly visible, anyone can see your Cloud Firestore endpoint. A savvy hacker could inspect your source code, find the endpoint, and attempt to retrieve data through the browser console. The solution is building database rules that govern which operations different users can perform.
When setting up a Firestore instance, you can choose "testing" mode (fully open) initially. Once ready, you restrict access with custom matching rules built directly into the console.
Firebase recommends establishing rules to control read operations. By keying data on userId, you ensure data can only be read by the user who created it during an authenticated session. In the console, this involves setting values in the "Rules" tab as shown:
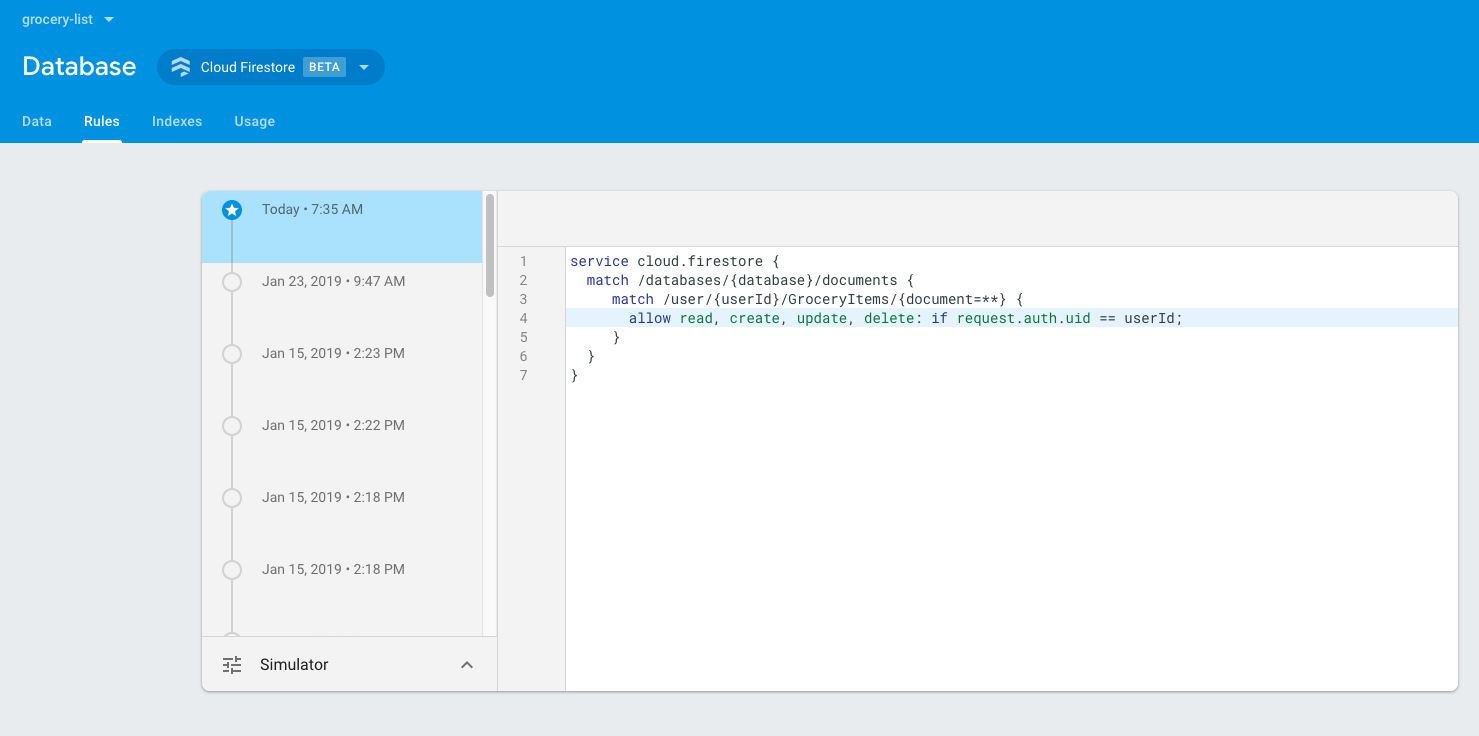
The configured rules essentially use pattern matching. Curly braces {} expose values as variables for interrogation. Each match traverses the documents and collections that form your NoSQL database structure.
The first match to /databases/{database}/documents traverses the nested collections, applying to any document in the database connected to your application.
The second match to /user/{userId}/GroceryItems/{document=**} targets any document in the user->userId->GroceryItems collection chain. The curly braces around {userId} make its value available as a variable in the console (same with {database}). We'll use that value for security enforcement next.
Within the second match, you'll see:
allow read, create, update, delete: if request.auth.uid == userId;
This rule states: "any read, update, or delete is permitted if the authenticated userId in the session matches the userId variable." That variable comes from the curly braces. This is crucial because it isolates permissions—a user's data can only be accessed by that user.
For more on building rules, the Firebase documentation has extensive information here.
Final Thoughts
As mentioned earlier, all this "magic" stems from observable streams and bi-directional near-instant communication channels. AngularFire follows a pattern similar to NgRx for controlling remote state, though without a formal reducer. Observable endpoints like valueChanges() receive realtime database updates, which propagate to all running app instances. Anywhere hosting your app stays in sync with Cloud Firestore's remote data. This simplifies development—you only subscribe to the observable streams. With the async pipe, you control what displays, and data updates in realtime without manual polling.
David East, a co-creator of AngularFire, gave an excellent talk explaining this in greater detail. Special thanks to Nicholas Jamieson from Angular-In-Depth for sharing the link. Watch David's talk for visual aids and deeper insight into AngularFire's relationship with NgRx. I hope this post gives you a solid foundation for using AngularFire in your projects.