Automating NPM Package Publishing with Azure DevOps
A practical walkthrough.
Imagine your source code lives on GitHub and your goal is to distribute it as an NPM package via Azure DevOps. Both platforms offer free accounts for open source projects.
Here's what this guide will help you set up:
- a Build pipeline that activates when code is merged into a
release/*branch - a Publish pipeline that runs automatically once the Build pipeline finishes successfully
- a manual approval gate so you can publish only what you explicitly review — for instance, multiple commits to your
release/1.0.0-rc1branch may trigger builds, but only the final one, with all tests passing, gets your go-ahead for publishing - separate configurations for pre-release (beta) publishing and stable release publishing
When this is complete, you'll have a release pipeline activated by a pull request merge into a branch like release/1.0.1 — it will wait for your explicit approval before pushing anything to NPM.
Looking for the final result? The complete build script is available as a
.ymlfile here, and you can import the release pipeline from this export after importing the publish task. You can then adapt it to your own project.
You can examine a live example of the build pipeline and the release pipeline in action.
The process, step by step:
Step 1: Grant Azure Pipelines Access
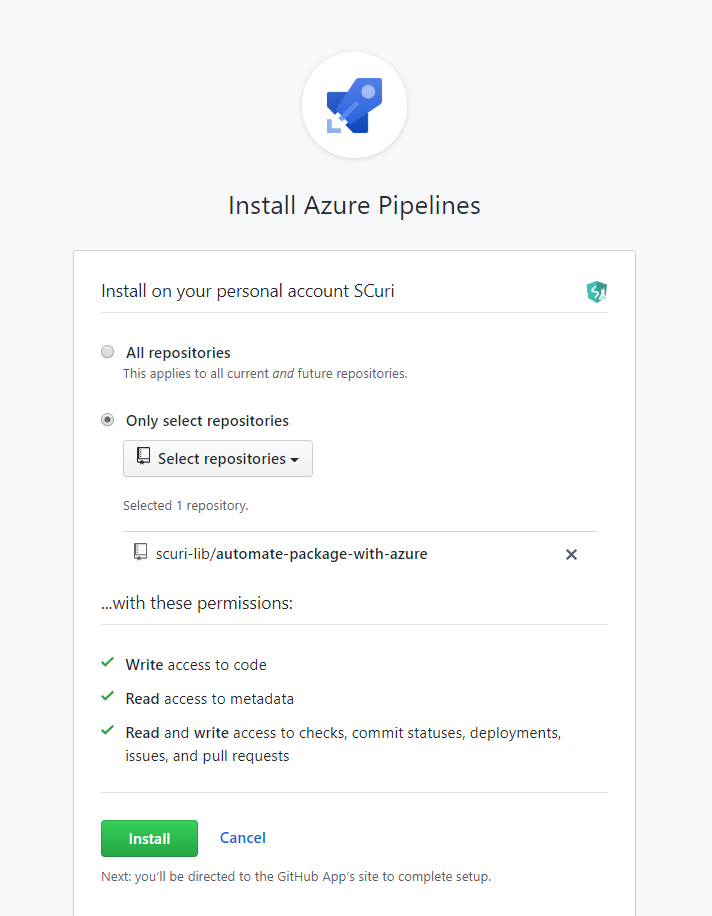
Connect Azure Pipelines to your GitHub repository. This integration enables GitHub to notify Azure DevOps when pull requests are opened and commits are merged — these notifications function as webhooks. Further guidance is available in this article.
Step 2: Configure the Build Pipeline
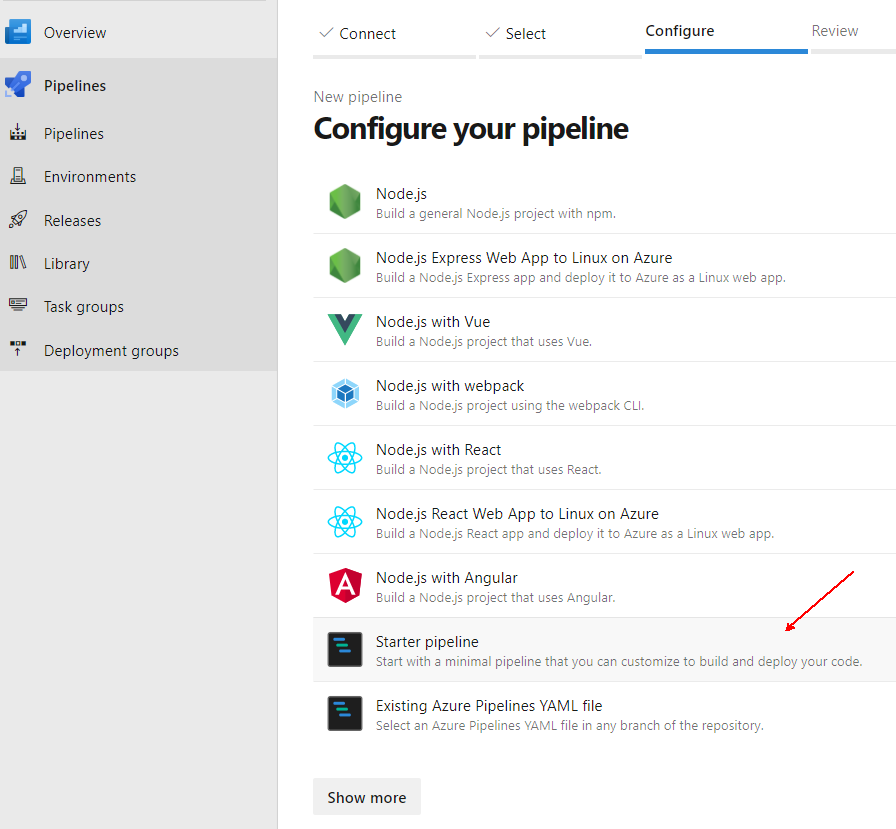
In Azure DevOps, create or modify your Build pipeline with the configuration below:
trigger:
    - release/*

pr: none

pool:
    vmImage: 'ubuntu-latest'

steps:
    - task: NodeTool@0
      inputs:
          versionSpec: '10.x'
      displayName: 'Install Node.js'

    - script: |
          npm install
      displayName: 'Install dependencies'
    - script: |
          npm pack
      displayName: 'Package package'
    - task: CopyFiles@2
      inputs:
          contents: '*.tgz'
          targetFolder: $(Build.ArtifactStagingDirectory)
      displayName: 'Copy archives to artifacts staging directory'

    - task: PublishBuildArtifacts@1
      inputs:
          path: $(Build.ArtifactStagingDirectory)
          artifact: package
      displayName: 'Publish artifacts'
Here's what each part accomplishes:
- The pipeline activates exclusively on merges to branches that begin with
release/— not on pull requests themselves (you might want to run it on PRs too, or, like me, maintain a separate PR pipeline for testing, linting, and building without packaging) - The virtual machine environment — this example uses
ubuntu-latest - The execution steps:
- install project dependencies
- package your library as a
.tgzfile using npm pack - upload the artifact so the Release Pipeline can access it later
Once your edits are done, click "Save" (it's under the "Save and run" button), then commit your changes, ideally through a pull request:
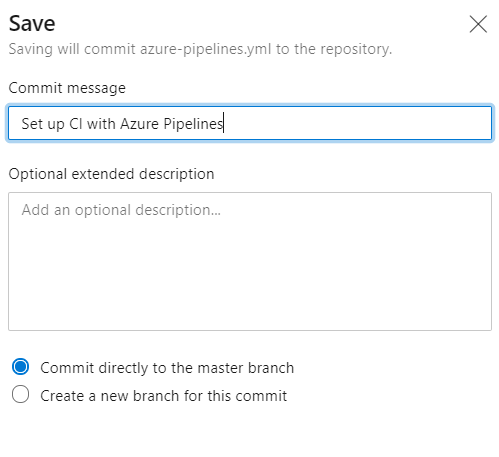
After this, your repository will contain an azure-pipelines.yml file with this content. This file serves as AzDO's instruction manual, and keeping it in your repo gives you version control and an audit trail.
Step 3: Set Up the Release Pipeline
Now, create a new release pipeline. You'll find several entry points to do this:
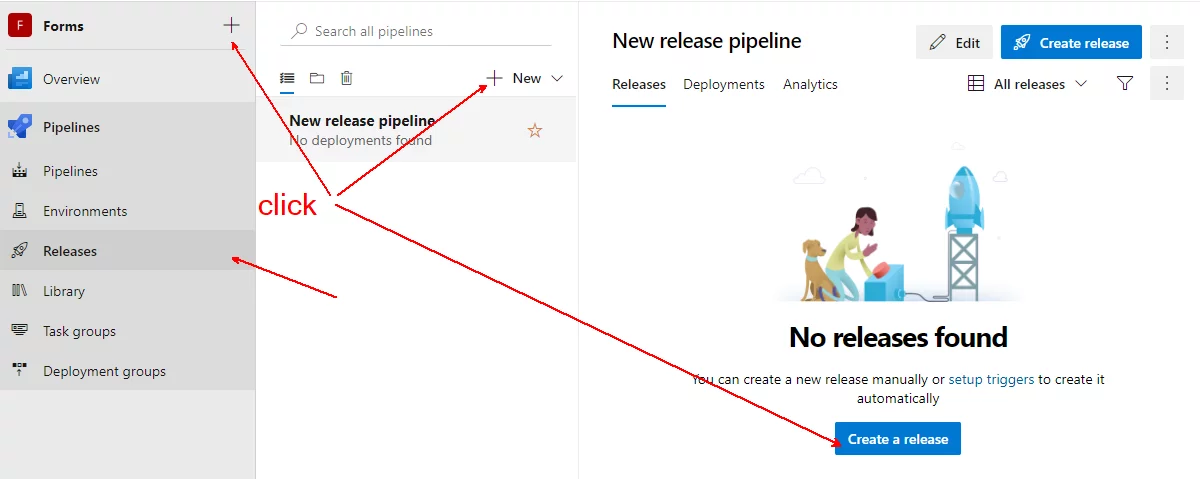
Choose the empty job template to start with a blank canvas.
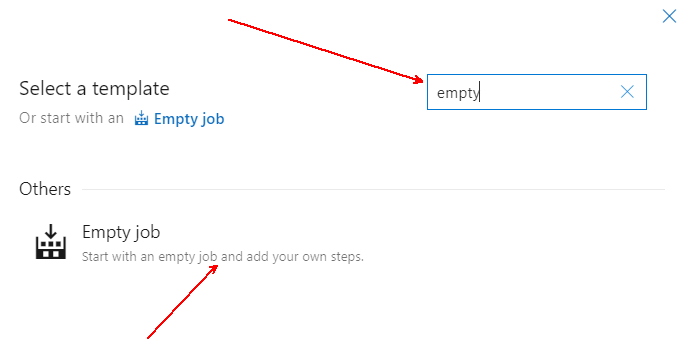
Select the Empty job option
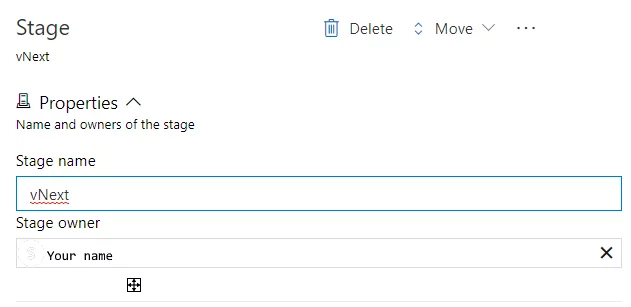
Name this stage vNext
Choosing the name vNext signals that this stage will handle pre-release versions — think beta or release candidate. This stage will publish your package under a dist-tag like next (or beta, rc), so a plain npm install won't pick it up by default. We'll add vLatest shortly for stable releases, publishing under the latest tag, which is what NPM installs by default. A deeper look at NPM tags is available in this article.
For illustration:
When my-lib has published version 1.0.0 tagged latest and version 1.0.1-rc1 tagged next, running npm i my-lib installs 1.0.0 — not the pre-release 1.0.1-rc1. That's the desired behavior. Users who explicitly want the pre-release can run npm i my-lib@next or npm i my-lib@1.0.1-rc1, acknowledging they're using an unstable version.
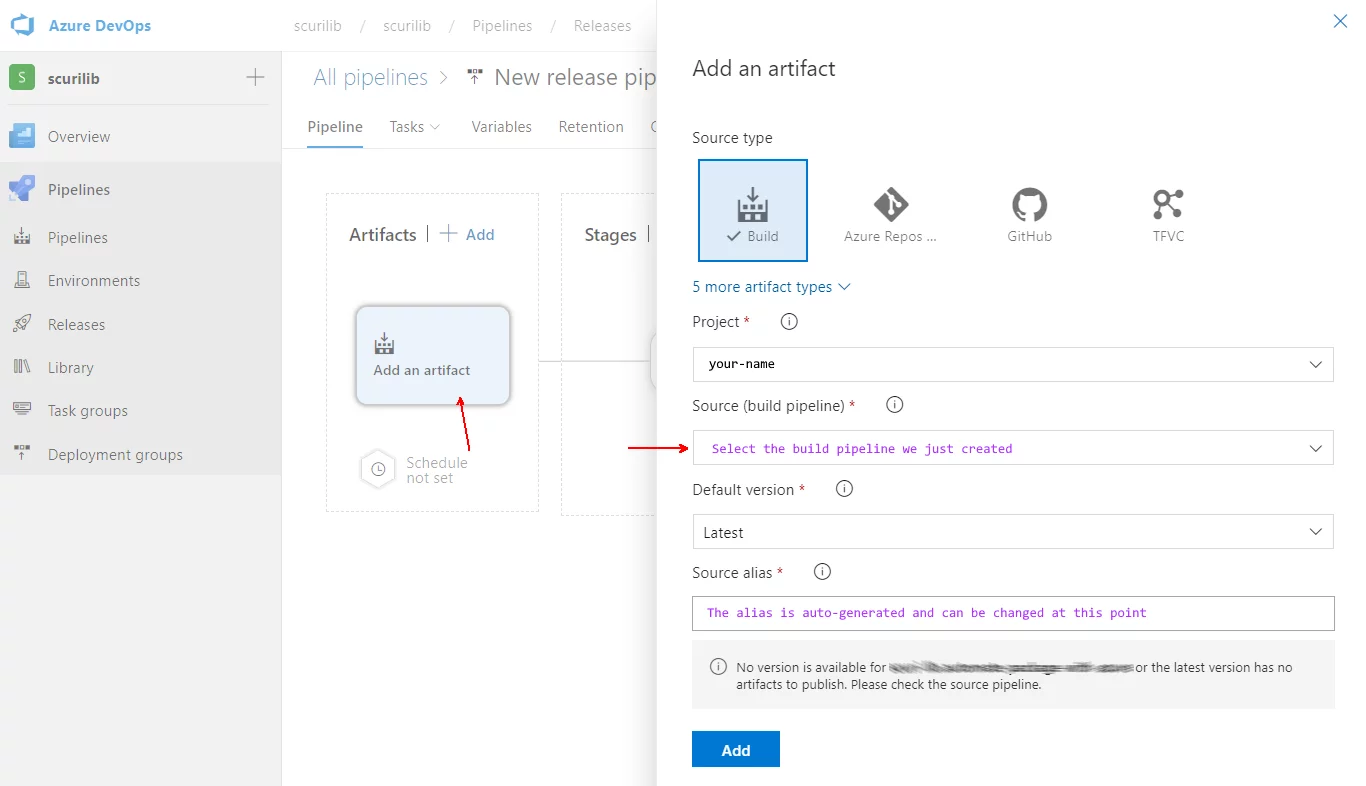
Set the release trigger to activate upon the successful completion of the Build pipeline — that is, when a new build artifact is produced.
A helpful tip: You can always trigger releases manually and select older artifacts if you need to publish a previous package version.

Turning on the release trigger for vNext after a successful build.

Be sure to give your pipeline a name and save it.
Step 4: Create an NPM Token for Publishing
Switch over to NPM to generate a token with Read and Publish permissions. Instructions are linked here.
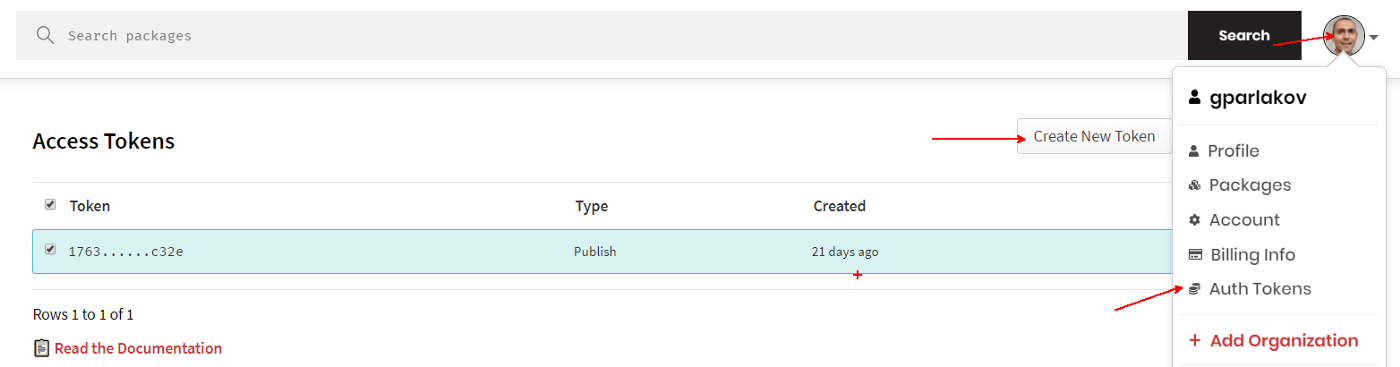
This token lets our pipeline authenticate to NPM without embedding a username and password in the pipeline definition. Importantly, it can be revoked at any time if compromised.
You can also generate a token via the CLI if you need to restrict the IP addresses from which the token can be used.
Establish a Variable Group in the Environment
Back in Azure DevOps, create a variable group for the release pipeline environment — this will be shared across both the vNext and vLatest stages.
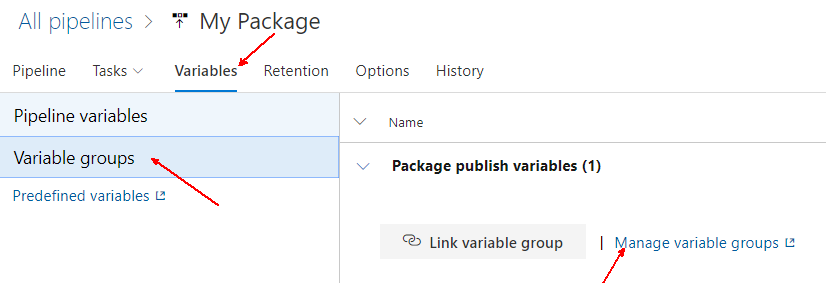
Make this variable a secret when you store the token:
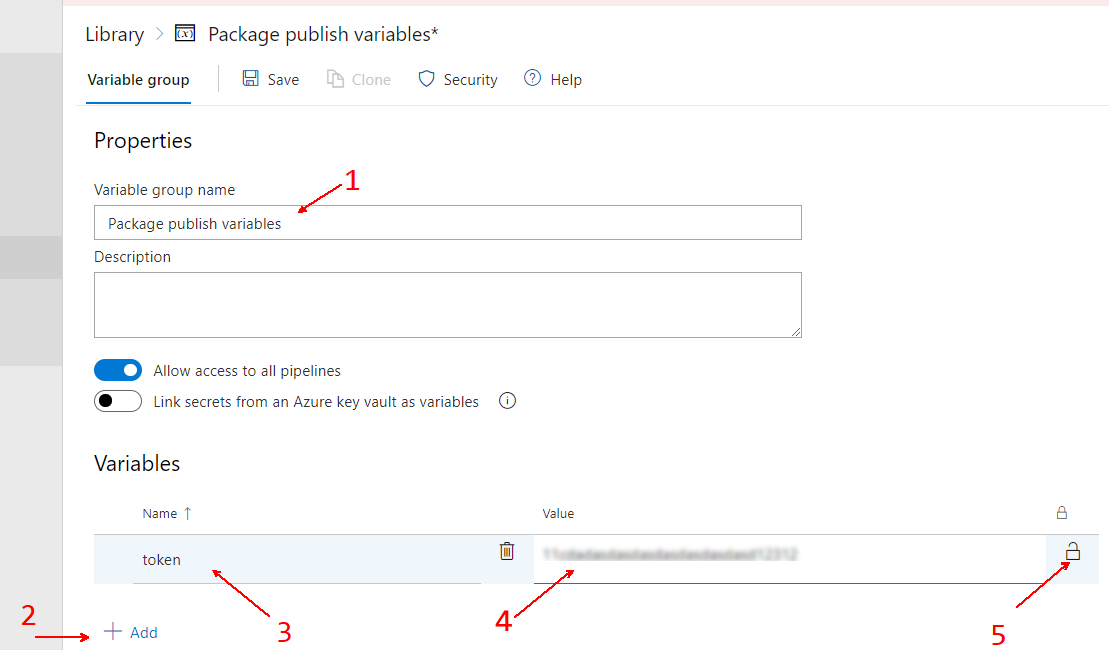
Paste your token and ensure the secret option is selected.
Marking it as a secret keeps it out of pipeline logs, making it safe even for public pipelines, like this one.
Attach this variable group to your release pipeline. Skipping this step means the token variable won't be accessible where you need it — you can see the consequence of that omission in this failed release:
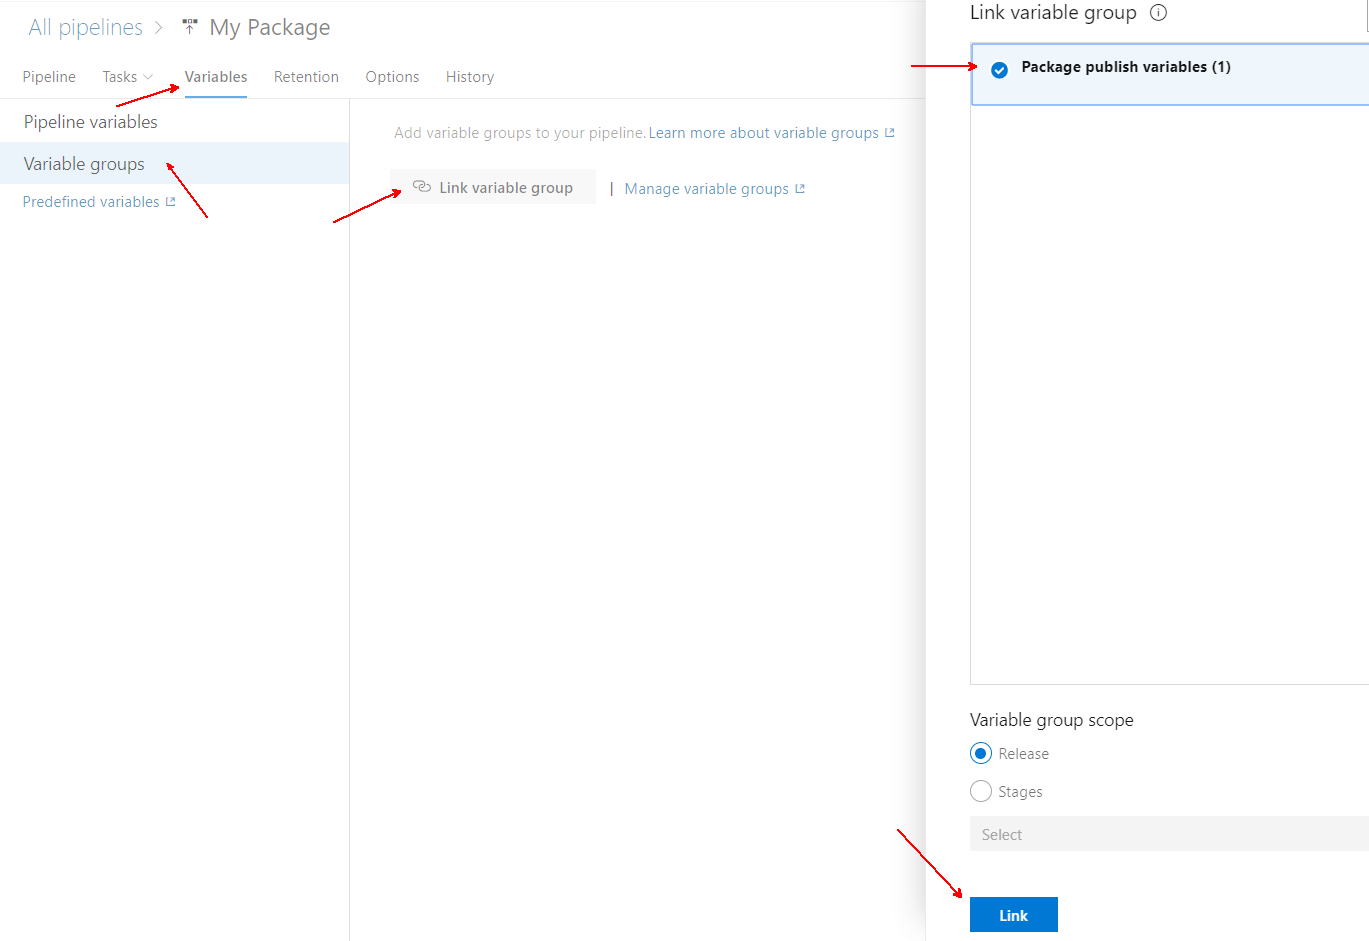
Step 5: Tailor the vNext Pipeline
Time to make this pipeline produce results.
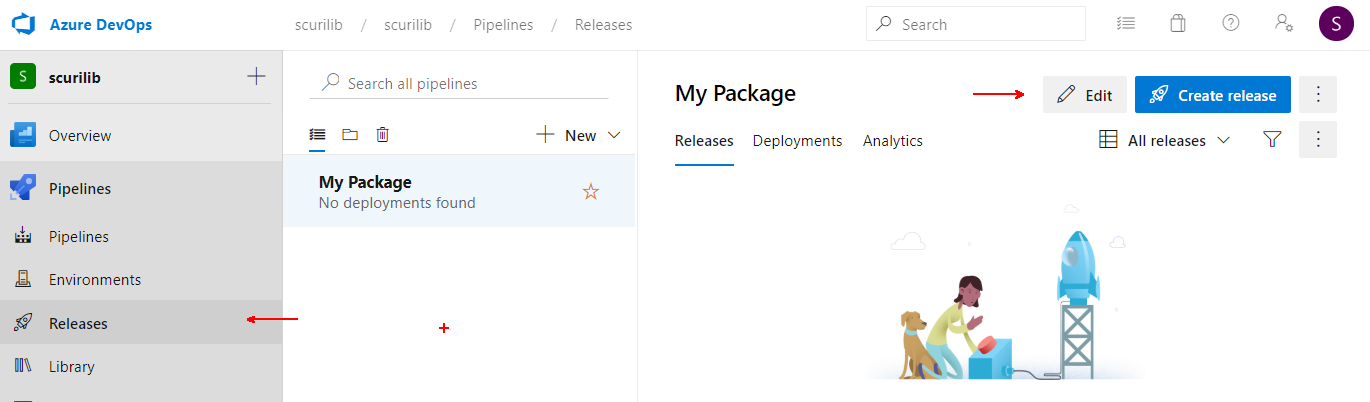
Navigate back to releases and select Edit.
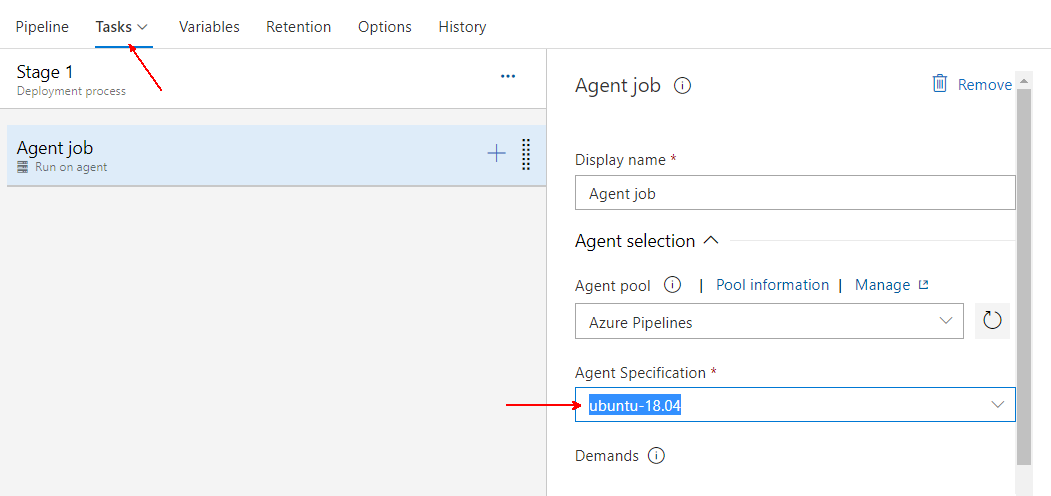
This example uses ubuntu-18.04, but feel free to choose another — Linux, Windows, and macOS agents are supported. You could also bring your own on-premises agent.
Start by unpacking the artifact (the output of npm pack). Add an "Extract files" task and configure it to place the contents into ./my-package folder — pick any name you like, but steer clear of the __.__ and ✅__Clean destination… combination, which would erase your downloaded artifact.

Including the Extract files task
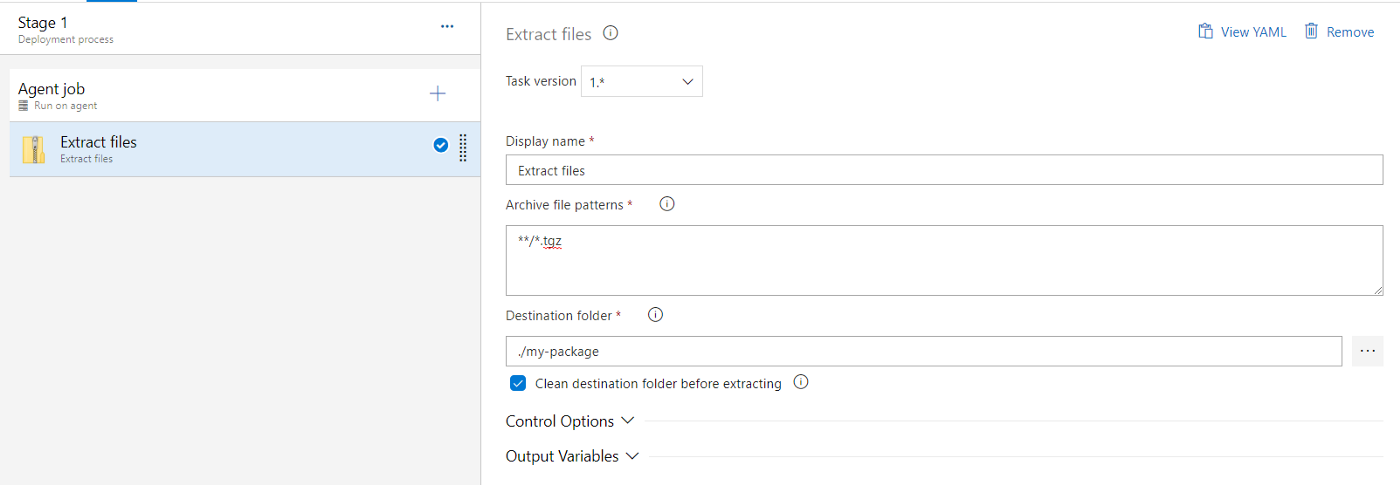
Setting up the Extract files task
To let the NPM CLI authenticate with our token, we need an .npmrc file placed alongside package.json inside the my-package/package folder. Since npm pack bundles the contents under a package directory, extracting my-package.tgz into ./my-package results in a nested path — ./my-package/package — that holds your actual package files.
Add a Bash script task with these settings:

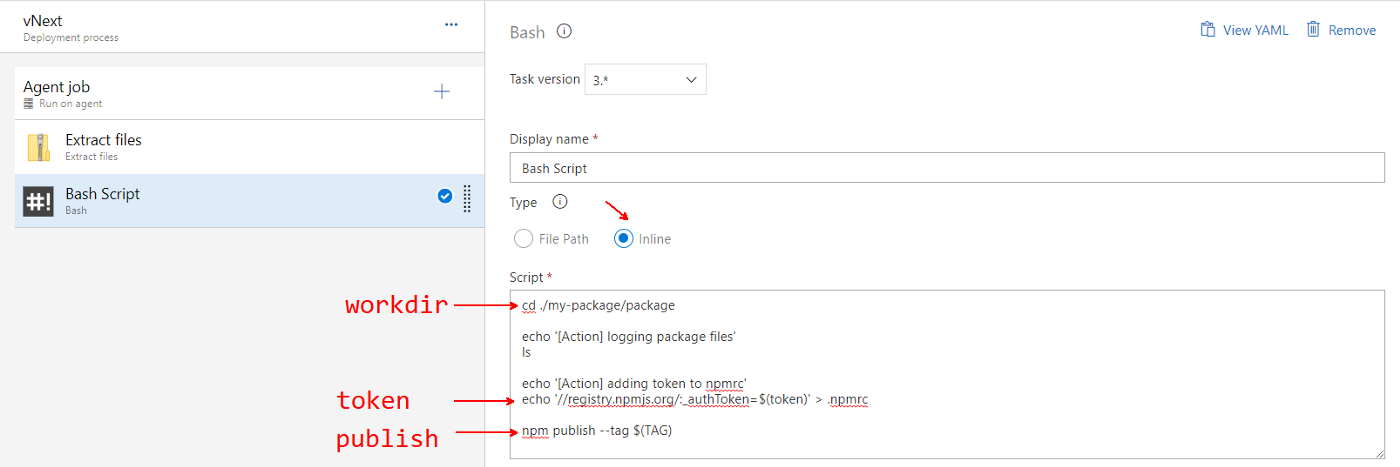
You can keep this script in your repository (for example, as ./deploy.sh) and reference it using the File Path option:
cd ./my-package/package
echo '[Action] logging package files'
ls
echo '[Action] adding token to npmrc'
echo '//registry.npmjs.org/:_authToken=$(token)' > .npmrc
npm publish --tag next
- Set the working directory to the extraction location. Each task begins in the agent's working directory — for Windows agents it's typically
d:\a\r1\a, as seen in this example log, and for Linux it's usually/home/vsts/work/r1/aas in this one. - Then just list directory contents — a handy debug mechanism when you lack direct access to the build agent.
- Next, add a line to a
.npmrcfile to instruct the NPM CLI which token to use for this repository:echo '//registry.npmjs.org/:_authToken=$(token)' > .npmrc - Finally, execute the publish — pay attention to the tag being applied.
Step 6: Introduce Manual Approval
Let's ensure this pipeline won't publish without a human check — an email notification triggers, and only after explicit approval does the release proceed.
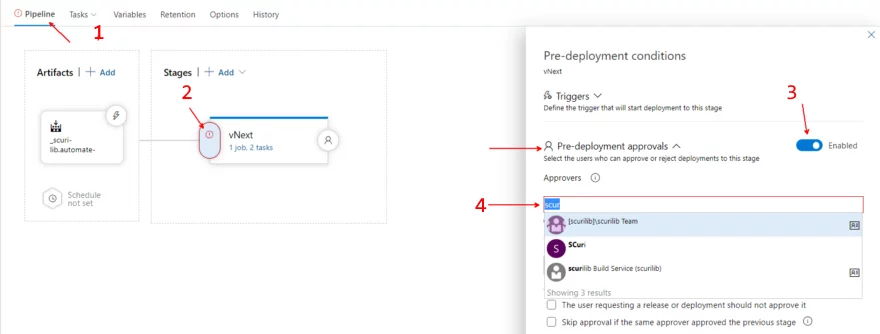
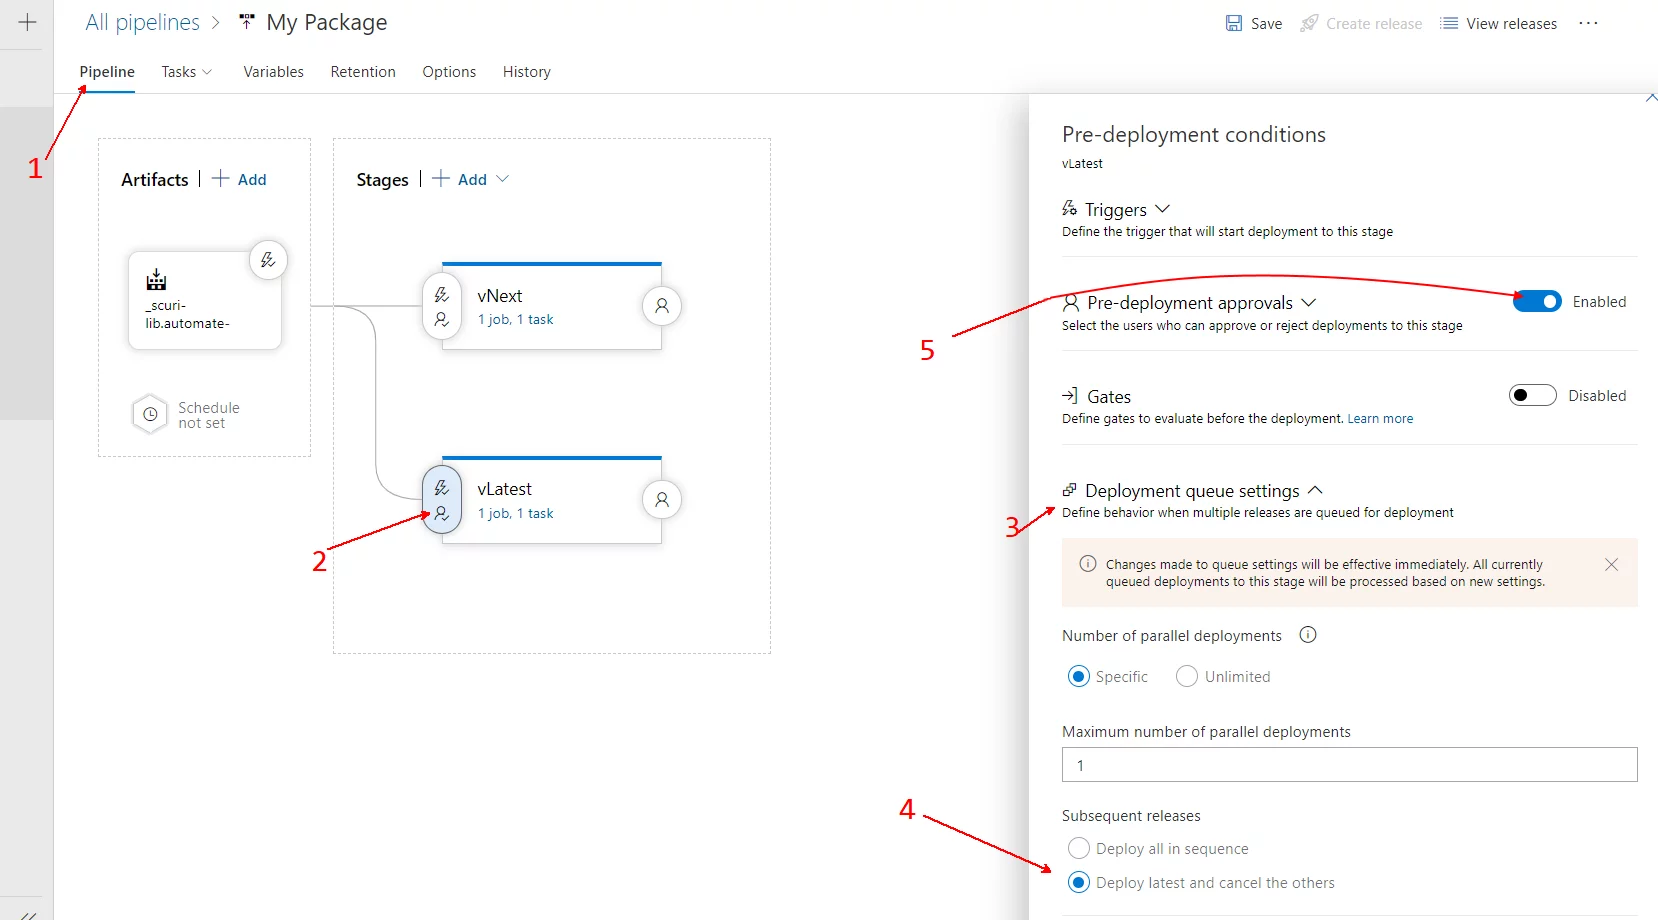
In the Pipelines tab (while editing the Pipeline), click the circle icon (2) at the start of the vNext stage. Activate the Pre-deployment approval and pick the user(s) authorized to approve. They'll receive an email notification:
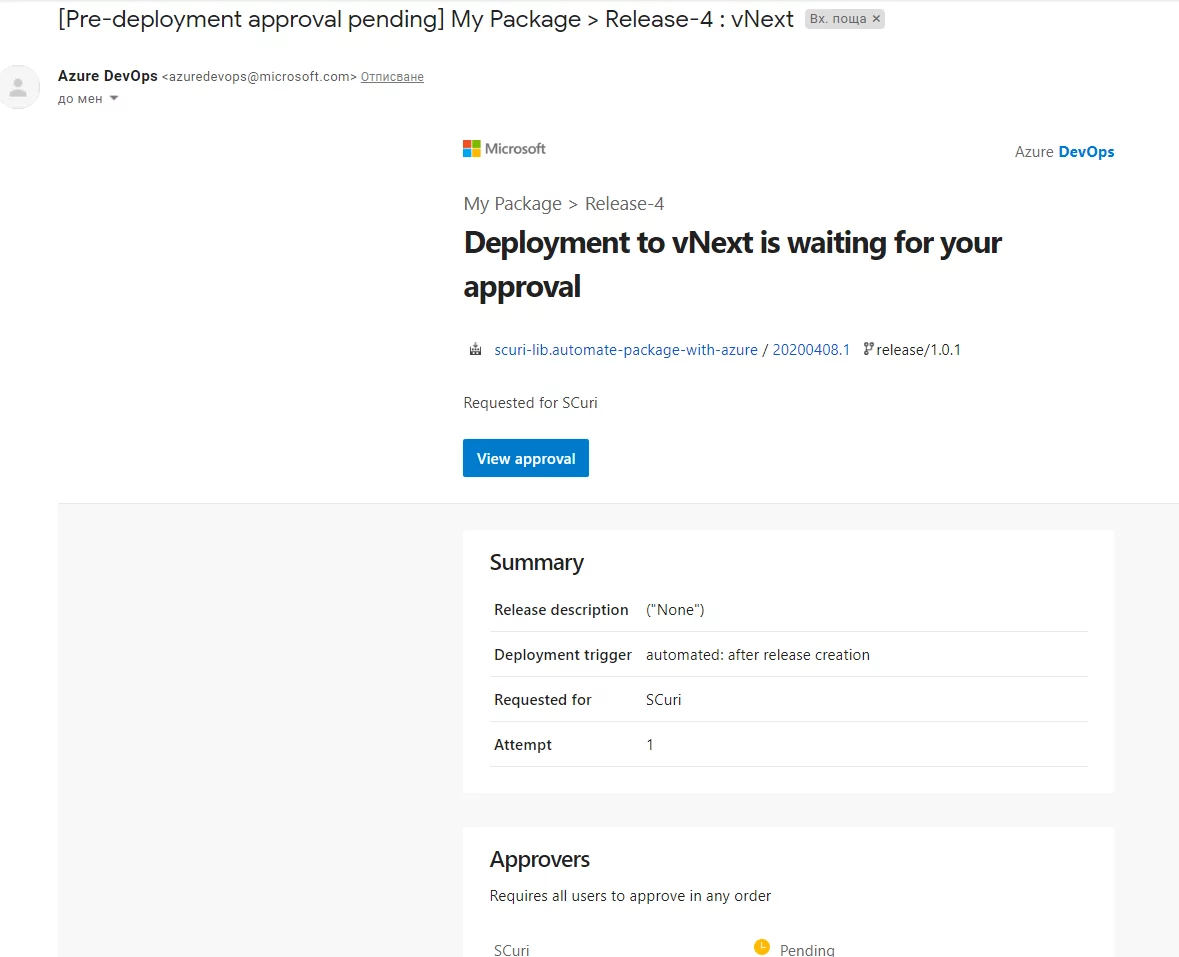
Those users can then approve or reject the deployment directly in the Azure DevOps UI.
Adjust the Deployment queue settings so only the most recent artifact is released. This way, if you push multiple updates to the release/ branch, the pipeline will cancel older runs — we don't want incomplete packages making their way to NPM:
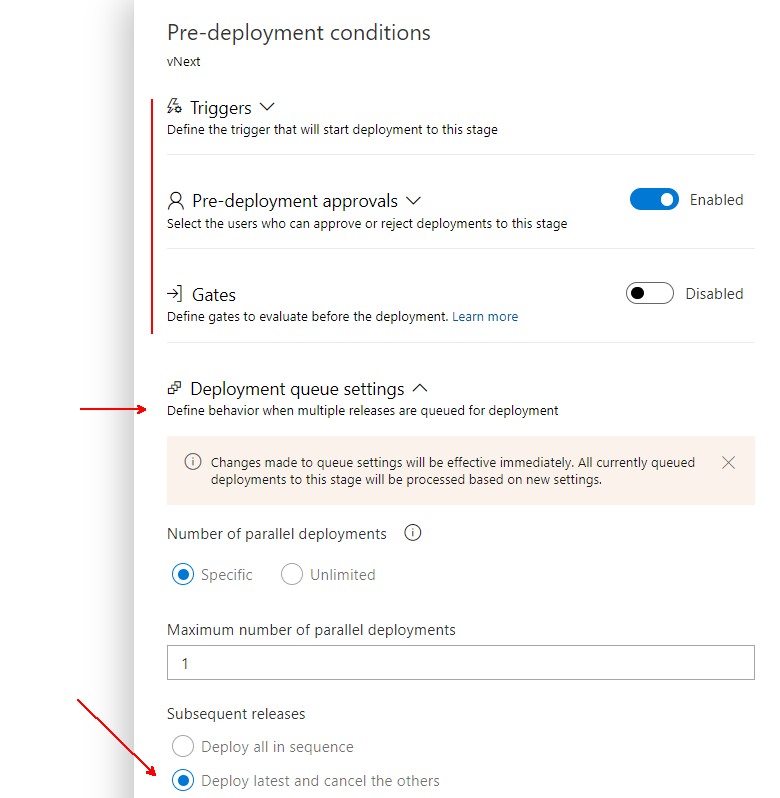
Step 7: Validate with vNext Release
Commit your changes to a branch named release/1.0.1-rc.0 (create it if needed) to exercise the whole CI/CD flow — Build and Release. Verify the azure-pipelines.yml file is committed on that branch!
For this article, I've set up a demo repo at https://github.com/scuri-lib/automate-package-with-azure with branches for the candidate release and final version.
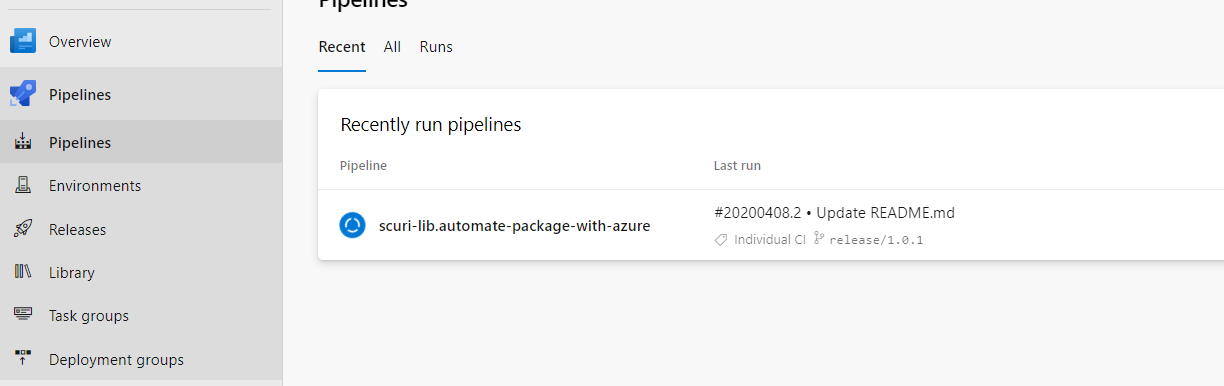
Anticipate a Build run:

That build should subsequently kick off a Release run:

Observe that this release is in a "waiting for approval" state. Without approval, it will eventually time out — remember this can be adjusted in the Pre-deployment conditions.
Step 8: Deploy via vLatest
First, we'll package the vNext tasks into a Task group for reuse.
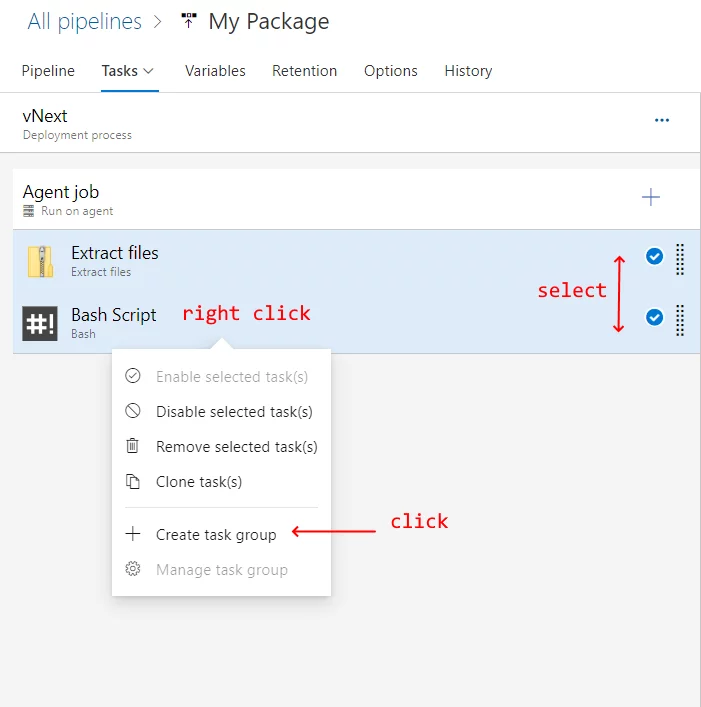
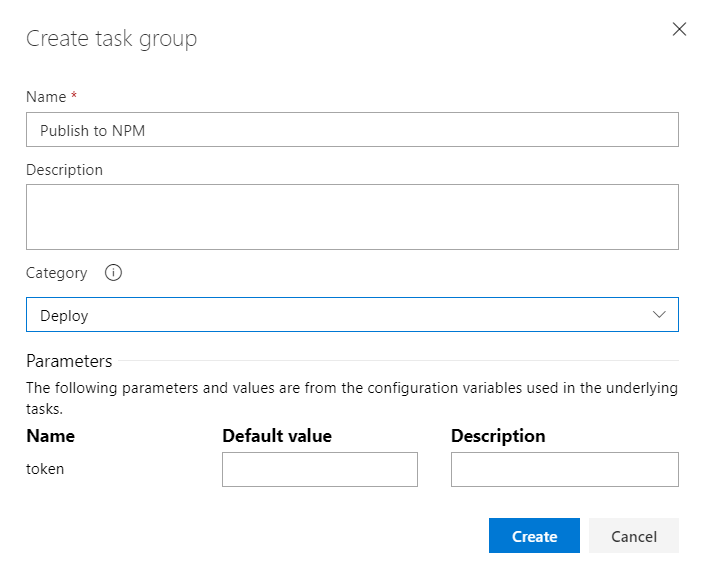
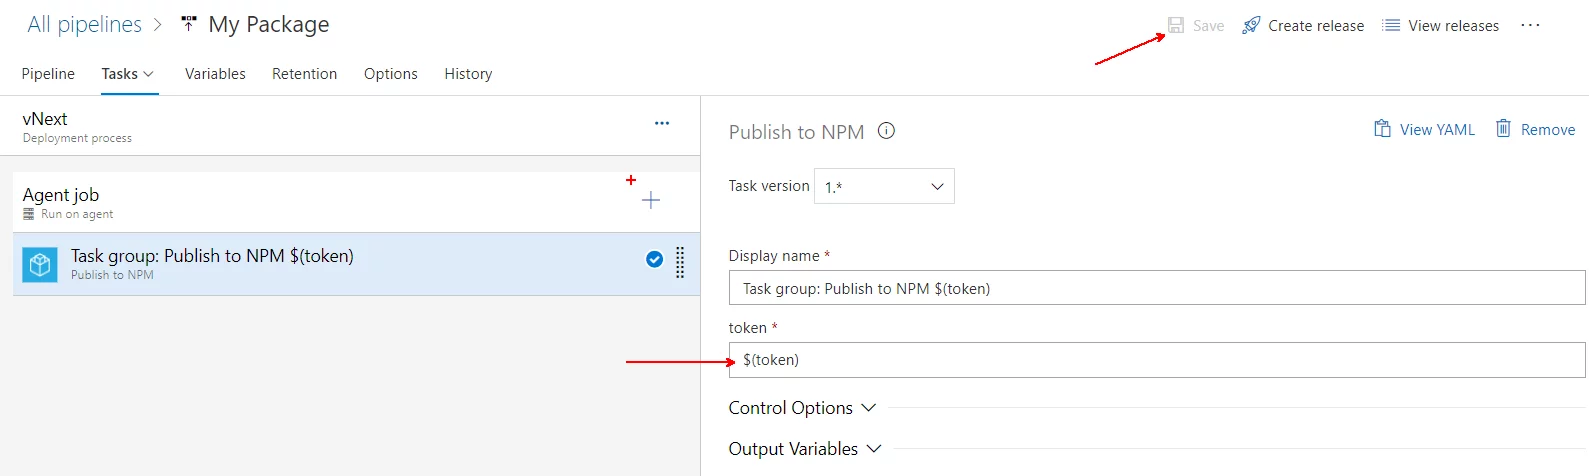
Set the token parameter value to $(token) and save. This maps the task group parameter to our environment variable.

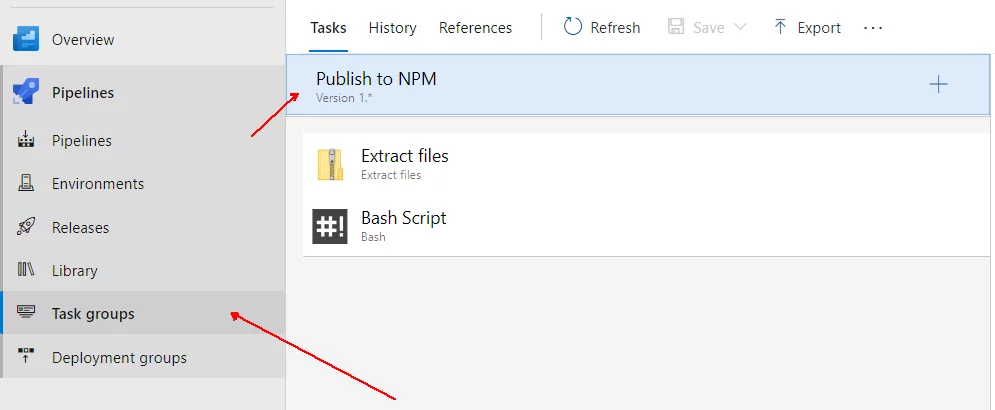
To open the task group, click the info message that appeared, or locate it under the 'Task groups' section.
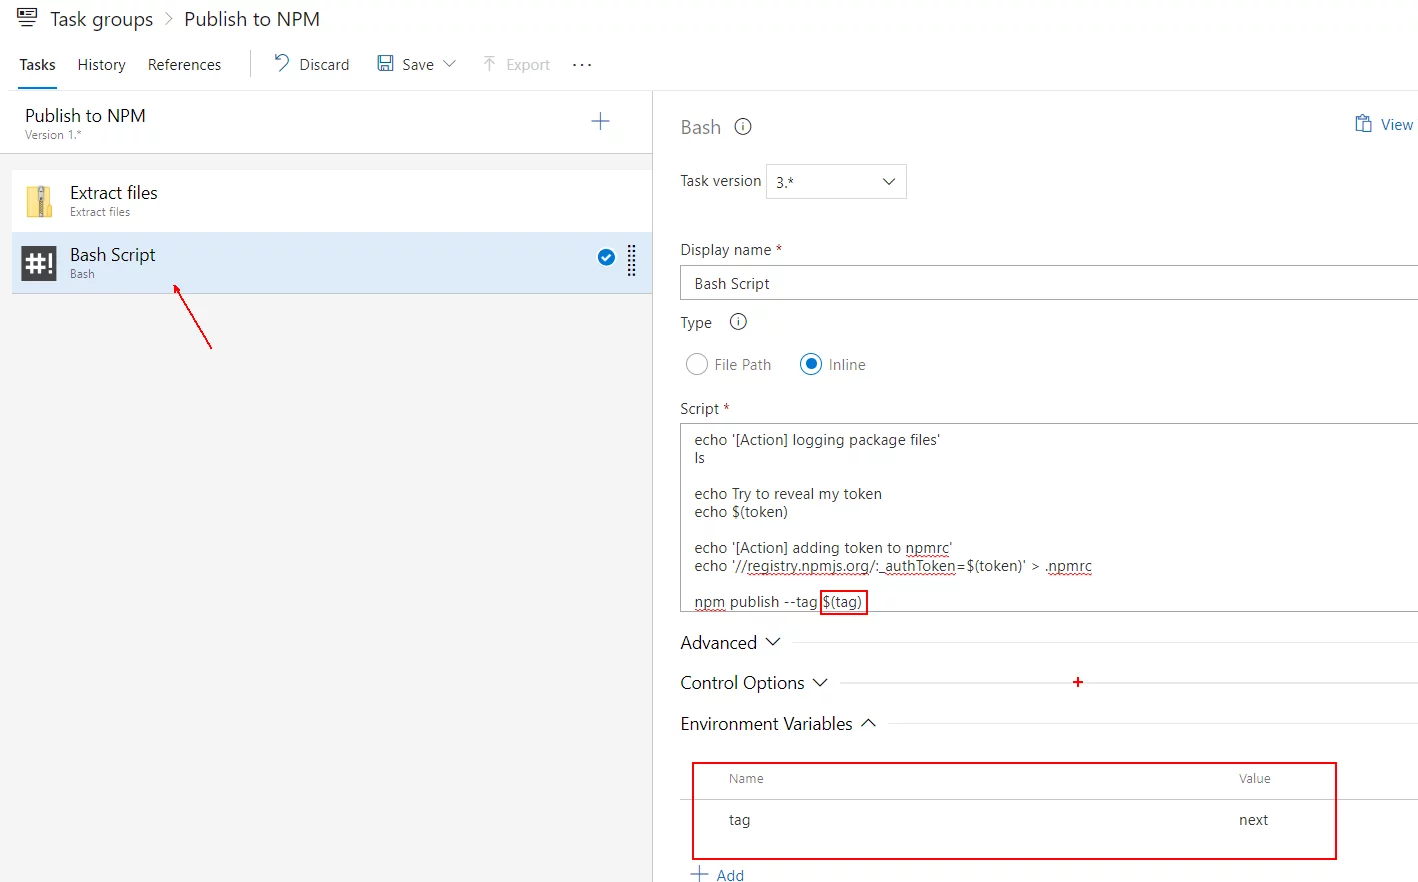
Modify the Bash script portion. Change the publish command to use an environment variable for the tag — then add that variable in the 'Environment Variables' section below. This makes the tag a task group parameter, letting us reuse this group for vLatest differently.
Head back to our release pipeline editor.
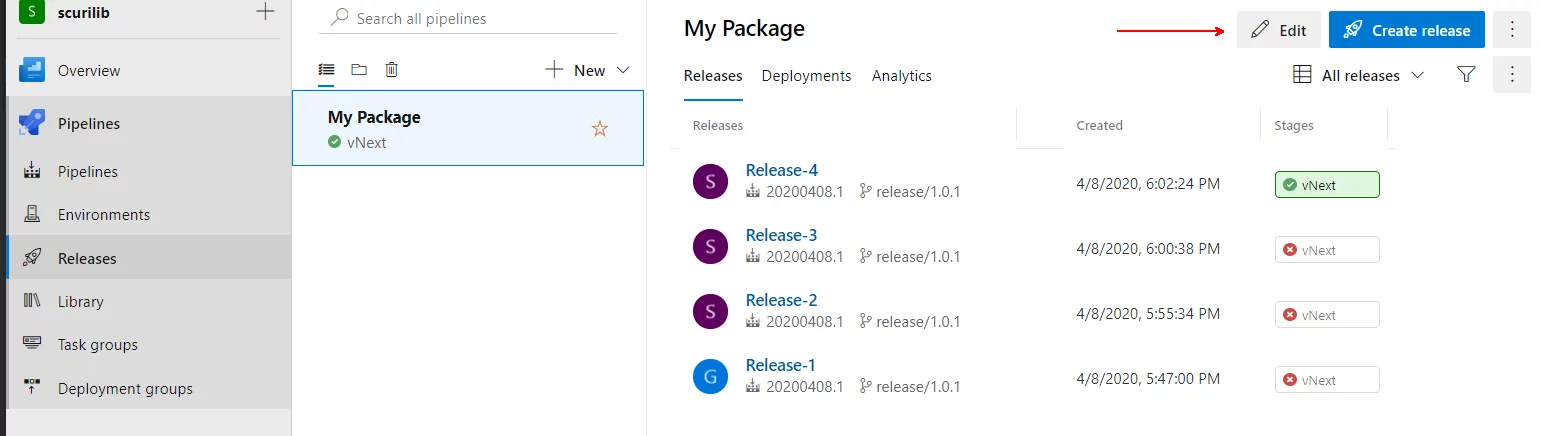
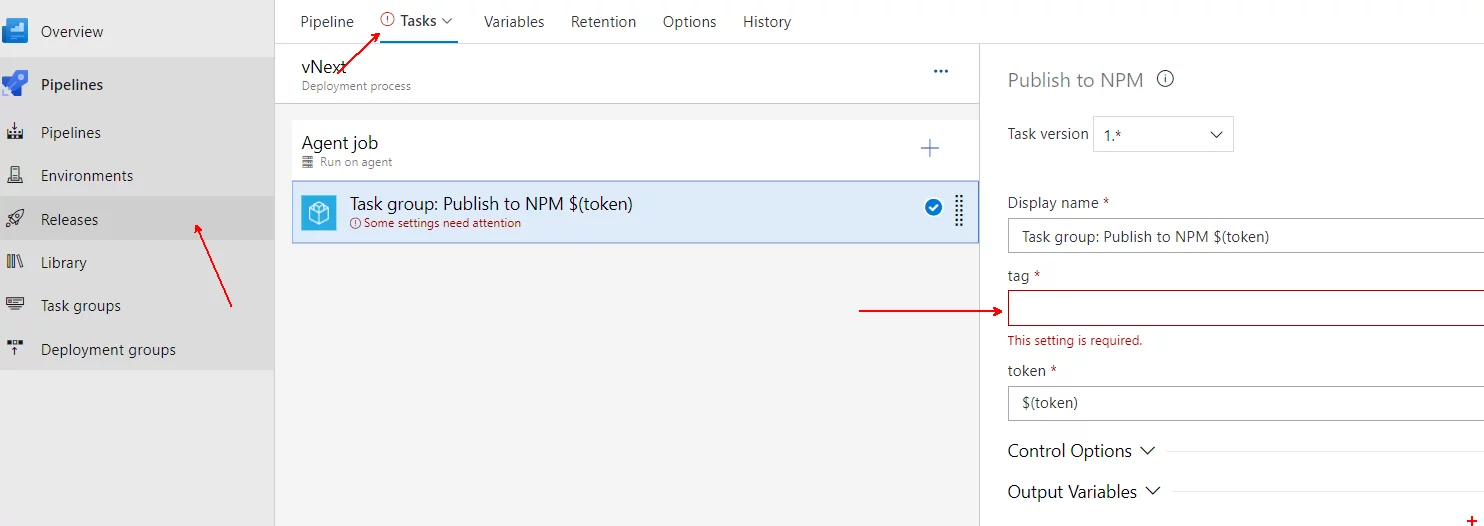
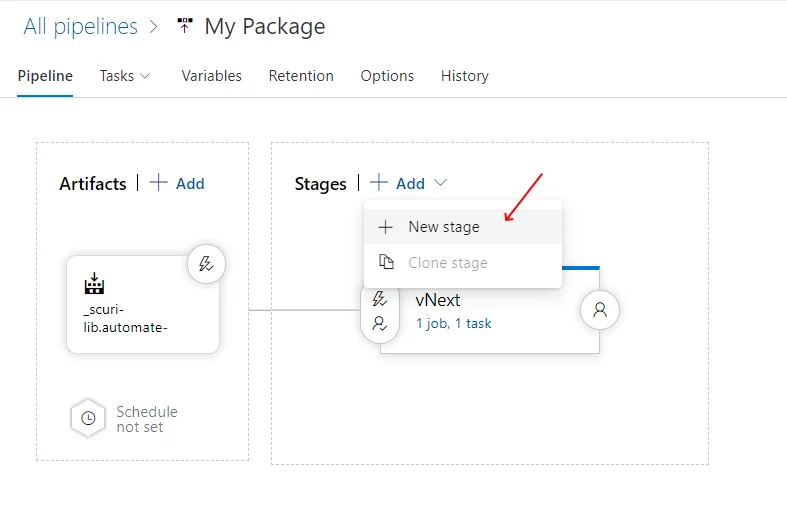
Enter next as the tag — this is our pre-release channel. Save it, and when you're back on the main release page, add a new stage. Be cautious not to click on the current stage, which would create a dependent stage — we're aiming for a parallel stage:
Once more, use the empty template and give it a descriptive name:
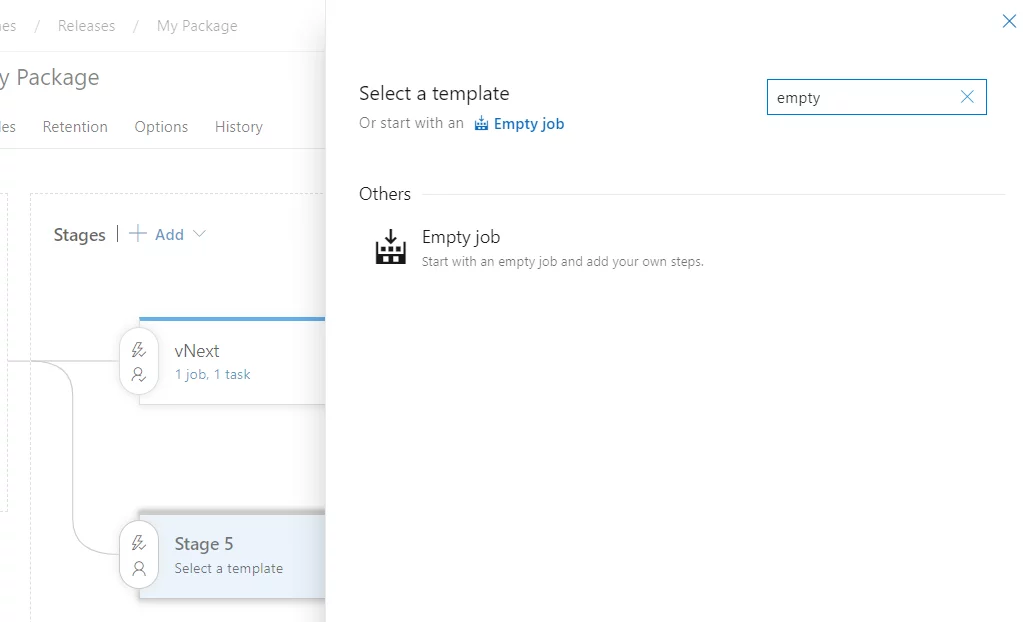
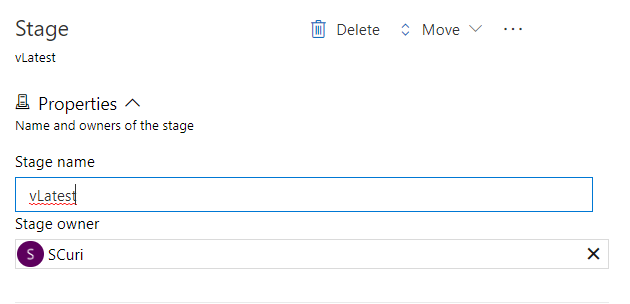
Include the newly minted task group:

Set the parameters — token as $(token) and tag as latest:
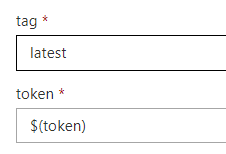
Save.
Configure the Pre-deployment approvals and Deployment queue settings for this stage from the main page's sidebar as you did earlier.
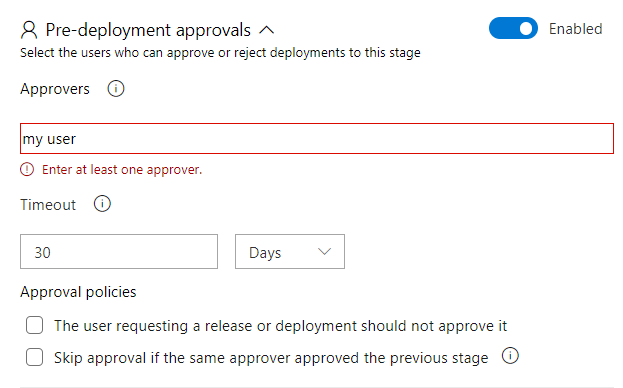
Choose the approver(s):
Now test the whole flow. Commit to your release/1.0.0 branch, and you should see:
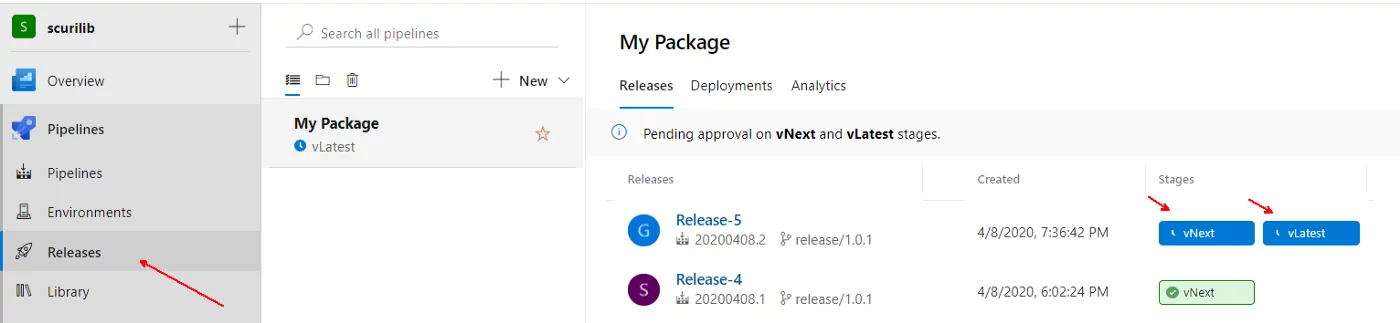
Once you approve the vLatest deployment, verify the package was published successfully.
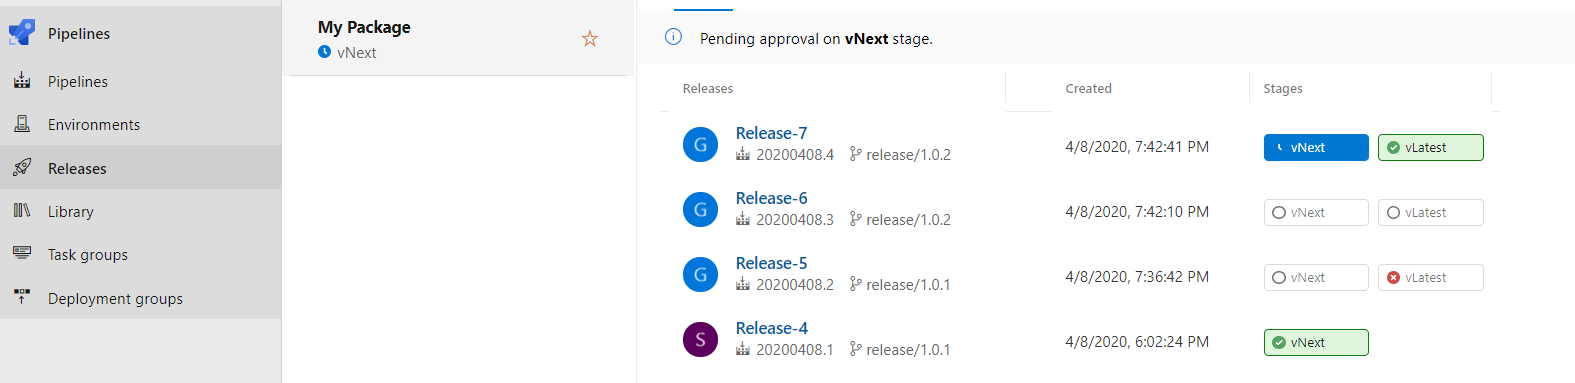
You might notice I published version 1.0.2, because my 1.0.1 accidentally went out tagged next rather than 1.0.1-rc.0.
In the screenshot above you can see vLatest successfully deployed after approval, while vNext still awaits authorization. Also note the skipped Release-6 deployment stages — the result of our 'Deployment queue' configuration.
Wrapping Up
That's it. You now have an automated NPM publishing pipeline triggered by any commit to a release/ prefixed branch, with final say resting with you via the approval step.
Finding the Logs
There are several routes to the logs — this one is straightforward:
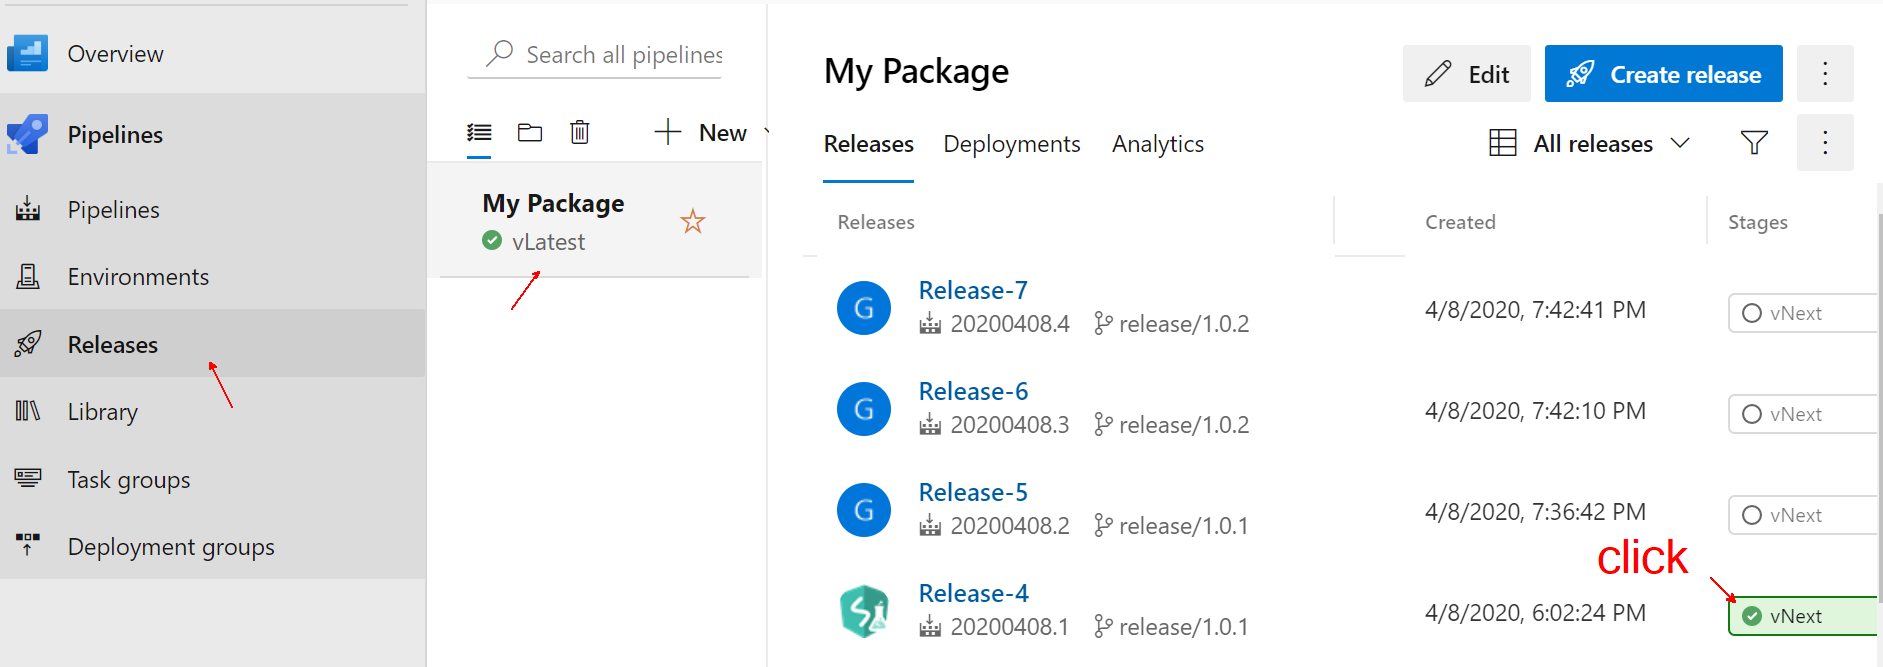
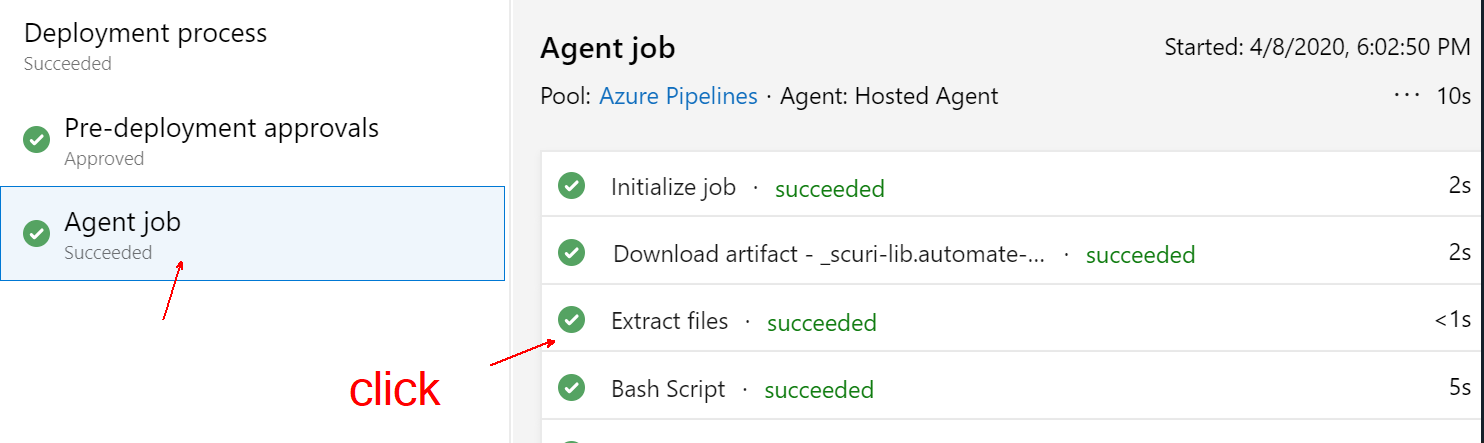
Troubleshooting the Pipeline
Things don't always go smoothly, as with this release. First, check the error message — in that instance, version 1.0.1 was already published, causing the failure.
When debugging, use console output within tasks. Commands like ls reveal context, pwd tells you the working directory, and echo shows variable values. This output is effectively your window into the agent's execution environment.
Accidentally Logged a Secret?
Azure DevOps is clever with secrets — they get scrubbed from the logs. If a tool or your script inadvertently tries to print a secret, here's how it appears:
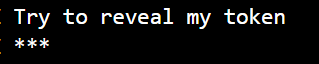
This snippet comes from the failed release referenced earlier.
Where to Learn More
The official documentation is the resource that helped me most. I recommend these Azure Pipelines docs to dig deeper.
Thank you for taking the time to read this!
I'm also building tooling for Angular developers:
SCuri — automates unit test boilerplate (with Enterprise options available)
ngx-forms-typed — type-safe Angular forms
ngx-show-form-control — inspect and edit any FormControl or FormGroup