Step by step guide
Fetching some log files can't be all that complicated, right? Surely a few lines of code will do the trick!
That was my initial assumption… and I was wrong. There's more involved than simply hitting a GET endpoint.
Part of the complexity comes from the fact that the logs endpoint returns a zip archive. Inside that archive you'll find multiple file entries — one per pipeline task. And then there's the whole authorization layer on top of that. So…
This walkthrough will guide you from an empty file all the way to having the logs from your Azure Dev Ops Release pipeline at your fingertips. The logs are accessible through the web UI, but navigating there requires several clicks. You might want to pull those logs and process them programmatically. In my case, I needed to verify whether a specific string appeared in the Release pipeline output.
What you'll need:
- node js – grab it for Windows/MacOS or Linux
- Azure Dev Ops account – register here (it's free, no worries)
What we'll cover
- Set up a fresh node.js project and pull in the dependencies – axios and yauzl.
- Generate a personal access token (PAT) from Azure Dev Ops, store it in an environment variable, and use it for authentication.
- Retrieve the zipped logs through the Azure Dev Ops REST API.
- Extract the archive in memory and pull out the text content.
- We'll focus on reading logs from a Release Pipeline run, but there's a section at the end that explains how to adjust the script for a Build Pipeline.
If you just want the finished code, here's the gist for a Release Pipeline and a Build Pipeline. I've included
// TODO Replace with your ownmarkers where you'll need to plug in your values.
My environment
I'm working with ts-node since I appreciate typescript's type safety and prefer to skip the compilation step. That means instead of node index.js I'll run ts-node index.ts. Once you strip out the types, the script should work fine as plain JavaScript if that's more your style.
My terminal is bash running inside Windows Subsystem for Linux (WSL).
1. Getting started
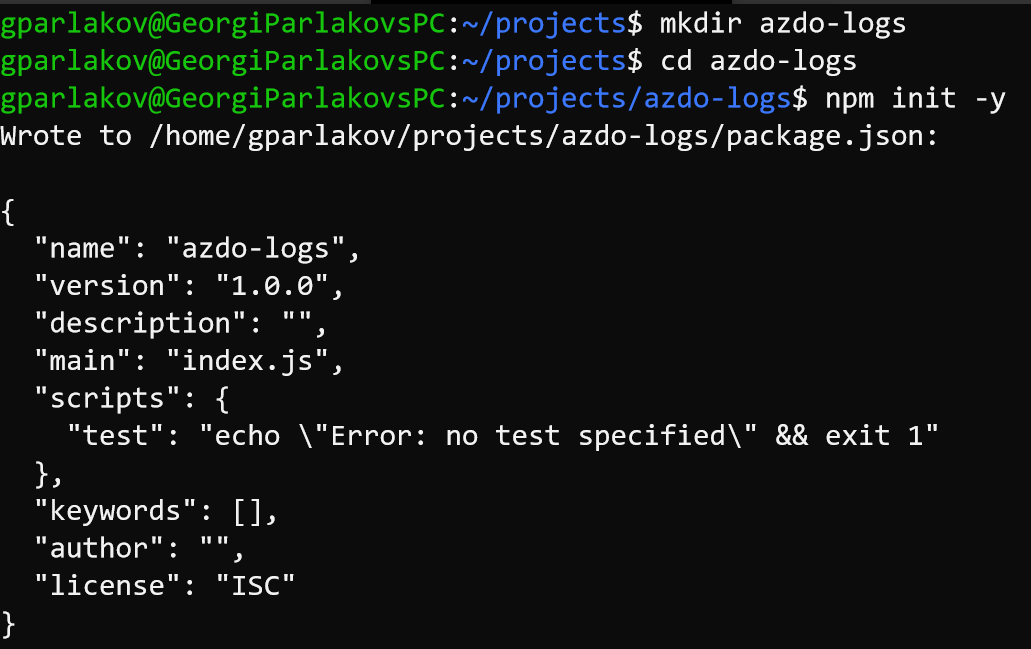
Create a folder called azdo-logs and initialize a node package inside it:
mkdir azdo-logs
cd azdo-logs
npm init -y
You should see output along these lines:
Now create an index.ts file and add these lines:
/// <reference types="node" />

const accessToken = process.env.AZURE_ACCESS_TOKEN;

if (accessToken == null || accessToken === '') {
  throw new Error('Please provide an access token');
} else {
  console.log('token is present!');
}
We want to verify that the token is available, tucked away in your private environment variable and definitely not committed to version control!
The reference directive at the top gives us access to the nodejs type definitions. You may need to install those as a dev dependency:
npm i @types/node -D
2. Install dependencies
Install ts-node and typescript globally so we can execute our script.
npm i -g ts-node typescript
Add axios and yauzl to our project. The -s flag saves them as regular dependencies in package.json. We'll also grab @types/yauzl for type definitions, using -D to place it in devDependencies
npm i axios yauzl -s
npm i @types/yauzl -D
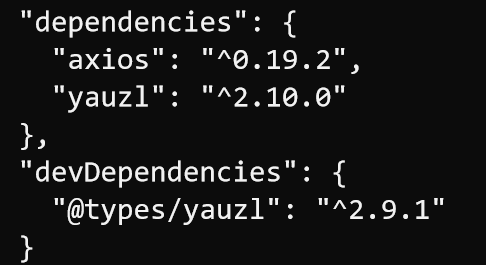
Here's what package.json should look like at this point:
{
  "name": "azdo-logs",
  "version": "1.0.0",
  "description": "",
  "main": "index.js",
  "scripts": {
    "test": "echo \"Error: no test specified\" && exit 1"
  },
  "keywords": [],
  "author": "",
  "license": "ISC",
  "dependencies": {
    "axios": "^0.19.2",
    "yauzl": "^2.10.0"
  },
  "devDependencies": {
    "@types/yauzl": "^2.9.1"
  }
}
3. Generate an Azure Dev Ops token
You can create one from the profile menu
- navigate to the personal access tokens page
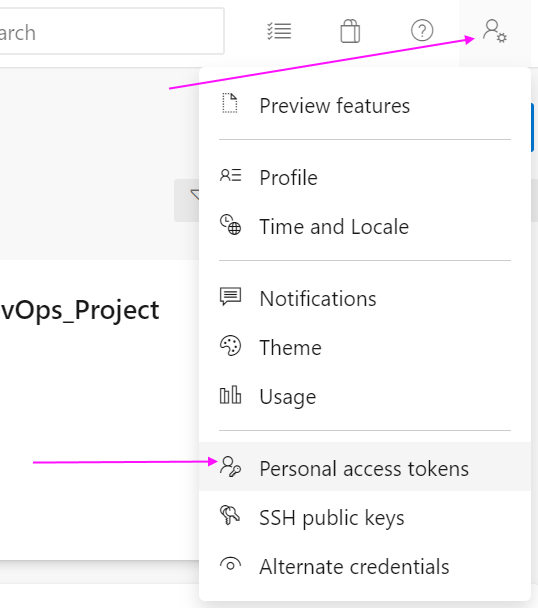
- create a fresh token with Release
Readpermission
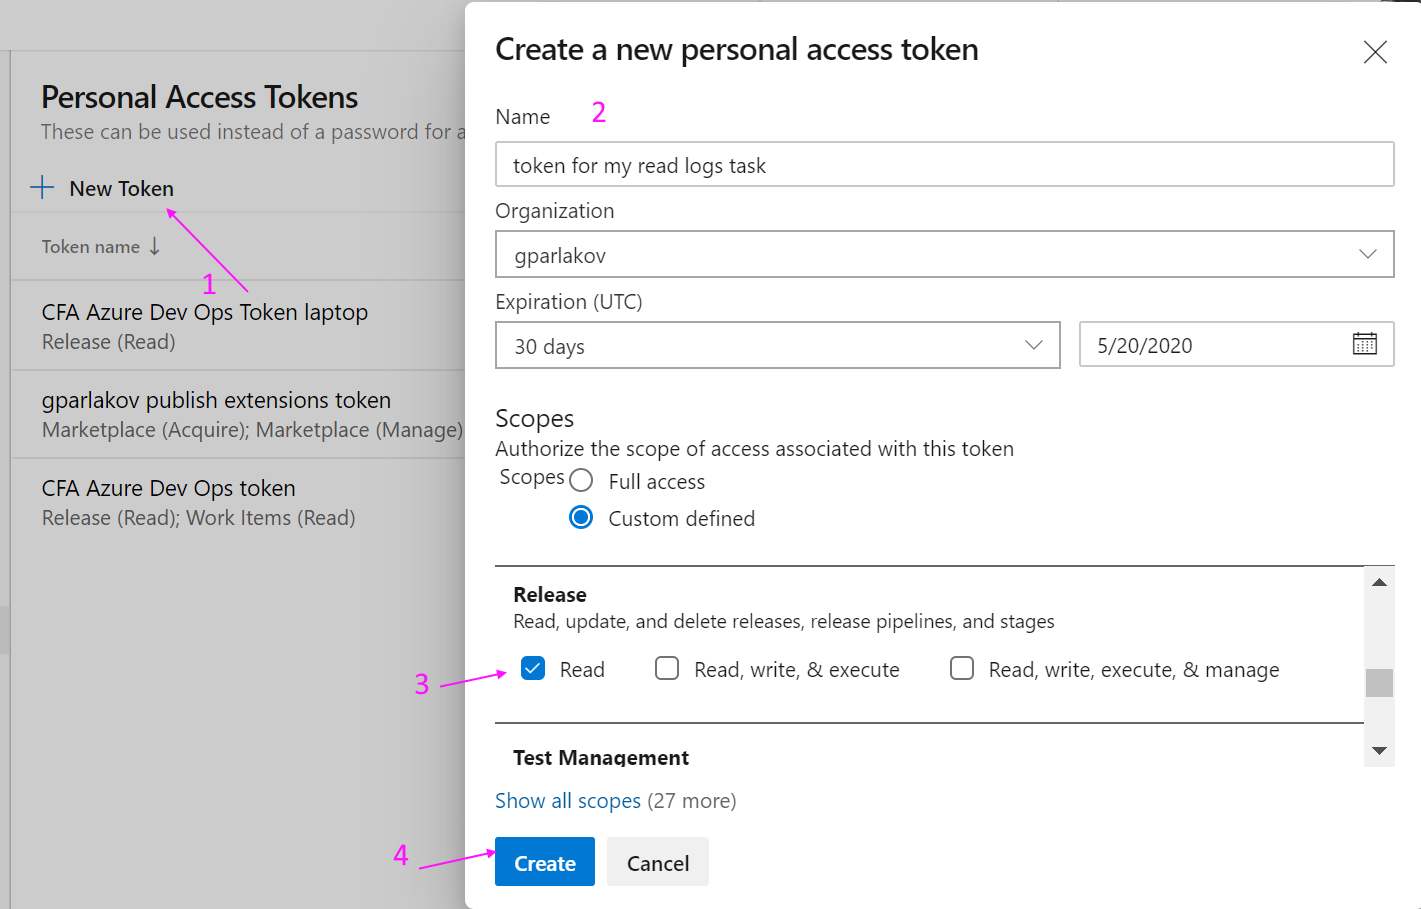
- copy it somewhere safe because you won't be able to view it again (you can always regenerate it if needed)
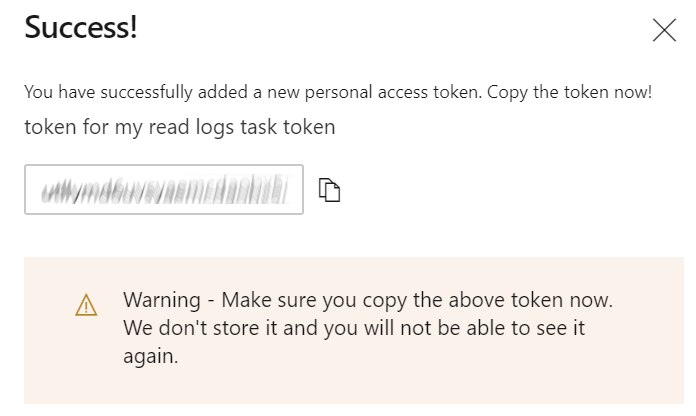
Then set it as an environment variable on your machine or use a secure location (like a secret environment variable)
export AZURE_ACCESS_TOKEN = "token-placeholder-not-actual-thing"; # replace token-placeholder-not-actual-thing with your token
or for Windows command prompt
set AZURE_ACCESS_TOKEN="token-placeholder-not-actual-thing";
I've placed this line in my .bashrc so the PAT loads automatically whenever bash starts, saving me from typing export each time I open a terminal.

On Windows you can add it under Environment Variables. Don't forget to restart your session (log out and back in) for the change to take effect.
Now run ts-node index.ts and you should see

For a complete guide on obtaining personal access tokens, check this documentation.
Great – we've got our token and dependencies sorted!
4. Identify the Azure Dev Ops Organization and Project
Fetching the logs requires knowing the organization and project names, along with the release id we want to examine. That id increments with every run – release 1, 2, 3 and so on – so you'll need to provide it each time. For this example, I'm targeting the release pipeline for a package I handle.
You can grab the project and organization names from the Azure Dev Ops interface:
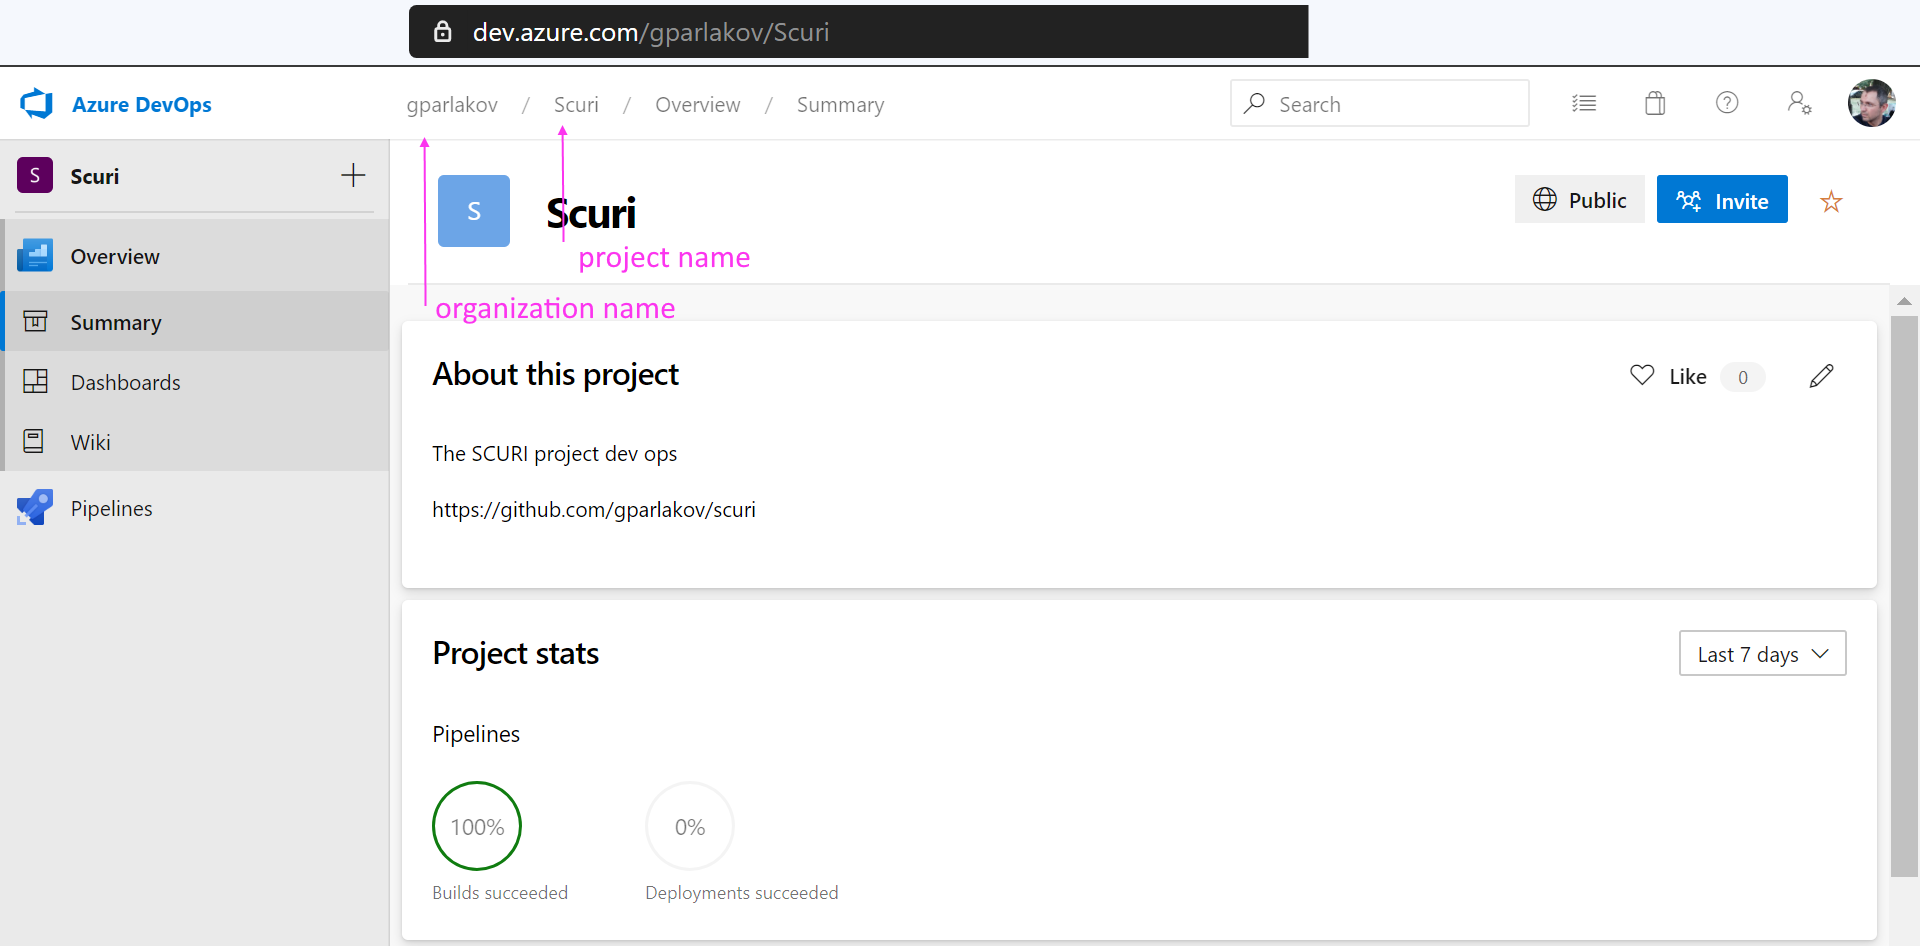
For me, the organization is 'gparlakov' and the project is 'Scuri'. Add these lines to index.ts, swapping in your own org and project names:
const project = 'Scuri';
const organization = 'gparlakov';
5. Set up authorization
To authenticate with the API using a personal access token (PAT), we need to include a header with the token encoded in base64, following a specific format. Add the following to the end of index.ts:
const headers = {
  Authorization: `Basic ${Buffer.from(`PAT:${this.token}`).toString('base64')}`,
  'X-TFS-FedAuthRedirect': 'Suppress', // we can't handle auth redirect so - suppress
};

export const axiosInstance = axios.create({
  baseURL: `https://vsrm.dev.azure.com/${organization}/${project}/_apis/`,
  headers: headers,
});
We'll also need to import the axios module at the top of index.ts
import axios from 'axios';
6. Pull the logs for your release
For demonstration, I'm using a real release with id 58 (swap in your own). Add this to index.ts:
const releaseId = 58;
axiosInstance
  .get(`release/releases/${releaseId}/logs`, {
    responseType: 'stream',
  })
  .then((logs) => {
    if (logs.status != 200) {
      throw new Error('logs missing');
    }
    console.log('Received bytes:', logs.data.read().length);
  });
When you run ts-node index.ts, you should get output resembling:

That confirms our authorization to use this REST API endpoint is working!
7. Extract the logs from the zip
Remove or comment out the console.log line – we won't need it right now – and modify the axiosInstance call to look like this:
axiosInstance
  .get(`release/releases/${releaseId}/logs`, {
    responseType: 'stream',
  })
  .then((logs) => {
    if (logs.status != 200) {
      throw new Error('logs missing');
    }
    return readLogs(logs.data);
  })
  .then(({ logs }) => {
    console.log(logs);
  });
then add the readLogs function:
function readLogs
  zipBuffer: NodeJS.ReadableStream
): Promise<{ logs: string; skippedFor: Error[] }> {
  // we'll reject the promise when we can't read anything from the zip
  // and resolve it when we could read (some) plus add the errors for the skipped parts
  // in the end we'd like to say - yes the logs contain the Proof OR no the logs do not contain the proof but there were skipped parts
  return new Promise((res, rej) => {
    const es: Error[] = [];
    const zipChunks: any[] = [];

    zipBuffer.on('data', (d) => zipChunks.push(d));
    zipBuffer.on('end', () => {
      yauzl.fromBuffer(Buffer.concat(zipChunks), { lazyEntries: true }, function (err, zipfile) {
        // can not even open the archive just reject the promise
        if (err) {
          rej(err);
        }
        if (zipfile != null) {
          const chunks: any[] = [];

          zipfile.on('entry', function (entry) {
            if (/\/$/.test(entry.fileName)) {
              // Directory file names end with '/'.
              // Note that entries for directories themselves are optional.
              // An entry's fileName implicitly requires its parent directories to exist.
              zipfile.readEntry();
            } else {
              // file entry
              zipfile.openReadStream(entry, function (err, readStream) {
                if (err) {
                  es.push(err);
                  // skip this one - could not read it from zip
                  zipfile.readEntry();
                }
                if (readStream == null) {
                  // just skip - could not get a read stream from it
                  es.push(
                    new Error(
                      'Could not create a readable stream for the log ' + (entry || {}).fileName ||
                        '<missing file name>'
                    )
                  );
                  zipfile.readEntry();
                } else {
                  readStream.on('data', (c) => chunks.push(c));
                  readStream.on('error', (e) => {
                    es.push(e);
                    // skip this one - could not read it from zip
                    zipfile.readEntry();
                  });
                  readStream.on('end', function () {
                    zipfile.readEntry();
                  });
                }
              });
            }
          });

          zipfile.once('end', function () {
            zipfile.close();
            res({ logs: Buffer.concat(chunks).toString('utf8'), skippedFor: es });
          });

          zipfile.readEntry();
        } else {
          // can't read the archive - reject the promise
          rej(new Error('Could not read the zipfile contents'));
        }
      });
    });
  });
}
That snippet has a fair amount going on. Essentially, it comes down to juggling 3 streams.
-
First, we read the
zipFile, pushing everything intozipChunksand combining those into aBuffer. -
Next, we feed that
Bufferintoyauzl.fromBuffer(), which gives us an object with areadEntry()method. I like to think of it asnext, since it advances to the following entry in the archive. -
For each entry in the zip, we obtain a
readStream. That's aReadableStreamthat we push into thechunksarray. -
Finally, we merge all the file chunks into a buffer and read a string from it:
Buffer.concat(chunks).toString('utf8');
Wrapped up!
We now have a string variable holding all our log content!
Here's the complete index.ts as a gist. There are // TODO Replace with your own comments marking where your values go.
Fetching build pipeline logs instead
To pull logs from a build pipeline, you'll need to
-
Either add "Build: Read" permission to your existing token or create a new one with that permission:
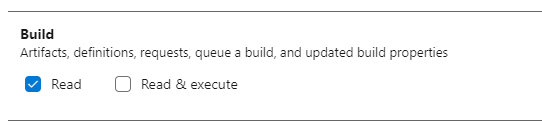
-
Tweak the auth logic slightly (just drop one piece):
const headers = { Authorization: `Basic ${Buffer.from(`:${this.token}`).toString('base64')}`, 'X-TFS-FedAuthRedirect': 'Suppress', // we can't handle auth redirect so - suppress }; -
Swap out the base URL:
export const axiosInstance = axios.create({ baseURL: `https://dev.azure.com/${organization}/${project}/_apis/`, headers: headers, }); -
Update the endpoint and supply a build number (I'm using this build as an example)
const buildId = 200;
axiosInstance.get(`build/builds/${buildId}/logs`, {
  responseType: 'stream',
  headers: {
    accept: 'application/zip',
  },
});
The final script is available as a gist.
A word on memory usage
This method maintains several buffers in memory, essentially duplicating the zip file a few times* in RAM. Since we're dealing with pipeline logs, that shouldn't be an issue – they're unlikely to be enormous. If memory is a concern, you could save the archive to disk instead (though that brings its own security considerations, as Samuel Attard @marshallofsound noted) and then use the alternative yauzl approach
logs.data.pipe(fs.createWriteStream('my-temp-zip-file.zip'))

yauzl.open('my-temp-zip-file.zip', { lazyEntries: true }, function(err, zipfile) {
    //... same code from here on down
*the response stream, the chunks, the buffer, the zip content chunks, their buffer, and finally the string
Useful references
- The RESTful API documentation – genuinely useful
- The nodejs client for this API (though it comes in at roughly 116k minified+GZipped! according to bundlephobia – about 830k of code for your runtime to parse – on every request)
- axios documentation
- yauzl documentation