
FormControl and ControlValueAccessor
If you've spent any time building Angular applications, you've likely encountered FormControl. The official documentation describes it as an entity responsible for tracking both the value and validation status of an individual form control. A key point to grasp is that a FormControl is instantiated in every forms scenario, whether you're working with reactive or template-driven approaches. In reactive forms, you explicitly instantiate the control and bind it to a native element using the formControl or formControlName directives. In template-driven forms, the NgModel directive handles the creation of the FormControl behind the scenes:
@Directive({
  selector: '[ngModel]...',
  ...
})
export class NgModel ... {
  _control = new FormControl();   <---------------- here
Regardless of whether a formControl is created explicitly or implicitly, it must communicate with a native HTML form element such as input or textarea. However, instead of a native element, a custom Angular component can also serve as a form control. This typically happens when wrapping a JavaScript library widget, such as the jQueryUI slider. In this article, I’ll use "native form control" to distinguish between Angular-specific formControl instances and HTML form elements. It's worth keeping in mind that any custom form control can fill the same role as a native element like input when interacting with a formControl.
Native form controls are finite in number, while custom form controls can be nearly limitless in variety. This is why Angular needs a universal mechanism to facilitate communication between the Angular formControl and whichever form control — native or custom — is being used. This is precisely where the ControlValueAccessor comes in. It serves as the intermediary that keeps values synchronized between Angular's formControl and the actual form element. The docs explain it this way:
A
ControlValueAccessoracts as a bridge between the Angular forms API and a native element in the DOM.
A component or directive becomes a ControlValueAccessor by implementing the interface of the same name and then registering itself as an NG_VALUE_ACCESSOR provider. We'll look at exactly how this is done shortly. Two critical methods within the interface are writeValue and registerOnChange:
interface ControlValueAccessor {
  writeValue(obj: any): void
  registerOnChange(fn: any): void
  registerOnTouched(fn: any): void
  ...
}
The writeValue method allows the formControl to push a new value down to the native form element. The registerOnChange method is where the formControl hands over a callback that must be invoked whenever the native control's value changes. It's up to you to call this callback with the updated value so that the Angular form control reflects the change. The registerOnTouched method is used to signal that a user has interacted with the control.
Here is a visual representation of this interaction:

It's essential to remember that the controlValueAccessor always works with a form control, whether it was created explicitly via reactive forms or implicitly through template-driven forms.
Angular ships with pre-built value accessors for every standard native input element:
+------------------------------------+----------------------+
|              Accessor              |     Form Element     |
+------------------------------------+----------------------+
| DefaultValueAccessor               | input, textarea      |
| CheckboxControlValueAccessor       | input[type=checkbox] |
| NumberValueAccessor                | input[type=number]   |
| RadioControlValueAccessor          | input[type=radio]    |
| RangeValueAccessor                 | input[type=range]    |
| SelectControlValueAccessor         | select               |
| SelectMultipleControlValueAccessor | select[multiple]     |
+------------------------------------+----------------------+
As you can see, the DefaultValueAccessor is applied automatically when Angular encounters an input or textarea within a component's template:
@Component({
  selector: 'my-app',
  template: `
      <input [formControl]="ctrl">
  `
})
export class AppComponent {
  ctrl = new FormControl(3);
}
Every form directive, including the formControl directive mentioned earlier, relies on the setUpControl function to establish the connection between a formControl and its ControlValueAccessor. The snippet below illustrates this for the formControl directive:
export class FormControlDirective ... {
  ...
  ngOnChanges(changes: SimpleChanges): void {
    if (this._isControlChanged(changes)) {
      setUpControl(this.form, this);
Here’s a simplified view of the setUpControl function, showing how the native and Angular form controls stay in sync:
export function setUpControl(control: FormControl, dir: NgControl) {

  // initialize a form control
  dir.valueAccessor.writeValue(control.value);

  // setup a listener for changes on the native control
  // and set this value to form control
  dir.valueAccessor.registerOnChange((newValue: any) => {
    control.setValue(newValue, {emitModelToViewChange: false});
  });

  // setup a listener for changes on the Angular formControl
  // and set this value to the native control
  control.registerOnChange((newValue: any, ...) => {
    dir.valueAccessor.writeValue(newValue);
  });
Now that we have a clearer picture of the underlying mechanics, we can move on to building our own accessor for a custom form control.
Implementing widget wrapper
Because Angular includes default value accessors for all standard native controls, a custom accessor is most frequently created to wrap third-party plugins or widgets. Earlier I brought up the slider widget from the jQueryUI library, and that's precisely the plugin we'll use for our custom form control.
Simple wrapper
Let's begin with the simplest possible implementation: a wrapper that renders the widget on screen. For that, we'll create a new NgxJquerySliderComponent and use a DOM element from its own template to instantiate the slider:
@Component({
  selector: 'ngx-jquery-slider',
  template: `
      <div #location></div>
  `,
  styles: ['div {width: 100px}']
})
export class NgxJquerySliderComponent {
  @ViewChild('location') location;
  widget;
  ngOnInit() {
    this.widget = $(this.location.nativeElement).slider()
  }
}
Using standard jQuery practices, we initialize the slider widget on the native DOM element. We then keep a reference to that created widget in the widget property.
With our wrapper component ready, we can integrate it into the parent App component as shown:
@Component({
  selector: 'my-app',
  template: `
      <h1>Hello {{name}}</h1>
      <ngx-jquery-slider></ngx-jquery-slider>
  `
})
export class AppComponent { ... }
To get the application running, we need to include the jQuery dependencies. For convenience, we'll add them globally through index.html:
<script src="https://code.jquery.com/jquery-3.2.1.js">
</script>
<script src="https://code.jquery.com/ui/1.12.1/jquery-ui.js">
</script>
<link rel="stylesheet" href="//code.jquery.com/ui/1.12.1/themes/smoothness/jquery-ui.css">
Here is the application that demonstrates the setup.
Interactive form control
With the implementation above, our custom slider has no way to communicate with the parent component. So let's introduce standard input and output mechanisms to establish that communication:
export class NgxJquerySliderComponent {
  @ViewChild('location') location;
  @Input() value;
  @Output() private valueChange = new EventEmitter();
  widget;

  ngOnInit() {
    this.widget = $(this.location.nativeElement).slider();
    this.widget.slider('value', this.value);
    this.widget.on('slidestop', (event, ui) => {
      this.valueChange.emit(ui.value);
    });
  }

  ngOnChanges() {
    if (this.widget && this.widget.slider('value') !== this.value) {
      this.widget.slider('value', this.value);
    }
  }
}
Once the slider widget is initialized, we listen for its value changes via the slidestop event. When that event fires, we notify the parent component using the valueChanges output emitter. We also track updates to the input value binding using the ngOnChanges lifecycle hook, and when a new value arrives, we pass it along to the slider widget.
Here's how we now use the component within the parent App component:
<ngx-jquery-slider
    [value]="sliderValue"
    (valueChange)="onSliderValueChange($event)">
</ngx-jquery-slider>
Here is the application that demonstrates the setup.
However, to use our slider as part of a form and communicate with it through template-driven or reactive directives, we need to implement a value accessor. At that point, the standard input/output mechanism becomes unnecessary, so we'll remove it when building the accessor.
Implementing custom value accessor
Implementing a custom value accessor is straightforward. It comes down to two key steps:
- registering a
NG_VALUE_ACCESSORprovider - implementing the
ControlValueAccessorinterface methods
The NG_VALUE_ACCESSOR provider designates a class that implements the ControlValueAccessor interface. Angular uses this provider to set up the synchronization with the formControl. Typically, it's the same class as the component or directive that registers the provider. All form directives pull in value accessors using the NG_VALUE_ACCESSOR token, and then choose a suitable accessor. If a non-built-in or DefaultValueAccessor implementation is available, that takes precedence. Otherwise, Angular falls back to the default accessor. Keep in mind that only one custom accessor can be defined per element.
So, let's start by defining the provider:
@Component({
  selector: 'ngx-jquery-slider',
  providers: [{
    provide: NG_VALUE_ACCESSOR,
    useExisting: NgxJquerySliderComponent,
    multi: true
  }]
  ...
})
class NgxJquerySliderComponent implements ControlValueAccessor {...}
We placed the class directly in the component decorator descriptor. In contrast, Angular's built-in accessors define their provider outside the class metadata, like this:
export const DEFAULT_VALUE_ACCESSOR: any = {
  provide: NG_VALUE_ACCESSOR,
  useExisting: forwardRef(() => DefaultValueAccessor),
  multi: true
};
@Directive({
  selector:'input',
  providers: [DEFAULT_VALUE_ACCESSOR]
  ...
})
export class DefaultValueAccessor implements ControlValueAccessor {}
which means they must rely on forwardRef. If you're curious about forwardRef, you can read more in What is `forwardRef` in Angular and why we need it. When implementing a custom controlValueAccessor, my recommendation is to specify the class directly within the decorator descriptor.
Once the provider is in place, let's implement the ControlValueAccessor interface:
export class NgxJquerySliderComponent implements ControlValueAccessor {
  @ViewChild('location') location;
  widget;
  onChange;
  value;
ngOnInit() {
    this.widget = $(this.location.nativeElement).slider(this.value);
this.widget.on('slidestop', (event, ui) => {
      this.onChange(ui.value);
    });
  }
writeValue(value) {
    this.value = value;
    if (this.widget && value) {
      this.widget.slider('value', value);
    }
  }
registerOnChange(fn) { this.onChange = fn;  }
registerOnTouched(fn) {  }
Since we don't need to track whether a user has touched the control, we leave registerOnTouched empty. Inside registerOnChange, we save the reference to the fn callback that formControl provides. We'll invoke this callback each time the slider's value changes. In the writeValue method, we assign the given value to the slider widget.
If we overlay this on our earlier interaction diagram, it would look like this:
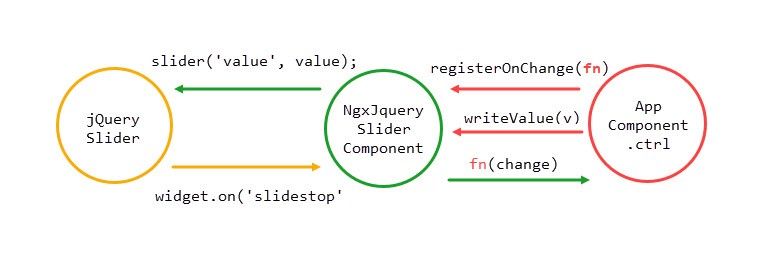
Comparing the simple wrapper and the controlValueAccessor implementations reveals that communication with the parent differs, while the interaction with the underlying slider widget stays the same. Interestingly, the formControl approach simplifies communication with the parent. For instance, writeValue replaces the ngOnChanges logic, and this.onChange stands in for the this.valueChange.emit(ui.value) call.
Our slider, now implemented as a ControlValueAccessor, can be used as follows:
@Component({
  selector: 'my-app',
  template: `
      <h1>Hello {{name}}</h1>
      <span>Current slider value: {{ctrl.value}}</span>
      <ngx-jquery-slider [formControl]="ctrl"></ngx-jquery-slider>
      <input [value]="ctrl.value" (change)="updateSlider($event)">
  `
})
export class AppComponent {
  ctrl = new FormControl(11);

  updateSlider($event) {
    this.ctrl.setValue($event.currentTarget.value, {emitModelToViewChange: true});
  }
}
You can find the final implementation here.
Github
That's all there is to it. The complete project is available on github here.