This is a follow-up to my earlier post on adding a theme switch to an Angular App. If you missed that one, I suggest starting there so you have the necessary background.
This write-up is aimed at developers of varying skill levels. A quick TL;DR; is included below for those who might only need certain parts.
TL;DR;
- Why Dark Theme in the Dark?
- Determining when it’s dark
- Enter: the
AmbientLightSensorWeb Interface - Using the
AmbientLightSensorWeb Interface - Trying it out
- Next Steps
- Closing Notes
To pick things up, we’ll simply carry on with the same Angular App from the earlier article.
That’s our starting point.
Why Dark Theme in the Dark?
As pointed out in the previous article, Dark Mode shines in low-light environments, and those are exactly the situations where it feels most natural.
Having users manually flip the theme when they move between lighting conditions is fine. But we can go further and make the theme adjust on its own, based on how much light is around the user.
That’s precisely what this article sets out to accomplish.
Determining when it’s dark
You might be wondering how we can tell if it’s dark. There’s a concept called Illuminance that fits the bill. As per Wikipedia:
Illuminance is a measure of the luminous flux spread over a given area.
One can think of luminous flux (which is measured in lumens BTW) as a measure of the total “amount” of visible light present, and the illuminance as a measure of the intensity of illumination on a surface.
In plain terms, the less the luminous flux, the darker the surroundings. For a rough reference, here’s a table that helps gauge darkness:
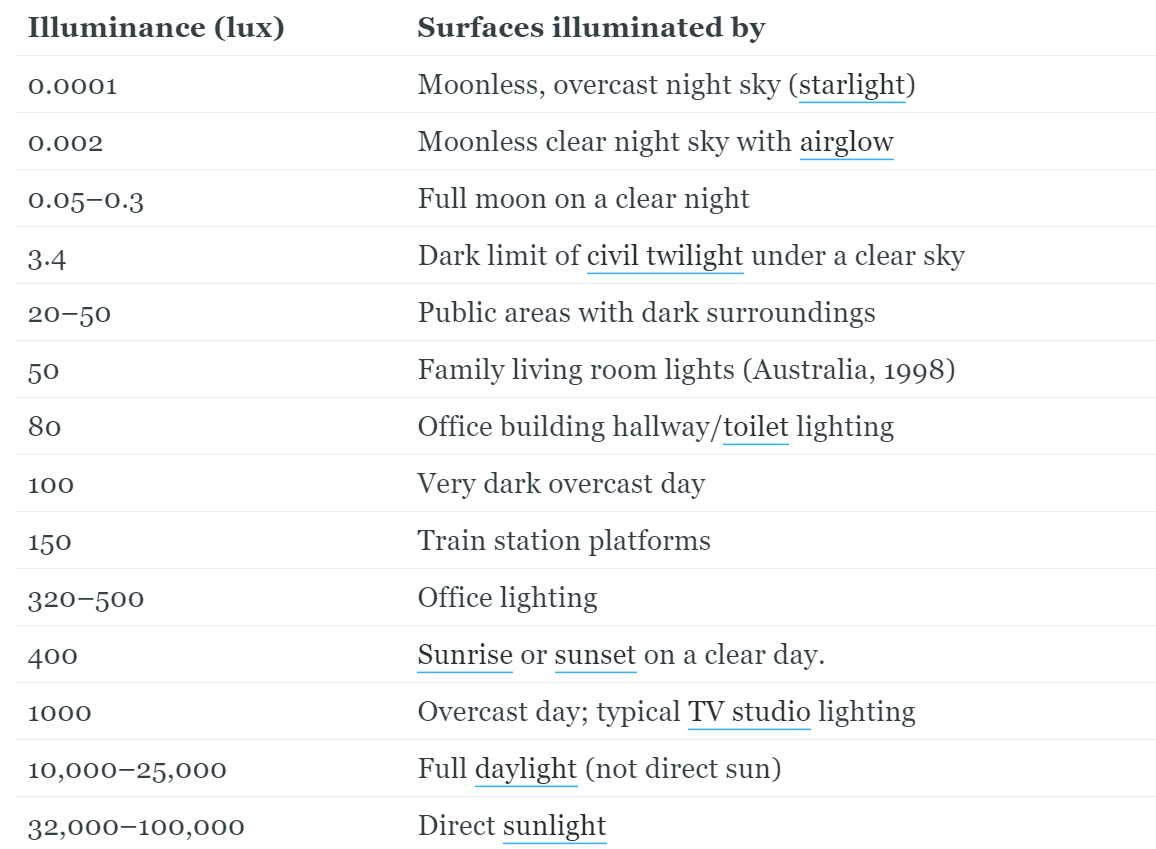
Based on that table, it’s reasonable to treat anything at or below 10 as a dim environment. It’s an arbitrary threshold, though — pick anything from 10 to 20 (or even 50 if that suits you) depending on what feels right.
So with luminous flux, we can decide if the setting is bright or dim. But how do we actually measure luminous flux?
Enter: the AmbientLightSensor Web Interface
This is a new addition from the Sensor APIs that provides the current light level, or illuminance, of the ambient light around the device.
The AmbientLightSensor object exposes a property called illuminance, which gives the current ambient light level in lux.
It only functions on devices equipped with the necessary ambient light sensor (hardware), obviously. This interface lets our browsers tap into the data collected by those sensors. Nice, right?
How does this translate for us? You can look at illuminance as the luminous flux falling onto a surface.
Now we have a way to obtain illuminance, and with the Illuminance Table, we can figure out if the current environment is bright or dark.
So, we’ll treat anything with illuminance <= 10 as dark (again, this number is flexible), and anything above that as light.
Getting illuminance via the AmbientLightSensor interface is fairly simple, and there’s a usage example in the MDN Docs.
But there’s a bunch of other details to handle when working with this interface. Let’s go through them step by step.
Feature Detection:
We need to verify whether the browser running our App actually supports AmbientLightSensor. A simple check works here:
if ('AmbientLightSensor' in window) {
  // Yay! The Browser has what it takes
}
Handling Edge Cases:
Simply detecting support doesn’t mean everything will go smoothly. A range of errors could pop up:
- During sensor instantiation.
- While the sensor is in use.
- If the user’s permission is needed to access the sensor.
- If the device itself doesn’t support the sensor type.
These situations would all lead to an error. So when we work with this interface, we have to plan for all these possible failure points too.
With a clear picture of what we’re dealing with, let’s move on to implementing this in our App.
Using the AmbientLightSensor Web Interface
Reading illuminance and covering all these edge cases is the kind of task best handed off to a service. So let’s build an Angular service that acts as the single place to manage this functionality.
The service’s only job is to expose an Observable that gives us the illuminance value or an error message to show the user. Let’s set that up. I’m calling it AmbientLightSensorService.
Because this service depends on the window object, we’ll provide it as a value so we can inject it as a dependency in the AmbientLightSensorService.
So within our AppModule:
...
import { AmbientLightSensorService } from "./ambient-light-sensor.service";

@NgModule({
  ...
  providers: [
    AmbientLightSensorService,
    {
      provide: Window,
      useValue: window,
    },
    ...
  ]
})
export class AppModule {}
**app.module.ts**
We also have a handful of messages, error types, sensor policy, and sensor name to handle. Let’s pull those out as constants as well:
export const SENSOR_NAME = 'AmbientLightSensor';
export const SENSOR_POLICY_NAME = 'ambient-light-sensor';
export const ACCESS_DENIED = 'denied';
export const THEME_OPTIONS_URL = '/assets/options.json';
export const THEME_BASE_PATH = 'node_modules/@angular/material/prebuilt-themes';
export const STYLE_TO_SET = 'theme';
export const DARK_THEME = 'pink-bluegrey';
export const LIGHT_THEME = 'deeppurple-amber';

export const ERROR_TYPES = {
  SECURITY: 'SecurityError',
  REFERENCE: 'ReferenceError',
  NOT_ALLOWED: 'NotAllowedError',
  NOT_READABLE: 'NotReadableError',
};

export const ERROR_MESSAGES = {
  UNSUPPORTED_FEATURE: "Your browser doesn't support this feature",
  BLOCKED_BY_FEATURE_POLICY:
    'Sensor construction was blocked by a feature policy.',
  NOT_SUPPORTED_BY_USER_AGENT: 'Sensor is not supported by the User-Agent.',
  PREMISSION_DENIED: 'Permission to use the ambient light sensor is denied.',
  CANNOT_CONNECT: 'Cannot connect to the sensor.',
};
**common.const.ts**
I trust the names I’ve picked for these variables make their purpose clear.
Now, let’s put together the service itself:
import { ReplaySubject, Observable } from 'rxjs';
import { Injectable } from '@angular/core';

import {
  SENSOR_NAME,
  SENSOR_POLICY_NAME,
  ACCESS_DENIED,
  ERROR_TYPES,
  ERROR_MESSAGES,
} from './common.const';

@Injectable()
export class AmbientLightSensorService {
  private illuminance: ReplaySubject<number> = new ReplaySubject<number>(1);
  illuminance$: Observable<number> = this.illuminance.asObservable();

  constructor(private window: Window) {
    try {
      if (SENSOR_NAME in window) {
        this.startReading();
      } else {
        this.illuminance.error(ERROR_MESSAGES.UNSUPPORTED_FEATURE);
      }
    } catch (error) {
      // Handle construction errors.
      if (error.name === ERROR_TYPES.SECURITY) {
        this.illuminance.error(ERROR_MESSAGES.BLOCKED_BY_FEATURE_POLICY);
      } else if (error.name === ERROR_TYPES.REFERENCE) {
        this.illuminance.error(ERROR_MESSAGES.NOT_SUPPORTED_BY_USER_AGENT);
      } else {
        this.illuminance.error(`${error.name}: ${error.message}`);
      }
    }
  }

  private startReading() {
    const sensor = new AmbientLightSensor();
    sensor.onreading = () => this.illuminance.next(sensor.illuminance);
    sensor.onerror = async (event) => {
      // Handle runtime errors.
      if (event.error.name === ERROR_TYPES.NOT_ALLOWED) {
        // Branch to code for requesting permission.
        const result = await navigator.permissions.query({
          name: SENSOR_POLICY_NAME,
        });
        if (result.state === ACCESS_DENIED) {
          this.illuminance.error(ERROR_MESSAGES.PREMISSION_DENIED);
          return;
        }
        this.startReading();
      } else if (event.error.name === ERROR_TYPES.NOT_READABLE) {
        this.illuminance.error(ERROR_MESSAGES.CANNOT_CONNECT);
      }
    };
    sensor.start();
  }
}
**ambient-light-sensor.service.ts**
The implementation takes care of every edge case we covered earlier.
Essentially, we’re exposing the illuminance ReplaySubject<number> as the illuminance$ Observable<number>.
“Why a ReplaySubject<number>(1)?” you ask. Because there’s no initial value to start with, and that approach fits better than a BehaviorSubject<number>(null).
We feed new lux values into the illuminance ReplaySubject by invoking next on it. For errors, we send them out via the error method.
Method names and error message identifiers are fairly descriptive too. If something isn’t obvious, leave a comment and I’ll go into more detail.
With the service ready, we can inject it into our HeaderComponent as a dependency, and use the illuminance$ Observable to get the lux reading (or the error message).
import { Component, OnDestroy, OnInit } from '@angular/core';
import { MatSnackBar } from '@angular/material/snack-bar';
import { Observable, Subject } from 'rxjs';
import { takeUntil } from 'rxjs/operators';

import { AmbientLightSensorService } from '../ambient-light-sensor.service';
import { DARK_THEME, LIGHT_THEME } from '../common.const';
import { Option } from '../option.model';
import { ThemeService } from '../theme.service';

@Component({
  selector: 'app-header',
  templateUrl: './header.component.html',
  styleUrls: ['./header.component.css'],
})
export class HeaderComponent implements OnInit, OnDestroy {
  options$: Observable<Array<Option>> = this.themeService.getThemeOptions();
  private unsubscribe$ = new Subject<void>();

  constructor(
    private readonly themeService: ThemeService,
    private readonly alsService: AmbientLightSensorService,
    private readonly snackBar: MatSnackBar
  ) {}

  ngOnInit() {
    this.themeService.setTheme(DARK_THEME);
    this.alsService.illuminance$.pipe(takeUntil(this.unsubscribe$)).subscribe(
      (illuminance) => {
        illuminance <= 10
          ? this.themeService.setTheme(DARK_THEME)
          : this.themeService.setTheme(LIGHT_THEME);
      },
      (error) => this.showMessage(error)
    );
  }

  themeChangeHandler(themeToSet) {
    this.themeService.setTheme(themeToSet);
  }

  ngOnDestroy() {
    this.unsubscribe$.next();
    this.unsubscribe$.complete();
  }

  private showMessage(messageToShow) {
    this.snackBar.open(messageToShow, 'OK', {
      duration: 4000,
    });
  }
}
**header.component.ts**
As you can see:
- We’ve now injected
AmbientLightSensorServiceas a dependency. - Inside the
ngOnInitlifecycle hook, wesubscribeto theObservable. From there: - The success callback fires with the
illuminancevalue. We evaluate that value: - If it’s
<= 10, we apply theDARK_THEME. - If it’s
> 10, we switch to theLIGHT_THEME. - The error callback runs with the
errormessage. In that case, we simply callshowMessageto display a snack bar.
Also, since we’re subscribeing to the Observable here, we need to take deliberate steps to prevent memory leaks. To achieve that, we go the declarative route with the takeUntil operator.
For more on that pattern, check out this article on AngularInDepth by Tomas Trajan
That’s all there is to it. Our AmbientLightSensor theme switch is complete. Let’s see it in action.
Trying it out
Before we dive in, there’s something to keep in mind about browser compatibility.
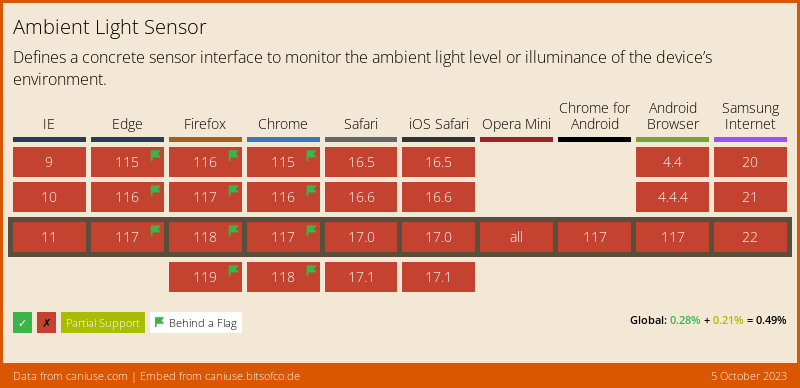
As the screenshot indicates, browser support is still shaky right now. But we’ll at least give it a try on the best browser out there (cough Chrome cough).
To make it work, we’ll need to enable a flag first:
I’m heading to chrome://flags/#enable-generic-sensor-extra-classes and toggling it on my phone (my laptop lacks the hardware sensor). After that, I’ll restart the browser on the phone.
Time to see if it works:
Cool, it worked!
Here’s the complete code:
The final Code
Moving Forward
At this point, the current solution still lacks one important detail: the user may not wish to have their theme changed automatically in response to the surrounding light. A straightforward way to address this is by introducing a simple user preference that allows them to toggle this behavior on or off. When the preference is enabled, the theme should follow the ambient light; when it is not, the theme should remain unchanged.
As an exercise, consider building a preferences or settings menu. The theme-switching logic should only execute once this automatic behavior has been expressly turned on by the user.
I would like to extend my sincere thanks to Martina Kraus and Rajat Badjatya for volunteering their time to review this article and for providing all the constructive feedback that helped refine it.
This article was originally published by the author under the Angular Publication on DEV.TO.