Initial Configuration
To gain a solid grasp of what this plugin can accomplish, we’ll work with a sample project throughout this discussion. We’ll tweak its configuration step by step to highlight various capabilities of the plugin.
Before we dive into the specific issue the plugin addresses, let’s take a look at the modest project and its setup that will kick off our exploration:
├── a.js
├── b.js
├── c.js
├── d.js
├── e.js
├── f.js
├── g.js
├── index.js
├── node_modules
│   ├── x.js
│   ├── y.js
│   └── z.js
└── webpack.config.js
You can access this project via this StackBlitz application. Be sure to complete the steps described in the readme.
The contents of the webpack.config.js file are as follows:
{
  mode: 'production',
  entry: {
    main: './src',
  },
  output: {
    path: path.join(__dirname, 'dist'),
    filename: '[name].js',
    clean: true,
  },
  optimization: {
    // Instruct webpack not to obfuscate the resulting code
    minimize: false,
    splitChunks: false,
  },
  context: __dirname,
};
Once you execute npm run build within the StackBlitz environment, the dist folder should contain the following layout:

Observe that there are 5 chunks in total: one for the sole item found in the entry object (specifically, main: './src'), and an additional 4 chunks generated through the use of the import() function.
The following diagram illustrates both the module dependencies (showing the dependent and its dependencies) and the parent-child relationships that exist between chunks:
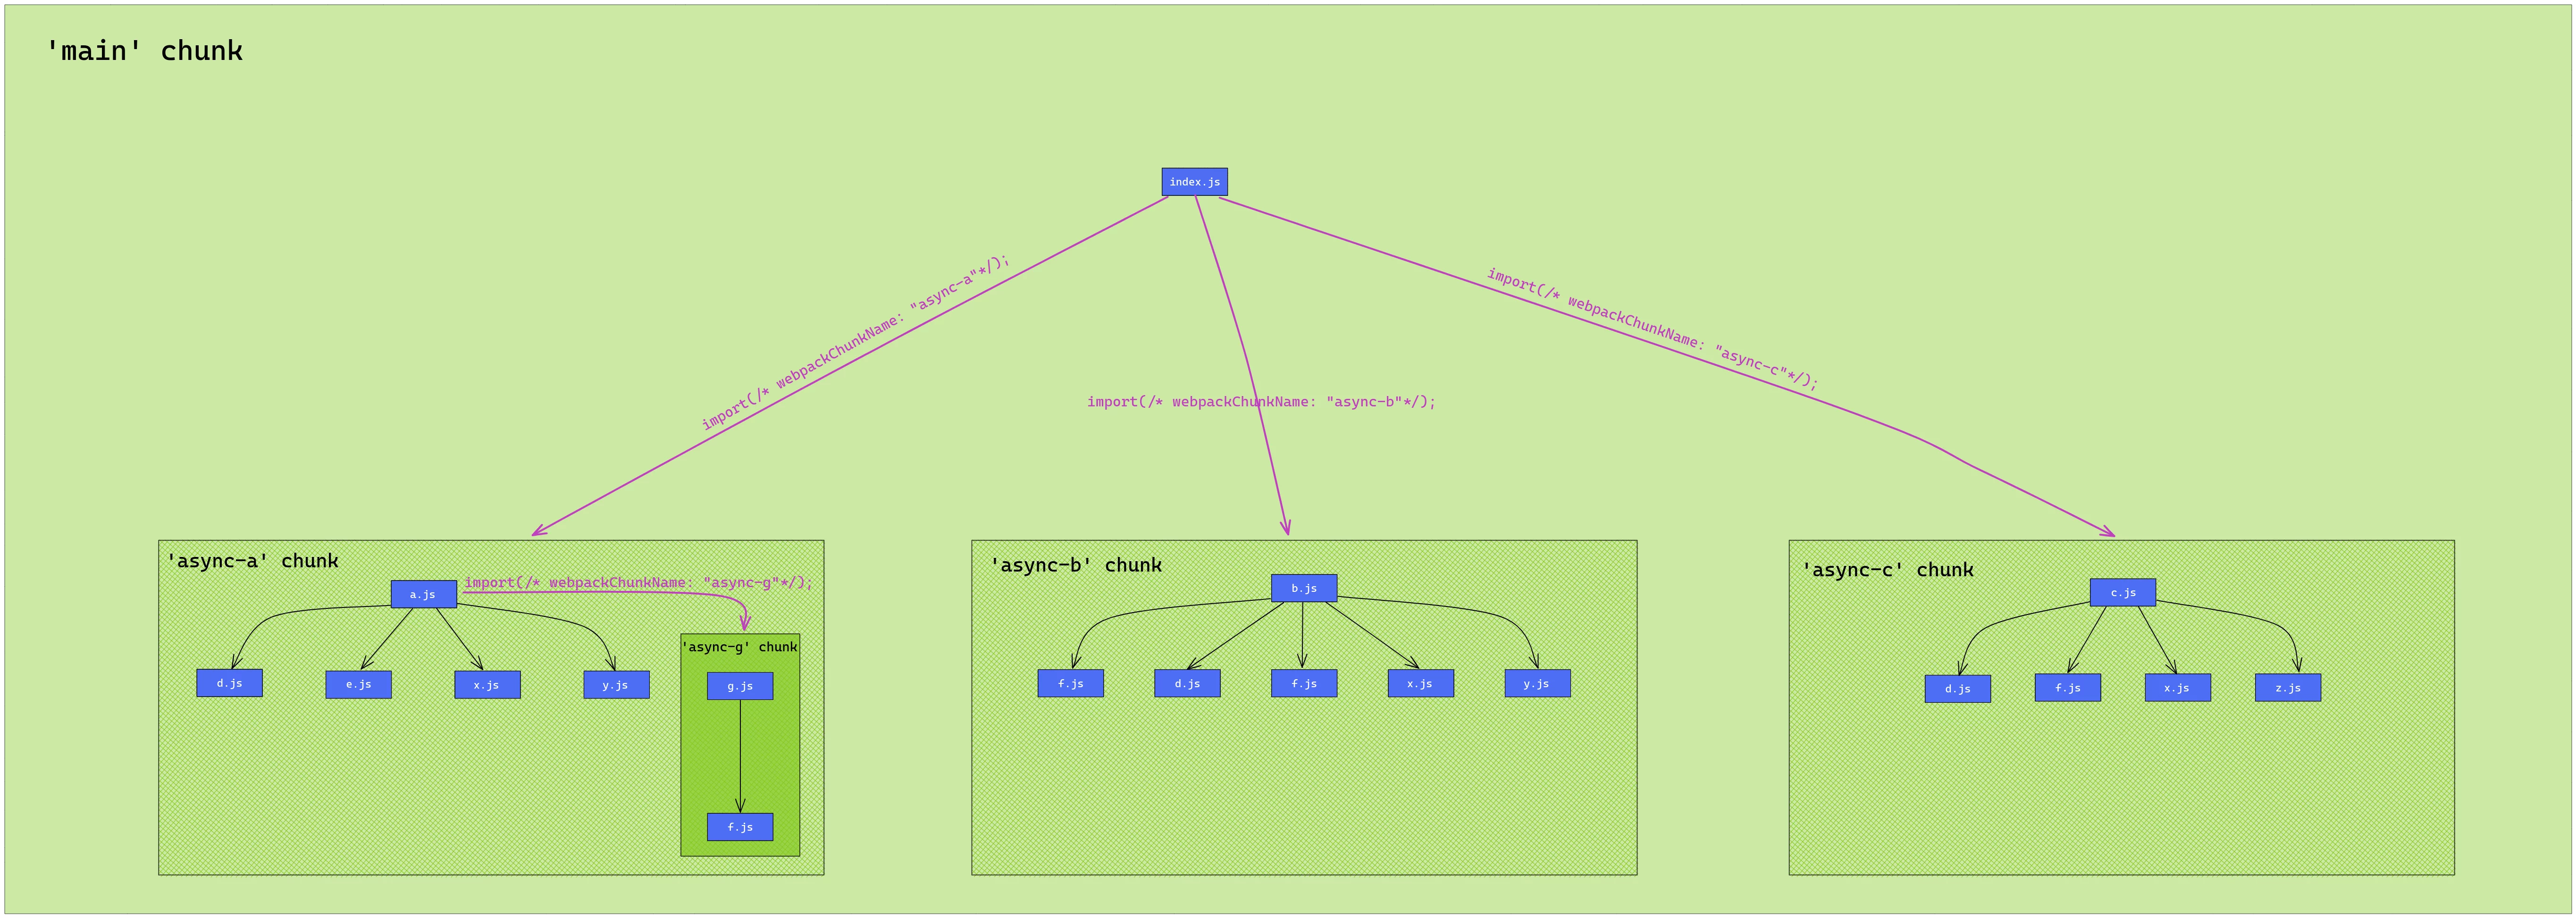
You can find the link to this diagram here.
I suggest you open that diagram link and spend a moment getting familiar with what it depicts.
The black arrows represent the usage of top-level ES module import statements (like import xDefault from 'x'). The purple arrows, as labeled on the arrows themselves, indicate the use of the import function (for example, import(/* webpackChunkName: "async-a" */ './a')). This latter usage has a significant consequence: it results in the creation of new chunks. Additionally, the chunks themselves are highlighted with green frames. Nested green frames denote a parent-child relationship between chunks.
For instance, the main chunk has 3 child chunks: async-a, async-b, and async-c. The async-a chunk also has its own child chunk, named async-g. It’s worth pointing out that modules (which are framed in blue) belong exclusively to the chunk indicated by the surrounding green frame. In other words, the g and f modules are part of the async-g chunk.
With these basic ideas established, we’re ready to proceed!
Identifying the core issue
Before we go further, I recommend executing the project’s build script. Here is the link to the relevant StackBlitz app once more. We’ll use the output from the dist directory to take our initial steps toward understanding the problem at hand.
Let’s take a closer look at what’s inside dist. As you’ll observe, there are 5 files, indicating that our project consists of 5 chunks. The main chunk truly lives up to its name (you can consider it the entry point of our application). This becomes evident when examining its source code—it contains a substantial amount of webpack’s runtime code, which includes the logic for loading other chunks (e.g., over HTTP), storing modules, and handling various other tasks. If you take a peek into the async-* files, you’ll see they contain only a minimal amount of runtime code needed to link these chunks back to the main chunk. The bulk of the code in an async-*.js file consists of the imported modules and their exported members.
Now, consider this intriguing question: how many times do you imagine the x module (which corresponds to the x.js file and is imported by the a, b, and c modules) will be replicated across these 5 resulting files? Feel free to consult the diagram. To determine the answer, you can copy the exported string from within the x.js file and do a global search in the StackBlitz application:

From this, we can determine that the contents of x.js are duplicated three times—once for each importing module that generates a separate async chunk (e.g., module a corresponds to the async-a chunk, b to async-b, and c to async-c). Now, envision the scenario where the x.js file contains hundreds of lines of code! All of those lines would be replicated in three distinct locations—this seems quite inefficient. It’s true that this duplication won’t lead webpack to execute the x module multiple times, so ultimately, we’ll still end up with just a single instance of x.js within our app.
However, remember what loading a chunk entails—an HTTP request. Because the contents of x.js are embedded within 3 chunks, if we initially load, say, the async-a chunk, the entire code contained within the async-a.js file must be fetched from the network and subsequently parsed. If the x.js file is particularly large, this loading procedure could consume a considerable amount of time. The prospect of repeating this time-consuming process twice more doesn’t seem like an optimal strategy, so clearly there must be a more efficient alternative.
Here’s a diagrammatic representation of this issue:

You can access the link for the above diagram here.
This diagram closely resembles the initial one, with the only difference being the highlighting of the x module in red. This is meant to signal that there’s something suboptimal regarding this module, and it will assist us in identifying what SplitChunksPlugin does to address the situation. That’s precisely the focus of the next section.
Note: as you may have observed, it’s accurate that modules like f, d, and y face a similar situation as x, but we’re concentrating solely on x at the moment to keep things straightforward.
The solution offered by SplitChunksPlugin
I imagine you’re eager to delve into the webpack configuration and discover what SplitChunksPlugin has to offer, but let’s first consider how we might approach a solution conceptually. In other words, referring to the diagram above, how would you refine the current state of affairs? Assuming x.js contains 1000 lines of code, our app would need to load those lines three times (since x is integrated into 3 distinct chunks, each requested via import() from the main chunk). I should also clarify that if the identical chunk is requested multiple times, only a single HTTP request is made, and its modules are subsequently stored in a cache object, ensuring that any later requests for that chunk retrieve everything directly from the cache.
Taking the above into account, we might consider loading those 1000 lines of code just once by isolating the x module into its own new chunk. Consequently, when module a needs x, an HTTP request would be triggered to fetch the chunk containing x (since this would be its first load). Then, when module b requires x, those 1000 lines of code would not be downloaded again; instead, x would be fetched directly from memory. The same logic applies when module c needs x.
Let’s see how this proposed solution looks in diagram form:
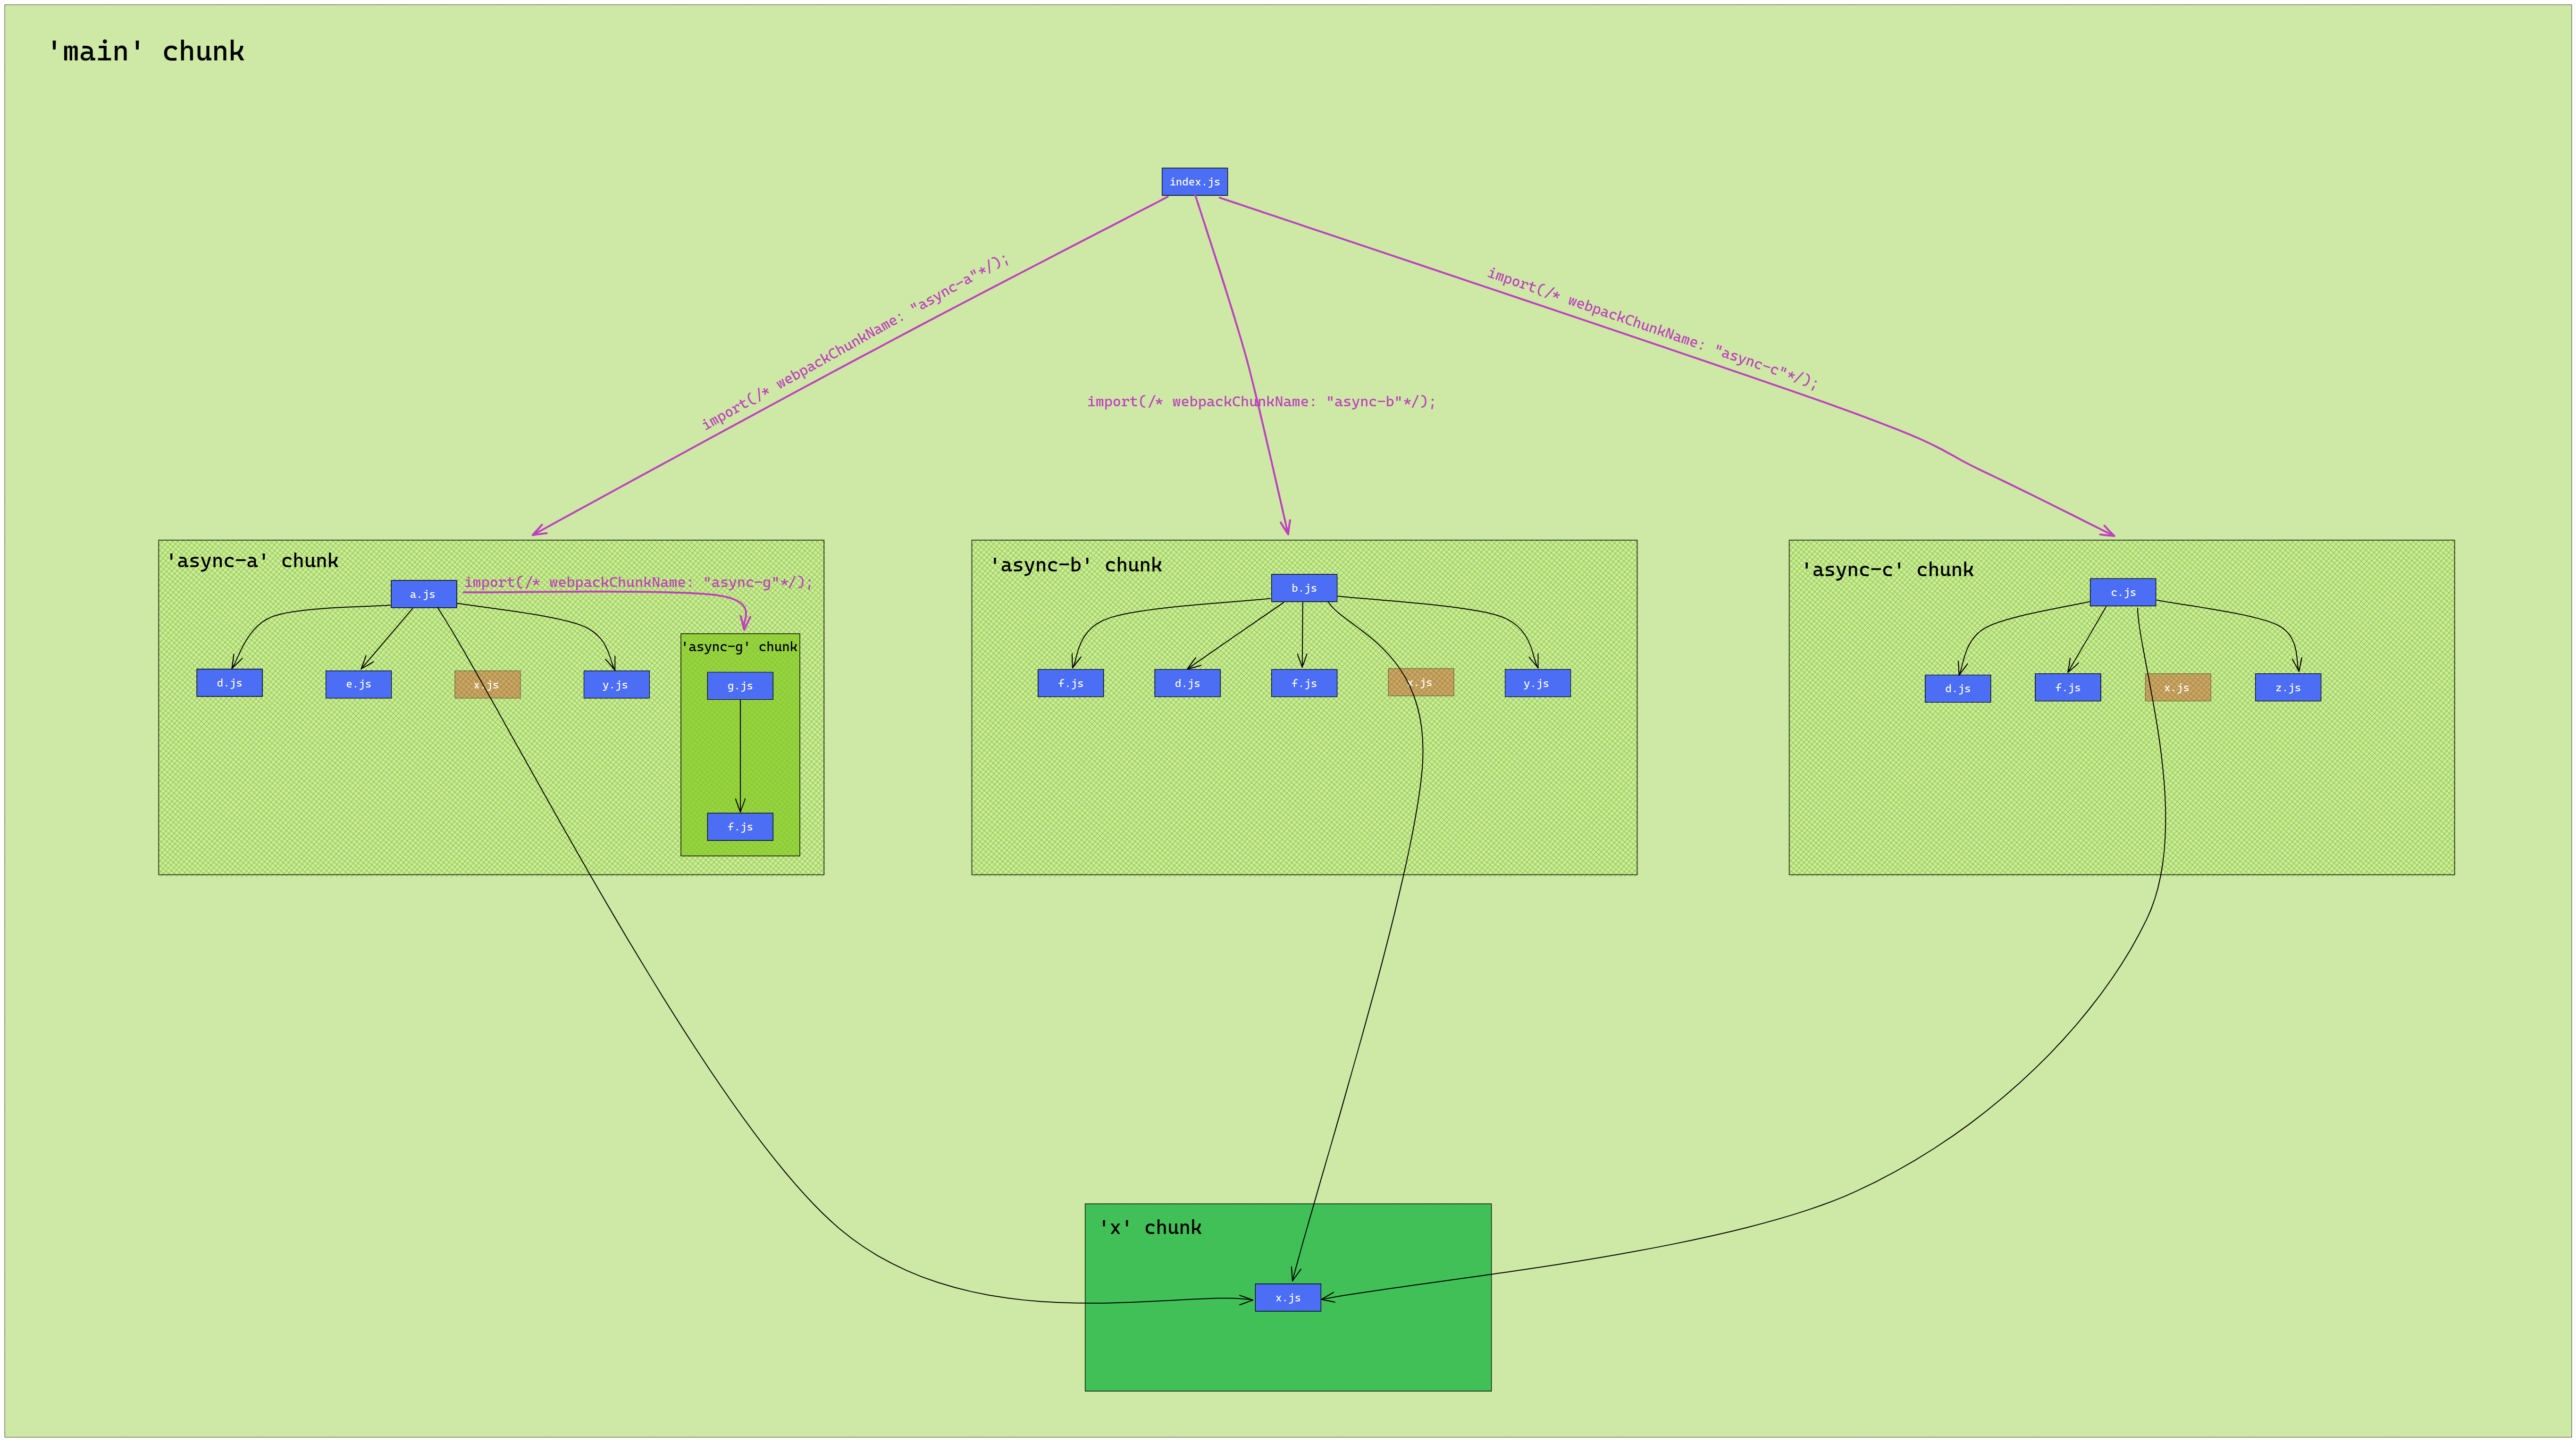
A link to the above diagram can be found here.
The faint red rectangles you see represent the modifications that have been implemented. Now that the x module resides in its own chunk, it will be loaded over the network only a single time, regardless of how frequently that module is needed. This is precisely what we can accomplish by leveraging SplitChunksPlugin.
Now, let’s return to our favorite topic: webpack configuration. Here’s what the webpack.config.js file should resemble in order to enable SplitChunksPlugin with its default settings:
{
  mode: 'production',
  entry: {
    main: './src',
  },
  output: {
    path: path.join(__dirname, 'dist'),
    filename: '[name].js',
    clean: true,
  },
  optimization: {
    // Instruct webpack not to obfuscate the resulting code
    minimize: false,

    splitChunks: {
      minSize: 0,
    },
  },
  context: __dirname,
}
This particular solution is available in this StackBlitz app (be sure to follow the guidance in the readme file).
The minSize option isn’t critical at this point, but it’s necessary because the chunk that includes x is rather small, and webpack would normally deem it not worthwhile to create a new chunk for just a handful of bytes. So, by setting minSize to 0, we’re instructing SplitChunksPlugin to consider creating a new chunk whenever its total size in bytes meets or exceeds zero.
As an aside, the x module isn’t the sole candidate that could populate this new chunk; others could join as well. The criterion for grouping modules is how they’re utilized across other chunks. For instance, if there were another module w that’s used in the same way as x, the separate chunk would then include both x and w.
The configuration options accepted by SplitChunksPlugin dictate how—and whether—new chunks come into existence. For any chunk to be formed, it must first satisfy a set of criteria that defines what’s known as a cache group.
As an illustration, we might specify: I want chunks to be generated exclusively from modules originating in node_modules, and any chunks thus formed must be at least 1000 bytes in size. We might also impose a requirement that a module appear in at least N existing chunks. In our ongoing example, we could prevent any chunks from being created unless the x module is found in no fewer than 3 chunks.
Collectively, these constraints can define a cache group, and only chunks that meet all its conditions will actually be created.
In the sections that follow, we’ll explore the various configuration options available for SplitChunksPlugin, beginning with arguably one of the most challenging to grasp intuitively.
Exploring the cacheGroup configuration
To recap what was introduced at the close of the prior section, a cache group is essentially a collection of criteria. These criteria determine the conditions under which fresh chunks are generated. Consider the following instructive example of a cache group:
cacheGroupFoo: {
	// The number of chunks the module must appear in
	minChunks: 3,
   	// Number of bytes put in a chunk(i.e. the sum of the number of bytes for each constituent module)
	// For example, if a chunk contains 2 modules, `x` and `w`, then `nrBytesChunk = nrBytes(x) + nrBytes(w)`.
	minSize: 10,
	// Which modules are to be considered
	modulePathPattern: /node_modules/
}
From what we covered earlier, a new chunk emerges when every one of these requirements is satisfied at the same time:
- the module needs to be part of at least 3 distinct chunks
- the chunk’s size must be no less than 10 bytes
- the modules that trigger chunk creation need to originate from the
node_modulesdirectory
That, in essence, defines the structure of a cache group. Multiple chunks can be produced from a single set of cache groups. Suppose the x module appears in 3 separate chunks, resides within node_modules, and is at least 10 bytes (the resulting chunk would also meet that size), then according to the cache group described above, x gets isolated into its own chunk. Now, if another node_modules module, say w, is included in 4 different chunks, it would receive its own separate chunk, provided all other criteria from the cache group are satisfied. However, if w was only utilized in 3 chunks, both x and w would be grouped together within a single chunk. A demonstration of this specific case is available as a StackBlitz project here—remember to check the instructions in the readme file.
When SplitChunksPlugin runs with the standard settings,
/* ... */
optimization: {
  // splitChunks: false,
  splitChunks: {
    minSize: 0,
  },
},
/* ... */
or more precisely, without designating cache groups explicitly, the plugin falls back on 2 built-in cache groups. These operate exactly as if we had defined them manually like this:
/* ... */
optimization: {
  splitChunks: {
  	default: {
        idHint: "",
        reuseExistingChunk: true,
        minChunks: 2,
        priority: -20
    },
    defaultVendors: {
        idHint: "vendors",
        reuseExistingChunk: true,
        test: NODE_MODULES_REGEXP,
        priority: -10
    }
  },
},
/* ... */
There is no need to worry about the novel options that appear—several will be discussed further along in this piece. At this point, capturing the general idea is sufficient.
These are the two cache groups: one tagged default, which applies to any module in our project (it does not matter what its source is), and another labeled defaultVendors, which is exclusively concerned with modules coming out of node_modules(that is what the test property dictates). You have likely noticed that the second cache group carries a higher priority. That turns out to be crucial when a single module qualifies for multiple cache groups. Given that it is cache groups that generate chunks, a module could end up in several fresh chunks. That scenario is undesirable since it leads back to the duplication issue we are aiming to fix. The priority setting resolves which single chunk the module is assigned to, while all the other potential assignments are ignored.
To bring those implicit cache groups into sharper focus, let’s look at the chunks they produce in an already-familiar example—the one where we first encountered SplitChunksPlugin. The corresponding StackBlitz demo is accessible here.
Here’s the webpack configuration that the project relies on:
{
  mode: 'production',
  entry: {
    main: './src',
  },
  output: {
    path: path.join(__dirname, 'dist'),
    filename: '[name].js',
    clean: true,
  },
  optimization: {
    // Instruct webpack not to obfuscate the resulting code
    minimize: false,
    splitChunks: {
      minSize: 0,
    },
  },
  context: __dirname,
};
A quick note: a cache group adopts certain options whenever those options are not explicitly stated within the group. For instance, minSize: 0 gets passed down to both default and defaultVendors. You’ll find the full list of inheritable options in webpack's type definitions, linked here.
Once we execute npm run build, let’s look at what appears inside the dist folder. Alongside the familiar outputs—the main file and a series of async-* files (each linked to its corresponding chunk)—we now see additional files:
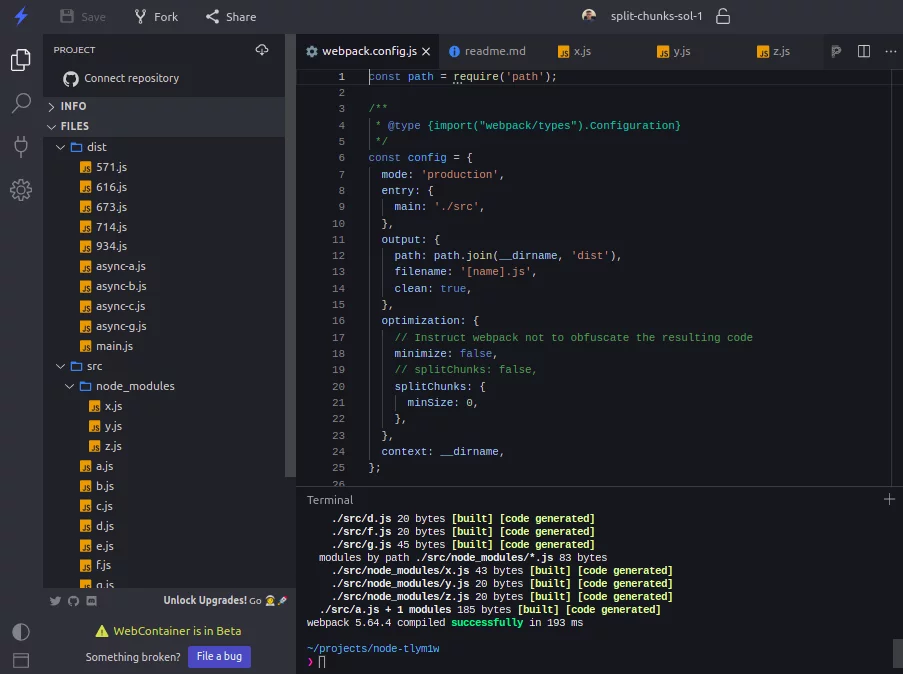
Please be aware: even if the generated file names vary, their contents will remain consistent with what we are about to inspect.
Not surprisingly, since each file inside dist represents its own chunk, these fresh files signal the formation of new chunks.
Without question, these new chunks were produced by SplitChunksPlugin. But which modules actually populate them? Before we go ahead and open these files, here’s an illustration that maps out the file layout along with the chunks that would exist under normal conditions (without the influence of SplitChunksPlugin):
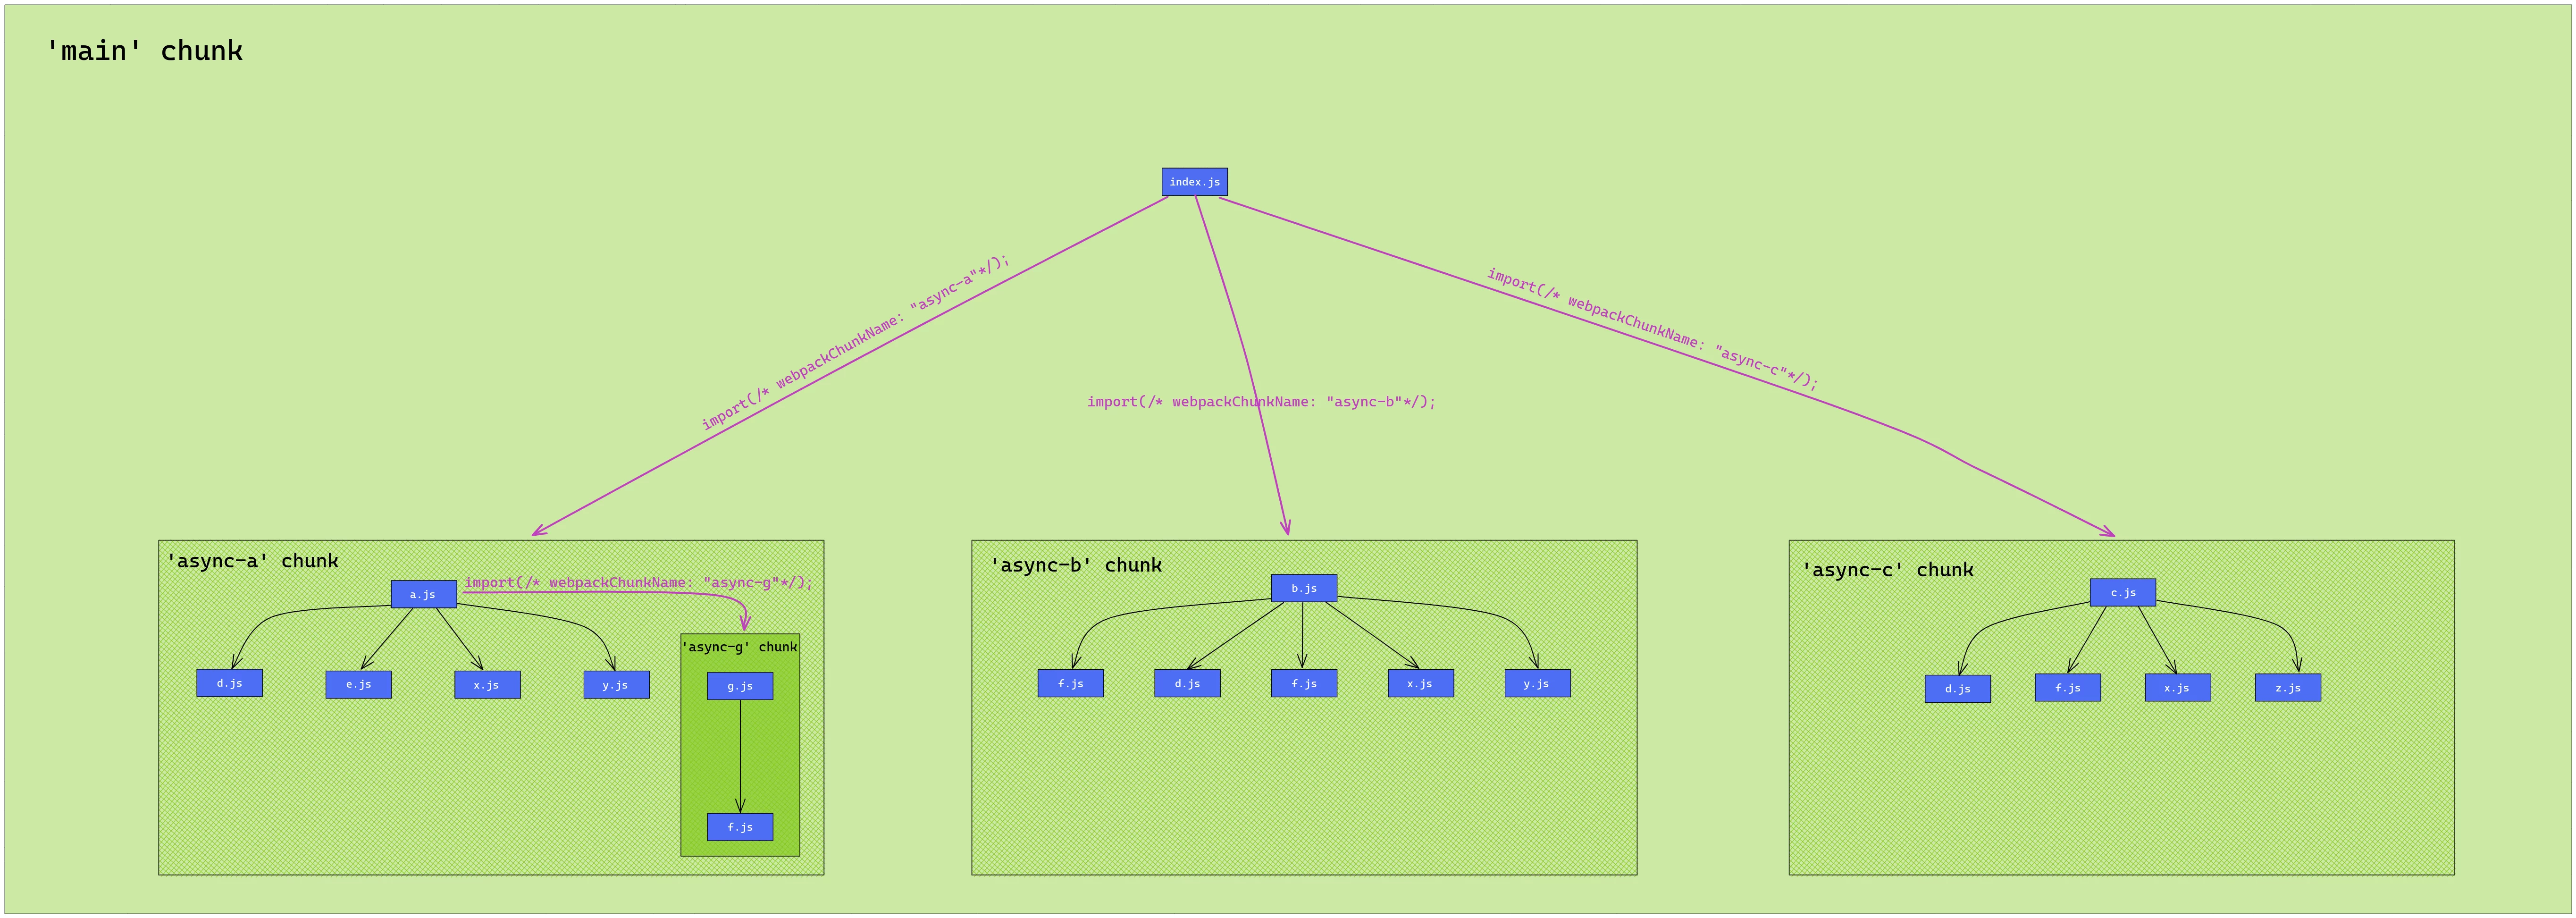
You can view this diagram in Excalidraw via this link.
We’ll use this visual reference repeatedly as we explain the reason behind each new chunk’s existence. Let’s begin with the first new file listed at the top.
For quick reference, here again are the default cache groups that we will rely on to identify why certain modules end up in certain chunks:
// The default cache groups that `SplitChunksPlugin` uses.
default: {
    idHint: "",
    reuseExistingChunk: true,
    minChunks: 2,
    priority: -20
},
defaultVendors: {
    idHint: "vendors",
    reuseExistingChunk: true,
    test: NODE_MODULES_REGEXP,
    priority: -10
}
Looking at 571.js, we see:
/* ... */
const __WEBPACK_DEFAULT_EXPORT__ = ('z');
/* ... */
This is simply the z module. Why does it deserve its own chunk? Well, z is located in the node_modules folder (visible in that screenshot), which brings it under the umbrella of the chunk group called defaultVendors. That group does not impose any limits on the minimum number of chunks a module must be part of. Even though z appears solely within the async-c chunk, that is perfectly fine as far as defaultVendors is concerned. Yes, z could also fit within the default group, yet defaultVendors commands a greater priority, so that’s where it lands.
For 616.js:
/* ... */
const __WEBPACK_DEFAULT_EXPORT__ = ('y');
/* ... */
Here we have the y module. It ends up in a distinct chunk because it originates from node_modules (so defaultVendors is yet again the reason for this chunk) and it shows up in both the async-b and async-a chunks.
For 673.js:
/* ... */
const __WEBPACK_DEFAULT_EXPORT__ = ('d');
/* ... */
This file contains the d module. Based on the screenshot, d does not come from node_modules. That means the default cache group is the one behind this chunk. A careful look at the diagram reveals that d is loaded from the async-a, async-b, and async-c chunks. That sums to 3 chunks, and default only requires that a module appear in at least 2 chunks. This requirement is satisfied, which explains why it gets separated.
For 714.js:
/* ... */
const __WEBPACK_DEFAULT_EXPORT__ = ('f');
/* ... */
This corresponds to the f module. From the diagram, f is the part of 3 chunks: async-g, async-b, and async-c. Based on that screenshot, f is not in node_modules, so we are dealing with the same logic as above—the default cache group was responsible here.
Finally, looking at 934.js:
/* ... */
const __WEBPACK_DEFAULT_EXPORT__ = ('some content from `x.js`!');
/* ... */
Predictably, it’s the x module. You might have already guessed the reason for its extraction, given how often we’ve mentioned it: x belongs to node_modules (hence defaultVendors created this chunk). Additionally, it’s referenced from 3 different chunks, though that fact would matter only if we added a minChunks constraint to the defaultVendors group.
Those are the outcomes of using the built-in options for SplitChunksPlugin. And if you’re curious about how webpack evaluates cache groups to decide which one springs a new chunk, the relevant logic lives here in the source code.
Investing time to understand these default cache groups wasn't wasted; without that knowledge, it would be quite difficult to tune them to get the exact behavior we want from SplitChunksPlugin. This understanding also lays the groundwork for looking at the various options that SplitChunksPlugin exposes.
Before diving into those, let’s take a quick look at how to turn off a cache group, since you’ll notice that technique being applied in the subsequent examples for clarity. For demonstration, we’ll disable the default cache group.
/* ... */
optimization: {
    splitChunks: {
        cacheGroups: {
        	// We're disabling it by setting it to false.
        	default: false,
        },
        minSize: 0,
  },
}
/* ... */
You can try a project set up with the above configuration in this StackBlitz app.
If we were to run npm run build now, what new chunks would you anticipate showing up? With default out of the picture, only modules hailing from node_modules get considered. Given the absence of other restrictions (except minSize; without lowering it, we wouldn’t spot any new chunks because those files are below the default minSize threshold), the dist directory would contain 3 newly made chunks, one for each of the modules x, y, and z:

In the following parts, we’ll dive into a range of features offered by SplitChunksPlugin. To keep things straightforward, each upcoming example will have one of the standard cache groups turned off so that the specific point of the example stands out. Let’s proceed!
Understanding the minChunks setting
This property has already been mentioned earlier in the article: it defines how many chunks need to include a module for it to be eligible. Let’s revisit the idea that for new chunks to arise from SplitChunksPlugin, a set of conditions must be satisfied. That means a chunk needs to match a particular cache group.
Let’s use a simpler example to illustrate: here are the criteria we want to enforce
- the modules inside the new chunks must be sourced from
node_modules - a module must show up in 3 or more chunks
Following those constraints, the webpack setup would be:
optimization: {
    // Instruct webpack not to obfuscate the resulting code
    minimize: false,
    splitChunks: {
      // minSize: 0,
      // minChunks: 3,
      cacheGroups: {
        // Disabling this group so that we can focus on one thing at a time.
        default: false,
        defaultVendors: {
          // We could have also set this property as: `splitChunks.minSize: 0`,
          // since this property is inherited(by default) by the cache groups.
          minSize: 0,

          // Enforcing the minimum number of chunks that request a module.
          minChunks: 3,

          // Q: What kind of modules should new chunks contain?
          // A: Modules that come from `node_modules`
          test: /node_modules/,
        },
      },
    },
  },
A StackBlitz demo that illustrates this option is available at this link.
What would dist contain after a successful npm run build? Beyond the expected output (the main and async-* chunks), there is exactly one fresh chunk, holding the x module. Referring back to the earlier project diagram (linked here), x is uniquely identified as the single node_modules module spread across no fewer than 3 chunks.

Now, what would the result look like with minChunks: 2? Raising the limit down to 2 effectively relaxes the requirement, meaning we’d expect two new chunks: one holding x, another holding y. Give it a shot in the StackBlitz app to confirm!
Understanding the chunks option
Throughout this series, we've mentioned phrases like module x appears in N different chunks. The chunks option lets us define the categories of those chunks. Since we haven't delved deeply into chunks and related concepts until now, let's revisit some foundational ideas. For that, we need to look back at our original diagram:
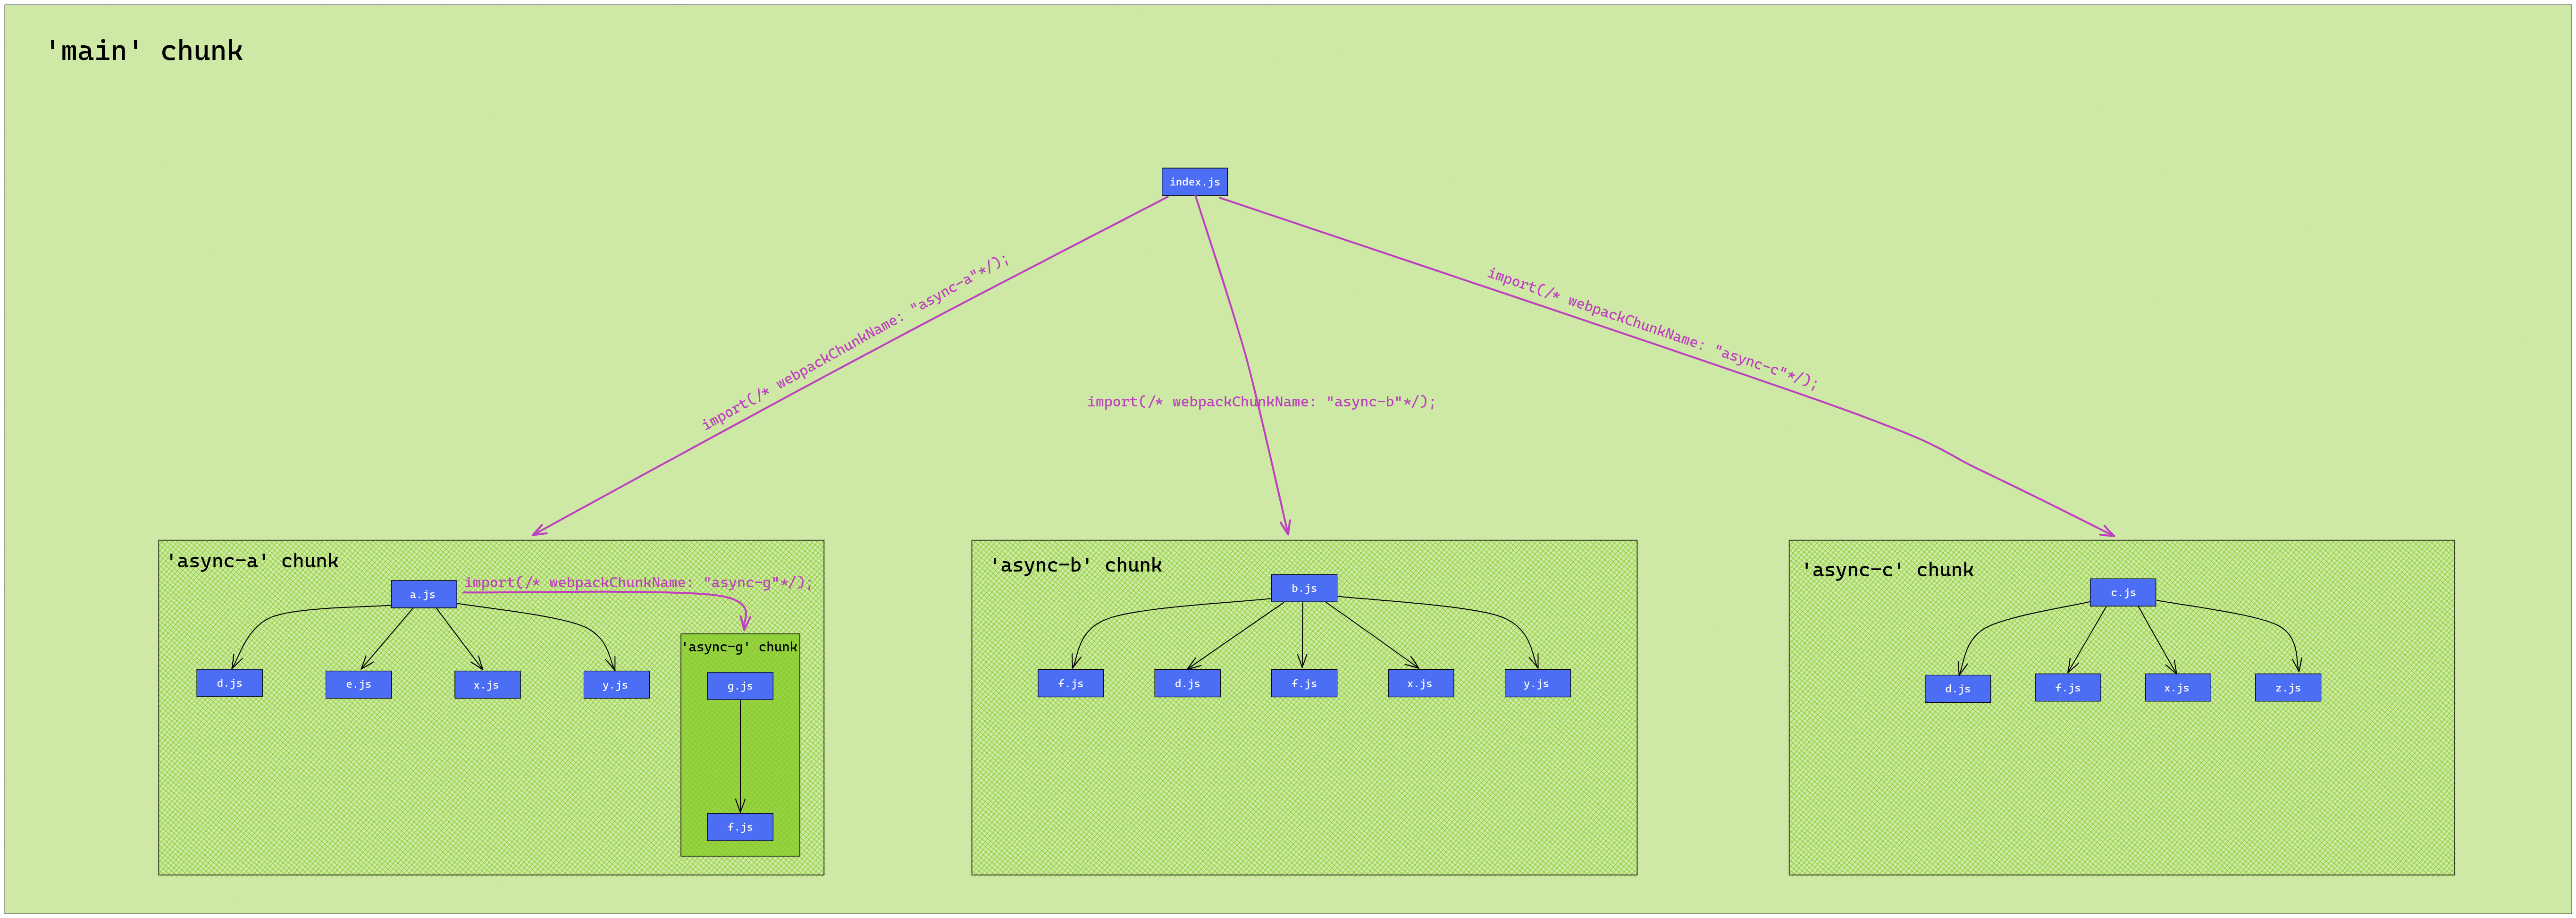
The diagram above can also be accessed via this link.
While a chunk is essentially a collection of modules, visualizing what a chunk really represents can be tricky. Based on the information we have, we can identify 2 distinct chunk types in the diagram (chunks are highlighted in green):
- Async chunks: These are the
async-*chunks. What unites them? They're all generated through the use of theimport()function. - Initial/main chunks: Only the
mainchunk fits this description in the diagram. What defines a main chunk? Like other chunk types, it contains modules that the application renders and uses, but it also bundles a substantial amount of runtime code — the code responsible for gluing together all generated chunks so the app functions correctly. This runtime code includes, for instance, the logic to load and integrate async chunks. Typically, initial chunks are identified by entries in theentryobject, e.g.,{ entry: { main: './index.js' } }.
Now, returning to the chunks option — it accepts four possible values:
async– the cache group only considers async chunks (this is the default). This means we can filter not only by the number of chunks containing a module, but also by the chunk type.initial– only initial/main chunks are considered.all– any chunk, regardless of type, is considered.- A predicate function – this allows for custom filtering based on various chunk properties, such as its name or the modules it contains.
It's important to highlight the interplay between the chunks option and minChunks. The chunks option filters which chunks are examined, and then SplitChunksPlugin compares the count of remaining chunks against minChunks. To illustrate, consider this StackBlitz project with the following layout:
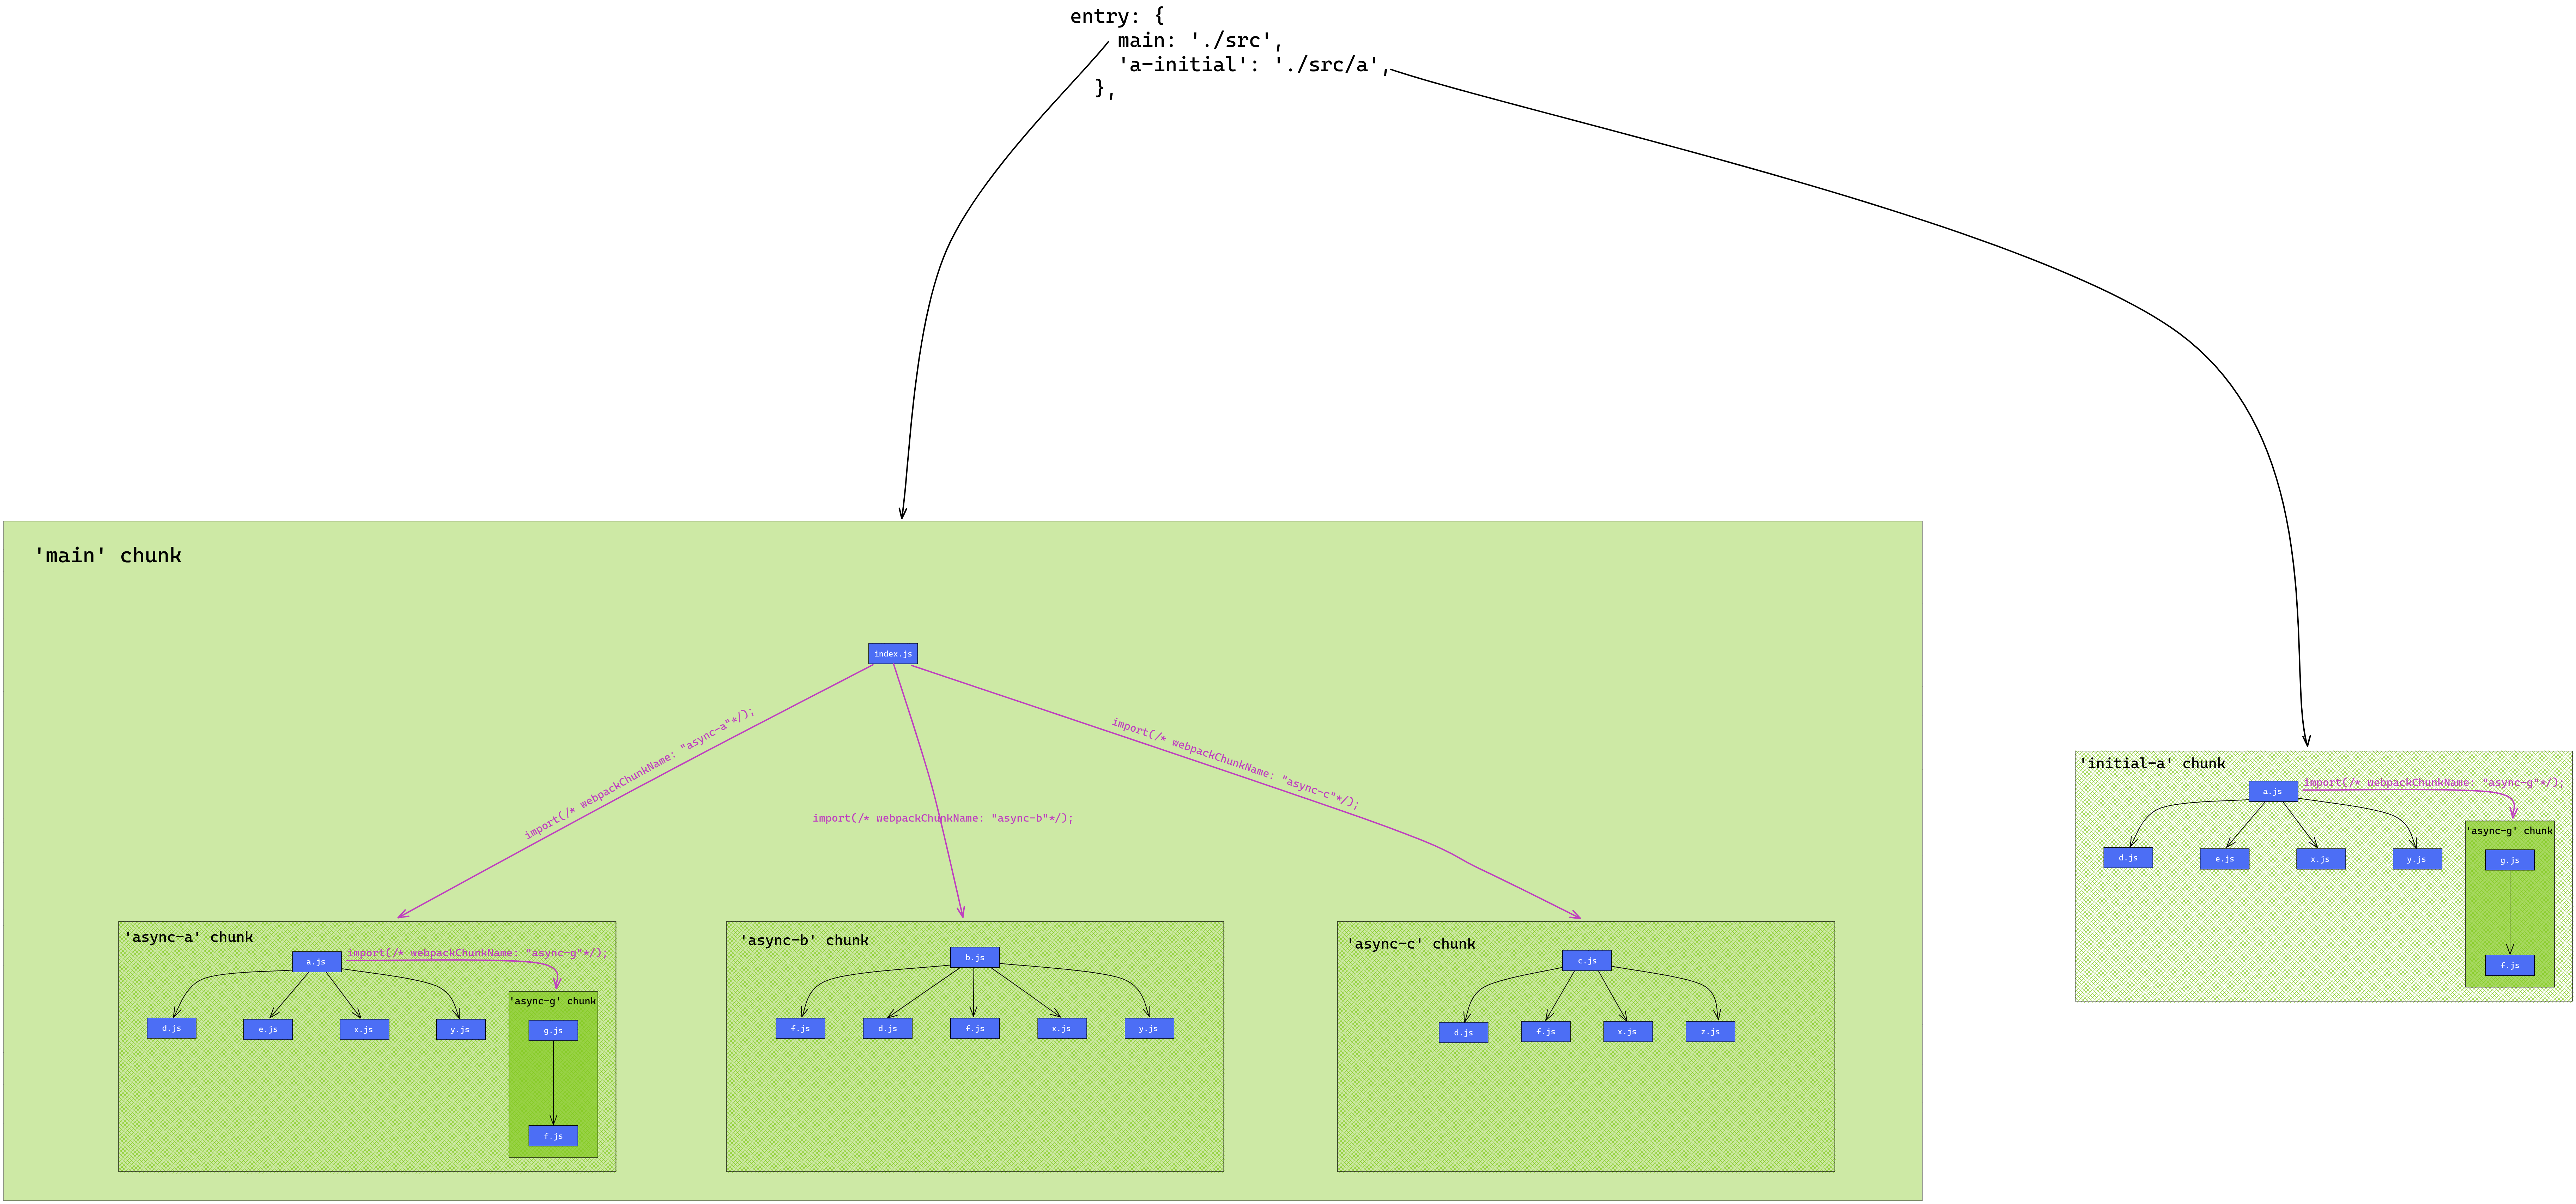
The diagram above is also available here.
As the diagram shows, there's a new main chunk named a-initial, matching the a-initial key in the entry object of the config file. Consequently, the x module is now requested from an additional chunk.
Let's tackle a problem: we want to create new chunks only if their modules appear in at least 4 different chunks, without distinguishing between async and initial types (effectively considering all chunks). Here's how to configure SplitChunksPlugin accordingly:
optimization: {
  // Instruct webpack not to obfuscate the resulting code
  minimize: false,
  splitChunks: {
    minSize: 0,
    chunks: 'all',
    minChunks: 4,
    cacheGroups: {
      // Disabling this cache group.
      default: false,
    },
  },
},
Using chunks: 'all' tells SplitChunksPlugin: consider every chunk that requires a module, whether it's async, initial, or any other kind.
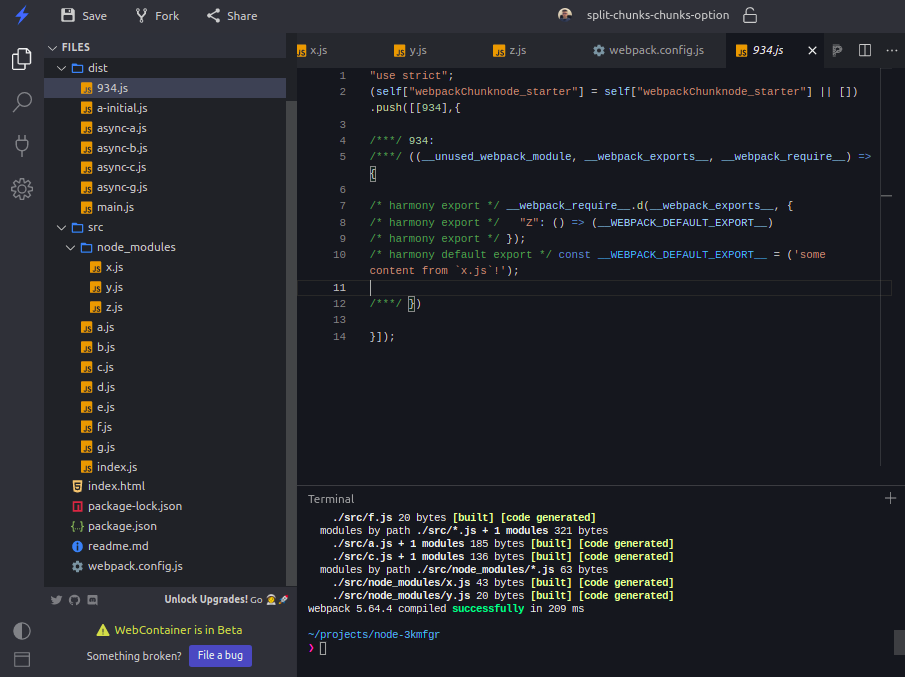
Running npm run build should generate just one new chunk, which contains only the x module:
We'll wrap up this section with a few exercises to deepen understanding.
Note: These tasks reference the chunk/module diagram above. You're encouraged to test the configurations in the provided StackBlitz app.
Can you spot what's off with this configuration? (Focus on the chunks and minChunks combination.)
optimization: {
  minimize: false,
  splitChunks: {
    minSize: 0,
    chunks: 'async',
    minChunks: 4,
    cacheGroups: {
      // Disabling this cache group.
      default: false,
    },
  },
},
The issue is that no module is present in 4 async chunks — the x module comes closest at 3. As a result, no new chunks are created, leaving duplicated code. To properly extract x into a separate chunk, minChunks needs to be lowered from 4 to 3 (try it in the StackBlitz project).
And what about this next one? What does this configuration instruct webpack to do?
optimization: {
  minimize: false,
  splitChunks: {
    minSize: 0,
    chunks: 'initial',
    minChunks: 4,
    cacheGroups: {
      // Disabling this cache group.
      default: false,
    },
  },
},
We're directing webpack to extract chunks only when they contain modules from node_modules (hence the defaultVendors cache group) that appear in at least 4 initial chunks. In this scenario, only one initial chunk—a-initial—requires such modules (x and z; the main chunk uses import() for its modules). So, the fix would be adjusting minChunks from 4 to 1.
We've introduced several new concepts in this section, and they'll prove valuable in future discussions as we explore more configuration options for this plugin.
Wrapping Up
This journey may have been challenging, but I trust the effort paid off.
To summarize the core problem SplitChunksPlugin addresses: code duplication — when a module is replicated across multiple chunks, it can become costly, especially for modules running into hundreds of lines. The solution is to consolidate such modules, allowing them to be shared across multiple consumers. This is done by placing the module into its own chunk, which is fetched over the network as a single HTTP request.
The key question becomes: what criteria determine when these dedicated chunks are created? That's where SplitChunksPlugin steps in—it manages how frequently-used modules are grouped into chunks to minimize duplication.
Thank you for reading!
Diagrams were created using Excalidraw.
Special thanks to Max Koretskyi for reviewing this piece and offering immensely helpful feedback.