Starting Point
The demonstration project for this discussion is a variation of the dashboard tile component featured in my earlier Angular Elements introduction.
The code is available in a repository containing a CLI workspace with two distinct projects. One project, named dashboard-tile, demonstrates how to expose a straightforward dashboard tile as an external component:
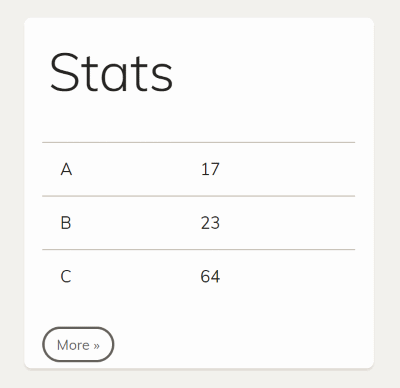
The underlying implementation is straightforward:
@Component({
  // selector: 'app-external-dashboard-tile',
  templateUrl: './external-dashboard-tile.component.html',
  styleUrls: ['./external-dashboard-tile.component.css']
})
export class ExternalDashboardTileComponent implements OnInit {

  @Input() src: number = 1;

  a: number;
  b: number;
  c: number;

  constructor(private http: HttpClient) {
  }

  ngOnInit(): void {
    this.load();
  }

  load() {
    this.http.get(/assets/stats-<span class="hljs-subst">${this.src}</span>.json).subscribe(
      data => {
        this.a = data['a'];
        this.b = data['b'];
        this.c = data['c'];
      }
    );
  }

  more() {
    this.src++;
    if (this.src > 3) {
      this.src = 1;
    }
    this.load();
  }

}
To register this component as a custom element during application startup, the necessary logic resides in the AppModule's ngDoBootstrap method:
@NgModule({
   imports: [
      HttpClientModule,
      BrowserModule
   ],
   declarations: [
      ExternalDashboardTileComponent
   ],
   bootstrap: [],
   entryComponents: [
      ExternalDashboardTileComponent
   ]
})
export class AppModule {
    constructor(private injector: Injector) {
    }

    ngDoBootstrap() {
        const externalTileCE = createCustomElement(ExternalDashboardTileComponent, { injector: this.injector });
        customElements.define('external-dashboard-tile', externalTileCE);
    }

}
The use of ngDoBootstrap is necessary here because there's no bootstrap component defined. Instead of initializing a conventional Angular component, we're simply registering a custom element with the browser.
After this setup, you'd expect to be able to use the web component directly in the index.html file.
<external-dashboard-tile src="1"></external-dashboard-tile>
However, attempting this with the starter branch of the provided source code produces the following error:
Failed to construct 'HTMLElement': Please use the 'new' operator, this DOM object constructor cannot be called as a function.
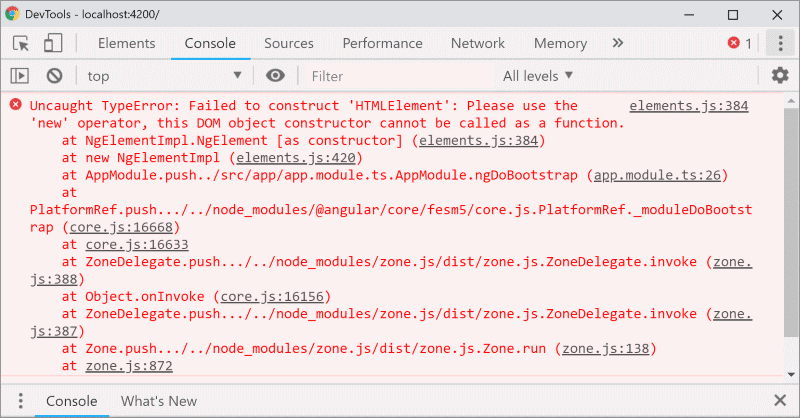
This error occurs when the compilation target is set to EcmaScript 5, typically done to support older browsers such as Internet Explorer 11. The root cause is that Custom Elements are designed to work with EcmaScript 2015 and newer versions.
Consequently, two distinct polyfills are required: one for modern browsers that anticipate EcmaScript 2015+ Custom Elements, and another for legacy browsers like Internet Explorer 11.
Differential loading, a feature introduced in Angular CLI 8, enables the simultaneous creation of EcmaScript 5 and EcmaScript 2015 bundles. More details on this approach will be covered in a subsequent section.
Polyfill Strategies
To provide support for older browsers, I've opted for the polyfills available in the @webcomponents/webcomponentsjs package. These are loaded by adding them as script entries in the angular.json file:
[...],
"scripts": [
  {
    "bundleName": "polyfill-webcomp-es5",
    "input": "node_modules/@webcomponents/webcomponentsjs/custom-elements-es5-adapter.js"
  },
  {
    "bundleName": "polyfill-webcomp",
    "input": "node_modules/@webcomponents/webcomponentsjs/bundles/webcomponents-sd-ce-pf.js"
  }
],
[...]
If your compilation target is es2015 or higher, the first script can be excluded.
When the build runs, this configuration generates two additional bundles: polyfill-webcomp-es5.js and polyfill-webcomp.
Streamlining Polyfill Setup
To eliminate the manual effort of adding polyfills, I've developed a schematic included in my community project called ngx-build-plus. Installation is done via ng add:
ng add ngx-build-plus --project dashboard-tile
Following installation, an included schematic handles the polyfill setup:
ng g ngx-build-plus:wc-polyfill --project dashboard-tile
It's important to remember that if you intend to use a custom element within an Angular Component, you must reference the CUSTOM_ELEMENTS_SCHEMA in the relevant modules:
@NgModule({
  declarations: [
    AppComponent
  ],
  imports: [
    BrowserModule
  ],
  providers: [],
  schemas: [CUSTOM_ELEMENTS_SCHEMA],
  bootstrap: [AppComponent]
})
export class AppModule { }
After launching the solution with npm start, Chrome should display something similar to this:
Angular Elements provides an alternative, more lightweight polyfill that gets registered in your
angular.jsonwhen you install it viang add @angular/elements. This option, however, is only suitable for browsers that support EcmaScript 2015 and newer. Therefore, if Internet Explorer support isn't a requirement, this lighter polyfill is the recommended choice.
Implementing Differential Loading
To take advantage of differential loading, set your tsconfig.json to target EcmaScript 2015+ and confirm that the browserslist file in your workspace root includes at least one EcmaScript 5 browser (which is typically the case). This setup prompts the CLI to produce two bundle versions: one for EcmaScript 5 and another for EcmaScript 2015.
With newer browsers now receiving EcmaScript 2015 code, the custom-elements-es5-adapter.js script mentioned earlier becomes unnecessary.
Bundle Creation
Now, we'll generate a bundle for our web component using the standard build command:
ng build --prod
This process results in multiple (!) bundles:
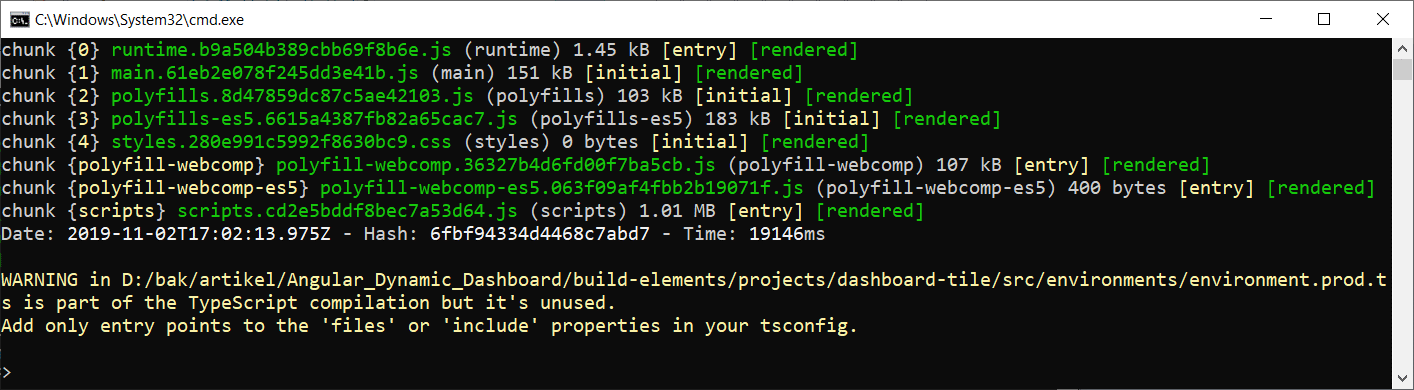
While such an output is fine for a typical single-page application, it's excessive for a simple web component. In our scenario, a single, self-contained bundle would be far more suitable.
My previously mentioned ngx-build-plus project offers a convenient workaround with its --single-bundle option:
ng build --prod --single-bundle
Executing this command yields a single bundle named main, instead of separate main, vendor, and runtime files:
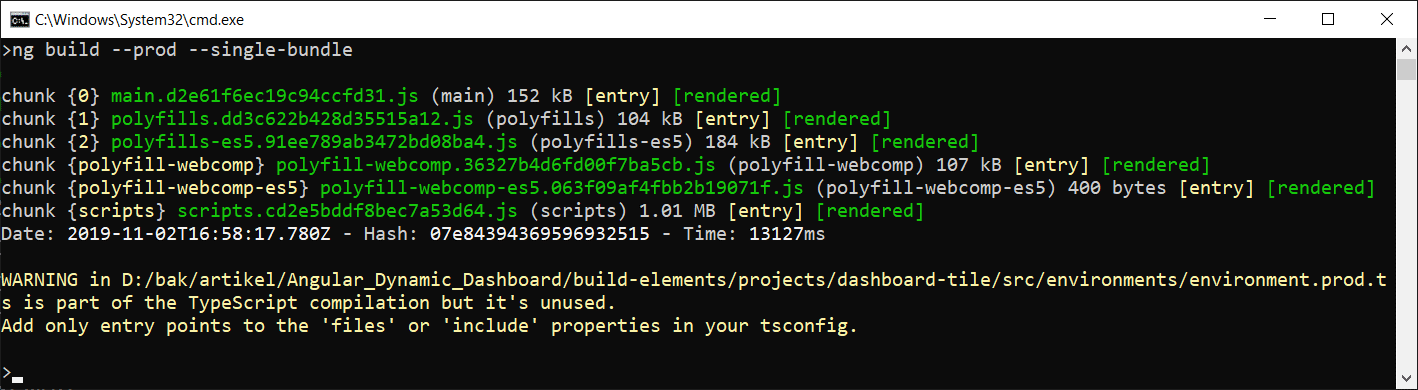
The most recent version of ngx-build-plus continues to generate polyfills, styles, and scripts as well. These are useful for testing, but you'd typically exclude them from distribution since the consuming application likely has its own versions.
A commonly seen alternative to
--single-bundleinvolves manually merging the four bundles into a single file. This approach, however, fails when multiple such meta-bundles are involved. The issue stems from webpack's use of a global variable, which gets overwritten when several separately compiled bundles are used together.
Examining the bundle sizes reveals they're far too large for such a simple web component. This is due to the inclusion of Angular, RxJS, and other libraries—or at least the portions that escaped tree-shaking. Moreover, compiling multiple bundles separately means each one carries its own copy of these libraries:
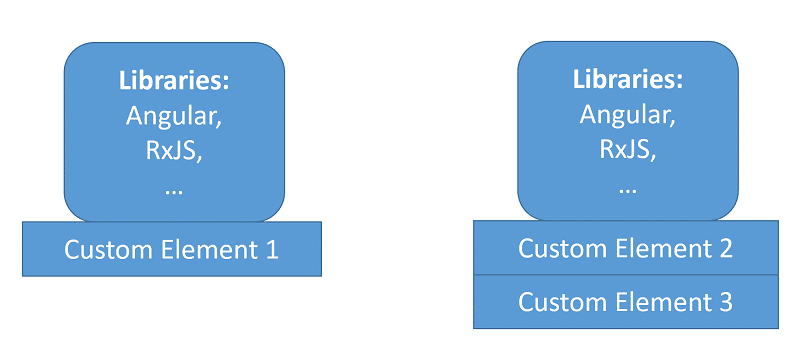
This is precisely where Ivy becomes relevant.
The Role of Ivy
Starting with Angular 9, the new Ivy compiler becomes the default. It enhances Angular's tree-shakability and compiles the UI portion of components into code that closely resembles direct DOM operations. As a result, typical web components stand to benefit significantly from Ivy, requiring only a minimal part of Angular in their final bundles.
Under ideal circumstances, two independently generated Angular Elements bundles would resemble this:
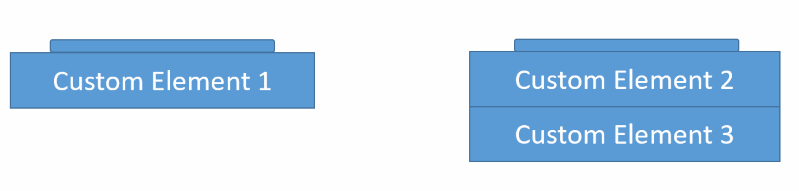
They would contain solely their component code and a very small Angular runtime remnant. As stated, this is the best-case scenario!
However, despite Ivy's considerable potential, we shouldn't anticipate miracles. Minko Gechev, now a member of the Angular Team, offered this perspective on Twitter:
Ivy will enable new features in Angular, which will come gradually, and it may reduce your app size but do not expect wonders - it will not make your JS disappear. I'd strongly recommend to not wait for ivy but instead, shrink JavaScript bundles today https://angular.io/guide/lazy-loading-ngmodules …
Specifically, if your components rely heavily on libraries beyond the UI code, Ivy offers limited assistance. To put it differently, it can't eliminate the portions of packages like @angular/forms or @angular/common/http that you're using.
In such situations, it becomes necessary to find a method for sharing these dependencies among separately built bundles. This leads us to an approach discussed in the next section.
Sharing Library Dependencies
To share libraries like @angular/common/http, which is used in our example Angular Element, we could load them into the website's global scope and subsequently reference them within our web component bundles:
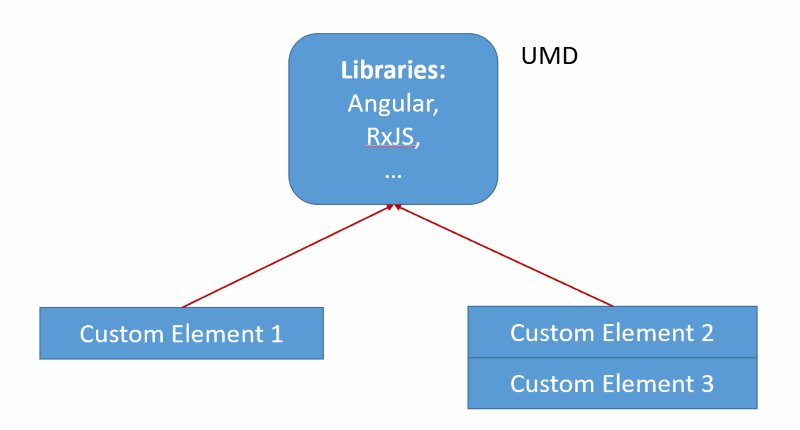
This pattern was commonplace in the past. Consider the jQuery era: you'd load jQuery and jQuery UI once, and your jQuery widget bundles would simply reference them.
Yet, Angular projects are typically built into several bundles that are only aware of each other; external code can't easily access their contents.
To address this, Rob Wormald from the Angular team came up with an innovative idea: modify the build process so that the resulting bundles expect shared libraries in the global scope rather than embedding them. Making this possible requires a mechanism to place Angular and its dependencies there.
Fortunately, the Angular package format mandates that Angular libraries also be exposed as UMD bundles. These bundles handle the registration under window.ng.core, window.ng.common, and so on.
Since this process involves many manual steps, I've automated it with another schematic:
ng g ngx-build-plus:externals --project dashboard-tile
To compile the entire solution, use the npm script that ngx-build-plus generated:
npm run build:dashboard-tile:externals
After compilation, navigate to your dist directory and test the result:
npm i -g live-server
cd dist
cd dashboard-tile
live-server
Understanding the Mechanism
Let's delve into what just occurred. The schematic we ran created a partial webpack configuration that specifies where shared libraries can be located on the browser's window object.
const webpack = require('webpack');

module.exports = {
    "externals": {
        "rxjs": "rxjs",
        "@angular/core": "ng.core",
        "@angular/common": "ng.common",
        "@angular/common/http": "ng.common.http",
        "@angular/platform-browser": "ng.platformBrowser",
        "@angular/platform-browser-dynamic": "ng.platformBrowserDynamic",
        "@angular/compiler": "ng.compiler",
        "@angular/elements": "ng.elements",

        // Uncomment and add to scripts in angular.json if needed
        // "@angular/router": "ng.router",
        // "@angular/forms": "ng.forms"
    }
}
During compilation, the CLI deliberately excludes these dependencies from your bundles. Instead, it generates references to them, pointing to locations like window.ng.core or window.ng.common.
To ensure Angular and RxJS are available on the window object, the schematic also adds references to the appropriate UMD bundles in the scripts section of angular.json:
"scripts": [
  [...]
  "node_modules/rxjs/bundles/rxjs.umd.js",
  "node_modules/@angular/core/bundles/core.umd.js",
  "node_modules/@angular/common/bundles/common.umd.js",
  "node_modules/@angular/common/bundles/common-http.umd.js",
  "node_modules/@angular/compiler/bundles/compiler.umd.js",
  "node_modules/@angular/elements/bundles/elements.umd.js",
  "node_modules/@angular/platform-browser/bundles/platform-browser.umd.js",
  "node_modules/@angular/platform-browser-dynamic/bundles/platform-browser-dynamic.umd.js"
]
Concluding Thoughts
Building web components requires a different set of strategies compared to constructing full-scale SPAs. Ivy will significantly reduce bundle sizes when your project consists primarily of UI code, while also improving overall tree-shakability.
For dependency sharing, the concept of externals proves useful. The ngx-build-plus community project facilitates this along with creating a unified bundle and installing polyfills for older browsers.
Furthermore, differential loading ensures that only browsers requiring polyfills receive them, while modern browsers benefit from leaner, more optimized EcmaScript 2015+ bundles.