
Here is a structured approach to building a shell for micro frontends.
This post is part of a series dedicated to micro frontends:
- A Software Architect's Approach Towards Using Angular (And SPAs In General) For Microservices Aka Microfrontends
- Micro Apps With Web Components Using Angular Elements
- Angular, React, Vue.Js and Co. peacefully united thanks to Micro Apps and Web Components
Supplementary series on Web Components with Angular Elements:
- Angular Elements, Part I: A Dynamic Dashboard In Four Steps With Web Components
- Angular Elements, Part II: Lazy And External Web Components
- Angular Elements, Part III: Angular Elements without Zone.js
- Angular Elements, Part IV: Content Projection with Slots in Angular Elements (>=7)
- Angular Elements, Part V: Your Options For Building Angular Elements With The CLI
Recently, I assisted many organizations in building Angular SPAs tailored to microservice architectures. As discussed in a previous article, multiple strategies exist for this.
Here, I demonstrate one of those strategies in 6 steps: a shell that loads micro frontends only when needed. Unlike my earlier discussion on micro frontends using web components, this implementation avoids web components for the macro architecture. Instead, it relies on regular SPAs that are fetched and started on demand. For the micro level, web components remain my tool of choice.
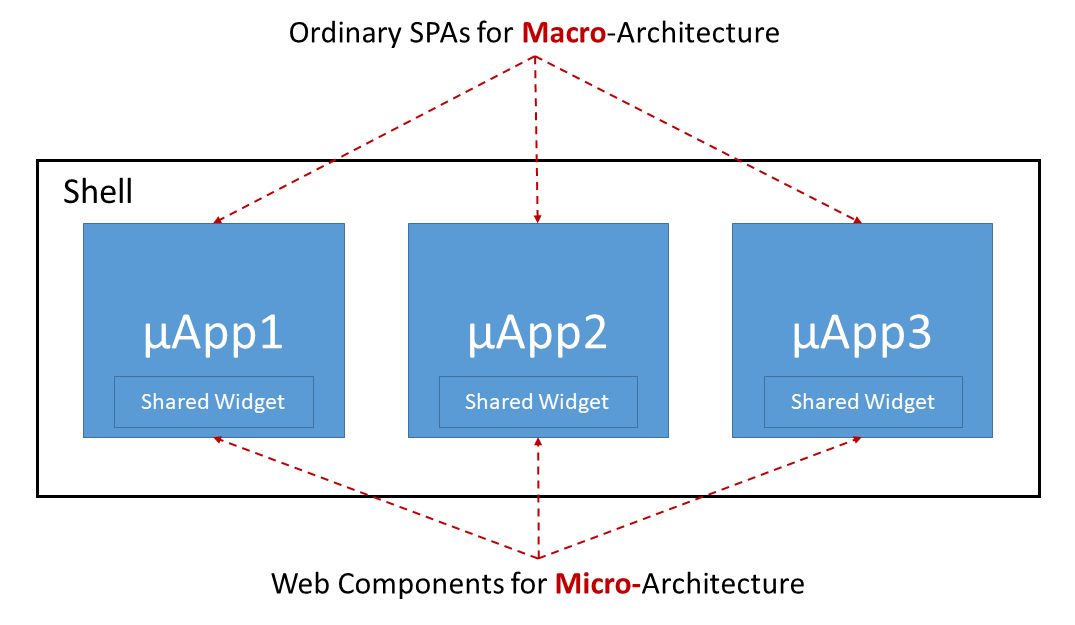
Opting for this approach keeps the codebase straightforward, yet we can still separate distinct applications through shadow DOM, a web components standard that Angular has embraced for its standard components from the very beginning.
In the example scenario, a basic client-a and a basic client-b are mounted into the shell. Additionally, the first app provides a widget that the second app consumes:


The code shown here is available in my GitHub repository.
Step 0: Make sure you need it
Before diving in, verify that this strategy aligns with your architecture. Micro frontends carry significant trade-offs that you must understand. Refer to my blog post for deeper insight.
Step 1: Implement Your SPAs
Build each micro frontend as a standard Angular app. In micro service setups, teams often assign a separate repository to each component to maximize decoupling (see Componentization via Services). However, I have observed many micro frontend projects relying on monorepos for pragmatic reasons.
We could debate when the term micro frontend truly applies, but that discussion offers little practical value. What matters is selecting an arrangement that meets your needs while being mindful of its repercussions.
With a monorepo, you must enforce boundaries—for instance, via linting—so that micro frontends remain independent. Nrwl's Nx excels here: it enables access rules that dictate which libraries can depend on others. Moreover, Nx identifies which portions of the monorepo a change affects, allowing you to recompile and retest only those pieces.
Naturally, this choice brings its own effects, as outlined in the referenced blog article.
To streamline cross-micro frontend routing, prefix every route with the application name. In this example, that name is client-a
@NgModule({
  imports: [
    ReactiveFormsModule,
    BrowserModule,
    RouterModule.forRoot([
      { path: 'client-a/page1', component: Page1Component },
      { path: 'client-a/page2', component: Page2Component },
      { path: '**', component: EmptyComponent}
    ], { useHash: true })
  ],
  [...]
})
export class AppModule {
  [...]
}
Step 2: Expose Shared Widgets
Make the widgets you intend to share available as Web Components, also known as Custom Elements. From a microservices standpoint, however, it's best to limit code sharing between micro frontends as much as you can. Sharing introduces coupling, which is precisely the thing this architecture is designed to prevent.
To turn an Angular Component into a Custom Element, Angular Elements is the tool to use. For the details, reference my post on Angular Elements as well as the follow-up about lazy and external Angular Elements.
Step 3: Compile your SPAs
Webpack — and therefore the Angular CLI — depends on a global array for bundle registration. This array allows the different (lazy) chunks of an app to locate one another. Yet, when several SPAs are loaded together on a single page, they battle for this array, corrupt it, and fail to function.
Two possible ways out of this predicament exist:
1) Combine all code into one bundle, thus eliminating the need for the global array
2) Give the global array a new name
For my approach, option 1) fits best. A micro frontend is inherently small, and a single bundle makes on-demand loading simpler. Furthermore, as we'll see, this setup allows us to share libraries like RxJS or even Angular itself across the micro frontends.
To achieve that, ngx-build-plus extends the CLI with a --single-bundle flag:
ng add ngx-build-plus
ng build --prod --single-bundle
With this flag enabled, the CLI outputs your entire application as a single main bundle. Still, scripts, styles, and polyfills each get their own separate bundle. This separation exists because the shell likely already loads those resources, and duplicating them would be wasteful.
If you prefer option 2), the ngx-build-plus package lets you customize the CLI's webpack configuration. By applying the output.jsonpFunction option, you can specify the name of the array in question.
In addition, we provide an advanced Angular workshop that covers this subject along with further approaches for Angular-based enterprise architectures. All details are available here.

Step 4: Create a shell and load the bundles on demand
On-demand bundle loading requires little effort. Simply use plain JavaScript to dynamically inject a script tag along with the tag for the application's root element:
// add script tag
const script = document.createElement('script');
script.src = '[...]/client-a/main.js';
document.body.appendChild(script);

// add app
const frontend = document.createElement('client-a');
const content = document.getElementById('content');
content.appendChild(frontend);
Naturally, you can encapsulate this logic within a custom directive as well.
Additionally, you'll require a snippet of code to toggle the visibility of the loaded micro frontend as needed:
frontend['visible'] = false;Step 5: Communication Between Microfrontends
As a rule, the interaction among microfrontends should be kept to a minimum, since it introduces coupling between them.
There are multiple ways to set up that interaction. My choice is the least invasive approach: relying on the query string. That option brings several benefits:
1) The sequence in which the microfrontends get loaded is irrelevant. Once they are active, they can read the current values straight from the url
2) It supports deep linking out of the box
3) It aligns with the standard web model
4) The implementation effort is low
Using the Angular router, setting a url parameter comes down to a single method invocation:
this.router.navigate(['.'], { queryParamsHandling: 'merge', queryParams: { id: 17 }});Using merge guarantees that any current URL parameters remain intact. When a parameter like id already exists, the router replaces its value.
Moreover, monitoring modifications in URL parameters is another task that the Angular router handles readily:
route.queryParams.subscribe(params => {
    console.debug('params', params);
});
There are some alternatives for this:
- If you wrap your micro frontends into web components, you could use their properties and events to communicate with the shell.
-
The shell could put a "message bus" into the global namespace:
(window as any).messageBus = new BehaviorSubject(null); Both, the shell and the Microfrontends could now subscribe to this message bus and listen for specific events they are interested into. Also, both can emit events.
-
Using custom Events provided by the browser:
// Sender
const customer = { id: 17, ... };
window.raiseEvent(new CustomEvent('CustomerSelected', {details: customer}))

// Receiver
window.addEventListener('CustomerSelected', (e) => { ... })
Step 6: Sharing Libraries Between Micro Frontends
At this point, we have multiple self-contained micro frontends, and each one carries its own set of dependencies—Angular, RxJS, and so on. Viewed through a microservices lens, that’s a great setup: it empowers every team behind a micro frontend to pick any framework or library at whatever version they want, and to decide independently whether or when to upgrade.
But when we factor in performance and load times, things take a turn for the worse. The result is duplicated code across our bundles. As an example, one specific Angular version might appear repeatedly inside several of the bundles we generate:
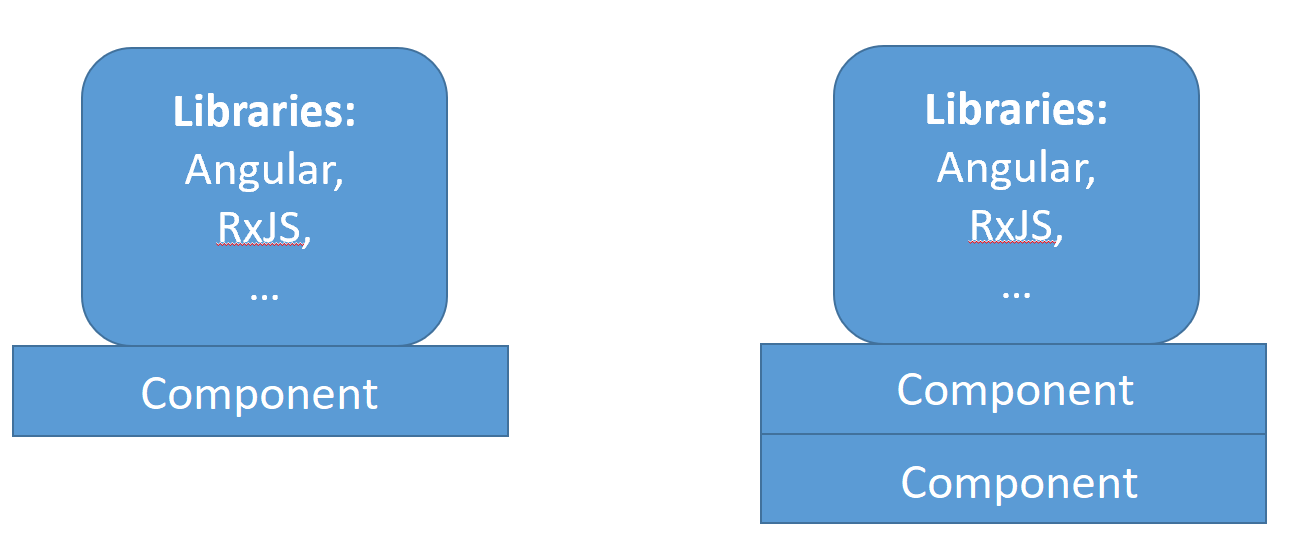
Luckily, Webpack externals offer a way out of this bind. I have discussed them before when covering external (standalone) Angular Elements, so let me highlight the key points again for micro apps:
Shared libraries become possible through externals. They are loaded upfront and handed out via the global namespace. UMD bundles, which most libraries ship with, already handle this and more. Our next move is to instruct webpack not to bundle those libraries into every single micro frontend; instead, it should look them up in the global namespace:
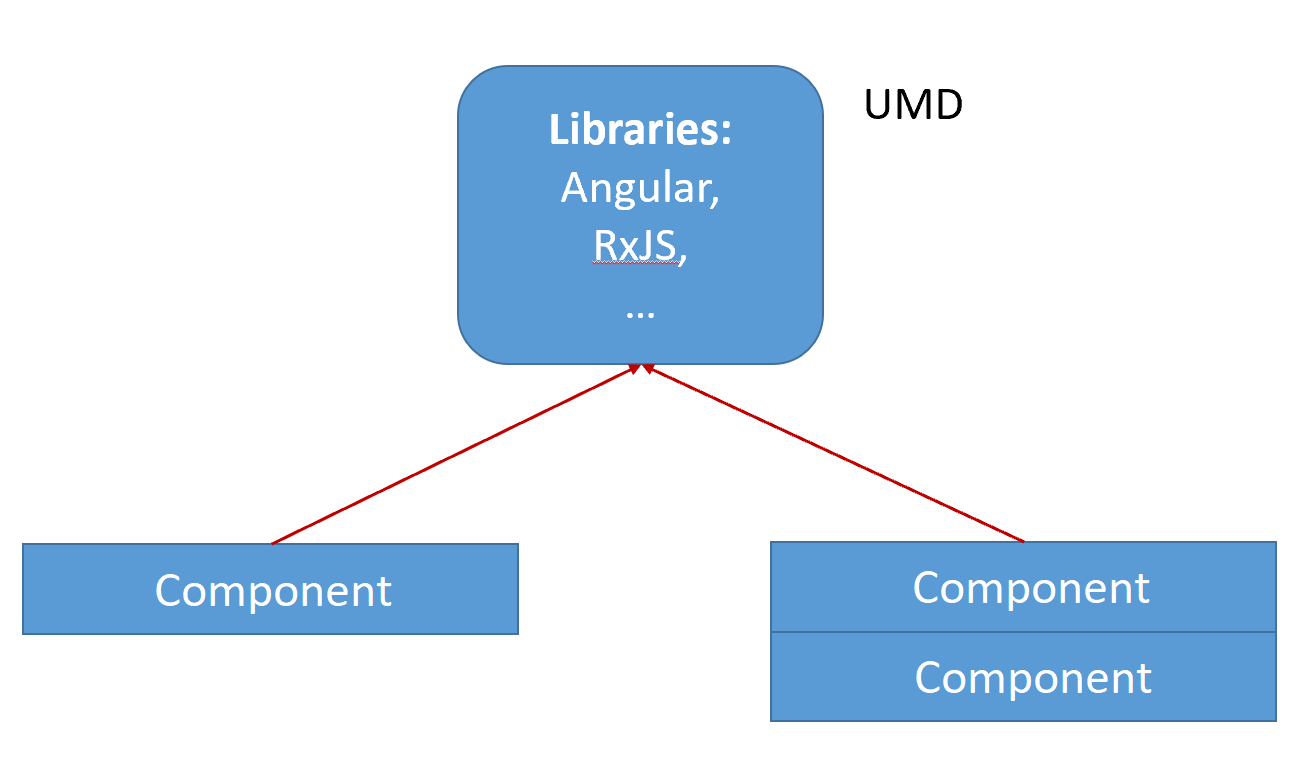
For combining webpack externals with the Angular CLI, ngx-build-plus is a viable option—it even provides a schematic that automates the required modifications in your project.
You can install it using ng add:
ng add ngx-build-plusThen, call the following schematic:
ng g ngx-build-plus:externalsRunning this script also creates an npm command called build:<project-name>:externals. In addition, for the default project, you get a script named build:externals.
Once you execute it, examining angular.json will reveal that Angular is now pulled in through UMD bundles:
"scripts": [
  "node_modules/rxjs/bundles/rxjs.umd.js",
  "node_modules/@angular/core/bundles/core.umd.js",
  "node_modules/@angular/common/bundles/common.umd.js",
  "node_modules/@angular/common/bundles/common-http.umd.js",
  "node_modules/@angular/compiler/bundles/compiler.umd.js",
  "node_modules/@angular/elements/bundles/elements.umd.js",
  "node_modules/@angular/platform-browser/bundles/platform-browser.umd.js",
  "node_modules/@angular/platform-browser-dynamic/bundles/platform-browser-dynamic.umd.js"
]
These UMD bundles expose Angular on window.ng, making it available for reuse across multiple individually built micro frontends.
Furthermore, inspecting the generated webpack.externals.js reveals a mapping that associates package names with global variables:
const webpack = require('webpack');

module.exports = {
    "externals": {
        "rxjs": "rxjs",
        "@angular/core": "ng.core",
        "@angular/common": "ng.common",
        "@angular/common/http": "ng.common.http",
        "@angular/platform-browser": "ng.platformBrowser",
        "@angular/platform-browser-dynamic": "ng.platformBrowserDynamic",
        "@angular/compiler": "ng.compiler",
        "@angular/elements": "ng.elements",
        "@angular/router": "ng.router",
        "@angular/forms": "ng.forms"
    }
}
As a result, when the generated bundle needs @angular/core, it points to the global variable ng.core instead. This means @angular/core no longer has to be bundled.
However, bear in mind that Angular does not run in this mode by default, which introduces certain caveats.
Conclusion
With the appropriate configuration, building a shell for micro frontends proves straightforward. Yet, as discussed here, this represents just one approach to micro apps, and like any method, it has its distinct pros and cons. Thus, before committing, verify that it aligns with your architectural objectives.
More Free e-Book
Should you find this article useful, you might also enjoy my complimentary e-Book on Angular Architecture, accessible here.
Additionally, we provide an advanced Angular workshop that covers this subject along with other strategies for enterprise-grade Angular architectures.
