Most discussions around Module Federation assume a single version of a primary framework, such as Angular. But what happens when you need to combine different versions or even different frameworks? Fear not — there is a way. This post walks through a concrete example and shows how to set up such a scenario in four steps.
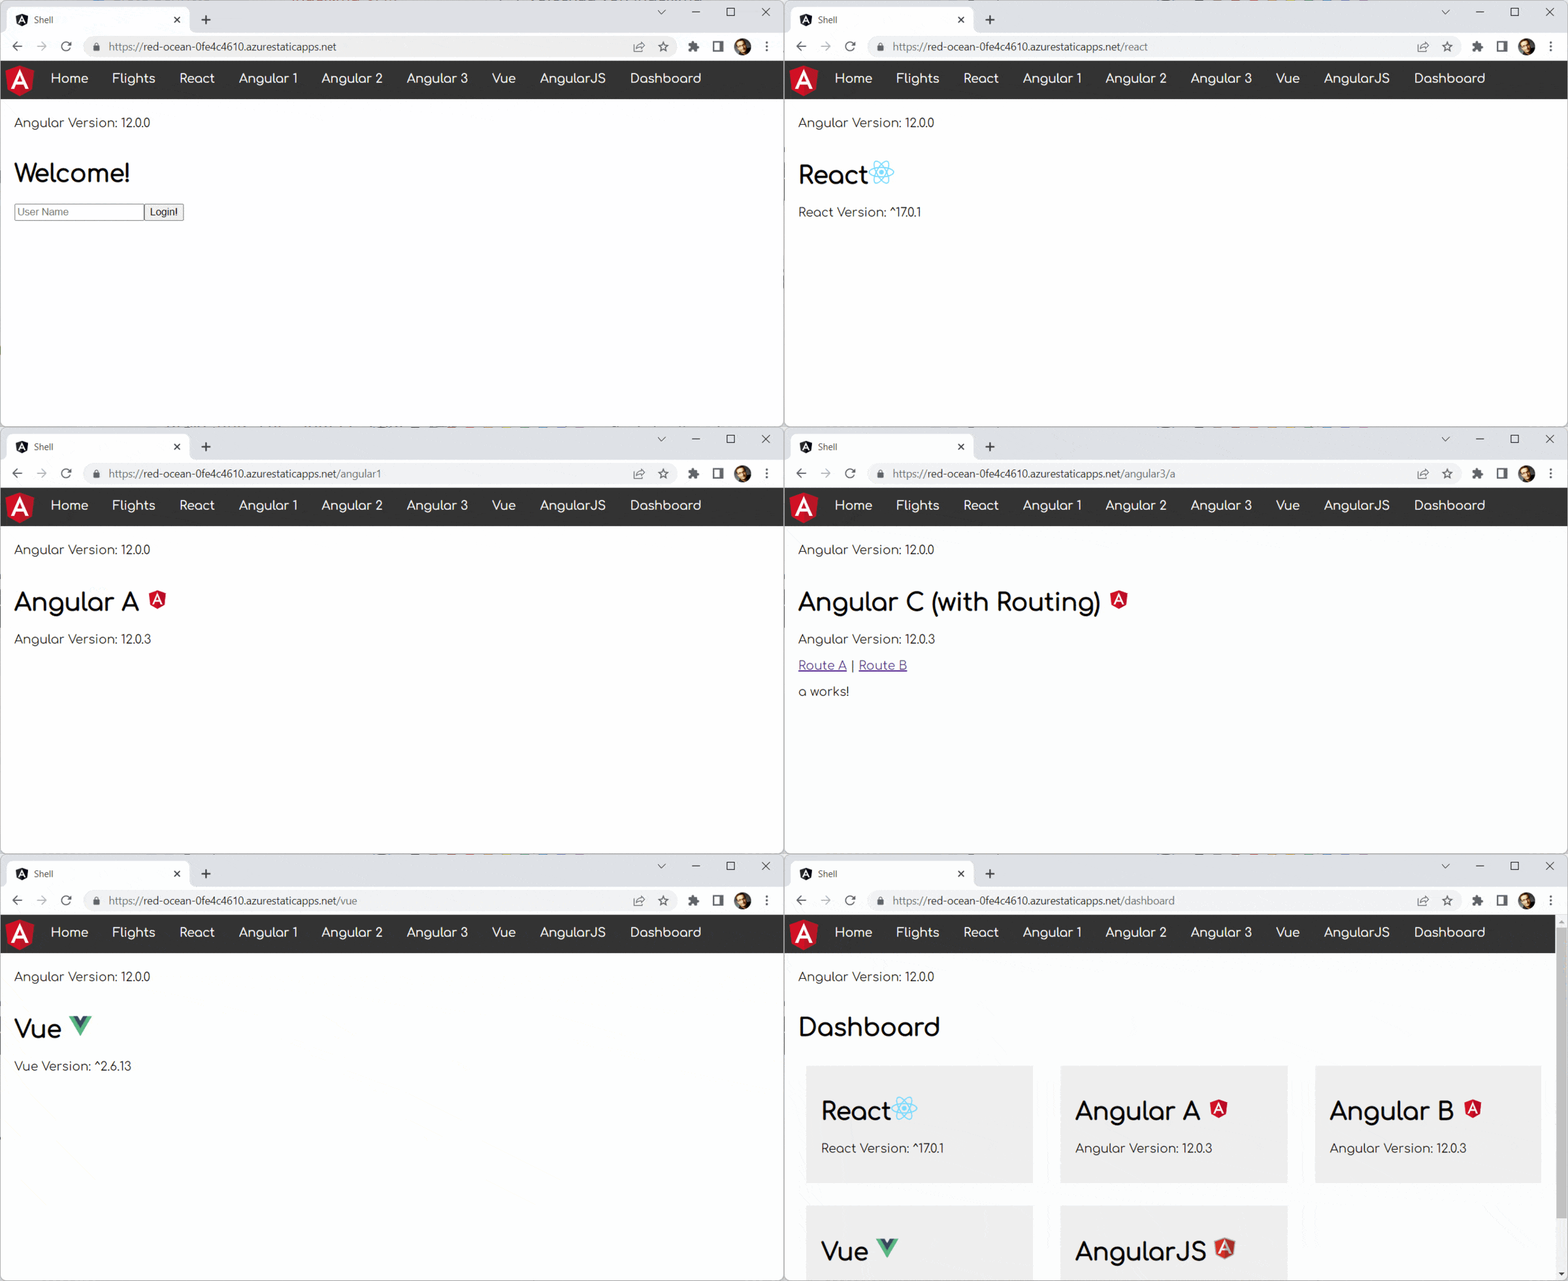
You can find the live demo and the corresponding source code at the links below:
- Live Example
- Source Code Shell
- Source Code for Micro Frontend
- Source Code for Micro Frontend with Routing
- Source Code for Micro Frontend with Vue
- Source Code for Micro Frontend with React
- Source Code for Micro Frontend with AngularJS
Is This a Pattern or an Anti-Pattern?
In a recent talk on Micro Frontend Anti Patterns, my colleague Luca Mezzalira points to combining multiple frontend frameworks in a single application as an anti-pattern. He refers to this as the Hydra of Lerna, drawing on the mythical Greek and Roman water monster known for its multiple heads.
There’s a solid rationale behind this classification: mainstream frameworks aren’t designed to be bootstrapped side by side in the same tab with other frameworks or other versions of themselves. In addition to inflating bundle size, this approach introduces added complexity and calls for workarounds.
That said, Luca also acknowledges scenarios where such an approach might be necessary. He highlights the following cases:
- Interfacing with legacy systems
- Migrating to a new UI framework or library
- Following company mergers with different tech stacks
This resonates strongly with my own experience, which I often share in conference talks and workshops: steer clear of mixing frameworks and versions in the browser when you can. But if you have a solid reason after weighing the alternatives, there are viable paths to making Multi-Framework and Multi-Version Micro Frontends work.
As is typical in software architecture — and likely in life in general — it comes down to trade-offs. If this approach carries fewer downsides than its alternatives with respect to your unique architecture goals, it’s worth pursuing.
Should Micro Frontends Be Web Components?
While not strictly required, wrapping your Micro Frontends in Web Components can be a worthwhile choice.
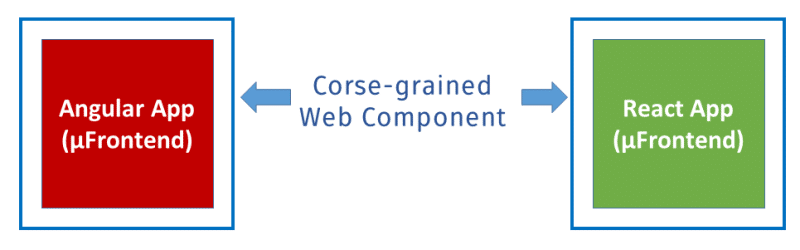
This offers several benefits:
- Abstracting the differences between frameworks
- Mounting and unmounting Web Components is straightforward
- Shadow DOM helps with CSS style isolation
- Custom Events and Properties enable communication
These first two points are tightly linked. We need to show and hide Micro Frontends dynamically — for instance, when a menu item is clicked. Since each Micro Frontend is a self-contained frontend, we also need to bootstrap it on demand in the middle of the page. Each framework exposes its own set of APIs for that. By wrapping them as Web Components, we only need to insert or remove the corresponding HTML tag that the framework’s Web Component is registered under.
Shadow DOM style isolation helps teams operate more autonomously. In practice, though, I’ve noticed teams often accept less independence in exchange for shared global CSS from the shell. In this case, Angular’s emulated Shadow DOM (whether or not you use Web Components) is a solid fit: it blocks styles from other components leaking in while still allowing global styling to apply.
At first glance, Custom Events and Properties seem ideal for communication. But for simplicity, I’ve come to favor a plain object acting as a mediator, or a lightweight “mini message bus,” exposed in the global namespace.
It’s important to recognize that such Web Components wrapping entire Micro Frontends aren’t typical Web Components. I emphasize this because people sometimes treat “component” and “micro frontend” as interchangeable, which leads to Micro Frontends that are far too granular and cause integration headaches.
Do We Even Need Module Federation?
Module Federation simplifies loading pieces of other applications into a host. In our case, the host is the Micro Frontend shell. It also helps share libraries between the shell and its Micro Frontends.
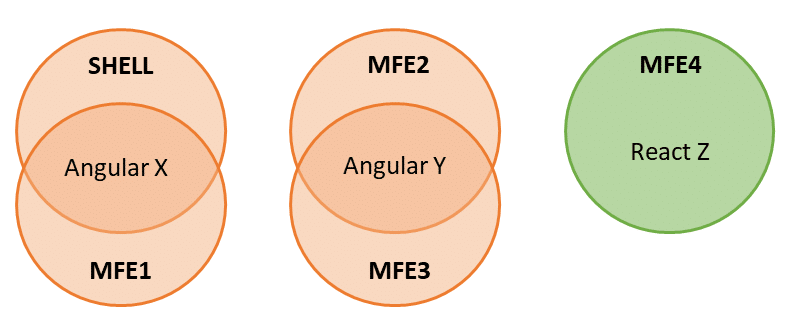
It even offers multiple strategies for resolving version conflicts. For example, you can configure it to reuse an already-loaded library when versions align perfectly; otherwise, it can load the version it was compiled against.
Loading our Micro Frontends via Module Federation thus gives the best of both worlds: shares libraries when possible and loads its own when it can’t:
Implementation in 4 Steps
With the strategy in place, here are the four concrete steps needed to build a setup like this.
Step 1: Wrap your Micro Frontend in a Web Component
For Angular-based Micro Frontends, Angular Elements is the direct route for turning a component into a Web Component. Install it through npm:
npm i @angular/elementsOnce installed, update your AppModule to look like this:
 import { createCustomElement } from '@angular/elements';
 [...]

 @NgModule({
   [...]
   declarations: [
     AppComponent
   ],
   bootstrap: [] // No bootstrap components!
 })
 export class AppModule implements DoBoostrap {
   constructor(private injector: Injector) {
   }

   ngDoBootstrap() {
     const ce = createCustomElement(AppComponent, {injector: this.injector});
     customElements.define('angular1-element', ce);
   }

 }
This configuration accomplishes several things:
- An empty
bootstraparray prevents Angular from initializing any component at startup. In this scenario, Angular requires a custom bootstrap routine inside thengDoBootstrapmethod, which comes from theDoBoostrapinterface. - Within
ngDoBootstrap, Angular Elements'createCustomElementconverts yourAppComponentinto a Web Component. The currentInjectormust be supplied to ensure dependency injection continues to function. - The call to
customElements.defineregisters this Web Component with the browser using the nameangular1-element.
The outcome is that the browser mounts the application inside every angular1-element tag it encounters.
If your chosen framework lacks built-in Web Component support, manual wrapping is an option. A React component, for instance, can be wrapped like this:
 // app.js
 import React from 'react'
 import ReactDOM from 'react-dom'

 class App extends React.Component {

   render() {
     const reactVersion = require('./package.json').dependencies['react'];

     return ([
         <h1>
           React
         </h1>,
         <p>
           React Version: {reactVersion}
         </p>
     ])
   }
 }

 class Mfe4Element extends HTMLElement {
   connectedCallback() {
     ReactDOM.render(<App/>, this);
   }
 }

 customElements.define('react-element', Mfe4Element);
Step 2: Expose your Web Component via Module Federation
Loading the Micro Frontends into the shell requires exposing their Web Components through Module Federation. For Angular-based Micro Frontends, begin by adding the @angular-architects/module-federation package:
ng add @angular-architects/module-federationThis command installs and configures the package in one go. When using Nx with Angular, it's more common to handle these two actions separately:
 npm i @angular-architects/module-federation -D
 ng g @angular-architects/module-federation:init
For other frameworks such as React or Vue, the process simply involves adding the ModuleFederationPlugin to the webpack configuration. Keep in mind that in most cases, your application must bootstrap asynchronously; therefore, your entry file will typically just contain a dynamic import that loads the remainder of the application.
With that in mind, the React-based Micro Frontend mentioned earlier uses the following index.js as its entry point:
 // index.js
 import('./app');
Similarly, @angular-architects/module-federation relocates the bootstrap code from main.ts into a newly created bootstrap.ts file and imports it:
// main.ts
 import('./bootstrap');
This standard pattern grants Module Federation sufficient time to load any shared dependencies.
After Module Federation is set up, expose the Web Component-based wrapper through the webpack configuration:
 // webpack.config.js
 [...]
 module.exports = {
   [...]
   plugins: [
     new ModuleFederationPlugin({

       name: "angular1",
       filename: "remoteEntry.js",

       exposes: {
         './web-components': './src/bootstrap.ts',
       },

       shared: share({
         "@angular/core": { requiredVersion: "auto" },
         "@angular/common": { requiredVersion: "auto" },
         "@angular/router": { requiredVersion: "auto" },
         "rxjs": { requiredVersion: "auto" },

         ...sharedMappings.getDescriptors()
       }),
       [...]
     })
   ],
 };
Since the objective is to showcase how to combine different Angular versions, this Micro Frontend relies on Angular 12 while the shell presented later uses a newer Angular release. As a result, an older version of @angular-architects/module-federation is employed, which explains the longer, more explicit configuration. Reference details on version differences here.
The entries under shared serve a dual purpose: they permit mixing several framework versions while also reusing a framework that's already loaded if version numbers align perfectly. To achieve this, requiredVersion should match the installed version—the one listed in your package.json. The share helper from @angular-architects/module-federation handles this automatically when you configure requiredVersion as auto.
Semantic versioning suggests that an Angular library with a higher minor or patch version is backwards compatible, but such guarantees don't apply to code that's already been compiled. The Angular compiler emits code that relies on internal APIs, where semantic versioning rules don't hold. Because of this, you should specify an exact version number, omitting any
^or~.
Step 3: Perform Workaround for Angular
Running multiple Angular applications side-by-side in one browser tab requires specific workarounds. The good news is that these have been collected into a minimal add-on called @angular-architects/module-federation-tools, built on top of @angular-architects/module-federation.
Install it (npm i @angular-architects/module-federation-tools -D) into both your Micro Frontends and your shell. Afterwards, start your shell and your Micro Frontends using its bootstrap method rather than Angular's native one:
 // main.ts
 import { AppModule } from './app/app.module';
 import { environment } from './environments/environment';
 import { bootstrap } from '@angular-architects/module-federation-tools';

 bootstrap(AppModule, {
   production: environment.production,
   appType: 'microfrontend'  // for micro frontend
   // appType: 'shell',      // for shell
 });
Step 4: Load Micro Frontends into the Shell
Module Federation also needs to be enabled in your shell. For an Angular-based shell, add the @angular-architects/module-federation plugin:
ng add @angular-architects/module-federationAs previously noted, with Nx and Angular, installation and initialization are performed separately:
npm i @angular-architects/module-federation -D
 ng g @angular-architects/module-federation:init --type host
The --type host switch produces a typical host configuration. This option has been available since plugin version 14.3, which corresponds to Angular 14.
For this example, there's no need to alter the generated webpack.config.js
 // webpack.config.js
 const { shareAll, withModuleFederationPlugin } = require('@angular-architects/module-federation/webpack');

 module.exports = withModuleFederationPlugin({

     shared: {
         ...shareAll({ singleton: true, strictVersion: true, requiredVersion: 'auto' }),
     },

 });
No other options from the ModuleFederationPlugin are required in this scenario.
Following that, the only remaining piece is a lazy route that loads the target Micro Frontends:
 import { WebComponentWrapper, WebComponentWrapperOptions } from '@angular-architects/module-federation-tools';

 export const APP_ROUTES: Routes = [
     [...]
     {
         path: 'react',
         component: WebComponentWrapper,
         data: {
             remoteEntry: 'https://witty-wave-0a695f710.azurestaticapps.net/remoteEntry.js',
             remoteName: 'react',
             exposedModule: './web-components',

             elementName: 'react-element'
         } as WebComponentWrapperOptions
     },
     [...]
 ]
The WebComponentWrapper referenced here comes from @angular-architects/module-federation-tools. It loads the Web Component via Module Federation using the specified key data. In this case, the react application is deployed as an Azure Static Web App. The remoteName and exposedModule values correspond to entries in the Micro Frontend's webpack configuration.
This wrapper component also generates an HTML element called react-element, which serves as the mounting point for the Web Component.
When loading a Micro Frontend compiled with Angular 13 or newer, the type property must be set to module:
 export const APP_ROUTES: Routes = [
     [...]
     {
         path: 'angular1',
         component: WebComponentWrapper,
         data: {
           type: 'module',
           remoteEntry: 'https://your-path/remoteEntry.js',
           exposedModule: './web-components',

           elementName: 'angular1-element'
         } as WebComponentWrapperOptions
     },
     [...]
 }
Additionally, for Angular 13+, the remoteName property becomes unnecessary. Both differences stem from the fact that Angular CLI 13+ no longer outputs "old-style JavaScript" files; instead, it produces JavaScript modules, which Module Federation processes differently.
If your Micro Frontend has its own router, the shell needs to be informed that the Micro Frontend will append additional segments to the URL. To do this, use the startsWith matcher, also included in @angular-architects/module-federation-tools:
 import {
     startsWith,
     WebComponentWrapper,
     WebComponentWrapperOptions
 }
 from '@angular-architects/module-federation-tools';

 [...]

 export const APP_ROUTES: Routes = [
     [...]
     {
         matcher: startsWith('angular3'),
         component: WebComponentWrapper,
         data: {
             [...]
         } as WebComponentWrapperOptions
     },
     [...]
 }
For this to work, the angular3 path prefix used here must also be adopted by the Micro Frontend. Since the routing configuration is just a data structure, there are ways to inject it dynamically.
Result
The final outcome is an application assembled from various frameworks and framework versions:
When feasible, the framework is shared across the board. Otherwise, Module Federation pulls in a fresh framework (version). Another benefit is that no additional meta framework is necessary; only a few lightweight helper functions are needed.
The trade-offs include greater complexity and larger bundle sizes. Furthermore, this approach steps outside officially supported scenarios: none of these frameworks has been tested by its maintainers in combination with other frameworks or multiple versions of itself within the same browser tab.
What's next? More on Architecture!
Up to this point, we've explored decomposing a large client into multiple Micro Frontends that may even use different frameworks. Yet, for enterprise-scale frontends, further considerations arise:
- What criteria should guide the division of a large application into sub-domains?
- How can loose coupling be enforced effectively?
- What ensures the solution remains maintainable over years or decades?
- Which established patterns are worth adopting?
- What additional Micro Frontend capabilities does Module Federation provide?
- Should we choose a monorepo or multiple repositories?
Our free eBook (roughly 120 pages) addresses all these topics and more:
Feel free to download it here now!