The mechanism behind Angular's change detection
Interactivity is at the heart of modern web applications. Application state shifts constantly, whether from user interactions or asynchronous server responses. When state changes, the code must recognize the shift and mirror it in what users see on screen. That responsibility falls to the change detection system.
Prefer a video format? Here's the talk I delivered at AngularConnect.
I've published extensive deep-dives on how change detection works within Angular over the past year. Those pieces offer thorough explanations and dig into considerable internal detail, yet they demand significant reading time. For readers who are curious but short on time, this piece takes a more accessible approach. It offers a bird's-eye view of the core pieces and their interactions: the data structures that represent components internally, how bindings function, and the steps executed during a detection pass. I'll also explain zones and demonstrate precisely how they enable Angular's automatic change detection.
When problems surface, understanding change detection internals makes debugging more efficient—especially for errors like ExpressionChangedAfterItHasBeenCheckedError, and helps clear up frequent misunderstandings. I'll showcase several configurations that produce this error and leverage them to clarify change detection internals.
Consider this straightforward Angular component. It displays the current time captured at the moment change detection fires. The timestamp shows millisecond precision. Pressing the button initiates a change detection pass:

The code looks like this:
@Component({
    selector: 'my-app',
    template: `
        <h3>
            Change detection is triggered at:
            <span [textContent]="time | date:'hh:mm:ss:SSS'"></span>
        </h3>
        <button (click)="0">Trigger Change Detection</button>
    `
})
export class AppComponent {
    get time() {
        return Date.now();
    }
}
The implementation is quite minimal. A getter identified as ****time**** produces the current timestamp, which I've bound to the ****span**** element within the HTML.
Angular prohibits empty expressions, so
****0****serves as the click callback.
You can experiment with it via this StackBlitz. During a change detection run, Angular retrieves the ****time**** property's value, feeds it through the ****date**** pipe, and updates the DOM with the output. The behavior appears correct. However, opening the console reveals the ****ExpressionChangedAfterItHasBeenCheckedError****:
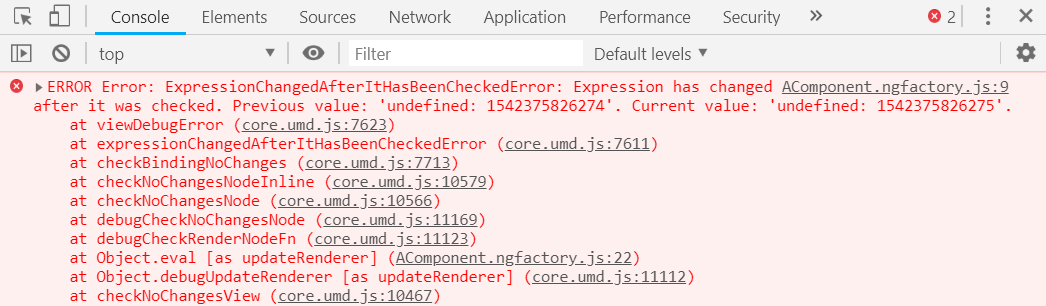
That's unexpected. Typically this error appears in considerably more complex scenarios. How can such basic functionality trigger it? Let's dig into that now.
Let's examine the error text:
Expression has changed after it was checked. Previous value: “textContent: 1542375826274”. Current value: “textContent: 1542375826275”.
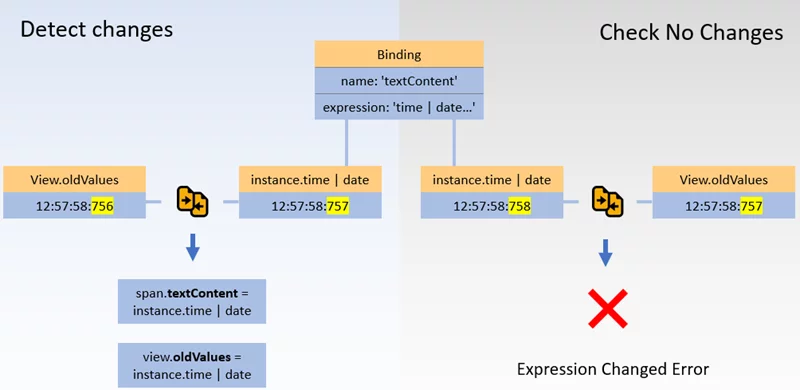
The message indicates that the values from the ****textContent**** binding expressions differ. The milliseconds are clearly distinct. Angular evaluated the expression ****time | date:’hh:mm:ss:SSS**** on two occasions and compared the outcomes. The discrepancy triggered the error.
What's the rationale behind Angular performing this comparison?
And precisely when does this comparison occur?
These questions piqued my interest and guided me into change detection's internals. Finding answers required debugging—extensive debugging that spanned, I'd estimate, several months. Let's address the second question—the timing of the error first. But before that, I need to share some discoveries that will make the behavior we observed sensible.
Component views and their bindings
Change detection in Angular rests on two fundamental elements:
- the component view
- the bindings connected to it
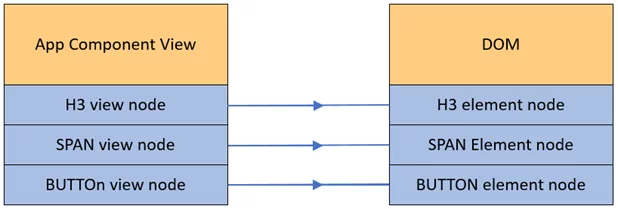
Each Angular component has a template containing HTML elements. When Angular constructs the DOM nodes to display the template content, it requires a location to retain references to those DOM nodes. Internally, a structure called the View fulfills this role. It also holds the component instance reference and stored prior values of binding expressions. Each component corresponds to exactly one view. This diagram illustrates the view:
During template analysis, the compiler identifies DOM element properties that might require updates during change detection. For each such property, a binding gets created. The binding specifies the property name targeted for update along with the expression Angular uses to derive a fresh value.
In this scenario, the ****time**** property feeds the expression backing the ****textContent**** property. Therefore, Angular establishes a binding and attaches it to the ****span**** element:
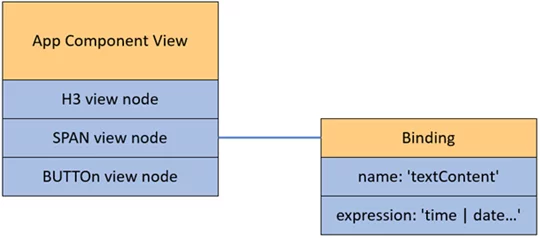
In the real implementation, a binding isn't a solitary object containing all relevant data. A
****viewDefinition****enumerates the actual bindings for template elements and the properties requiring updates. The expression tied to a binding lives within the****updateRenderer****function.
Examining a component view
Change detection in Angular runs per component, as you're aware. Given that views represent components internally, we can equivalently state that each view undergoes its own change detection pass.
When inspecting a view, Angular iterates through all bindings the compiler generated for it. Each expression gets evaluated, and its result is compared against values stored in the view's ****oldValues**** array. This is the origin of the term dirty checking. When discrepancies appear, Angular updates the relevant DOM property for that binding. The new value then replaces the prior entry in the ****oldValues**** array. That completes the process—the UI now reflects fresh data. Angular proceeds to child components and repeats these identical steps.
Only one binding exists in our app: the ****textContent**** property of the ****span**** element within the ****App**** component. So change detection retrieves the component's ****time**** value, processes it through the ****date**** pipe, and checks it against the stored previous value. Any difference prompts Angular to refresh the span's ****textContent**** property and the ****oldValues**** array.
So where does the error originate?
After a change detection cycle wraps up, Angular—in development mode—executes another check synchronously, verifying that expressions yield identical values to the prior pass. This verification lies outside the regular change detection cycle. It executes after the entire component tree has been processed and replicates the same procedure. The difference: when Angular spots a discrepancy now, it skips the DOM update and instead raises the ****ExpressionChangedAfterItHasBeenCheckedError****.
The reasoning behind it
We've established when the error gets thrown. But what necessitates this verification? Picture this: certain component properties got modified during the change detection run. Consequently, expressions now generate new values inconsistent with the rendered UI. What options does Angular have? It could execute another change detection cycle to reconcile app state with the interface. Yet what happens if properties shift again mid-cycle? Notice the pattern? Angular might spiral into endless change detection iterations. And indeed, that was a frequent problem in AngularJS.
To prevent this, Angular established what's called Unidirectional Data Flow. The post-change-detection check and its resulting ****ExpressionChangedAfterItHasBeenCheckedError**** serve as the enforcement mechanism. After Angular processes a component's bindings, modifying properties used within those binding expressions is off-limits.
Resolving the error
Avoiding the error requires ensuring expressions return matching values during both the change detection run and the subsequent check. In our case, moving the evaluation outside the ****time**** getter accomplishes this:
export class AppComponent {
    _time;
    get time() {  return this._time; }

    constructor() {
        this._time = Date.now();
    }
}
Yet with that approach, the ****time**** getter perpetually produces a constant value. An update still needs to happen. Earlier we noted that the error-triggering check executes synchronously right after the change detection cycle. Updating the value asynchronously sidesteps the error. So, to refresh the value every millisecond, we can employ the ****setInterval**** function with a ****1**** millisecond delay:
export class AppComponent {
    _time;
    get time() {  return this._time; }

    constructor() {
        this._time = Date.now();

        setInterval(() => {
            this._time = Date.now();
        }, 1);
    }
}
This approach resolves the initial issue. However, it brings a new complication. Angular treats all timing events—including ****setInterval****—as triggers for change detection. Consequently, this implementation produces ceaseless change detection cycles. To circumvent that, we require a method to execute ****setInterval**** ****without activating change detection.**** Fortunately, such a method exists. Understanding why ****setInterval**** causes change detection in Angular is the first step toward finding it.
How zones enable automatic change detection
Unlike React, Angular has the ability to run change detection on its own whenever any asynchronous event occurs in the browser. This is achieved through a library called zone.js which introduces the concept of zones. It’s a common misconception that zones are an integral part of Angular’s change detection mechanism. In reality, Angular is fully functional without them. The role of the library is simply to intercept asynchronous operations like setInterval and inform Angular when they happen. Angular then responds by triggering change detection.
It’s worth noting that a single web page can host multiple zones simultaneously. One of these is NgZone, which gets instantiated during Angular’s bootstrap process. This is where the entire Angular application operates. Crucially, Angular only receives notifications for events that take place within this particular zone.
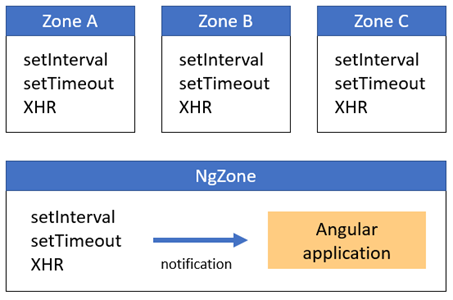
However, zone.js exposes methods that allow code execution in a zone different from the Angular one. When async events occur in these other zones, Angular remains unaware, and without that notification, change detection is never initiated. The specific method for this is runOutsideAngular, which comes from the NgZone service.
The snippet below demonstrates how to inject NgZone and execute setInterval outside the Angular zone:
export class AppComponent {
    _time;
    get time() {
        return this._time;
    }

    constructor(zone: NgZone) {
        this._time = Date.now();

        zone.runOutsideAngular(() => {
            setInterval(() => {
                this._time = Date.now()
            }, 1);
        });
    }
}
In this scenario, the time value is being refreshed continuously, but it happens asynchronously and outside Angular’s zone. This approach ensures that when change detection runs and the time getter is evaluated, the returned value is consistent throughout the entire cycle. On the next detection pass, Angular will pick up the new value and update the view accordingly.
A widely used optimization strategy is to leverage NgZone for executing code outside Angular, thus preventing unnecessary change detection triggers.
Inspecting the internals
If you’re curious whether there’s a way to observe this view structure and its bindings directly, the answer is yes. There’s a method called checkAndUpdateView located in the @angular/core module. This function iterates through every view in the component tree and validates each one. When I encounter change detection issues, this is my first stop for debugging.
Feel free to experiment with it. Head over to this stackblitz demo and open the browser console. Locate the function and set a breakpoint on it. After clicking the button that triggers change detection, examine the view variable. Here’s a recording of the process:
The initial view you’ll encounter is the host view — essentially a root structure Angular creates to contain our main component. Continue execution to reach its child view, which corresponds to AppComponent. Take a closer look. The component property points to the App instance. The nodes property contains references to the DOM elements generated from the template. Meanwhile, the oldValues array holds the previous results of binding expressions.
Understanding the sequence
Earlier, we discussed how the unidirectional data flow constraint prevents modifying component properties once that component has already been checked. Such modifications typically occur via shared services or synchronous event broadcasts while Angular processes child components. But there’s another path: a child can inject its parent directly and alter the parent’s state within a lifecycle hook. Consider this example:
@Component({
    selector: 'my-app',
    template: `
        <div [textContent]="text"></div>
        <child-comp></child-comp>
    `
})
export class AppComponent {
    text = 'Original text in parent component';
}

@Component({
    selector: 'child-comp',
    template: `<span>I am child component</span>`
})
export class ChildComponent {
    constructor(private parent: AppComponent) {}

    ngAfterViewChecked() {
        this.parent.text = 'Updated text in parent component';
    }
}
You can test it here. The setup involves a straightforward two-component hierarchy. The parent defines a text property used in its template binding. The child injects the parent and updates text inside its ngAfterViewChecked hook. What output do you expect in the console?
As you might have guessed, the familiar ExpressionChangedAfterItWasChecked error shows up. The reason is straightforward: by the time Angular executes ngAfterViewChecked on the child, it has already validated the parent App component’s bindings. Our update to the bound text property happens after that validation.
Now, the intriguing question: if we switch the hook to ngOnInit, would the error still appear?
export class ChildComponent {
    constructor(private parent: AppComponent) {}

    ngOnInit() {
        this.parent.text = 'Updated text in parent component';
    }
}
Surprisingly, it doesn’t. Check the demo. In fact, placing the same code in any other hook — excluding AfterViewInit and AfterViewChecked — results in no error at all. So what makes ngAfterViewChecked unique?
The answer lies in the sequence of operations that Angular follows during change detection. To see this, we can revisit the checkAndUpdateView function mentioned earlier. Here’s a relevant excerpt from its body:
function checkAndUpdateView(view, ...) {
    ...
    // update input bindings on child views (components) & directives,
    // call NgOnInit, NgDoCheck and ngOnChanges hooks if needed
    Services.updateDirectives(view, CheckType.CheckAndUpdate);

    // DOM updates, perform rendering for the current view (component)
    Services.updateRenderer(view, CheckType.CheckAndUpdate);

    // run change detection on child views (components)
    execComponentViewsAction(view, ViewAction.CheckAndUpdate);

    // call AfterViewChecked and AfterViewInit hooks
    callLifecycleHooksChildrenFirst(…, NodeFlags.AfterViewChecked…);
    ...
}
Notice that lifecycle hooks are fired as part of change detection. The key detail is that certain hooks execute before the binding processing and DOM updates, while others run afterwards. The illustration below shows the flow when Angular checks the parent component:

Going through the sequence: Angular starts by updating the child component’s input bindings. Subsequently, it invokes the OnInit, DoCheck, and OnChanges hooks — again on the child. This order makes perfect sense, as the child needs to be informed that its inputs have been set. Next comes the rendering phase for the current component. After that, change detection proceeds for the child, essentially repeating these steps on the child’s own view. Finally, the AfterViewChecked and AfterViewInit hooks are called on the child, signaling that its checking is complete.
The crucial observation here is that AfterViewChecked for the child is invoked after the parent’s bindings have been processed. Conversely, the OnInit hook runs before any binding evaluation. So, even when text is altered in OnInit, the value remains stable during the subsequent check. This explains why the error doesn’t occur with ngOnInit — the mystery is resolved.
Wrapping up
Let’s recap the key takeaways. Internally, every Angular component is represented as a view structure. During compilation, the template is parsed and bindings are generated. Each binding specifies both the DOM element property to update and the expression that supplies the value. Old values used for comparison are stored in the view’s oldValues property. When change detection runs, Angular iterates through bindings, evaluates expressions, compares them against previously stored values, and updates the DOM as needed. Following each cycle, Angular runs a verification pass to ensure the component state aligns with the UI. This verification is synchronous and can trigger the ExpressionChangedAfterItWasChecked error when inconsistencies are found.
What to explore next
These 5 articles will make you an Angular Change Detection expert
For those seeking a deeper dive into Angular’s change detection, this curated collection is an excellent starting point. It covers various aspects including zones, DOM update internals, unidirectional data flow, and the ExpressionChangedAfterItWasChecked error.
Level Up Your Reverse Engineering Skills
Much of what I’ve presented here came from my own reverse-engineering efforts. While this approach is highly rewarding, it certainly presents challenges. The linked article shares my experiences and offers a set of guidelines to help you begin exploring source code independently.