

Setting Up the Router
The first step toward enabling routing is to invoke the provideRouter function, which registers the essential providers for the router to operate.
provideRouter(routes: ROUTES, ...features: RouterFeatures[]): EnvironmentProvidersThis setup is placed within your application’s configuration:
bootstrapApplication(AppComponent, { providers: [provideRouter(ROUTES)] });
This approach is relatively modern, having been introduced alongside standalone components. In applications built around modules, the equivalent was achieved by calling the static forRoot method on RouterModule:
static forRoot(routes: Routes, config?: ExtraOptions):
	ModuleWithProviders<RouterModule>
Afterward, the RouterModule itself needs to be imported into the root module:
@NgModule({
   imports: [RouterModule.forRoot(ROUTES)]
})
export class AppModule { }
Defining Routes
With the router configured, the next task is to supply the Routes — an array of Route objects. This array serves as the navigation blueprint for Angular. The two core properties of a route are the path and the component it is linked to.
The path is a text string that constructs the URL visible in the address bar. It can be either static or dynamic. Dynamic paths, also known as params, use a leading colon to indicate that a portion of the URL is a variable. The text following the colon acts as the parameter’s identifier, allowing the value to be retrieved and used within the application.
URLs create a hierarchy via slashes that separate path segments. This structure is mirrored in the route configuration through the children property, which accepts a nested array of routes, forming a tree structure.
const ROUTES: Routes = [
   { path: ‘dashboard’, component: DashboardComponent },
   { path: ‘products’, component: ProductsComponent, children: [
      { path: ‘top’, component: TopProductsComponent },
	{ path: ‘:id’, component: ProductDetailsComponent }
   ]},
   { path: ‘’, redirectTo: ‘/dashboard’, pathMatch: ‘full’ },
   { path: ‘**’, component: PageNotFoundComponent }
]
The sequence of routes is significant. Angular employs a first-match-wins approach, picking the first route it successfully matches. Consequently, more specific routes should be listed before more generic ones. For instance, the route "top" must precede the route ":id". If the order were reversed, "top" would be interpreted as the value for the id param, leading to the display of ProductDetailsComponent.
Note the pathMatch parameter in the empty route definition. This property influences the matching logic and can be set to one of two values:
- "prefix" (the default) – The route matches when the specified path is a prefix of the full URL. A route with the path "admin" would match URLs such as "/admin", "/admin/settings", and "/admin/users".
{ path: ‘admin’, component: AdminComponent, pathMatch: ‘prefix’ }
- "full" – The route only matches when the complete URL corresponds exactly to the configured path. In the example above, without
pathMatchset to "full", the empty route would always match, as an empty string is a prefix of every URL. This would prevent thePageNotFoundComponentfrom ever being shown for invalid URLs, as the user would be redirected to the dashboard instead.
The double asterisk ** acts as a wildcard, matching any URL. This route should always be declared last. The router falls back to this option when no other route matches, indicating the requested URL points to a non-existent page, thus rendering the PageNotFoundComponent.
There are occasions when you’ll want to send the user to a different page. In the example, an empty URL results in a redirect to the dashboard. This is done using the redirectTo property, which can hold a static string for the target URL or a function to handle more intricate scenarios.
type RedirectFunction = (
  redirectData: Pick<
    ActivatedRouteSnapshot,
    'routeConfig' | 'url' | 'params' | 'queryParams' | 'fragment' | 'data' | 'outlet' | 'title'
  >,
) => string | UrlTree

{
   path: ‘old-dashboard-page’,
   redirectTo: ({ url }) => {
      if (url.contains(‘v2’)) return ‘/dashboard’
      else {
         inject(NotifictionService).open(‘Page no longer available’, Theme.ERROR);
         return ‘/not-found’
      }
   }
}
Lazy Loading
Lazy loading is a fundamental yet potent optimization strategy. It defers the fetching of components (or modules) until the user navigates to a particular route, rather than downloading all code at application startup. This technique splits the application into smaller bundles, also known as chunks, which are loaded on demand, thereby shrinking the initial bundle size and boosting performance. This practice is indispensable for crafting scalable and efficient applications, with the advantages becoming more pronounced as the codebase grows.
This effect is observable in the network tab. Consider a simple experiment: an application with two routes, each displaying a table from Angular Material. In the first scenario, lazy loading is disabled:
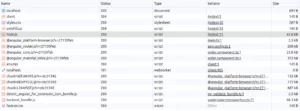
All files were fetched at the initial load, and navigation triggers no further requests. Take note of the main.js bundle size. Now, let’s enable lazy loading and observe the difference:

The initial main.js size is noticeably reduced. The chunk files containing the table components are fetched asynchronously only after the user navigates to their respective routes.
To apply this pattern, you provide a function to the loadComponent property. This function uses a dynamic import to load the component on demand:
const ROUTES: Routes = [
  {
    path: 'user',
    loadComponent: () =>
      import('./user.component').then((c) => c.UserComponent),
  },
];
It is crucial that the import statement is used inside the loadComponent function. Placing a static import (e.g., import {UserComponent} from './user.component') at the top of the file would cause the component to be loaded eagerly, defeating the purpose.
In module-based setups, the equivalent was achieved with the loadChildren function, which loaded an NgModule that imported RouterModule via the forChild static method to define its routes:
const ROUTES: Routes = [
  {
    path: 'user',
    loadChildren: () => import('./user.module).then(m => m.UserModule),
  },
];

@NgModule({ imports: [RouterModule.forChild(USER_FEATURE_ROUTES)] })
export class UserModule {}
In this case, USER_FEATURE_ROUTES encloses the user-related subroutes, with UserModule acting as the gateway to the "user" feature. This is a practical way to organize code by domain. Nonetheless, with the shift away from NgModules, an alternative is needed.
Maintaining a single, massive constant for all routes is an anti-pattern. Instead, routes should be kept in files at the feature level. However, a direct import would trigger eager loading. A straightforward solution exists: the function passed to loadChildren can lazy load not only a module but also a file containing routes:
const ROUTES: Routes = [
  {
    path: 'user',
    loadChildren: () =>
      import('./user.routes).then((m) => m.USER_FEATURE_ROUTES),
  },
];
For brevity, the examples in this article omit lazy loading, as the eager component syntax is more compact. In a production application, you should consistently employ lazy loading.
Route Matchers
A route matcher is a custom function that defines bespoke logic for route matching. It proves useful when the default matching strategy is insufficiently flexible. The function returns an UrlMatchResult object, which includes the consumed segments and an object filling in the resolved path parameter values. If the URL does not satisfy the requirements, it returns null.
type UrlMatcher = (
  segments: UrlSegment[],
  group: UrlSegmentGroup,
  route: Route,
) => UrlMatchResult | null

type UrlMatchResult = {
  consumed: UrlSegment[];
  posParams?: {[name: string]: UrlSegment};
}
Let’s create a matcher that identifies a route if the username param appears to be an X (formerly Twitter) handle, meaning it starts with an "@". The matcher will also strip the leading "@" before storing the param value:
export const ROUTES: Routes = [
  {
    path: 'users',
    component: UsersListComponent,
    children: [
      {
        matcher: nameMatcher,
        component: UserComponent,
        children: [{ path: 'details', component: UserDetailsComponent }],
      },
    ],
  },
];

const nameMatcher: UrlMatcher = (
  url: UrlSegment[],
): UrlMatchResult | null => {
  const usernameSegment = url[0];

  if (usernameSegment.path.match(/^@[\w]+$/gm))
    return {
      consumed: [usernameSegment],
      posParams: {
        username: new UrlSegment(usernameSegment.path.slice(1), {}),
      },
    };
  else return null;
};
When a user enters the URL "users/@angularlove/details", the url parameter receives the array ["@angularlove", "details"]. The "users" segment was already matched by the router to select the UserListComponent route. The first remaining segment is the username. This value is checked against the regular expression to see if it begins with "@". If it does, we return the UrlMatchResult object. The consumed property lists the segments used for matching, as each segment is only available once. Here, we consume the "@angularlove" segment. If we also consumed "details", the router could match the UserComponent route but would fail to match UserDetailsComponent, as no segments would remain.
The posParams property defines the path params. We create a param named "username" and assign it the value with the leading "@" removed. To avoid type errors, a new UrlSegment is constructed. The second argument to the UrlSegment constructor is for matrix params, which are part of a URL segment. Since matrix params are unused here, an empty object is passed. The path param can then be accessed in the component as shown:
@Component({ ... })
export class UserComponent implements OnInit {
  readonly usernameParam$ = inject(ActivatedRoute).paramMap.pipe(
    map((paramMap) => paramMap.get('username')),
  );

  ngOnInit() {
    this.usernameParam$.subscribe(console.log); // ‘angularlove’
  }
}
Understanding Route Guards
Route guards act as navigation checkpoints, giving you the power to determine whether a user is permitted to enter or exit a specific route. These mechanisms are vital for implementing security protocols, handling user authentication, and enforcing access restrictions across your application.

The CanActivate Guard
This particular guard is responsible for deciding whether a route is eligible for activation. Its primary use case revolves around performing authentication or authorization checks prior to granting access to protected sections of the app.
type CanActivateFn = (
 route: ActivatedRouteSnapshot,
 state: RouterStateSnapshot
) => MaybeAsync<GuardResult>
Before diving into the code, let's break down the types involved:
- The initial parameter, route, represents a snapshot of the target route containing its configuration details like params, queryParams, data, and so on.
- The state argument provides the URL along with the parameters of the root route.
- The MaybeAsync type is a union that looks like this:
MaybeAsync<T> = T | Observable<T> | Promise<T> - GuardResult is a type that defines what a guard function can return:
GuardResult = boolean | UrlTree | RedirectCommand
Angular 18 introduced the RedirectCommand, a more robust alternative to UrlTree for redirects, as it allows you to explicitly define the navigation behavior:
RedirectCommand.constructor(
   redirectTo: UrlTree,
   navigationBehaviorOptions?: NavigationBehaviorOptions | undefined
)
Since multiple guards can guard a single route, the behavior is as follows:
- Navigation continues only if every guard returns true
- Navigation is halted if any guard returns false
- If any guard yields a UrlTree or RedirectCommand, the ongoing navigation gets cancelled, and the user is rerouted according to the returned object
Let’s put this into practice by building an authentication guard:
const authGuard: CanActivateFn = (): boolean | UrlTree => {
  const authService = inject(AuthService);
  const router = inject(Router);
  return authService.isAuthenticated() || router.createUrlTree([‘/login’])
}
Our guard’s logic only depends on the AuthService, allowing us to leave out the route and state arguments. If the user holds a valid authentication token, the navigation process proceeds; otherwise, they are sent to the login screen. Thanks to the injection context in which guard functions execute, we can confidently utilize the inject function to fetch our dependencies.
To shield a component from unauthenticated access, simply insert the guard into the canActivate array of the Route object:
const ROUTES: Routes = [
  {
    path: ‘some-path’,
    component: MyComponent,
    canActivate: [authGuard]
  }
];
The functional guard pattern has been available since Angular 14. Prior to this, guards were typically defined as injectable services implementing a specific interface. While this service-based approach is now deprecated, you’ll still encounter it in legacy codebases. An equivalent service-based version of our authGuard would be:
@Injectable({ providedIn: 'root' })
class AuthGuard implements CanActivate {
  constructor(
    private readonly authService: AuthService,
    private readonly router: Router
  ) {}

  canActivate(): boolean | UrlTree {
    return (
      this.authService.isAuthenticated() ||
      this.router.createUrlTree(['/login'])
    );
  }
}
The CanActivateChild Guard
Consider a scenario where a welcome page contains several subpages, each requiring user authentication. Rather than reinventing the wheel, we could reuse our existing authGuard across the board, leading to a route configuration like this:
const ROUTES: Routes = [
  {
    path: '',
    component: WelcomeComponent,
    children: [
      {
        path: 'feature-1',
        component: Feature1Component,
        canActivate: [authGuard],
      },
      {
        path: 'feature-2',
        component: Feature2Component,
        canActivate: [authGuard],
      },
	...
      {
        path: 'feature-10',
        component: Feature10Component,
        canActivate: [authGuard],
      }
    ],
  },
];
This setup, however, is cluttered and repetitive. This is precisely where CanActivateChild shines. It provides a mechanism to control the activation of child routes from the parent level, promoting cleaner, DRY code.
type CanActivateChildFn = (
 childRoute: ActivatedRouteSnapshot,
 state: RouterStateSnapshot,
) => MaybeAsync<GuardResult>
The implementation closely mirrors CanActivate, and we can even reuse the same authGuard since its signature satisfies both guard types:
const ROUTES: Routes = [
  {
    path: '',
    component: WelcomeComponent,
    canActivateChild: [authGuard],
    children: [
      {
        path: 'feature-1',
        component: Feature1Component,
      },
      {
        path: 'feature-2',
        component: Feature2Component,
      },
	...
      {
        path: 'feature-10',
        component: Feature10Component,
      }
    ],
  },
];
That's a significant improvement! But let’s introduce a new twist. Suppose we need to add a public 'contact' subpage that should not require authentication. Must we revert to the repetitive pattern of defining guards on each child? Not quite.
The Component-Less Route pattern offers a neat solution here. By creating a 'middleware' route with an empty path and no component, we can group routes without altering the routing mechanism:
const ROUTES: Routes = [
  {
    path: '',
    component: WelcomeComponent,
    children: [
      {
        path: 'contact',
        component: ContactComponent
      },
      {
        path: '',
        canActivateChild: [authGuard],
        children: [
          {
            path: 'feature-1',
            component: Feature1Component,
          },
          {
            path: 'feature-2',
            component: Feature2Component,
          },
	    ...
          {
            path: 'feature-10',
            component: Feature10Component,
          }
        ]
      }
    ],
  },
];
When placed on a component-less route, CanActivateChild is invoked every time any feature subpage is accessed. Alternatively, using the CanActivate guard on this 'middleware' route triggers the guard only when navigating into the group from outside, skipping the check during internal navigation between its children. This approach is particularly advantageous when combined with resolvers, as it helps avoid redundant data fetching operations.
It's also important to note that a component-less route doesn't introduce an extra layer, so retrieving route parameters within your feature components via ActivatedRoute remains entirely unaffected.
The CanDeactivate Guard
This guard governs whether the current route can be left. Its most common application is to intercept navigation attempts and warn the user about unsaved changes, typically via a confirmation dialog.
type CanDeactivateFn<T> = (
 component: T,
 currentRoute: ActivatedRouteSnapshot,
 currentState: RouterStateSnapshot,
 nextState: RouterStateSnapshot,
) => MaybeAsync<GuardResult>
Alongside the standard router state parameters (currentRoute and currentState), and the upcoming state (nextState), this guard uniquely receives the component instance. This allows the guard’s logic to make decisions based on the internal state of the component being left.
Let’s construct such a guard. For maximum reusability, we'll start by defining an interface that any component protected by our CanDeactivate guard should implement:
interface SafeDeactivate {
  get canBeDeactivated(): boolean
}
This interface declares a function that answers the question: 'Is it safe to leave this page?'. A form component, for instance, could implement this to return the status of its pristine state.
const canDeactivate: CanDeactivateFn<SafeDeactivate> = (
  component: SafeDeactivate
): boolean | Observable<boolean> =>
  component.canBeDeactivated ||
  inject(MatDialog)
    .open(ConfirmationDialog)
    .afterClosed()
    .pipe(map(response => !!response));
Our guard leverages this function; if it returns false, a confirmation dialog pops up, informing the user of potential data loss and seeking their explicit confirmation to proceed with the navigation.
const routes: Routes = [
  {
    path: ‘form’,
    component: MassiveFormComponent,
    canActivate: [canDeactivate]
  }
];
The CanMatch Guard
To fully grasp CanMatch, let’s first walk through the sequence of events during a navigation:
- It all starts with a user action, such as clicking a link or button, or even typing a new URL.
- Angular then attempts to match the new URL against your route configuration. Employing a first-match-wins strategy, it selects the very first route configuration that matches.
- If the matched route specifies lazy loading, the relevant chunk is loaded at this point.
- Once the route is identified, Angular verifies navigation permissions. This involves executing the guards we’ve covered previously. For instance, navigating from A to B triggers:
- Checking if A can be deactivated (CanDeactivate)
- If B is a child route, Angular runs CanActivate on its parent and CanActivateChild concerning route B
- Finally, verifying access to component B itself (CanActivate)
- With all checks passed, Angular activates the route, resolves data, and instantiates the component.
Notice that the previous guards are involved at step 4, only after the route has been matched. CanMatch, however, is evaluated during step 2—during the matching phase—allowing a route to be skipped entirely.
type CanMatchFn =
(route: Route, segments: UrlSegment[]) => MaybeAsync<GuardResult>
If any CanMatch guard returns false, that route is ignored for matching purposes, and Angular continues assessing the remaining configuration. This feature is invaluable for associating two distinct components under the same path. Take a 'dashboard' path for example, intended for different user roles with different capabilities. Instead of building a smart shell component to conditionally render the right dashboard, CanMatch facilitates a cleaner setup:
const canMatchAdmin: CanMatchFn = (): boolean =>
	inject(AuthService).isAdmin();

const canMatchUser: CanMatchFn = (): boolean =>
	inject(AuthService).isUser();

const routes: Routes = [
  {
    path: ‘dashboard’,
    component: AdminDashboardComponent,
    canMatch: [canMatchAdmin]
  },
  {
    path: ‘dashboard’,
    component: UserDashboardComponent,
    canMatch: [canMatchUser]
  }
];
The Deprecated CanLoad Guard
The CanLoad guard has been deprecated in favor of CanMatch. Functionally, they were quite similar. CanLoad controlled whether a lazy-loaded module, linked via the loadChildren property, could be fetched. Its main objective was to avoid loading modules the user lacks permission to access.
type CanLoadFn = (route: Route, segments: UrlSegment[]) =>
	MaybeAsync<GuardResult>
The reasoning behind its deprecation was to keep lazy loading purely as a performance optimization. Its implementation should not be based on application logic; it should always load modules regardless of access. Moreover, CanLoad had limitations; it was only applicable to lazy-loaded modules and did not extend to lazy-loaded standalone components, making it less flexible than CanMatch.
Understanding Resolvers
Although not technically a guard, resolvers are frequently discussed in the same context. They allow you to pre-fetch data during navigation, and the router will not activate the target route until the data resolution is complete. This ensures data is available immediately upon component creation. Should an error occur during resolution, you can still employ RedirectCommand to route the user to an appropriate error page.
type ResolveFn<T> = (
  route: ActivatedRouteSnapshot,
  state: RouterStateSnapshot,
) => MaybeAsync<T | RedirectCommand>
Let's build a simple resolver for user data:
const userResolver: ResolveFn<User> = (route: ActivatedRouteSnapshot) => {
  const router = inject(Router);
  return inject(UserService)
    .getUser(route.paramMap.get('id') ?? '')
    .pipe(
      catchError(() =>
        of(
          new RedirectCommand(router.createUrlTree(['/not-found']), {
            skipLocationChange: true,
          }),
        ),
      ),
    );
};
Unlike guards, resolvers are registered in the resolve property of the route configuration, which takes an object rather than an array:
{
   path: ‘user/:id’,
   component: UserDetailsComponent,
   resolve: { user: userResolver }
}
The chosen key defines how to access the resolved data in the component through ActivatedRoute:
@Component({ ... })
export class UserDetailsComponent {
   readonly user$: = inject(ActivatedRoute).data.pipe(
      map(data => data?.user)
   );
}
Consider a page displaying data from multiple sources, each sourced from different components. Showcasing loading spinners for each individual part can be tedious and jarring for the user, especially if they resolve at different times. A more elegant solution involves preloading the data and then seamlessly navigating to the fully-loaded page. Resolvers excel in this scenario:
{
   path: dashboard,
   component: DashboardComponent,
   resolve: {
      user: userResolver,
      orders: ordersResolver,
      payments: paymantsResolver
   }
}
This strategy ensures the dashboard is displayed only when all data has arrived. However, the user remains on the current page until then. To improve this wait time, we can provide feedback that a transition is in progress. The router’s internal event system proves handy here. Let's create a utility to signal whether data resolution is ongoing:
// Use only inside the injection context
export function isResolveInProgress(): Observable<boolean> =>
   inject(Router).events.pipe(
      filter(e => e instanceof ResolveStart || e instanceof ResolveEnd),
      map(e => e instanceof ResolveStart)
   )
Rest assured, the presence of multiple resolvers, such as three here, doesn't complicate matters. The navigation events fire a single time each—ResolveStart triggers when the route is being activated, and ResolveEnd fires once all resolvers have finished their work.
Controlling Re-execution of Guards and Resolvers
By default, guards and resolvers run their course each time a route is activated or left. But what if you're just tweaking query parameters? You might not need to rerun all that logic. The runGuardsAndResolvers property on the route config lets you set a policy for this. Its value dictates whether changes to path params, matrix params (separated by semicolons), query params, or the fragment should cause a re-run.

For complete control, you can even provide a custom function. This function receives the snapshots of the outgoing and incoming routes and must return a boolean to decide on re-execution:
type RunGuardsAndResolversFn = (
  from: ActivatedRouteSnapshot,
  to: ActivatedRouteSnapshot
) => boolean
While this feature is not often required, it’s a useful tool when you're synchronizing UI state (like a sort table order) with the URL, helping you avoid unnecessary heavy operations.
Configuring page titles
The page title is the text displayed on a browser tab alongside the favicon. Assigning descriptive titles to your routes improves the user experience and provides SEO benefits.
The simplest approach is to assign a static value to the title property within the route definition. However, static strings are often insufficient since titles frequently need to reflect dynamic data. Angular offers a mechanism for generating dynamic titles through resolvers. Let’s build a resolver that uses the product name as the title on the details page:
const productNameTitleResolver: ResolveFn<string> = (
  route: ActivatedRouteSnapshot,
): string => {
  const productId = route.paramMap.get('id');
  return productId ? inject(ProductsService).getById(productId).name : '';
};

export const ROUTES: Routes = [
  {
    path: 'products',
    component: ProductsComponent,
    title: 'Products',
    children: [
      {
        path: ':id',
        component: ProductDetailsComponent,
        title: productNameTitleResolver
      },
    ],
  },
  {
    path: 'cart',
    component: CartSummaryComponent,
    title: 'Cart Summary'
  },
];
When a portion of the title, like your application name, needs to appear across many routes, a custom title strategy is the way to go. This involves creating a service that extends the TitleStrategy class:
abstract class TitleStrategy {
  abstract updateTitle(snapshot: RouterStateSnapshot): void;
  buildTitle(snapshot: RouterStateSnapshot): string;
  getResolvedTitleForRoute(snapshot: ActivatedRouteSnapshot): any;
}
This strategy prefixes the application name to the existing route title. If no title is defined for the route, only the application name is shown. To retrieve the title assigned to the activated route—whether it's static or resolved—the buildTitle method is used. The Title service is then responsible for applying the new title.
@Injectable()
export class AppNameTitleStrategy extends TitleStrategy {
  private readonly titleService = inject(Title);

  override updateTitle(snapshot: RouterStateSnapshot) {
    const routeTitle = this.buildTitle(snapshot);
    this.titleService.setTitle(routeTitle ? `MyApp | ${routeTitle}` : 'MyApp');
  }
}
The final step is registering the new strategy as a provider. Since this should apply globally, configuring it at the application root is appropriate:
bootstrapApplication(AppComponent, {
  providers: [
    provideRouter(ROUTES),
    { provide: TitleStrategy, useClass: AppNameTitleStrategy },
  ],
});
Route-level providers
Starting with Angular 14, providers can be defined directly within the route configuration. These dependencies are supplied by an Environment Injector, which is created alongside dynamically loaded components. The injection hierarchy checks this injector right after the Element Injector tree. In essence, this provider is accessible to the route's component and all of its child components. For a deeper dive into Dependency Injection, our separate article on the topic covers it extensively.
The provideRouter function accepts not just routes, but also router features. These are activated through dedicated functions. For module-based applications, the same features can be enabled via the options object passed as the second argument to RouterModule.forRoot. Let’s explore what these options provide.
Binding Inputs to Components
Introduced in version 16, this feature links routing properties—such as path parameters, query parameters, resolver outputs, and custom route data—directly to the inputs of the route's component. This eliminates the need to manually inject the ActivatedRoute service to access these values.
Enable it by passing the withComponentInputBinding function to provideRouter:
provideRouter(ROUTES, withComponentInputBinding())Consider this example route:
{
  path: ':id',
  data: { description: 'Customer profile page' },
  resolve: { customer: customerResolver },
  component: CustomerProfileComponent,
}
Assume CustomerProfileComponent shows a table of customer orders and relies on the “page” and “size” query parameters in the URL for pagination.
Without input binding, these values would need to be manually extracted:
@Component { … }
export class CustomerIdComponent {
  private readonly route = inject(ActivatedRoute);

  readonly customerId$ = this.route.paramMap.pipe(
    map((paramMap) => paramMap.get('id')),
  );

  readonly customer$ = this.route.data.pipe(
    map((data) => data['customer']),
    map((customer) => (isCustomerType(customer) ? customer : null)),
  );

  readonly page$ = this.route.queryParamMap.pipe(
    map((queryParamMap) => queryParamMap.get('page')),
    map((page) => (page ? parseInt(page) : null)),
  );

  readonly size$ = this.route.queryParamMap.pipe(
    map((queryParamMap) => queryParamMap.get('size')),
    map((size) => (size ? parseInt(size) : null)),
  );

  readonly description$ = this.route.data.pipe(
    map(data => data['description']),
  );
}
With input binding, much of the boilerplate disappears:
@Component { … }
export class CustomerIdComponent {
  customerId = input<string | undefined>(undefined, { alias: 'id' });
  customer = input<Customer | undefined, unknown>(undefined, {
    transform: (customer: unknown) =>
      isCustomerType(customer) ? customer : undefined,
  });
  page = input(undefined, { transform: numberAttribute });
  size = input(undefined, { transform: numberAttribute });
  description = input<string>();
}
Since Angular automatically assigns these values without regard to the declared input types (as they aren't bound in a template), using transformation functions for type safety is crucial to prevent runtime errors.
Router configuration options
The withRouterConfig function provides a way to supply a set of configuration properties without needing a unique feature function for each one.
canceledNavigationResolution
Specifies how the router should manage state when a navigation is canceled:
- “replace” (default) – resets the browser state to the router state from before the navigation began, effectively replacing the history entry.
- “computed” – the router attempts to navigate back to the history index that matches its state at the time of cancellation.
urlUpdateStrategy
Controls when the browser URL gets updated:
- “deffered” (default) – updates the URL only after a successful navigation.
- “eager” – updates the URL at the very start of navigation. This is useful for handling errors by referencing the failed URL.
onSameUrlNavigation
Dictates how to respond to a navigation request for the current URL:
- “ignore” (default) – the router disregards the request.
- “reload” – the router processes the URL even if it hasn't changed. This is handy for re-triggering redirects, guards, or resolvers based on internal state that might have shifted. Note that even with this setting, the router reuses the component instance by default.
paramsInheritanceStrategy
Determines how the router merges parameters, data, and resolved values from parent routes into child routes:
- “emptyOnly” (default) – a child route inherits parameters only if its path is empty or its parent is a component-less route.
- “always” – a child route inherits all parameters from its ancestors.
resolveNavigationPromiseOnError
When set to true, a navigation error will cause the navigation Promise to resolve with a value of false (similar to other navigation failures like guard rejections) instead of rejecting.
Strategies for Preloading
We've covered lazy loading and its benefits. There are scenarios where you can predict that a user will soon access a lazy-loaded component or module. In such cases, preloading that chunk can eliminate unnecessary delays—it isn't in the initial bundle but is ready to go (almost) immediately.
To define a custom preloading approach, use the withPreloading function. It expects a class that extends the abstract PreloadingStrategy class:
abstract class PreloadingStrategy {
  abstract preload(route: Route, fn: () => Observable<any>): Observable<any>
}
Angular provides two built-in strategies:
- NoPreloading (default) – no chunks are preloaded.
- PreloadAllModules – all lazy chunks are preloaded as soon as possible.
You can also craft a custom strategy, for instance, one that preloads based on a flag within the data property:
@Injectable({ providedIn: 'root' })
export class FlagBasedPreloadingStrategy extends PreloadingStrategy {
  override preload(
    route: Route,
    preload: () => Observable<any>,
  ): Observable<any> {
    return route.data?.['preload'] === true ? preload() : of(null);
  }
}

bootstrapApplication(AppComponent, {
  providers: [
    provideRouter(
      [
	  ...,
        {
          path: 'dashboard',
          loadComponent: () =>
            import('./dashboard.component').then((m) => m.DashboardComponent),
          data: { preload: true },
        },
      ],
      withPreloading(FlagBasedPreloadingStrategy),
    ),
  ],
});
Managing Scroll Position
Consider a user scrolling through a list, selecting an item for details, and then navigating back. Restoring the scroll position in this scenario significantly enhances the experience. The withInMemoryScrolling feature enables this. It accepts a configuration object containing two properties:
- anchorScrolling – when “enabled”, it scrolls to an anchor element if the URL contains a fragment.
- scrollPositionRestoration – manages the scroll position during back-navigation. Three modes are available:
- “disabled” – does nothing.
- “top” – scrolls to the top of the page.
- “enabled” – restores the previous scroll location when navigating back.
Scroll restoration is driven by a Scroll router event that captures the scroll position. If your list fetches data from a server (a common scenario), you might find that restoration doesn't work as expected. This happens because the Scroll event is emitted right after NavigationEnd, but the server data may not have arrived yet. To resolve this, you can build a service to store the desired position and restore it at the right moment.
type ScrollPosition = [number, number];

@Injectable({ providedIn: 'root' })
export class ScrollRestorationService {
  private readonly viewportScroller = inject(ViewportScroller);

  private readonly position = toSignal(
    inject(Router).events.pipe(
      filter((event): event is Scroll => event instanceof Scroll),
      map((scrollEvent): Scroll => scrollEvent.position ?? [0, 0]),
    ),
    { initialValue: [0, 0] },
  );

  restoreScrollingPosition() {
    this.viewportScroller.scrollToPosition(this.position());
  }
}
Then, call the restoreScrollingPosition method as soon as the list is rendered—perhaps by using a directive or a viewChild query.
Implementing View Transitions
The View Transitions API is another powerful tool for enhancing user experience by enabling smooth element transitions between pages. By leveraging the withViewTransitions function, you avoid manual API configuration and can focus solely on defining rich animations for your transitions.
Extra configuration can be supplied through a configuration object with the following properties:
- skipInitialTransition – disables the transition animation during the initial page load.
- onViewTransitionCreated – a callback that receives a ViewTransitionInfo object, allowing for finer control, such as skipping transitions when only query parameters change.
Handling Navigation Errors
For better error management, the withNavigationErrorHandler feature provides a function to be executed when a navigation error occurs. This function runs within the injection context, ensuring seamless access to your services. Furthermore, you can convert an error into a redirect by returning a RedirectCommand. Any other return value is disregarded, allowing the Router to handle the error using its default mechanism.
provideRouter(
  ROUTES,
  withNavigationErrorHandler((error: NavigationError) => {
    inject(LoggerService).log(error.toString());
    return new RedirectCommand(inject(Router).parseUrl('/error'), {
      skipLocationChange: true,
    });
  }),
)
Controlling initial navigation
There are times when you need to dictate when the router performs its initial navigation. The default setting (“enabledNonBlocking”) initiates navigation after the root component is created, without blocking the bootstrap process on its completion.
To block the bootstrap process until the initial navigation completes, use the withEnabledBlockingInitialNavigation function. In this mode (“enabledBlocking”), the bootstrap waits for the navigation to finish first. This is essential for server-side rendering to avoid content duplication or flashing.
The withDisabledInitialNavigation option (“disabled”) blocks the initial navigation altogether. This is suitable when you need to manage the process manually due to complex initialization logic.
Choosing a location strategy
When building a single-page application, we delegate routing responsibilities to the client—the browser—rather than making a fresh server request each time the URL changes. Angular's Router supports two distinct location strategies for this purpose.
The PathLocationStrategy serves as the default option in Angular. It relies on the History API, which means the browser must support HTML 5. By leveraging pushState, the Router can modify the URL without triggering a server request for a new page. This results in a URL that looks perfectly normal—easy to share or bookmark—while routing is handled entirely on the client side.
There is, however, a notable drawback. If a user refreshes the page at an address like "my-app/users/123/orders", the browser sends a request to the server for that exact path. Consequently, when using the PathLocationStrategy, the server must be set up to return the main application shell—typically index.html with the app-root element—for any URL, not just the root one.
Another requirement is telling the browser what prefix to prepend to the requested path when generating the URL. This can be achieved by setting a base href in the head of index.html:
<base href=’your/prefix’ />
Alternatively, you can provide a value through the APP_BASE_HREF token.
The other approach is the HashLocationStrategy. To enable it, use the withHashLocation function. This strategy relies on hash fragments—the portion of the URL preceded by the hash (#) character—so an address would look like "my-app/#/users/123/orders".
For many years, this was the standard technique for client-side routing because the hash fragment is never transmitted to the server; it holds the state of your client-side application. In this setup, the server sees only one URL ("my-app"), while the Router consumes the hash fragment ("users/123/orders") on its own.
Today, the HasLocationStrategy should be reserved for cases where you must accommodate legacy browsers.
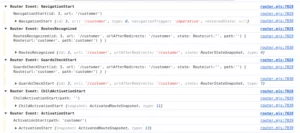
Enabling debug tracing
By invoking the withDebugTracing function, you instruct the Router to log every navigation event to the browser console. This can be a valuable aid when troubleshooting routing issues.
Working with routing in templates
We've handled a fair amount of configuration. Now it's time to put those pieces into practice.
The RouterLink directive
First and foremost, users need a smooth way to move through the app. Apply the routerLink directive to any element in a template to turn it into a link that triggers navigation toward a specific route. The path is easily the most common argument. You have several ways to define it:
- a static link that points directly to a route:
<a routerLink=’/users/123’> Link to user page </a>- a dynamic link built from an array of path segments, followed by any parameters:
<a [routerLink]=”[‘/users’, userId]”> Link to user page </a> - a combination where static segments are bundled into a single string and parameters are appended separately
<a [routerLink]=”[‘/settings/users’, userId]”> Link to user page </a>
Since matrix parameters are attached to the segment itself, they can also be placed within this array:
<a [routerLink]=”[‘/users’, userId, {details: true}]”> Link to user page </a>Given that userId has a value of "123", the link above would resolve to "/users/123;details=true".
It's often quite handy to define navigation relative to the current route. This is possible by using specific prefixes at the start of the first segment. If the segment begins with:
- / – the Router starts its search from the root of the route tree
- ./ – or with no prefix at all – the search starts within the children of the current route
- ../ – the Router moves up one level in the current route's hierarchy
Query parameters can be set by providing an object to the queryParams input:
<a routerLink=”/users” [queryParams]=”{showInactive: showInactiveUsers, sortBy: ‘name’}”> Users </a>The link will navigate to the address "/users?showInactive=true&sortBy=name". When moving between two URLs that both have query parameters, you can control how they're managed via the queryParamsHandling input:
- an empty string or omitting the input (the default) – old parameters are swapped out for the new ones
- "merge" – new parameters are blended with the existing ones
- "preserve" – the current parameters are kept as they are
The fragment, another URL component, can be set with the fragment input:
<a [routerLink]=”[‘/products’, productId]” [queryParams]=”{currency: ‘EUR’}” fragment=”pricing”> Product </a>
This link points to "/products/123?currency=EUR#pricing". By default, the fragment gets replaced during navigation. If you'd rather keep the existing fragment, you can use the preserveFragment input.
Beyond URL generation, RouterLink offers inputs that influence navigation behavior itself:
- relativeTo (ActivatedRoute) – designates the starting point for relative navigation
- skipLocationChange (boolean) – navigates without adding a new entry to the browser's history (the URL stays the same)
- replaceUrl (boolean) – navigates by replacing the current history entry instead of adding a new one
- state (object) – a value saved to the browser's History.state property. You can access it later via the extras object from the getCurrentNavigation method
- info (unknown) – meant for passing short-lived data about a specific navigation. This is tied to the current Navigation instance, distinguishing it from the persistent state value
The RouterLinkActive directive
For a better user experience, it's crucial that users can see which link corresponds to the currently active route. The routerLinkActive directive lets you apply CSS classes that style an element when its associated route is active:
<a routerLink=”/users” routerLinkActive=”class1 class2”>Users</a>
<a routerLink=”/orders” [routerLinkActive]=”[‘class1’, ‘class2’]”>Orders</a>
If you need to inspect the link's status directly, you can assign the RouterLinkActive instance to a template reference variable:
<a routerLink=”/users” routerLinkActive #active=”routerLinkActive”>Users {{ active.isActive ? ‘(active)’ : ‘’ }}</a>The directive also provides an output event that fires when the link transitions between active and inactive states:
<a routerLink=”/users” routerLinkActive=”active-link” (isActiveChange)=”onLinkActiveChange($event)”>Users</a>
To fine-tune how the directive decides if a link is active, use the routerLinkActiveOptions input, which takes a configuration object:
interface IsActiveMatchOptions {
  matrixParams: "exact" | "subset" | "ignored";
  queryParams: "exact" | "subset" | "ignored";
  paths: "exact" | "subset";
  fragment: "exact" | "ignored";
}
As you'll notice, the properties within this object can be set to one of these values:
- "exact" – every parameter must match exactly
- "subset" – extra parameters are allowed, but the ones present must align with those in the current URL
- "ignored" – the parameter is not considered
There's no need to spell out every property each time. For instance, passing the object {exact: true} is a shorthand for:
const exactMatchOptions: IsActiveMatchOptions = {
  paths: 'exact',
  fragment: 'ignored',
  matrixParams: 'ignored',
  queryParams: 'exact',
}
Similarly, providing {exact: false}, or not setting the input at all, results in a configuration object shaped like this:
const subsetMatchOptions: IsActiveMatchOptions = {
  paths: 'subset',
  fragment: 'ignored',
  matrixParams: 'ignored',
  queryParams: 'subset',
}
The RouterOutlet directive
Now that users can click their way around, it's time to render the chosen page. The RouterOutlet directive is responsible for inserting the component that matches the current URL.
<nav>
  <ul>
    <li><a routerLink="/users" routerLinkActive="active">Users</a></li>
    <li><a routerLink="/orders" routerLinkActive="active">Orders</a></li>
  </ul>
</nav>

<!-- Displays UserComponent if “/users” matches the URL –>
<!-- Displays OrdersComponent if “/orders” matches the URL –>
<router-outlet></router-outlet>
The RouterOutlet exposes four events you can listen to:
- activate – emitted right after a new component is created
- deactivate – emitted when a component is being destroyed
- attach – emits the attached component instance when a reuse strategy decides to re-attach a previously detached part of the tree
- detach – emits the detached component instance when a reuse strategy decides to detach a part of the tree
Navigating with multiple named outlets

Each outlet can be given a unique name through the name input, which must be a static string. If you omit it, the outlet defaults to "primary". Usually, we don't worry about the name since we tend to use just one outlet per component.
However, you could define several outlets inside a single component, give them distinct names, and create separate navigation branches, since each outlet is independent of the others. Consider a basic scenario where the viewport is split in two:
<div class=”users-container”>
   <!-- You need to have one primary outlet –>
   <router-outlet></router-outlet>
</div>
<div class=”orders-container”>
   <router-outlet name=”orders”></router-outlet>
</div>
Next, set the outlet name on the Route property called outlet to tell them apart:
const ROUTES: Routes = [
  {
    path: 'users',
    component: UsersSectionComponent,
    children: [
      { path: '', component: UsersListComponent },
      { path: ':id', component: UserDetailsComponent },
    ],
  },
  {
    path: 'orders',
    component: OrdersSectionComponent,
    outlet: 'orders',
    children: [
      { path: '', component: OrdersListComponent },
      { path: ':id', component: OrderDetailsComponent },
    ],
  }]
Since the users part is handled by the primary outlet, routing there works conventionally. But for the orders section, RouterLinks require a slight adjustment. To create a link that navigates within a named outlet's branch, use a configuration object that includes an outlets property. This property consists of key-value pairs where the key is the outlet's name and the value is the path array (just like you'd normally use with RouterLink):
<a [routerLink]="['', {outlets: { orders: ['orders',order.id] } }]">#{{order.id}}</a>The intent of this link is to show order details in the orders section while leaving the users section untouched.
One more intriguing aspect is how the URL is structured. The part belonging to the primary outlet looks standard, but the segment for a named outlet is wrapped in parentheses and prefixed with the outlet's name. For example, having user details on the left and order details on the right would yield a URL like: my-app/users/123(orders:orders/345)
Working with the Router Service
Template-based navigation with directives covers many scenarios, but there are times when navigation logic needs to live inside a service or a function, or when more elaborate control is required. In those situations, the Router service is the primary tool.
Its core feature is, naturally, triggering navigation. Two methods handle this. The navigate method closely mirrors the RouterLink directive's API. Its first parameter is an array of commands, i.e. URL segments, just like the directive's input. The second parameter is a NavigationExtras object, which bundles all the options you'd otherwise set via RouterLink's various inputs, such as query parameters, fragment, or parameter handling strategy.
@Component( { … } )
export class SomeComponent {
  private readonly router = inject(Router);

  navigateToUserOrders(userId: string) {
    this.router.navigate(['users', userId, 'orders'], {
      queryParams: { showCompletedOrders: true },
    });
  }
}
The alternative is navigateByUrl. Instead of a command array, it takes a complete URL, either as a string or as a UrlTree. Its second parameter is a NavigationBehaviorOptions object. Since a UrlTree already encodes the full destination, this method is useful when you have a pre-built URL structure.
@Component( { … } )
export class SomeComponent {
  private readonly router = inject(Router);

  navigateToUserOrders(userId: string) {
    const url = `/users/${userId}/orders?showCompletedOrders=true`;
    this.router.navigateByUrl(url)
  }
}
Beyond navigation, the Router service provides helpful methods for URL manipulation:
serializeUrlconverts aUrlTreeinto a string representation.
parseUrldoes the reverse, turning a string into aUrlTree.
createUrlTreebuilds aUrlTreefrom an array of route segments.
Navigation is a multi-step process, and Angular models each stage with a specific RouterEvent. The Router service exposes a stream of these events through its events property, allowing you to subscribe and react to the navigation lifecycle.
The events fire in a defined sequence during a standard navigation:
NavigationStart– marks the beginning of navigation. It includes anavigationTriggerfield indicating the source:
-
-
- "imperative" – triggered by explicit
Routermethod calls - "popstate" – triggered by browser history actions like the back button or
window.history/Locationservice usage - "hashchange" – triggered when the URL fragment changes
- "imperative" – triggered by explicit
-
RouteConfigLoadStart– emitted before lazy loading of a route's configuration begins.
RouteConfigLoadEnd– emitted after lazy loading of the configuration completes.
RoutesRecognized– the router has matched the URL to a route definition. If the matched route involves lazy-loaded configuration or modules, those are fetched at this stage.
GuardsCheckStart– the router begins evaluating route guards.
ChildActivationStart– the router begins activating a route's child routes.
ActivationStart– the router begins activating the route itself.
GuardsCheckEnd– all guards have successfully granted access.
ResolveStart– resolvers are about to run.
ResolveEnd– all resolvers have finished successfully.
ChildActivationEnd– the router finishes activating the child routes.
ActivationEnd– the router finishes activating the route.
NavigationEnd– the navigation completed successfully.Scroll– fires when scroll position is being restored or managed.
Of course, navigation can also fail. Two events cover error scenarios:
NavigationCancel– navigation was aborted because a guard returnedfalse, or because a guard or resolver triggered a redirect by returning aUrlTreeor aRedirectCommand.NavigationError– navigation terminated due to an unexpected error.
These events have appeared in examples throughout this article, but the classic use case is displaying a loading indicator:
function showNavigationLoadingIndicator(): Signal<boolean> {
  return toSignal(
    inject(Router).events.pipe(
      filter(
        (e) =>
          e instanceof NavigationStart ||
          e instanceof NavigationEnd ||
          e instanceof NavigationCancel ||
          e instanceof NavigationError
      ),
      map((e) => e instanceof NavigationStart),
      debounceTime(200),
      distinctUntilChanged(),
    ),
    { initialValue: false },
  );
}
Another important property is routerState. The router's state is structured as a tree, where each node is an ActivatedRoute instance. This structure lets you traverse the tree from any node to access its ancestors, descendants, or siblings. Which brings us to…
The ActivatedRoute Service
The ActivatedRoute service is a rich source of data about the route currently associated with the component rendered in an outlet. It provides access to URL-related information via observables like url, params, paramMap, queryParams, queryParamsMap, and fragment. It also exposes route configuration through title and routeConfig, and its position in the router tree through root, parent, firstChild, children, and pathFromRoot.
The URL-related properties are Observables because they can change across navigations. When you need a one-time, static value, the snapshot property comes in handy. Its type, ActivatedRouteSnapshot, mirrors the structure of the service and holds the latest emitted values from those observables.
Passing configuration via Injection Tokens is a standard Angular pattern. It offers great flexibility through Dependency Injection, and the router leverages this extensively. We've already seen this with a custom title strategy, but several other tokens are available.
Customizing URL Serialization
You can customize how URLs are serialized and deserialized by providing a custom UrlSerializer. For example, to change the encoding of spaces from %20 to a plus sign (+), you would supply a custom implementation:
class CustomUrlSerializer implements UrlSerializer {
  private readonly defaultUrlSerializer = new DefaultUrlSerializer();

  parse(url: string): UrlTree {
    return this.defaultUrlSerializer.parse(url.replace(/\+/g, '%20'));
  }

  serialize(tree: UrlTree): string {
    return this.defaultUrlSerializer.serialize(tree).replace(/%20/g, '+');
  }
}

bootstrapApplication(AppComponent, {
  providers: [
    provideRouter(ROUTES),
    { provide: UrlSerializer, useClass: CustomUrlSerializer },
  ],
});
With this setup, a query parameter value like "my param" results in "some-url?query=my+param" rather than "some-url?query=my%20param".
Implementing Route Reuse
Each navigation typically causes Angular to remove the current component from the DOM, destroy its instance, and create a fresh one for the new route. This process executes JavaScript and can be costly, especially for large components. The only exception is navigating to the same route, which by default doesn't trigger a rebuild.
To mitigate performance issues, Angular allows a custom RouteReuseStrategy. This strategy can store a component instance instead of destroying it, and later reattach it when its route is revisited. Here's an implementation based on a flag in the route configuration.
The strategy interface defines five methods:
shouldDetach– determines whether the route (and its entire subtree) should be detached for potential reuse.
store– handles saving the detached route tree.
shouldAttach– decides if a previously stored route can be restored.
retrieve– returns the stored instance to be reused.
shouldReuseRoute– determines whether the reuse flow should be initiated at all between two routes.
export class FlagBasedReuseStrategy implements RouteReuseStrategy {
  private readonly storage = new Map<string, DetachedRouteHandle>();

  shouldDetach(route: ActivatedRouteSnapshot): boolean {
    return route.routeConfig?.data?.['reusable'];
  }

  store(route: ActivatedRouteSnapshot, handle: DetachedRouteHandle | null) {
    const routeComponentName = route.routeConfig?.component?.name;
    if (routeComponentName && handle)
      this.storage.set(routeComponentName, handle);
  }

  shouldAttach(route: ActivatedRouteSnapshot): boolean {
    return this.storage.has(route.routeConfig?.component?.name ?? '')
  }

  retrieve(route: ActivatedRouteSnapshot): DetachedRouteHandle | null {
    return this.storage.get(route.routeConfig?.component?.name ?? '') ?? null
  }

  shouldReuseRoute(
    future: ActivatedRouteSnapshot,
    curr: ActivatedRouteSnapshot,
  ): boolean {
    return (
      future.routeConfig === curr.routeConfig ||
      future.routeConfig?.data?.['reusable']
    );
  }
}

bootstrapApplication(AppComponent, {
  providers: [
    provideRouter(ROUTES),
    { provide: RouteReuseStrategy, useClass: FlagBasedReuseStrategy },
  ],
});
Routing is a foundational pillar of Angular, essential for building dynamic single-page applications. A solid command of Angular's routing features allows developers to craft seamless, interactive user experiences that feel as fluid as native applications. This article has walked through the fundamentals, from initial configuration to advanced patterns.
Applying routing effectively does more than boost performance and responsiveness; it also contributes to cleaner code and easier maintenance. With Angular's comprehensive toolset, developers can design routing solutions precisely tailored to the unique requirements of their projects.
As you advance your Angular expertise, continue exploring its routing configuration and advanced features to unlock the framework's full potential. A deep understanding of routing empowers you to construct increasingly sophisticated, user-centric applications and marks you as a well-rounded developer in the fast-paced world of web development.