Automating the deployment of an Angular application to AWS S3 becomes straightforward when you set up a pipeline using AWS CodePipeline. This approach establishes a continuous integration and continuous delivery (CI/CD) workflow for your Angular project. If these AWS services are unfamiliar, here is a quick overview.
Understanding AWS CodePipeline
AWS CodePipeline is a fully managed continuous delivery service designed to automate your release pipelines, ensuring fast and reliable application updates. Additional details are available here.
Understanding AWS S3
Amazon Simple Storage Service (Amazon S3) is an object storage solution that provides high scalability, data availability, security, and performance. Additional details are available here.
Since this article centers on deployment automation, a deeper dive into these AWS services is out of scope. Instead, let's move directly into the practical steps involved.
1) Setting Up an Angular Project
In many cases, you will already have a project ready for deployment. However, if you want to experiment from scratch, you can create a new one using the command prompt:
ng new angular-aws-app
Replace angular-aws-app with your desired application name.
Once the project is created successfully, head over to github.com, create a new repository for your app, and push the initial code to the master branch.
2) Creating a Pipeline on AWS CodePipeline
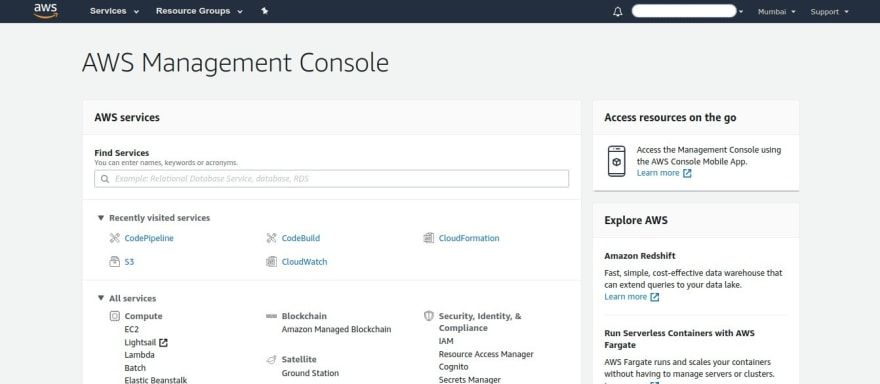
aws management console
After your code is on GitHub, the next step is building an automated process to deploy that code from the repository to Amazon S3. This requires an AWS account to access the services. You can sign up for a free tier account which is valid for 365 days. Once your account is ready, you will land on the AWS dashboard console.
Search for code pipeline in the console, open the service, and navigate to pipelines in the sidebar to initiate a new pipeline. A prominent orange button in the top right corner will allow you to start the creation process.
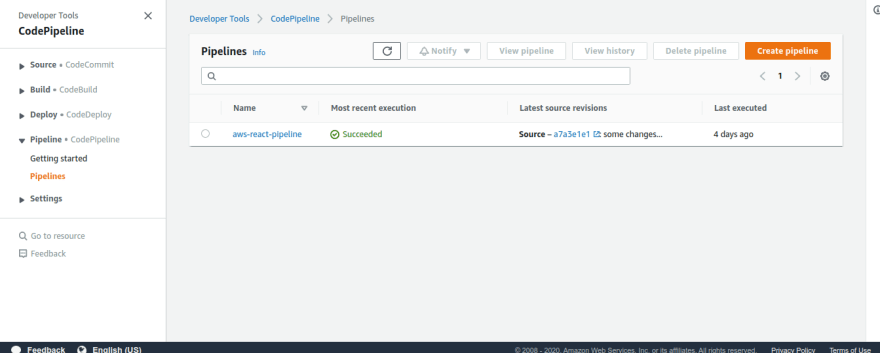
aws codepipeline tools
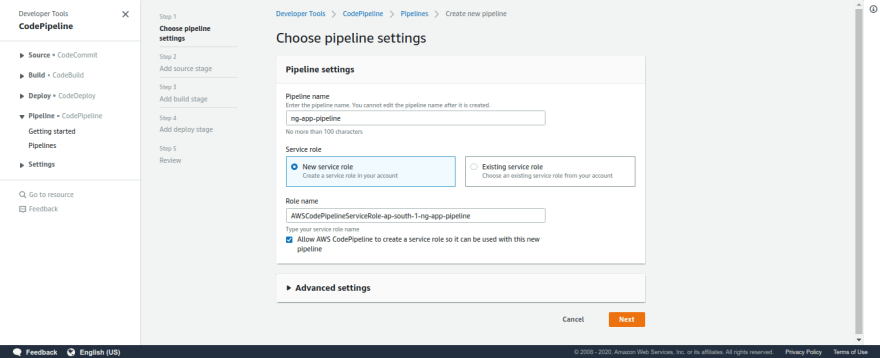
Start by naming your pipeline ng-app-pipeline. For the service role, choose New Service Role since this is a fresh pipeline setup. After configuring these details, proceed by clicking next.
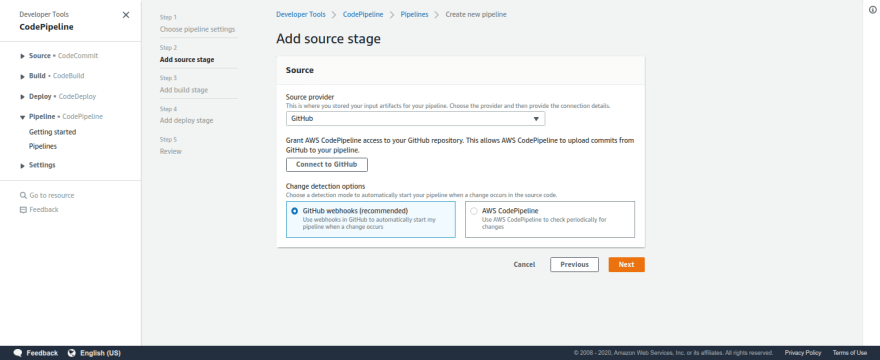
The second step requires you to specify your source control provider where your code resides. Since the code is on GitHub, select Github. After choosing it, click the Connect to Github button to link your repository and choose the production branch, typically master. Click next to continue.
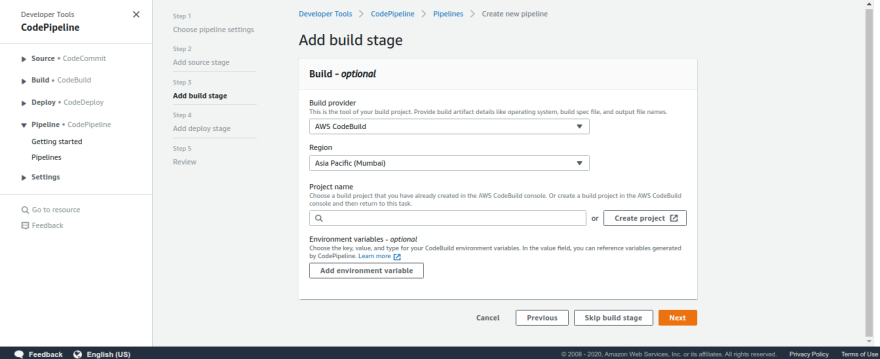
In the Add Build Stage step, you need to select a service to handle the building process. Here, AWS CodeBuild is selected as the build service; alternatively, Jenkins is available if that's your preference. Choose your region and create a new build project. A new window will appear where you can define the build project's details.
Project Configuration
Enter a name for your build project. Feel free to use any name you like.
Environment Settings
Choose the following options:
operating system: ubuntu,
Runtime: Standard,
Image: aws/codebuild/standard:1.0,
Image Version: always use latest image for this runtime version,
Click Continue to CodePipeline to finalize the build project. Once it's created successfully, move to the deployment stage by clicking next.
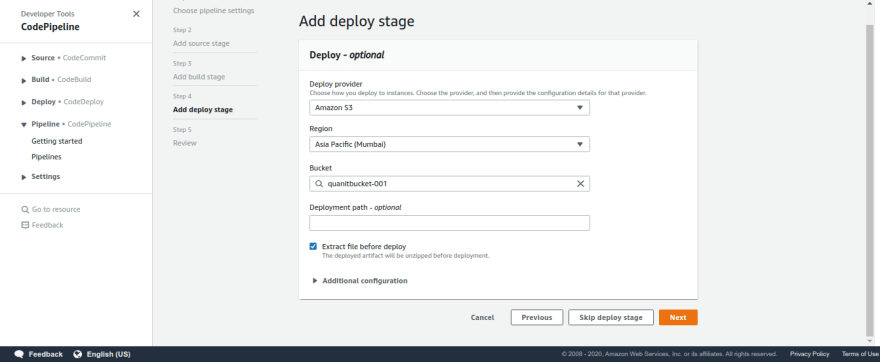
For the deploy step, select s3 as your deploy provider since the app will be hosted on AWS S3. Ensure you choose your preferred region. For the bucket, you can either create a new one or pick an existing bucket for hosting the build output. Make sure to check Extract file before deploy, as the build process generates archived files that need to be extracted before being stored in S3. After making these choices, click next to review all previously configured settings.
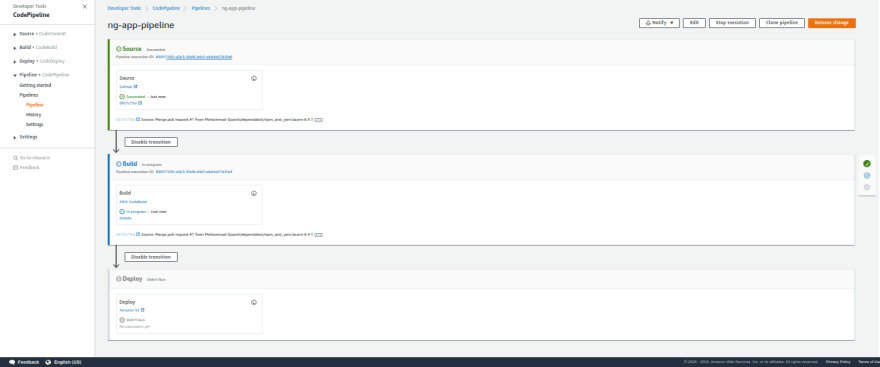
After reviewing the configuration, click the create pipeline button. You'll then see your pipeline stages for source, build, and deployment.
Setting Up Buildspec.yaml
So far, we've configured the automation flow within the AWS CodePipeline service. Now, it's crucial to create a buildspec.yaml file in the root directory of your Angular project. This file plays a vital role in continuous integration; the commands in it must be accurate, or the build process will fail.
Here's an example of what a buildspec.yaml file might look like:
version: 0.1

phases:
  install:
    commands:
      - echo installing nodejs...
      - curl -sL https://deb.nodesource.com/setup_12.x | bash -
      - apt-get install -y nodejs
      - echo installing yarn...
      - curl -sS https://dl.yarnpkg.com/debian/pubkey.gpg | apt-key add -
      - echo "deb https://dl.yarnpkg.com/debian/ stable main" | tee /etc/apt/sources.list.d/yarn.list
      - apt install --no-install-recommends yarn
  pre_build:
    commands:
      - echo installing dependencies...
      - npm i -g @angular/cli
      - npm install
  build:
    commands:
      # - echo testing...
      # - echo building...
      - ng build --prod
artifacts:
  files:
    - "**/*"
  discard-paths: no
  base-directory: dist/your-app-name
Buildspec.yaml organizes its execution into various phases. The phases section starts with commands to set up nodejs and yarn. Let's break down each command.
1) curl -sL https://deb.nodesource.com/setup_12.x | bash –
This command fetches the node.js version 12 installation script and runs it within the ubuntu container, which serves as the environment for building our app.
2) apt-get install -y nodejs
For those familiar with ubuntu, apt-get is a package manager. This command installs node.js in the container using the script downloaded previously.
3) curl -sS https://dl.yarnpkg.com/debian/pubkey.gpg | apt-key add –
This step downloads the GPG key for the yarn package manager. While not strictly necessary, yarn is often preferred over npm for its speed and reliability.
4) apt install –no-install-recommends yarn
This command installs the yarn package manager itself.
Next is the Pre-Build section, which handles project dependencies:
4) npm i -g @angular/cli
This globally installs the Angular CLI, enabling the use of ng build to create builds. This is essential; without it, the build process won't work.
5) npm install
This installs all dependencies defined in your project's package.json, which are necessary for the app to run.
Following that is the build section for generating the project build:
6) ng build –prod
This command generates the production build of the Angular application.
Finally, the artifacts section defines where the build output is located:
7) files "*/"
This pattern grabs all build-generated files so they can be uploaded to AWS S3 for hosting.
8) base-directory: dist/your-app-name
This specifies the directory containing the build files.
Once you've created the buildspec.yaml file in the root folder, push your changes to the repository's master branch. The pipeline will automatically fetch the source, run the build, and deploy the output to S3.

As shown in the image, the pipeline will initiate the build process. You can monitor its logs by clicking the details button.
Once everything runs smoothly, navigate to the S3 service in the AWS console and locate your bucket. Inside, you will find your build files. In the Properties tab, click on the static website hosting card. Select Use this bucket to host a website, enter index.html for both the index and error document fields, then save. AWS will provide an endpoint URL for your application. Open it in a new tab, and your site is now live on AWS S3.
To test the workflow, introduce some changes in your code, and push them to the master branch. After the build and deploy stages complete, your live app will reflect the latest updates.
That's the complete process for automating your Angular app deployment. For what it's worth, this method works similarly for react, vue, or any other framework — you only need to tweak the buildspec.yaml scripts to match your specific setup.
I hope you found these steps insightful.