Getting Started
Most applications we build today require a user-facing interface as well as a server-side component that processes incoming requests. There are countless approaches to structuring such projects, but the more integrated your setup, the more streamlined your development workflow tends to be. You might keep the frontend in one repository and the backend in another — a pattern we use regularly at my organization, and one that brings clear advantages in terms of coordination between teams. That said, I've come to appreciate the simplicity of having both applications housed in a single repository, where they can share relevant code with minimal friction.
This guide walks through a practical example using Angular on the frontend, NestJS on the backend, and Nx as the build orchestrator. You'll get a firsthand look at what happens when the two applications live side by side and how code reuse becomes a natural part of the workflow.
Before diving in, ensure that Node and Nx are installed on your machine — both are essential for this project. Additionally, installing the Nx Console extension for VS Code is highly recommended, as it provides a convenient graphical interface for generating and managing the various pieces of your Angular and NestJS applications.
Workspace Setup
With the prerequisites in place, it's time to scaffold the workspace. A few different routes exist here, but the approach we've settled on involves creating the NestJS API first, then layering the Angular application on top.
Generating the API
Nx ships with a variety of starters for new workspaces. As mentioned, there's more than one valid path, but the method we'll highlight starts by scaffolding the workspace around a NestJS app. The command to do this is:
npx create-nx-workspace@latest workspace-name
The
workspace-nameyou provide will become both the folder on disk and the workspace identifier. To avoid confusion, it's wise to pick something distinct from your app names — for a scheduling tool from Acme Corp, for instance, something likeacme-scheduling-workspacekeeps things clear. The choice is entirely yours, though.
Once the command runs, the terminal will present a series of prompts. When asked about the backend type, choose "Node." From there, you'll pick a framework — while any option is viable, NestJS is our selection for this demonstration. Nest is a TypeScript-native Node framework that feels immediately familiar to Angular developers. Its default runtime is Node, but Fastify is available if you prefer it. The next prompt asks whether you want an integrated monorepo or a standalone project; your choice determines how Nx structures the workspace. If you anticipate housing multiple apps (Node, Angular, React, etc.) together, "Integrated Monorepo" is the right call, and it's what we'll use here. Then, name the API project "api" for this example. The final prompts ask about a Dockerfile and Nx caching — neither figures into this guide, so your selections there are unimportant.
After you answer everything, Nx scaffolds the workspace and installs dependencies. When it finishes, navigate into the newly created directory. Your api lives under apps, and you can launch it with nx serve api. With the workspace and backend ready, we'll bring Angular into the mix.
Adding Angular and an Angular App
To generate an Angular application, you first need to install Nx's Angular tooling. A single npm command does the trick: npm i -D @nx/angular. This adds @nx/angular to your dev dependencies. Once that completes, open the Nx Console extension to create the Angular app.
Click the Nx logo in the VS Code sidebar to bring up the Nx Console panel.

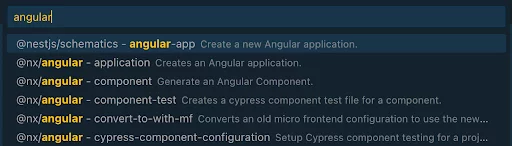
Within that panel, you'll find a section labeled "Generate and Run Target," where you can select generate. Doing so opens a search menu at the top of VS Code. Type "angular" to filter the options, then look for the entry labelled "@nx/angular – application." This triggers Nx's generator to scaffold an Angular app.
A configuration screen appears with numerous choices for shaping your Angular app. Each option comes with a description, but here are the ones I typically pick:
- Name. Our frontend needs a name — for this demo, I chose frontend.
- Bundler. As of this writing, you can opt for esbuild or webpack. I went with esbuild, which has been the default since v17.
- Routing. Almost every app needs routing, and this was pre-enabled for me. I kept it.
- Standalone. This too was preselected.
- projectNameAndRootFormat. I tend to change this from as-provided to derived. It's a minor tweak, but I find the resulting generated names for apps and libraries stay more distinct.
- Directory. Confirm that the app lands in apps; the dry run output in the VS Code console lets you verify this.
- e2eTestRunner. Cypress is the default, though you can switch to Playwright or disable it entirely.
- addTailwind. Choose this if Tailwind is on your roadmap; it installs the necessary packages and creates a config file.
- Style. Pick the file extension for your app's stylesheets.
When you've made your selections, hit the generate button at the top. Along with the new Angular app, an e2e project is generated unless you opted out of an e2e runner.
The workspace now contains both our API and our Angular app, ready to serve as the foundation for a full-stack application.
Libraries in an Nx Workspace
Nx has strong opinions about application structure. In a standard Angular project, features are split into modules; Nx takes a similar stance, but each feature module becomes a library instead. These libraries typically fall into four categories — feature, util, ui, and data-access — though your specific needs might warrant more. On top of that, libraries are scoped by app, with shared items living in a common folder when they're used by multiple apps in the workspace.
This post won't dive deeper into the rationale behind workspace organization, but I'll touch on where libraries get created and why I put them there. For a deeper look, check out the Nx docs.
Why an Integrated Monorepo Pays Off
Type Safety Across the Stack
With our integrated monorepo in place — API and Angular app side by side — we can start layering in features. As we do, the need for typed contracts becomes obvious. This is where co-locating the apps shines. In separate repos, keeping interfaces and classes in sync across boundaries is a chore, and drift often creeps in. Here, that pain vanishes.
Let's begin by creating a shared-scope library for interfaces, types, enums, and classes. Use the Nx Console extension again — open the generate UI and select @nx/js - library. Since nothing Angular-specific is needed here, a plain JS library suffices. Name it something intuitive, like "models" or "interfaces." I went with "models" for this demo. Specify a unit test runner and a directory for the library.
From our experience, the ideal layout puts all libraries under a
libsfolder at the workspace root, organized by scope. So you'd have an api folder for backend libs, a frontend folder for the Angular app's libs, and a shared folder for anything used across both.
Once the library exists, you can start defining the types and models your app needs, whether those are shared between frontend and backend or local to one side. Often, these are straightforward TypeScript interfaces, enums, or constants. Don't forget to export them from the library's index.ts so other libraries can reference them. I've adopted a convention from the .NET world and prefix interfaces with "I" to make them easy to spot across the codebase.
Because these interfaces are shared, updates become trivial. Renaming a property? Use the "Rename Symbol" feature in VS Code, and the change propagates to every usage across the app. Adding a required field? A quick search for all references lets you update each location methodically. The upshot: your interfaces stay aligned between the backend and frontend without extra overhead.
Entities and DTOs
NestJS apps frequently connect to a database, and TypeORM is a common choice for handling those interactions. The types you've shared will prove just as useful for DTOs and entities.
Take creating a new entity. You can have it implement the shared interface, which forces you to include every field the interface declares. Later, if you extend the interface, TypeScript will immediately flag that your entity is missing the new property.
DTOs benefit similarly, but you can pair the interface with TypeScript utility types to customize them. This is particularly handy for "create" operations. Consider a CreatePersonDto implementing the IPerson interface:
export class CreatePersonDto implements Omit<IPerson, 'id'> {
  @ApiProperty({ description: "The person's first name" })
  @IsString()
  readonly firstName!: string;

  @ApiProperty({ description: "The person's last name" })
  @IsString()
  readonly lastName!: string;

  @ApiProperty({ description: "The person's email address" })
  @IsString()
  @IsEmail()
  readonly emailAddress!: string;

  @ApiProperty({ description: "The person's email address" })
  @IsString()
  readonly type!: PersonType;
}
The first line brings in the IPerson interface, but the Omit utility type removes the need to supply an ID. That's logical — when creating a person, there's no ID yet, so there's no reason to require it.
Shared Utility Functions
Occasionally, your apps need to share utility functions between client and server. With separate repositories, you'd duplicate those functions and then remember to update both copies with every change. On an integrated monorepo, that utility is written once and invoked wherever needed; modifications propagate with a single edit.
To house those shared utilities, create a util library in the shared scope and export the functions from it.
Launching Your Apps
Deploying from an Nx workspace is a smooth experience. A host of services automate deployment on merge to your main branch, and with both frontend and backend living in the same repo, you never have to worry about shipping one without the other — they deploy in lockstep.
Serving the NestJS App
At heart, a NestJS app is just a node app, so it can run on practically any host. Render.com is a strong candidate, though. You can wire it to deploy automatically on pushes to main, and its generous free tier is more than enough to get started — there's no reason to pay while you're still experimenting.
Render also hosts Postgres databases, which is a convenient pairing. That same free tier applies to database hosting, too. In a recent project, I had the database and Nest app up and running within thirty minutes. It's been live for roughly a month as I write this, and my bill is still zero — we'll start paying once we're ready for a real launch.
Serving the Angular App
Angular apps have plenty of hosting options, but Netlify has long been a favourite of mine. It's straightforward to configure, comes with a generous free tier, and offers deep customization. Connect the GitHub repo and it builds on pushes to main, plus you get automatic deploy previews for pull requests. Adding form handling and analytics is also relatively painless.
Wrapping Up
Keeping both the server and the client within a single repository eliminates a host of issues that arise when they are split across different projects. Shared code becomes easier to reuse, and version alignment between the two layers is far less of a headache. Nx turns out to be an excellent fit for organizing such a workspace, while NestJS and Angular complement each other beautifully for building full-stack solutions.