
Understanding the Deferrable Views Testing Approach
The deferrable views, also known as the @defer block, represent an Angular feature that enables declarative lazy loading of specific HTML segments. With this mechanism, we can designate which portion of our component tree should reside in a separate chunk and be loaded lazily based on a particular trigger. For a deeper exploration of deferrable views, you might find this resource quite helpful.
Before we begin examining the testing methodology for deferrable views, it’s essential to grasp how these views can be loaded in various scenarios.
Deferrable views can be triggered through multiple mechanisms, some necessitating user interaction while others operate automatically without any direct user involvement.
The following table outlines these variations:
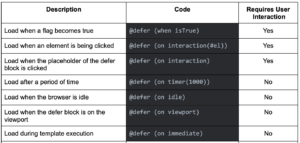
Q1: Why is distinguishing between user-interaction-dependent and independent triggers crucial?
A1: When a trigger requires user interaction, writing our unit test becomes quite straightforward. We simply replicate that particular action and then verify the expected outcome.
Q2: What approach should we take for scenarios that don't involve user interaction?
A2: A common suggestion might be to mock the underlying implementation, as this is typical practice in unit testing. However, mocking the requestIdleCallback (which powers the idle trigger) and the IntersectionObserver (which drives the viewport trigger) presents considerable difficulty.
Q3: Is there an alternative to mocking these native browser APIs?
A3: Angular provides a dedicated test harness that allows us to explicitly dictate which part of the deferrable view should be rendered during testing.
Introducing the Test Harness
By “Test Harness,” we refer to the testing API designed to facilitate component testing. It offers a structured way to interact with components and validate their behavior within a testing environment. For a comprehensive understanding, I recommend watching Mateusz Stefańczyk's presentation, "Testing with component harnesses" – Mateusz Stefańczyk | #8 Angular Meetup
When working with deferrable views, there are two testing behaviors available:
- Manual
This option grants us the ability to choose which defer block gets loaded and determine its specific state. - Playthrough
This behavior is the default, simulating how the code would execute in a real browser environment.
The behavior is set within the configureTestingModule as follows:
TestBed.configureTestingModule({
   deferBlockBehavior: DeferBlockBehavior.Manual,
});
Beyond selecting the behavior, we also have the capability to specify which state should be rendered. The available states are defined in this enum:
export declare enum ɵDeferBlockState {
    /** The placeholder block content is rendered */
    Placeholder = 0,
    /** The loading block content is rendered */
    Loading = 1,
    /** The main content block content is rendered */
    Complete = 2,
    /** The error block content is rendered */
    Error = 3
}
While the Playthrough mode is quite clear, the Manual mode might require a bit more explanation.
In the Manual mode, we explicitly identify the defer block we want to target and choose the state to render. For instance, let's consider needing to render the second defer block in the example below.
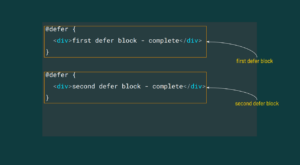
The necessary code would look like this:
// Get the second defer block fixture
const deferBlock = (await fixture.getDeferBlocks())[1]; //note the index number

// Render the complete state
await deferBlock.render(DeferBlockState.Complete);
Now, let's explore the various states:
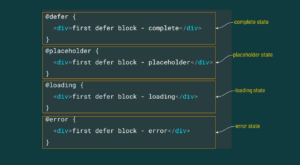
If our goal is to render the loading state, the code becomes:
// Get the second defer block fixture
const deferBlock = (await fixture.getDeferBlocks())[1]; //note the index number

// Render the loading state
await deferBlock.render(ɵDeferBlockState.Loading);
Now that we have a solid understanding of the defer block testing tools, let's dive into the unit testing of each trigger.
Testing Trigger Points
Across all our unit tests, we will load the following component:
Lazy Component:
@Component({
  selector: 'app-lazy',
  standalone: true,
  template: ` <p>lazy works!</p> `,
})
export class LazyComponent {}
When (Playthrough)
Since the "when" feature relies on user action, we’ll use the Playthrough option. This is actually the pre-configured default, so specifying it in the configureTestingModule is unnecessary!
Let's assume the component we want to test is structured as follows:
Dummy Component for testing:
@Component({
    selector: 'app-root',
    template: `
      <button data-test="button--isVisible"
              (click)="isVisible = !isVisible">
        Toggle
      </button>

      @defer (when isVisible) {
        <app-lazy />
      }
      ,
    `,
    standalone: true,
    imports: [LazyComponent],
  })
  class DummyComponent {
    isVisible = false;
  }
To trigger the loading of <app-lazy/>, we must first click the button and then proceed with our assertions.
Here's the corresponding unit test:
it('should render the defer block on button click, fakeAsync(() => {
    // Arrange
    TestBed.configureTestingModule({
      deferBlockBehavior: DeferBlockBehavior.Playthrough,
    });

    fixture = TestBed.createComponent(DummyComponent);

    const button = fixture.debugElement.query(
      By.css('[data-test="button--isVisible"]'),
    );

    // Act
    button.triggerEventHandler('click', null);
    fixture.detectChanges();
    tick();

    // Assert
    expect(fixture.nativeElement.innerHTML).toContain('lazy works!');
  }));
on interaction – explicit (Playthrough)
As "on interaction" requires user interaction, we'll adopt the Playthrough behavior.
> “Explicit interaction” refers to the need to deliberately interact with a specific element to load the deferrable view.
Consider the template we need to test:
<button #toggleButton data-test="button--isVisible">Toggle</button>

@defer (on interaction(toggleButton)) {
    <app-lazy />
}
To load the <app-lazy/>, we should start by clicking the button, followed by our assertions.
The unit test appears as:
it('should render the defer block on explicit interaction', fakeAsync(() => {
    // Arrange
    TestBed.configureTestingModule({
      deferBlockBehavior: DeferBlockBehavior.Playthrough,
    });

    fixture = TestBed.createComponent(DummyComponent);

    const button = fixture.debugElement.query(
      By.css('[data-test="button--isVisible"]'),
    );

    // Act
    button.nativeElement.click();
    fixture.detectChanges();
    tick();

    // Assert
    expect(fixture.nativeElement.innerHTML).toContain('lazy works!');
  }));
Note: In this test, we avoid using the triggerEventHandler method because the native element lacks an event handler for the click event.
on interaction – implicit (Playthrough)
Since "on interaction" mandates user interaction, the Playthrough behavior is our choice.
> “Implicit interaction” means we must interact with the deferrable view itself to initiate loading.
Assume the template under test is as follows:
@defer (on interaction) {
    <app-lazy />
} @placeholder {
    <div data-test="el--placeholder">
        click here to load the complete state
    </div>
}
To load <app-lazy/>, the first step is to interact (click) with the placeholder, then we can assert.
Here is the unit test:
it('should render the defer block on implicit interaction', fakeAsync(() => {
    // Arrange
    TestBed.configureTestingModule({
      deferBlockBehavior: DeferBlockBehavior.Playthrough,
    });

    fixture = TestBed.createComponent(DummyComponent);

    const placeholderElement = fixture.debugElement.query(
      By.css('[data-test="el--placeholder"]'),
    );

    // Act
    placeholderElement.nativeElement.click();
    fixture.detectChanges();
    tick();

    // Assert
    expect(fixture.nativeElement.innerHTML).toContain('lazy works!');
  }));
on timer (Playthrough)
The "on timer" feature doesn't rely on user interaction, but because it uses setTimeout under the hood, we'll employ the Playthrough behavior.
Suppose the template under test is:
@defer (on timer(1000)) {
  <app-lazy />
}
The unit test is:
 it('should render the defer block on timer', fakeAsync(() => {
    // Arrange
    TestBed.configureTestingModule({
      deferBlockBehavior: DeferBlockBehavior.Playthrough,
    });

    fixture = TestBed.createComponent(DummyComponent);

    // Act
    fixture.detectChanges();
    tick(1000);

    // Assert
    expect(fixture.nativeElement.innerHTML).toContain('lazy works!');
  }));
Observe that we wait (tick(1000)) for a duration matching the delay specified in timer(1000).
default (Manual)
By default, content loads during system idle periods. Therefore, using @defer without a trigger is synonymous with @defer (on idle). The "on idle" mechanism depends on requestIdleCallback, which can be quite challenging to test in isolation. This is precisely why we opt for the Manual testing behavior. We'll cover how to render each distinct state in a moment.
Let's assume the template we need to test is:
@defer {
  <app-lazy />
} @placeholder {
  <div>Placeholder text</div>
} @loading {
  <div>Loading text</div>
} @error {
  <div>Error text</div>
}
Load the placeholder state and write the test:
  it('should render the defer block on idle - placeholder', async () => {
    // Arrange
    TestBed.configureTestingModule({
      deferBlockBehavior: DeferBlockBehavior.Manual,
    });

    fixture = TestBed.createComponent(DummyComponent);

    // Assert
    expect(fixture.nativeElement.innerHTML).toContain('Placeholder text');
  });
Note: For the placeholder state, specifying the intended state is unnecessary because the placeholder is rendered by default.
Load the loading state and write the test:
it('should render the defer block on idle - loading', async () => {
    // Arrange
    TestBed.configureTestingModule({
      deferBlockBehavior: DeferBlockBehavior.Manual,
    });

    fixture = TestBed.createComponent(DummyComponent);

    // Act
    const firstDeferBlock = (await fixture.getDeferBlocks())[0];
    await firstDeferBlock.render(ɵDeferBlockState.Loading);

    // Assert
    expect(fixture.nativeElement.innerHTML).toContain('Loading text');
  });
Load the error state and write the test:
it('should render the defer block on idle - error', async () => {
    // Arrange
    TestBed.configureTestingModule({
      deferBlockBehavior: DeferBlockBehavior.Manual,
    });

    fixture = TestBed.createComponent(DummyComponent);

    // Act
    const firstDeferBlock = (await fixture.getDeferBlocks())[0];
    await firstDeferBlock.render(ɵDeferBlockState.Error);

    // Assert
    expect(fixture.nativeElement.innerHTML).toContain('Error text');
  });
Load the complete state and write the test:
  it('should render the defer block on idle - complete', async () => {
    // Arrange
    TestBed.configureTestingModule({
      deferBlockBehavior: DeferBlockBehavior.Manual,
    });

    fixture = TestBed.createComponent(DummyComponent);

    // Act
    const firstDeferBlock = (await fixture.getDeferBlocks())[0];
    await firstDeferBlock.render(ɵDeferBlockState.Complete);

    // Assert
    expect(fixture.nativeElement.innerHTML).toContain('lazy works!');
  });
on viewport (Manual)
> This is similar to the idle case.
The "on viewport" trigger is built on the intersectionObserver API, which is difficult to mock directly, hence we rely on the Manual behavior.
Let's assume the template we need to test is:
@defer (on viewport) {
  <app-lazy />
} @placeholder {
  <div>on viewport the complete state will be loaded</div>
}
The corresponding unit test is:
  it('should render the defer block on viewport', async () => {
    // Arrange
    TestBed.configureTestingModule({
      deferBlockBehavior: DeferBlockBehavior.Manual,
    });

    fixture = TestBed.createComponent(DummyComponent);

    // Act
    const firstDeferBlock = (await fixture.getDeferBlocks())[0];
    await firstDeferBlock.render(ɵDeferBlockState.Complete);

    // Assert
    expect(fixture.nativeElement.innerHTML).toContain('lazy works!');
  });
on immediate (Manual)
> This is also similar to the viewport case.
Let's assume the template we need to test is:
@defer (on immediate) {
  <app-lazy />
}
The unit test becomes:
 it('should render the defer block on immediate', async () => {
    // Arrange
    TestBed.configureTestingModule({
      deferBlockBehavior: DeferBlockBehavior.Manual,
    });

    fixture = TestBed.createComponent(DummyComponent);

    // Act
    const firstDeferBlock = (await fixture.getDeferBlocks())[0];
    await firstDeferBlock.render(ɵDeferBlockState.Complete);

    // Assert
    expect(fixture.nativeElement.innerHTML).toContain('lazy works!');
  });
on immediate with nested blocks
Let's break down the testing process for nested blocks. Imagine a nested block residing within another block, similar to a box inside a box.
To test the inner box, we must first construct the outer box. After that, we can proceed to build the inner one.
In this illustration, the "nested defer block" is situated within a larger block. So, to test it, we must first render the entire outer block, and then render the nested inner block.
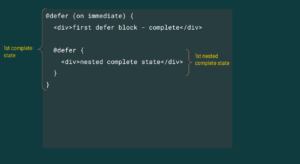
Let's assume the template we need to test is:
@defer (on immediate) {
  <app-lazy />

  @defer {
    <div>nested complete state</div>
  }
}
The unit test appears as:
it('should render the nested defer block', async () => {
    // Arrange
    TestBed.configureTestingModule({
      deferBlockBehavior: DeferBlockBehavior.Manual,
    });

    fixture = TestBed.createComponent(DummyComponent);

    // Act
    const firstDeferBlock = (await fixture.getDeferBlocks())[0];
    await firstDeferBlock.render(ɵDeferBlockState.Complete);

    const secondDeferBLock = (await firstDeferBlock.getDeferBlocks())[0];
    await secondDeferBLock.render(ɵDeferBlockState.Complete);

    // Assert
    expect(fixture.nativeElement.innerHTML).toContain('nested complete state');
  });
Let's analyze this code. First, we render the outer defer block (firstDeferBlock). Then, we access all the inner defer blocks associated with it (firstDeferBlock.getDeferBlocks).
Concluding Thoughts
Angular's approach to testing defer blocks is notably effective, primarily due to the test harness provided by the Angular team. However, there is one limitation: currently, you must specify which defer block to test by providing its index number. This requirement can lead to unexpected test failures if you later add more defer blocks to your template, thereby shifting the indices.
Fortunately, the Angular team is mindful of this constraint, and upcoming releases will introduce more flexible mechanisms for writing defer block tests.
I appreciate you taking the time to read this article! 🙂