Reviewing What We Have So Far
In the first installment of this series, we set up a workspace with the Angular CLI and generated a library named example-ng6-lib. That gave us two distinct projects inside the workspace:
- A library project under
projects/example-ng6-lib - A conventional application project under
src/app
We then imported the library into that application and verified it worked with a fresh component we added.
The code from that earlier article is available in the GitHub repository t-palmer/example-ng6-lib so you can follow along easily.
Building the Library
To streamline the workflow, let's add a convenience script for building the library. Edit the root package.json and introduce a build_lib script:
"scripts": {
  ...
  "build_lib": "ng build example-ng6-lib",
  ...
},
With this in place, running npm run build_lib will generate the library output in a folder named example-ng6-lib within the dist directory of the workspace.
After that, you can build the main application with ng build, which will create an example-ng6-lib-app folder in the same dist directory.
Understanding All Those package.json Files
“Hold on, more package.json files?”
Yes, it can feel like they are multiplying. Once the library is built, there are at least three of them floating around the workspace. Let's take a moment to clarify what each one does.
The Root package.json
This file is the central manifest for the entire workspace. It lists all the dependencies required by both the application and the library. Any package needed to run or build either part of the project belongs here.
It's also the file that npm install updates when you add a new package during development.
The Library Project's package.json
Situated in the projects\example-ng6-lib directory, this file instructs ng-packagr on what content should go into the package.json that is eventually published alongside our library. Three fields are particularly vital:
- name
Unsurprisingly, this is the library's identifier. When someone imports a module from it later, this is the string that appears in thefromclause, for instance:
import { ExampleNg6LibModule } from 'example-ng6-lib'; - version
The version number lets users track updates and ensure they are on the latest release. It’s standard practice to follow semantic versioning for packages distributed through npm. - dependencies
Only the packages required for the library to function are listed here. You'll finddependenciesandpeerDependencies, but notdevDependencies, which are reserved for development tooling.
You’ll also want to populate the usual npm metadata, such as license, author, and repository.
A key note: when you run npm install, packages are only recorded in the root package.json. They will not automatically appear in the library project’s file. If your library code relies on a new package, you'll have to add it to this file manually. A future article will dive deeper into the nuances of dependencies versus peerDependencies.
The Distribution package.json
When the library is built, ng-packagr creates a new package.json inside dist\example-ng6-lib. This is the distribution file that ships with the library. Consumers who install the library will have npm consult this file to figure out what other packages need to be pulled in.
Since this file is automatically generated, you should never edit it directly. Any adjustments must be made to the library project's package.json in the projects\example-ng6-lib folder. ng-packagr reads that source file and uses it as a blueprint for the distribution version.
REMEMBER: Never directly modify the library distribution package.json.
Packaging the Library
Packaging takes the distribution files and bundles them into a single tgz archive, which can be shared manually or published to npm.
Let's add a script to the root package.json that uses npm pack to handle this:
"scripts": {
  ...
  "npm_pack": "cd dist/example-ng6-lib && npm pack",
  ...
},
Now you can run npm run npm_pack to package the library. This script navigates to the library's dist folder and executes npm pack, producing a file named something like example-ng6-lib-0.0.1.tgz.
To avoid repetitive tasks, I prefer to create a single script that performs both building and packaging. Add this to the scripts object in package.json:
"package": "npm run build_lib && npm run npm_pack"
After these additions, the relevant scripts in the root package.json should resemble this:
"scripts": {
  ...
  "build_lib": "ng build example-ng6-lib",
  "npm_pack": "cd dist/example-ng6-lib && npm pack",
  "package": "npm run build_lib && npm run npm_pack"
},
You can see that the package script first invokes build_lib, and only then runs npm_pack.
Make sure to build and package the library with:
npm run package
The package script accomplishes two tasks:
- Compiles the library into the
dist/example-ng6-libdirectory - Runs
npm packto create the npm package fileexample-ng6-lib-0.0.1.tgzin that same directory
It's important to note that simply compressing the dist folder into a tgz archive won't produce a valid npm package.
ALWAYS: Use npm pack to create the tgz file.
Consuming the Library in a Fresh Application
With the build and packaging process covered, let's set up another workspace to experience what it's like for external developers to actually use the library.
Setting up a test workspace
Before creating a new workspace, make sure your current working directory is the parent of the example-ng6-lib workspace, not inside it. Then, use the Angular CLI to generate a new workspace as a sibling:
ng new lib-tester
cd lib-tester
ng serve
If you need to support Internet Explorer, check out the guide on Angular and Internet Explorer.
Opening http://localhost:4200/ will show the default Angular CLI welcome page, which is not particularly interesting to show again.
Installing the library
Now that we have the test application, we can install the library with npm install:
npm install ../example-ng6-lib/dist/example-ng6-lib/example-ng6-lib-0.0.1.tgz
After installation, inspect the package.json in the lib-tester workspace. You’ll see example-ng6-lib listed under dependencies. For instance:
"dependencies": {
  "@angular/animations": "^6.0.3",
  "@angular/common": "^6.0.3",
  "@angular/compiler": "^6.0.3",
  "@angular/core": "^6.0.3",
  "@angular/forms": "^6.0.3",
  "@angular/http": "^6.0.3",
  "@angular/platform-browser": "^6.0.3",
  "@angular/platform-browser-dynamic": "^6.0.3",
  "@angular/router": "^6.0.3",
  "core-js": "^2.5.4",
  "example-ng6-lib": "file:../example-ng6-lib/dist/example-ng6-lib/example-ng6-lib-0.0.1.tgz",
  "rxjs": "^6.0.0",
  "zone.js": "^0.8.26"
},
If you browse the node_modules directory, you'll find a folder named example-ng6-lib for the library.
WARNING: When I first started building libraries, I had just enough npm knowledge to be dangerous. I reasoned, “Why not just install the dist directory directly? It would be easier to pick up changes.” Unless you enjoy troubleshooting bizarre errors related to 3rd party imports, avoid this at all costs.
ALWAYS: Install the library’s .tgz package and NOT the directory.
Importing the library module
To utilize any components from the library, we need to add its module to our application's module. Two changes are required in src\app\app.module.ts:
- Import the
ExampleNg6LibModulewith the following statement:
import { ExampleNg6LibModule } from 'example-ng6-lib'; - Add
ExampleNg6LibModuleto theimportsarray in theAppModule. Your completedapp.module.tsshould match this:
import { BrowserModule } from '@angular/platform-browser';
import { NgModule } from '@angular/core';

import { AppComponent } from './app.component';
import { ExampleNg6LibModule } from 'example-ng6-lib';

@NgModule({
  declarations: [
    AppComponent
  ],
  imports: [
    BrowserModule,
    ExampleNg6LibModule
  ],
  providers: [],
  bootstrap: [AppComponent]
})
export class AppModule { }
Using a component from the library
Just as we did in the library's own demo application, we can now use the enl-foo component. In the lib-tester application, modify the HTML template for AppComponent to include the FooComponent. The updated app.component.html should look something like this:
<div style="text-align:center">
  <h1>
    Welcome to {{ title }}!
  </h1>
  <enl-foo></enl-foo>
</div>
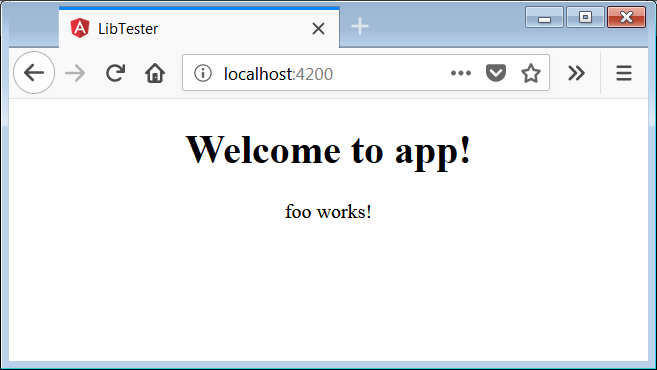
With these changes, pointing your browser to http://localhost:4200/ should correctly render the component from our library.
And that's all there is to it.
What Comes Next
In the next part, The Angular Library Series — Publishing, we'll address the finer points of publishing your library to the npm registry.