
Inside the Angular View Engine
Imagine you're asked to take a child component out of the DOM. Consider a parent component template that includes a child A component, which needs to be removed:
@Component({
  ...
  template: `
    <button (click)="remove()">Remove child component</button>
    <a-comp></a-comp>
  `
})
export class AppComponent {}
A flawed method to accomplish this is to manipulate the <a-comp> element directly using the Renderer or the native DOM API:
@Component({...})
export class AppComponent {
  ...
  remove() {
    this.renderer.removeChild(
       this.hostElement.nativeElement,      // parent App comp node
       this.childComps.first.nativeElement  // child A comp node
     );
  }
}
The complete solution can be found here. After the node is removed, inspecting the rendered HTML in the Elements panel shows that the child A component is gone from the DOM:
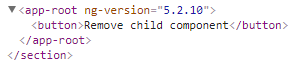
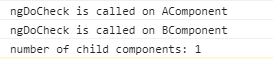
Yet, when you check the console, Angular still indicates that the number of child components is 1, not 0. More critically, change detection continues to execute for the child A component and its descendants. The console logs below demonstrate this:
The underlying reason
This behavior occurs because Angular represents a component internally as a data structure known as a View or Component View. The following diagram illustrates the connection between a view and its corresponding DOM:
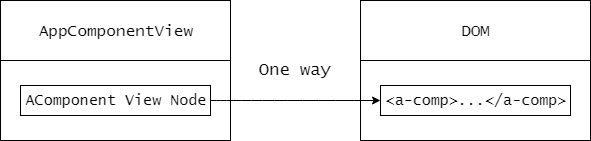
Every view is composed of view nodes that maintain references to their associated DOM elements. When the DOM is modified directly, the view node within the view—which points to that specific DOM element—remains untouched. Below is a diagram showing the state of the view and DOM after the A component's element is removed from the DOM:

Since operations like ViewChildren and change detection operate on the View rather than the DOM, Angular sees one view matching the A component and reports the count as 1 instead of the expected 0. Furthermore, because the view associated with the A component still exists, Angular runs change detection for that component and all of its children.
This illustrates that directly removing child components from the DOM isn't acceptable. In fact, you should steer clear of removing any HTML elements generated by the framework and only handle elements Angular isn't aware of—such as those created by your own code or a third-party plugin.
To handle this task properly, we need a tool that operates directly on views. In Angular, that tool is the View Container.
Understanding the View Container
A view container ensures safe modifications to the DOM hierarchy and is the mechanism behind all built-in structural directives in Angular. It functions as a unique type of View Node embedded within a View, serving as a holder for other views:
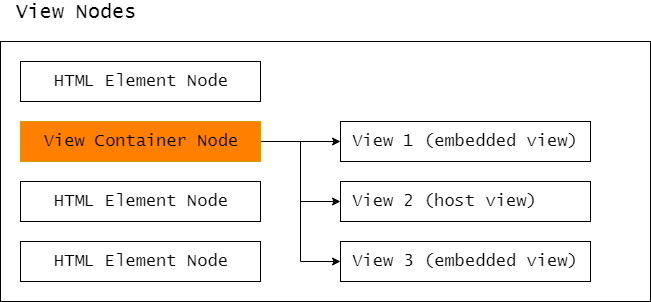
As depicted, it can contain two kinds of views: embedded views and host views.
These are the only view types present in Angular, and their primary difference lies in the input data used to generate them. Additionally, embedded views are exclusively attached to view containers, whereas host views can also be connected to any DOM element, commonly termed a host element.
Embedded views are generated from templates via TemplateRef, while host views are produced using a view (component) factory. For instance, the root component that bootstraps an app (AppComponent) is internally represented as a host view linked to the component's host element (<app-comp>).
The View Container offers an API for creating, controlling, and removing dynamic views. We label these as dynamic views to distinguish them from the static views the framework generates for components found in templates. Angular does not employ a View Container for static views; instead, it keeps a reference to the child view directly in the node specific to the child component. The diagram below clarifies this concept:
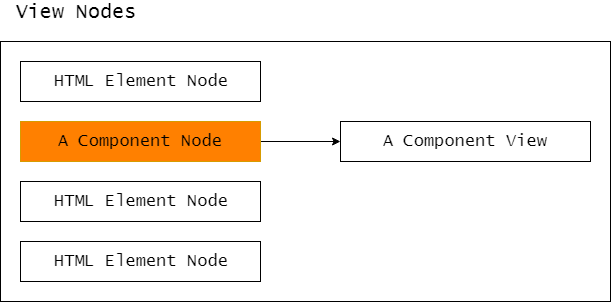
Notice the absence of a view container node here; the reference to the child view is linked directly to the A component's view node.
Controlling dynamic views
Prior to creating and attaching views to a view container, you must establish that container within a component's template and set it up. Any element inside a template has the potential to serve as a view container, but <ng-container> is the preferred choice because it renders as a comment node, thus avoiding any redundant elements in the DOM.
To designate an element as a view container, we employ the {read: ViewContainerRef} option in a view query:
@Component({
   …
   template: `<ng-container #vc></ng-container>`
})
export class AppComponent implements AfterViewChecked {
   @ViewChild('vc', {read: ViewContainerRef}) viewContainer: ViewContainerRef;
}
Once Angular processes the view query and assigns the view container reference to a class property, that reference can be utilized to generate a dynamic view.
Generating an embedded view
To generate an embedded view, you'll need a template. In Angular, the <ng-template> element encapsulates DOM elements to define a template's structure. Then, a view query with the {read: TemplateRef} parameter allows us to fetch the template reference:
@Component({
  ...
  template: `
    <ng-template #tpl>
        <!-- any HTML elements can go here -->
    </ng-template>
  `
})
export class AppComponent implements AfterViewChecked {
    @ViewChild('tpl', {read: TemplateRef}) tpl: TemplateRef<null>;
}
After Angular evaluates this query and assigns the template reference to a class property, we can leverage that reference to create and attach an embedded view to a view container, using the [createEmbeddedView](https://angular.io/api/core/ViewContainerRef#createEmbeddedView.) method:
@Component({ ... })
export class AppComponent implements AfterViewInit {
    ...
    ngAfterViewInit() {
        this.viewContainer.createEmbeddedView(this.tpl);
    }
}
Your logic should be implemented within the ngAfterViewInit lifecycle hook, as this is when view queries are initialized. Additionally, for embedded views, you have the option to define a context object containing values for bindings within the template. Consult the API documentation for further details.
A complete example of creating an embedded view is available here.
Generating a host view
To generate a host view, a component factory is necessary. For insights into factories and dynamic components, check out Here is what you need to know about dynamic components in Angular.
In Angular, the [componentFactoryResolver](https://angular.io/api/core/ComponentFactoryResolver) service is used to get a reference to a component factory:
@Component({ ... })
export class AppComponent implements AfterViewChecked {
  ...
  constructor(private r: ComponentFactoryResolver) {}
  ngAfterViewInit() {
    const factory = this.r.resolveComponentFactory(ComponentClass);
  }
 }
}
With the factory in hand, we can initialize the component, create the host view, and attach it to a view container. This is achieved by invoking the createComponent method with the component factory as an argument:
@Component({ ... })
export class AppComponent implements AfterViewChecked {
    ...
    ngAfterViewInit() {
        this.viewContainer.createComponent(this.factory);
    }
}
A full example of creating a host view is available here.
Eliminating a view
Any view attached to a view container can be eliminated using either the remove or detach methods. Both approaches detach a view from the view container and the DOM. However, while remove destroys the view, preventing re-attachment, detach keeps the view intact for future use—a crucial feature for the optimization strategies discussed next.
Consequently, the correct way to tackle the removal of a child component (or any DOM element) involves first creating either an embedded or a host view and attaching it to a view container. Once that's done, any available API method can be used to detach it from both the view container and the DOM.
Refining performance: optimization strategies
There are scenarios where you need to repeatedly show and hide the same component or template-defined HTML. In the following example, clicks on different buttons toggle which component is displayed:

If we apply the previously described approach directly with the following code:
@Component({...})
export class AppComponent {
  show(type) {
    ...
    // a view is destroyed
    this.viewContainer.clear();

    // a view is created and attached to a view container
    this.viewContainer.createComponent(factory);
  }
}
we encounter an undesirable outcome: each button click and show method invocation results in views being destroyed and recreated.
In this specific case, it's the host view that gets destroyed and recreated, given our use of a component factory and the createComponent method. If we had opted for the createEmbeddedView method with a TemplateRef, an embedded view would undergo the same destructive cycle:
show(type) {
    ...
    // a view is destroyed
    this.viewContainer.clear();

    // a view is created and attached to a view container
    this.viewContainer.createEmbeddedView(this.tpl);
}
Our goal should be to create a view once and simply reuse it thereafter. Fortunately, the view container API offers methods to attach an existing view and later remove it without destroying it.
Understanding ViewRef
Both ComponentFactory and TemplateRef include view creation methods. When you call a view container's createEmbeddedView or createComponent methods with the necessary input, it leverages these methods internally. The advantage is that we can invoke these methods ourselves to create an embedded or host view and capture a reference to it. In Angular, views are referenced via the ViewRef type and its subclasses.
Creating a host view for reuse
Here's how you use a component factory to create a host view and obtain its reference:
aComponentFactory = resolver.resolveComponentFactory(AComponent);
aComponentRef = aComponentFactory.create(this.injector);
view: ViewRef = aComponentRef.hostView;
For a host view, the view linked to a component is accessible through the ComponentRef returned by the create method, exposed via the hostView property.
Once the view is obtained, it can be attached to a view container using the insert method. The view you wish to hide can be removed and preserved with detach. Thus, the optimized solution for the component-toggling task looks like this:
showView2() {
    ...
    // Existing view 1 is removed from a view container and the DOM
    this.viewContainer.detach();
    // Existing view 2 is attached to a view container and the DOM
    this.viewContainer.insert(view);
}
Take note that we use detach rather than clear or remove to keep the view available for future reattachment. A full implementation is available here.
Creating an embedded view for reuse
When dealing with an embedded view based on a template, the createEmbeddedView method returns the view directly:
view1: ViewRef;
view2: ViewRef;
ngAfterViewInit() {
    this.view1 = this.t1.createEmbeddedView(null);
    this.view2 = this.t2.createEmbeddedView(null);
}
Following that, one view can be detached from the view container while another is reattached, mirroring the previous example. The full implementation is again accessible here.
It's worth noting that the view container's createEmbeddedView and createComponent methods also return a reference to the view they generate.