Have you ever built a new feature only to find that subsequent requirements forced you to modify components, adjust logic, or expand data structures? This is a common reality in agile workflows. Recognizing this from the start and designing with future extension in mind is crucial.
There is an important distinction between designing for extensibility and writing speculative code that isn't required yet. I advise against adding unnecessary code—future needs are unpredictable. The goal is to establish an architecture that simplifies future changes, regardless of how requirements shift.
This is why proper design decisions must come before coding. Take a step back, see the big picture, and avoid getting lost in details at first. Instead, focus on how components relate, what the data flow should look like, which classes are involved, and what each responsibility entails.
Design Patterns
When architecting a new feature, familiarity with common architectural templates—known as Design Patterns—is a major advantage. These are essentially proven guidelines that apply to many situations. It's worth investing time to learn them. You don't need to memorize everything right away; proficiency develops naturally with practice. Rather, consider your features and tasks through the lens of these patterns to see where they fit.
Crucial Design Points
Some points stand out as particularly important in my experience. When I plan architecture, I aim to resolve these before writing any code. Specifically, I consider:
- Which components, services, and other classes do I need? Can any existing ones be reused, or must I create new ones?
- What are the core responsibilities of these classes? Are they well-scoped?
- How does data flow between these classes, especially across components?
- What dependencies do the components have?
- Is my plan future-proof and open to extension? (similar to the "O" in SOLID)
Why Container-Presentation?
The pattern I'm going to walk you through is the Container-Presentation pattern, and it directly addresses all of the above questions. Why choose this one specifically? It’s a practical, almost daily tool in feature design. Many of you probably already apply it intuitively. I want to lay out its structure clearly, demonstrate how to implement it step by step, and show how it can be extended. Despite its popularity, a key part of this pattern is often skipped, and I’ll point this out and argue for including it in your own work.
Before we look at the architecture in detail, here are the main reasons you might find this pattern beneficial:
- it facilitates a flexible and extensible structure for component division
- the clear separation allows for tailored change strategies depending on the component type
- dependencies become limited and structured, making them far easier to manage – ideally, some components end up with no dependencies at all
- it pushes you toward building highly generic, reusable components
- the separation of logic from the UI means you can safely alter the presentation without impacting the underlying feature logic
Now, let’s dive in.
Container-Presentation pattern
This pattern fits especially well with Agile development practices — and I'm about to show you why.
The remainder of this article unfolds in stages. With each stage, you'll see how the pattern maintains its underlying structure while adapting to evolving conditions — specifically, new requirements arriving mid-project.
Example – CRUD view
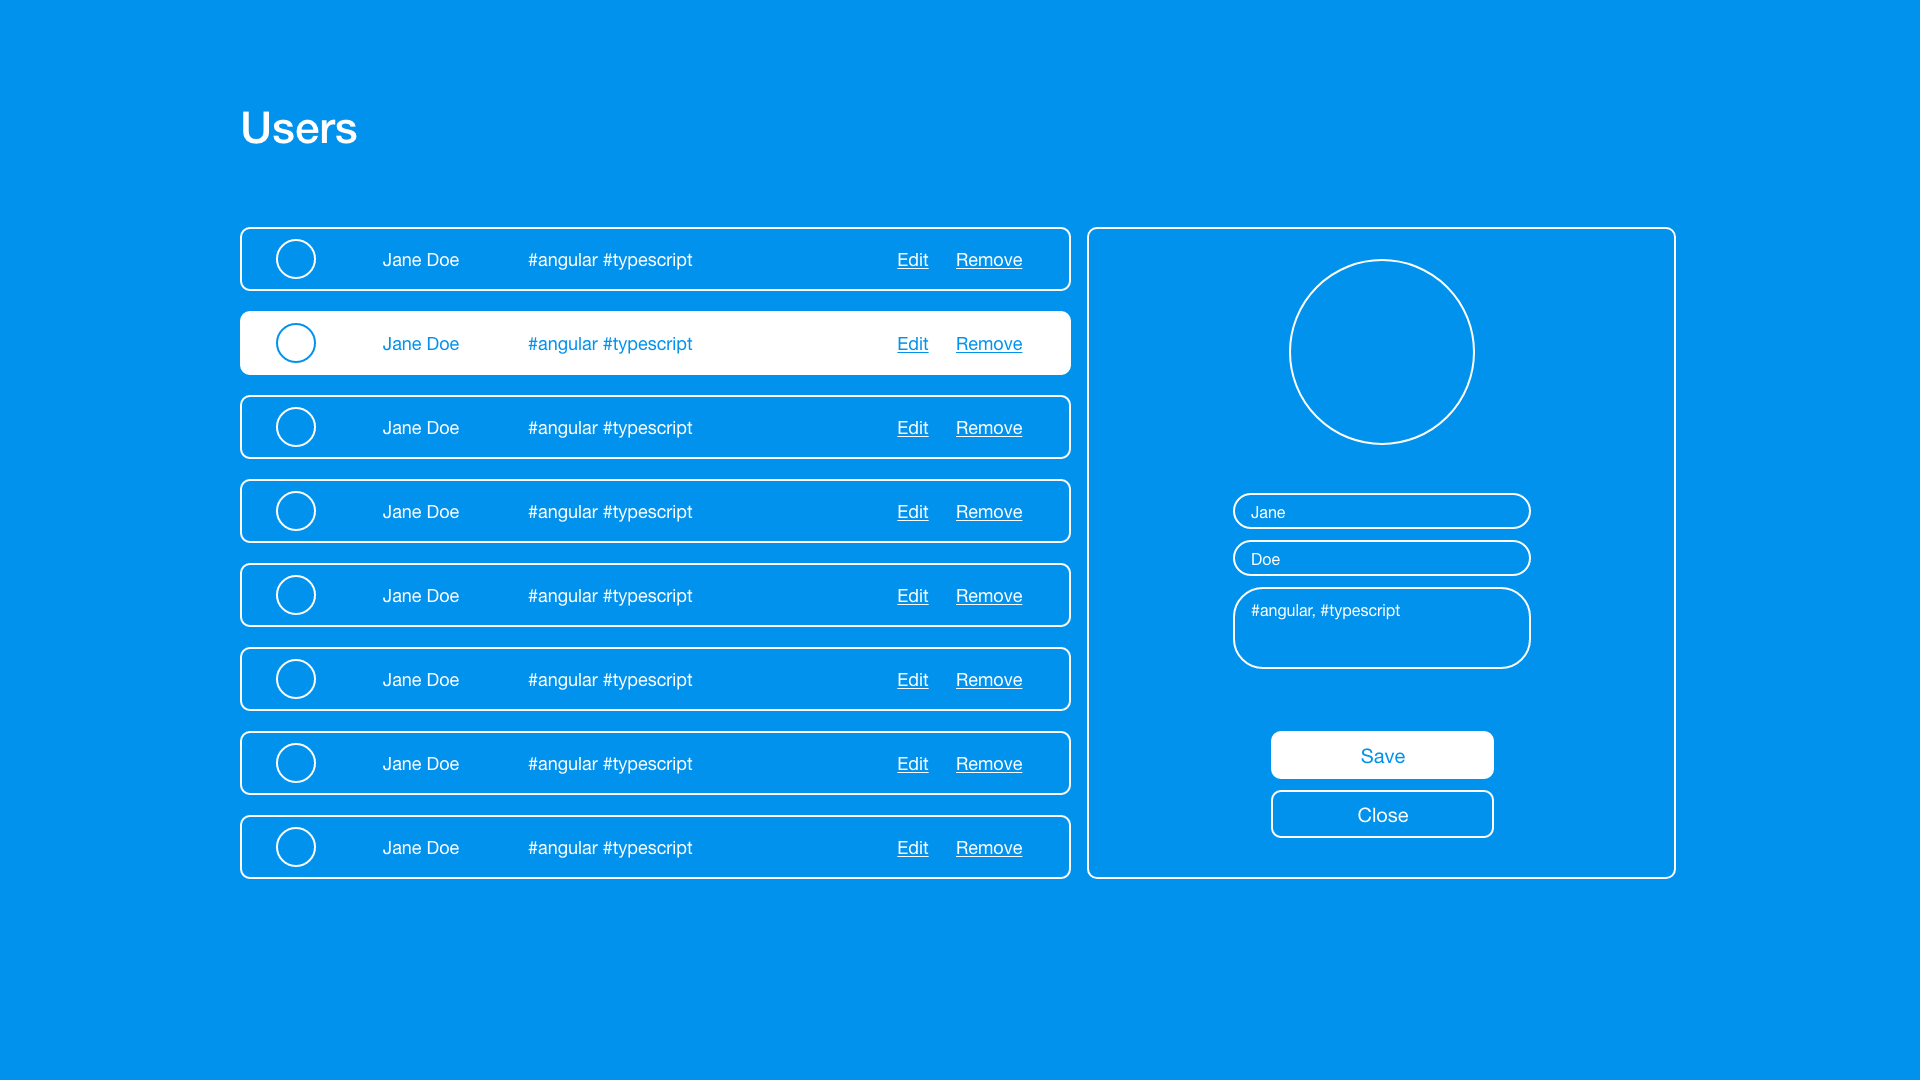
Abstract concepts are notoriously difficult to follow, so a concrete example will carry the discussion. Picture this: a new feature requests a standard CRUD view for users. The deliverable is a functional screen — a user list with both editing and creation capabilities.
example app
The feature's requirements, each addressed in upcoming sections, are listed here:
- Render a view that presents a list of users
- Enable editing: select a user from the list, then modify them in a side view
- Enable creation: add a brand-new user to the existing list
Foundations of Container-Presentation pattern
So where do you even begin with Container-Presentation? Your first task is breaking the UI into components. How? Start with the most obvious component — usually the most prominent one — then apply divide-and-conquer. As you break the larger task into smaller chunks, assign each chunk a dedicated component tailored to that specific job.
That's the theory, at least. In practice, hammering out every component up-front rarely works. Instead, my suggestion is to begin with a rough version of the main component — or a few primaries, depending on the feature's complexity — and then iteratively apply divide-and-conquer as you go. That iterative process naturally guides you toward the right set of components.
Once an initial component or group of components exists (likely pattern-free so far), you can think about refactoring toward Container-Presentation.
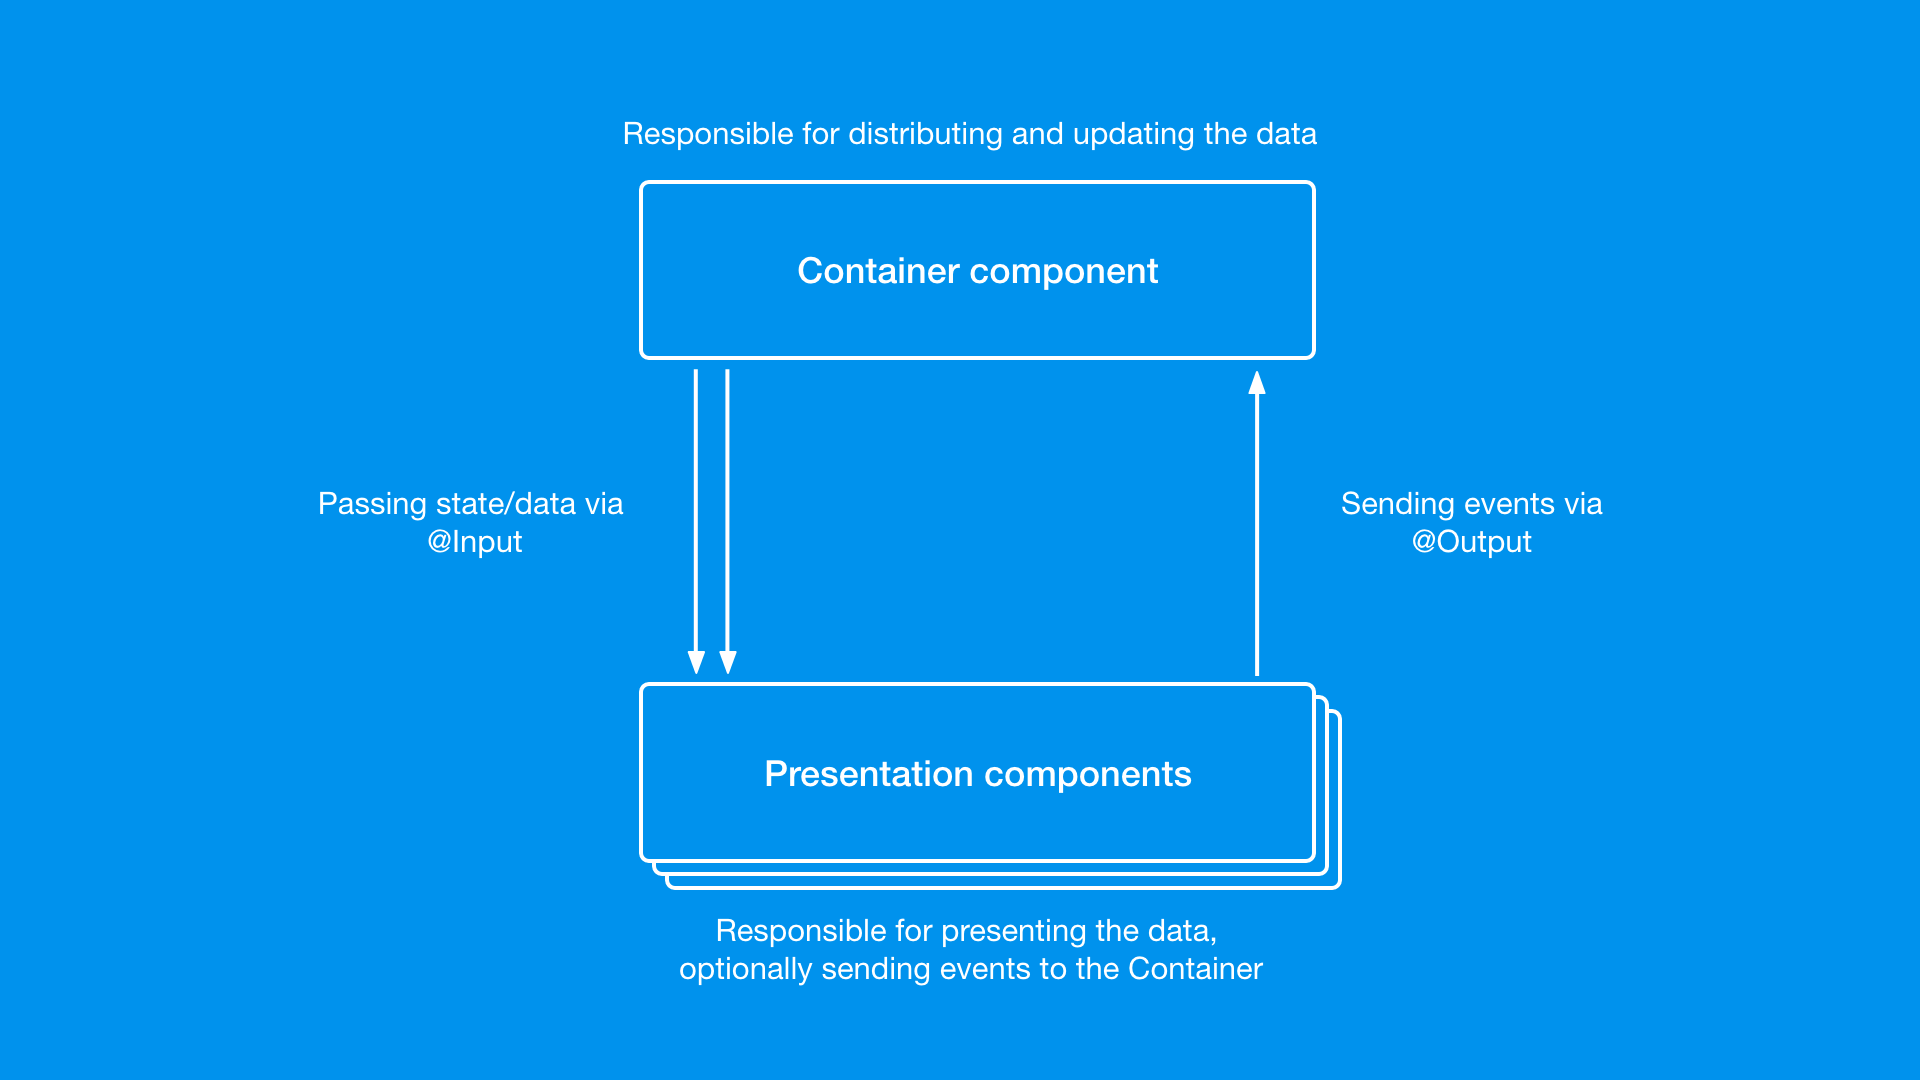
With basic components in hand, it's a question of deciding which ones act as "Container" components and which are "Presentation" components. How do you tell? Think of the two roles this way: Container components perform actions and push data outward, while Presentation components simply render data and optionally collect user intents, like clicks. A frequently held misconception: when a component receives user input, that component must react with a concrete action — call a service, crunch numbers, and so forth. In this pattern, the opposite holds. Most of the time, a component's only duty is to notify its Container of the event; nothing else is required. The Container then handles the event with whatever logic is appropriate.
In short:
- Container: handles data — grabbing, distributing, service calls, and the bulk of business logic
- Presentation: renders data; occasionally surfaces user events to its Container
The diagram below shows the baseline data flow of Container-Presentation:
Container-Presentation diagram
No heavy machinery required — this pattern doesn't demand sophisticated classes or layered abstractions. In the simplest version, plain Input/Output component communication suffices. The only Service in the base flow is the one that provides data to the Container component.
Stage 1: a bunch of variables
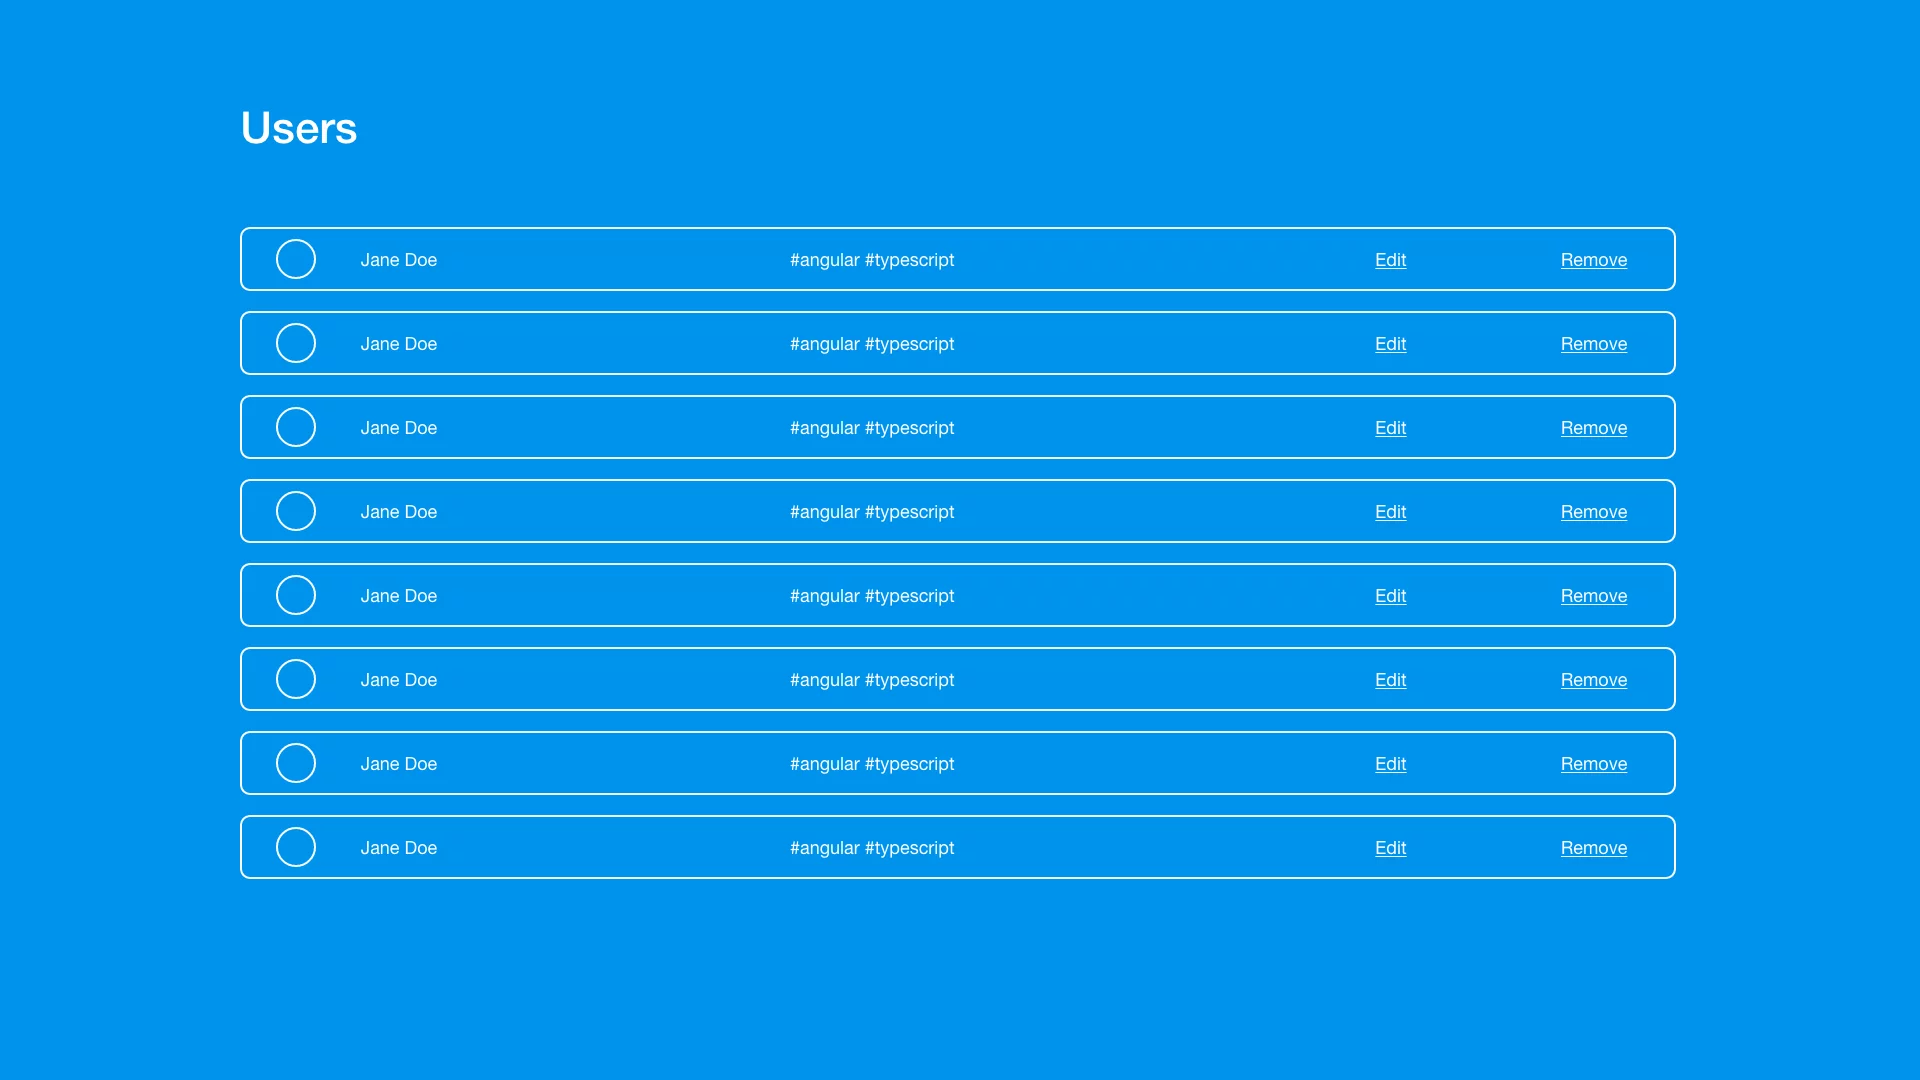
Back to our CRUD view for users. Imagine the initial requirement: render a table fetched from the API. The mock-ups show what's expected:
example app – first stage
With Container-Presentation as the target, how should the architecture be planned?
The most obvious implementation wins here — start with one component that simply does what's asked.
The component class might look like this:
@Component({
  selector: 'app-users',
  templateUrl: './users.component.html',
  styleUrls: ['./users.component.css']
})
export class UsersComponent implements OnInit {
  users;

  constructor(private data: DataService) {}

  ngOnInit() {
    this.users = this.data.getUsers();
  }
}
users component
And the template renders the users directly:
<article *ngFor="let user of user">
  <p>{{user.name}} {{user.lastName}}</p>
  <p>
    <span *ngFor="let tag of user.tags">#{{tag}}</span>
  </p>
  <button>Edit</button>
  <button>Delete</button>
</article>
users component template
Leaving it as a single, do-everything component is tempting, but what's the cost?
The class body will expand quickly. Business logic mingles with presentation logic. Efficient Change Detection strategies become hard to apply when the component has many triggers scattered across different places. Extending the view becomes painful due to tight coupling in that single component — the classic signs of poor planning.
Let's refactor it. A component that displays user information — clearly needed. Does that same component need to fetch data? Probably not — that's a distinct responsibility. So another class enters the picture: a wrapper component that retrieves data. With two components, we already have a Presentation component and a Container component. Nice work!
Here's a simple diagram to ensure we're aligned:

Container-Presentation diagram in context of example app
The communication is still barely a one-way street. The Container gets data through a Service, resolves it, then passes it along to the Presentation component via an Input property. Presentation displays it. Requirements met!
Enough theory — time for the code:
I'll kick things off with the Presentation component because its implementation should be independent of the Container's design. Starting with a clear head on what this component needs — and nothing more — is my usual approach.
What we need here is a component that renders simple data as a tile, takes the data through Inputs, and stops there for now.
@Component({
  selector: 'app-user-tile',
  templateUrl: './user-tile.component.html',
  styleUrls: ['./user-tile.component.css'],
  changeDetection: ChangeDetectionStrategy.OnPush
})
export class UserTileComponent {
  @Input() name: string;
  @Input() lastName: string;
  @Input() tags: string[];
}
user tile component
Straightforward is the goal! Why burden a component with heavy logic or complex processing? A lean Presentation component reads cleanly and stays easy to maintain. Notably, this component sidesteps advanced Types — it accepts primitive Inputs, implements zero interfaces, and can safely lean on the OnPush Change Detection strategy.
A simple, performant, maintainable component.
<article>
  <p>{{name}} {{lastName}}</p>
  <p>
    <span *ngFor="let tag of tags">#{{tag}} </span>
  </p>
  <button>Edit</button>
  <button>Delete</button>
</article>
user tile component template
The template holds no surprises either — matching the mock-ups, it shows the user's full name, tags, and two buttons that come in handy later.
Next up, the Container component. It needs to fetch data via a Service, and it needs to display the user list. Wait — the Presentation component for a user already exists, so this is largely wiring.
@Component({
  selector: 'app-users',
  templateUrl: './users.component.html',
  styleUrls: ['./users.component.css']
})
export class UsersComponent implements OnInit {
  users;

  constructor(private data: DataService) {}

  ngOnInit() {
    this.users = this.data.getUsers();
  }
}
users component
No deep explanation required — a clear, minimal component with data resting in the users property.
<app-user-tile *ngFor="let user of users"
               [name]="user.name"
               [lastName]="user.lastName"
               [tags]="user.tags">
</app-user-tile>
users component template
The template is equally plain — it renders a series of user-tile components, feeding each the right data.
Guess what? That's the entire codebase fulfilling the current requirement — and all this pattern needs.
The upcoming sections demonstrate how the pattern handles changing demands and complexity. As long as we stay true to Container-Presentation, we're in good shape.
So, what did we achieve in this first step?
- A lean Presentation component with minimal primitive Inputs and an OnPush Change Detection Strategy — resulting in an efficient, easily understandable component free of app-specific dependencies.
- A Container component owning data retrieval, slotting presentation components in place with properly bound values.
Stage 2: Model
New requirements dropped!
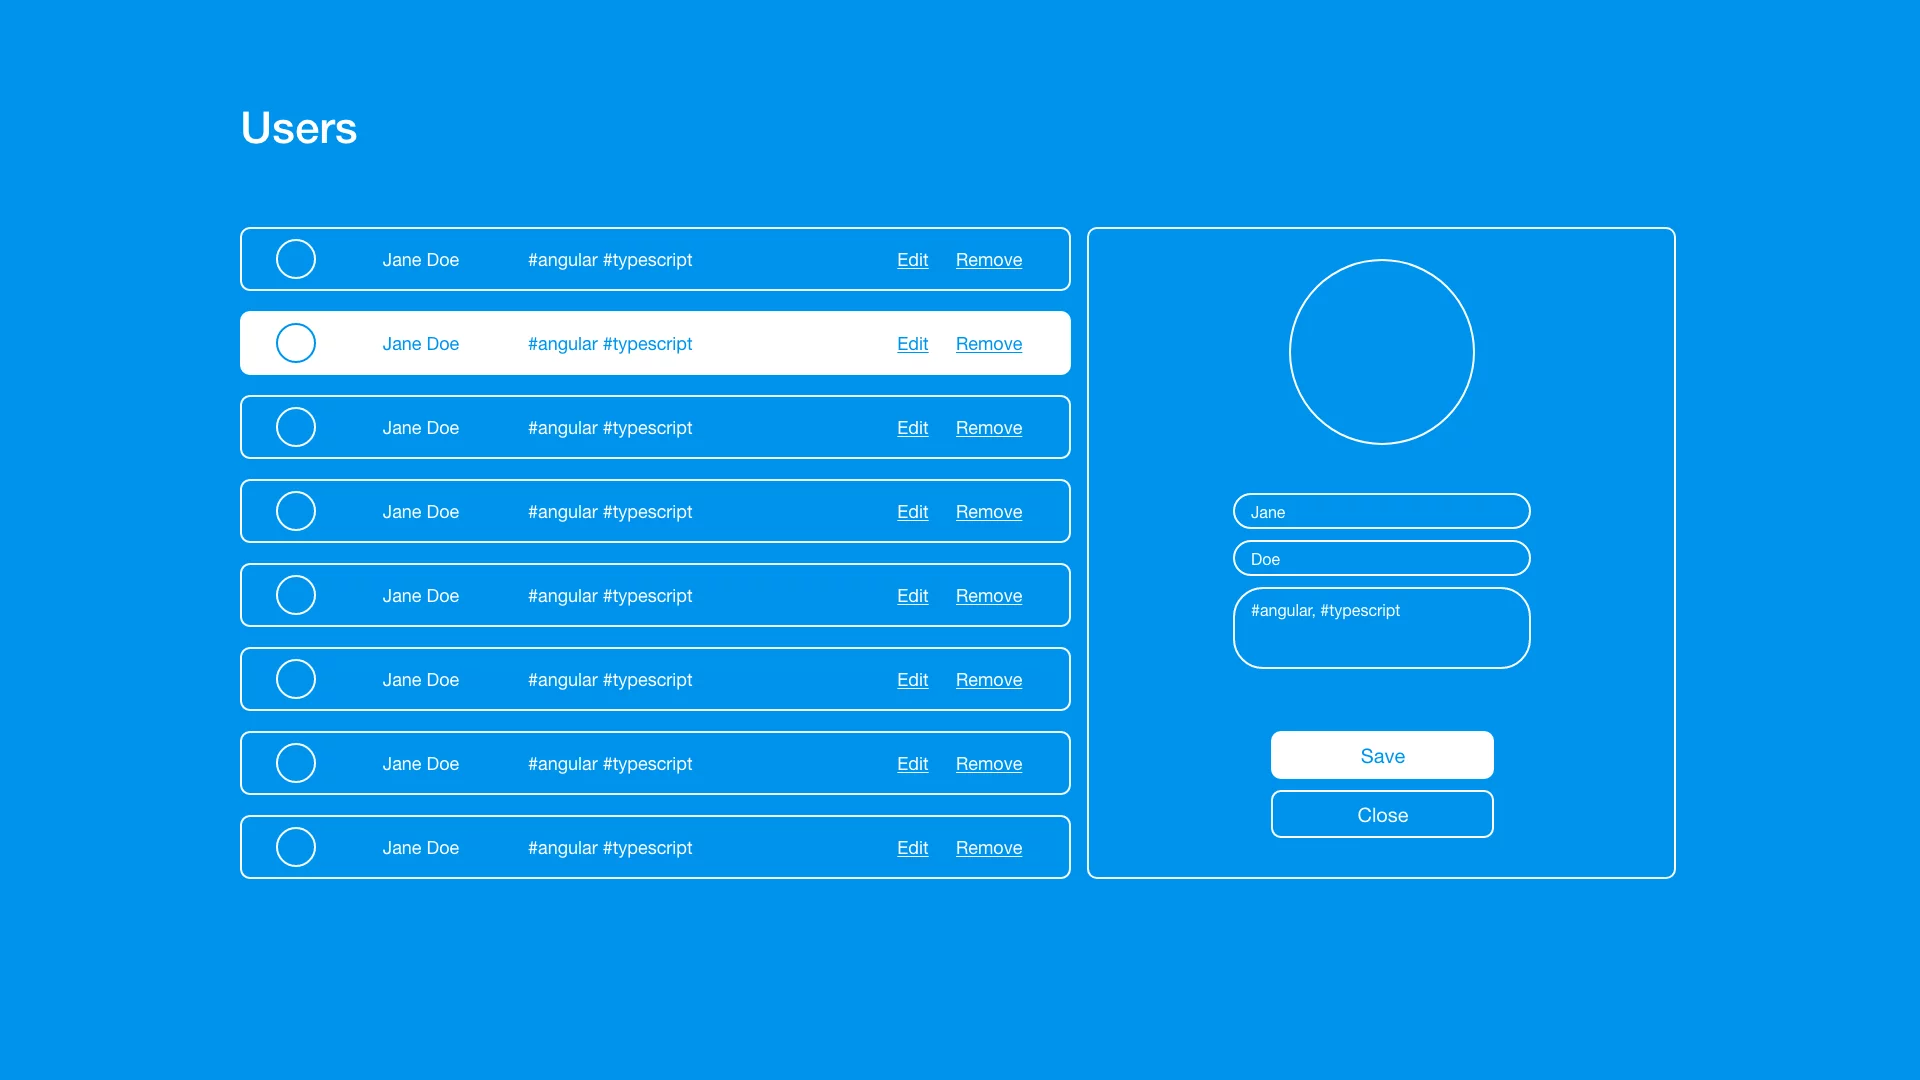
First, users need to edit existing user records. That translates into an editable detail view for the selected user, along with a way to persist the changed data. Additionally, the currently chosen user should stand out visually in the list.
Check the mock-ups:
example app – stage 2
Given stage 1, it should be clear how this fits into the existing architecture.
- Container (users-component) – track which user is actively being edited
- Presentation (user-tile-component) – apply a highlight when that tile is the one selected
What about the editing form on the right? For one, it's another Presentation component. For another, it should receive the relevant data, allow that data to stay editable, and — you guessed it — inform the Container of changes.
Why shouldn't the form just save the user itself? Peek at the result if it did: the Presentation component latches onto the Data Service, waits for a response, then notifies the parent to refresh the table. Needless complexity! Keeping the editing interface a pure Presentation component means no Service coupling, no heavy data processing, and no orchestrating refreshes across other components. The Container remains the only place holding a Service dependency, staying best positioned to decide when and how the view gets refreshed.
Once again, Presentation-first: I'll adjust the user-tile component first. Let's add a flag to signal selection, which the template will use to apply the highlight.
export class UserTileComponent {
  @Input() name: string;
  @Input() lastName: string;
  @Input() tags: string[];
  @Input() active: boolean; // <--- new property
}
user tile component
The template can thus react accordingly:
<article [class.highlighted]="active">
  <p>{{name}} {{lastName}}</p>
  ...
</article>
user tile component template
That works, but notice something? When the requirement expanded, I had to bolt on another Input property. And that's a slippery path — dozens of those properties down the road and readability collapses. Enter the Model, the concept named in this section's title. It's quite common to deal with properties that belong together in a specific context. That bundled context is what we call a Model. A Model typically maps a domain or business structure within the app. This aligns with Domain Driven Design thinking, where the Entity forms the foundation of the concept, and a Model stems from that. It goes by different names in different circles, but the underlying idea is consistent.
How does the Model fit here? Take a look at this class:
export class UserTileComponent {
  @Input() vm: {
    name: string,
    lastName: string,
    tags: string[],
  }
  @Input() active: boolean;
}
user tile component
Why is it called vm? VM is short for View Model — a common naming convention where a single Input property receives an entire group of properties. Hence the "vm" moniker.
What does that get you? One Input property triggering a single Change Detection cycle. Casting it to the right type catches wrong inputs, so it becomes practically impossible to forget a required field. Tighter and provably correct. If you prefer, extract that definition into its own standalone Type for extra clarity. I'm leaving the active property outside this vm for now — tricky to fold in — but the general principle stands.
The data-receiving strategy looks settled. Now for eventing: when the user clicks the "Edit" button, this Presentation component doesn't need to do anything meaningful with that click beyond emitting an event outward. The Presentation component could end up in completely different contexts later, so the subsequent action is context-dependent anyway. We just relay the intent and let the Container dictate follow-up behavior.
export class UserTileComponent {
  ...
  @Output() selected = new EventEmitter();

  select() {
    this.selected.emit();
  }
}
user tile component
Presentation components communicate push-events to Containers via Outputs, as I mentioned. The button in the template simply invokes the select function on click. That's the extent of it.
The second half of this requirement introduces editing. To handle that, a simple form template:
<form>
  <input type="text" [(ngModel)]="vm.name">
  <input type="text" [(ngModel)]="vm.lastName">
  <button (click)="onSave()">Save</button>
</form>
user form component template
This one's also a Presentation component, so expect Inputs and Outputs. No secret logic tucked away — receive data in, emit events out.
@Component({
  selector: 'app-user-form',
  templateUrl: './user-form.component.html',
  styleUrls: ['./user-form.component.css'],
  changeDetection: ChangeDetectionStrategy.OnPush
})
export class UserFormComponent {
  @Input() vm;
  @Output() save = new EventEmitter();

  onSave() {
    this.save.emit(this.vm);
  }
}
user form component
Now, pause and see if a flaw jumps out at you.
It's all about data passing: we intend to pass one object — the Model — to bundle all input together, then modify the values in place. But the vm object is passed by reference. That references the original, so mutating the form data would ripple back into the table, which holds the source-of-truth data!
An obvious mistake — mutating original data is never acceptable. Instead, we should make a copy, let edits happen on that copy, persist it, then refresh the displayed data.
Who should own that copy step? Container-Presentation dictates: only the Container decides which data lands where, making the Container accountable.
How should the copy work? There's no single, universal approach for cloning in JavaScript. The complexity varies depending on how deep the data structure goes. In our case, vm is plain — just a few individual properties, none of which are objects. A shallow clone is enough. Nested objects, on the other hand, often demand deep cloning.
For shallow cloning, the spread operator does the job temptingly well. For deep clones, external utilities like lodash or clone can help — and the native JSON object exists as well.
For this example, a spread operator copy works.
Let's move through the Container implementation. The template is familiar:
<app-user-tile *ngFor="let user of users"
               [vm]="user"
			   [active]="selectedUser?.id === user.id"
               (selected)="selectUser(user)">
</app-user-tile>
<app-user-form *ngIf="selectedUser"
               [vm]="selectedUser"
               (save)="save($event)">
</app-user-form>
users component template
Our new Presentation component for selection editing slots right in.
@Component({
  selector: 'app-users',
  templateUrl: './users.component.html',
  styleUrls: ['./users.component.css']
})
export class UsersComponent implements OnInit {
  users;
  selectedUser;

  ...

  selectUser(user) {
    this.selectedUser = {...user};
  }

  save(user) {
    this.data.edit(user);
    this.users = this.data.getUsers();
  }
}
users component
Take a close look at selectUser's evolution — it's grown beyond mere assignment. Thanks to the spread operator, the copy it produces means selectedUser never points back at the original record.
save remains quite direct. It takes the edited data, delegates persistence to the service, then syncs the list.
Done — the requirements fulfilled with barely any code, more importantly while still respecting the Container-Presentation pattern. You saw the change cost: adding moving parts, not rearranging existing ones. In my view, that's the unmistakable signature of a well-structured architecture — open to extension, closed to modification!
Quick recap of this stage's key takeaways:
- Model – captures domain/business structure, typically feeding Presentation Components through a single Input. Improves readability, enforces type safety, and guarantees required fields.
- vm – the ubiquitous shortcut for View Model, handy when representing a Model
- cloning – you will face data duplication needs. There's a spectrum of approaches — a simple spread often suffices for shallow copies.
Stage 3: Model Class
Spoiler alert — there are new requirements! Users must now be creatable.
We currently have the list plus the existing editing form. Creation will reuse essentially the same form component — almost identical. The distinction comes in knowing whether we're editing an existing record or making a novel one. Options are plenty, but I'm going with an id property. Imagine every user carries a unique identifier, and someone brand-new doesn't have one yet — they get one when first submitted.
Three conclusions emerge. First, the user entity is expanding. Second, certain properties exist based on context, or not at all. Third, creating a whitespace user that later fills with data is now a necessity.
This pushes us to derive structure within the existing architecture. Honestly, it's simpler than it sounds. One addition — a Class — consolidates all pertinent properties, declares optional versus required fields, and notably makes crafting blank objects trivial.
A sensible Class implementation given our needs and prior guesses:
export class User {
  constructor(
    public name: string = '',
    public lastName: string = '',
    public tags: string[] = [],
    public id?: string
  ) {}
}
user
That class carries all three existing properties plus an optional id. Its constructor enables quick creation:
const blank = new User();
blank user creation
Result: a sturdy, blank user primed for the creation flow. Plenty sufficient.
Alright — adapting our components:
The Container gets a button initiating creation, plus a method that delivers a fresh blank user to the Presentation form component.
<button (click)="create()">Create</button>

<app-user-tile *ngFor="let user of users"
               [vm]="user" [
               [active]="selectedUser?.id === user.id"
               (selected)="selectUser(user)">
</app-user-tile>
<app-user-form *ngIf="selectedUser"
               [vm]="selectedUser"
               (save)="save($event)">
</app-user-form>
users component template
Button in place. Now the logic:
@Component({
  selector: 'app-users',
  templateUrl: './users.component.html',
  styleUrls: ['./users.component.css']
})
export class UsersComponent implements OnInit {
  users: User[];
  selectedUser: User;

  ...

  selectUser(user: User) {
    this.selectedUser = {...user};
  }

  create() {
    this.selectedUser = new User();
  }

  save(user: User) {
    if(user.id){
      this.data.edit(user);
    }else{
      this.data.create(user);
    }
    this.users = this.data.getUsers();
    this.selectedUser = null;
  }
}
users component
I slipped the User type onto the class too, for tangible safety and correctness.
With the Container ready — what does the Presentation form need adjusting?
Actually — nothing! It does what it did before: receives a User (now an empty shell), broadcasts the submit intent upward, finishes. Cases like this illustrate why this pattern matters: when the semantics shift, it's a marginal extension, never a rewrite.
Stage 4: VM class with extras
For this stage, no fresh demands — just fine-tuning our code and overall experience. The changes all fit within the architecture we've established.
Each tweak falls under one of these:
- moving the cloning implementation
- smooth access to full names
- scrubbing how blanks get created
- baking in a small validation
Cloning — We clone user objects for the editing scenario, which now happens. That's correct behavior, but I suspect the cloning responsibility can live more appropriately. At the moment, the Container handles the spread. But is it the Container's place to know cloning mechanics? No. Using a clone matters to it; how the clone happens shouldn't be the Container's concern.
Here's what exists right now:
selectUser(user: User) {
  this.selectedUser = {...user};
}
users component
Shifting the cloning specifics into the Class itself relieves the Container:
export class User {

  clone(): User {
    return new User(this.name, this.lastName, this.tags, this.id);
  }

  constructor(
    public name: string = '',
    public lastName: string = '',
    public tags: string[] = [],
    public id?: string
  ) {}
}
user
The Container's surface area shrinks accordingly through the removed dependency, and readability jumps.
selectUser(user: User) {
  this.selectedUser = user.clone();
}
users component
With that settled, how are full names rendered in the list? Peek:
<article>
  <p>{{vm.name}} {{vm.lastName}}</p>
  ...
</article>
user tile component template
Repeated formatting of a full name hints we might centralize that formatting. Options range from an Angular Pipe to — wait — a simple getter on the vm mechanism we already have? Let's use the prevailing structure:
export class User {

  clone(): User {
    return new User(this.name, this.lastName, this.tags, this.id);
  }

  get fullName(): string{
    return `${this.name} ${this.lastName}`;
  }

  constructor(
    public name: string = '',
    public lastName: string = '',
    public tags: string[] = [],
    public id?: string
  ) {}
}
user
Subsequently, the Presentation tile template simplifies:
<article>
  <p>{{vm.fullName}}</p>
  ...
</article>
user tile component template
Charming. We're adding tiny helpers to the vm Class, and the entire landscape reshapes smoothly without a heavy refactor.
I realize you now appreciate how the vm class supports the codebase, but for thoroughness — two more examples of venturing into its full repertoire.
That blank user for creations was manufactured inside the Container — remember that? This mirrors cloning. The Container should use a blank session, not know the drill of making one — shift into the vm class!
export class User {

  static createBlank(): User {
    return new User();
  }

  clone(): User {
    return new User(this.name, this.lastName, this.tags, this.id);
  }

  get fullName(): string{
    return `${this.name} ${this.lastName}`;
  }

  constructor(
    public name: string = '',
    public lastName: string = '',
    public tags: string[] = [],
    public id?: string
  ) {}
}
user
Thus, the Container triggers a static method for a blank — that's all — ignoring its construction entirely.
create() {
    this.selectedUser = User.createBlank();
}
users component
One more improvement: validation. In our Container component, whether user input is legitimate goes unchecked. Legitimacy means non-empty name and non-empty last name, we'll say. Where belongs that rule? Clearly, with the vm class!
export class User {

  static createBlank(): User {
    return new User();
  }

  clone(): User {
    return new User(this.name, this.lastName, this.tags, this.id);
  }

  get fullName(): string{
    return `${this.name} ${this.lastName}`;
  }

  get valid(): boolean {
    return this.name.length > 0 && this.lastName.length > 0;
  }

  constructor(
    public name: string = '',
    public lastName: string = '',
    public tags: string[] = [],
    public id?: string
  ) {}
}
user
Then the Container checks is it to be submitted — create or update:
save(user: User) {
    if (!user.valid) {
      return;
    }

    if (user.id) {
      this.data.edit(user);
    } else {
      this.data.create(user);
    }

    this.users = this.data.getUsers();
    this.selectedUser = null;
}
users component
These patterns bail you out time and time again, believe me. With proper design, fresh requirements and refactors rarely cause friction. It’s merely about extending the core pattern just where and when required.
Stage n: complex scenario with Service
So what happens when a lone Container no longer cuts it? Let’s suppose the feature matures, has more entanglements, sub-features multiply, and rather naturally we find many components nested several—even many—layers beneath.
No threat to our pattern! It just means an adjustment, as it always does. The underlying dynamic between Container and Presentation pairs stays intact — that’s the pivot. Multiple Containers aren't a cause for worry — they’re a reasonable answer for complexity. What deserves thought is whether data distribution via pure Input/Output logic remains ideal for the situation.
For select clusters of components, yes — but nothing says that holds for entirely every part. Maybe cases arise where multiple Models converge, satisfying a requirement that no single existing data source covers. Elevate that composition into Services, and those become useful to Containers as providers of sliced-and-diced data relevant to their sub-features.
If you adhere to this pattern, slotting in a Service layer requires no drama.
Several methodologies exist for handling relationships and manipulation of data. Some situations pull for an OOP-centric model — other times a set of service-oriented factories nudging toward immutable state with POJO data is a neat match. But the higher-level imperative stays universal: keep to the formulas you know — the pattern’s skeleton that extends elegantly with demand.
Options are broad and increasingly fit whatever stage you reach, but note that the core tenets stay permanent.
Wrap-Up
That concludes the walkthrough of the Container-Presentation pattern. While many of these techniques may already be familiar, the real value lies in combining them into a coherent and maintainable architecture.
The core building blocks of this approach are:
- Container Components – handle data retrieval and pass it down to presentational components.
- Presentation Components – focus on rendering data and emitting events (e.g., user interactions) back to the container.
For communication between these two roles:
- Use
InputandOutputfor the majority of cases. - Fall back to a shared service only when the interaction logic becomes too complex.
Other concepts revisited in this guide:
vm– a View Model convention that bundles all@Inputproperties into a single, strongly typed object for better consistency and safety.ChangeDetectionStrategy.OnPush– a performant strategy that is almost always safe to use in presentation components.- View Model classes – when the model grows or needs to encapsulate related logic, turning it into a dedicated class with getters and functions helps reduce duplication and centralizes behavior.
- Cloning – avoid mutating shared data by cloning objects before making changes. The choice between shallow and deep cloning depends on the data shape, with the spread operator being handy for shallow copies.
Finally, the key takeaway from this article is the importance of intentional architecture. By applying these patterns, you can achieve:
- Duplication-free code that's easier to scan and navigate.
- A clear separation of responsibilities , making each class's purpose obvious.
- Extensibility – your architecture becomes more resilient to changing requirements, often requiring additions rather than modifications to existing code.
You can find the complete implementation in this StackBlitz demo.
A special thanks to John Papa and Dan Wahlin for introducing this pattern at their workshop during this year's ng-conf – it was the direct inspiration for this article.