
Converting an Application to PWA
Now it is time to walk through the process of turning an existing app into a PWA. There are three distinct paths we can take to achieve this goal. To illustrate the concepts, we built a small demo application that renders images fetched from an API on our server. The returned graphics change on a five-second interval.
Our Service Worker will implement the stale-while-revalidate pattern. In practice, the app reads the displayed image from the cache right away, while the synchronization happens behind the scenes. If new data arrives during the application launch, a SnackBar will appear, notifying the user about the pending update. Once the user decides to fetch the fresh content, the application reloads.
Here is the overall architecture:
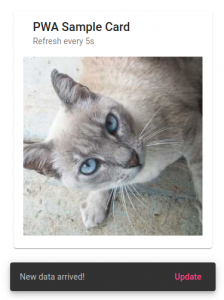
A visual representation of the application.
The final code for this project is stored in our repository. Feel free to clone it and run it locally — the README.md file contains all the necessary instructions.
- Angular PWA
1.1. Angular.json
1.2. App.module
1.3. index.html
1.4. Icons
1.5. Service Worker Service
1.6. Repository Service - Server
- Recipes
3.1. Service Worker - Angular Service Worker
- WorkBox
- Recipes vs Angular Service Worker vs WorkBox
6.1. Recipes
6.2. Angular Service Worker
6.3. WorkBox - Summary
- Useful links
Angular PWA
To get started, we need to bring the @angular/pwa package into our project. We can do that by executing the following command:

It is worth noting that this task should not be performed with the Nx CLI.
Once the command completes, a Service Worker is generated to cache our application resources. For a step-by-step guide, the Angular documentation is a good reference.
After this package is added, several areas of our application are adjusted automatically.
Angular.json
The configuration file has been updated so that the build process also copies a predefined Angular Service Worker alongside our app bundle.
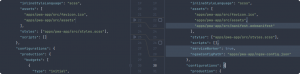
Alterations made in Angular.json.
Looking at the diff above, we can see that a manifest has been added to the list of app assets. Moreover, the serviceWorker flag is now enabled, and the path to the ngswConfigPath has been specified. This path points to the configuration that controls how the Service Worker is built.
This Web App Manifest holds the essential details about our application and is used by the browser once the app is installed on the user's device. If you want to dive deeper, check out the MDN documentation or the web.dev article that covers most of the available options.
App.module
Our main application module now also includes ServiceWorkerModule. This module is responsible for registering the Service Worker itself.
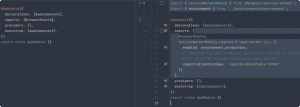
The modifications in app.module.ts.
index.html
The Web App Manifest needs to be referenced in our index.html file. Once it's there, the browser will treat our application as a PWA when the page is opened. Additionally, a theme-color is set by default; this controls the color of the browser's address bar when users visit the site.
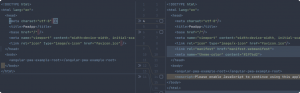
The updates applied to index.html.
Icons
We also need to add icons to the application. These are used in various places within the PWA, such as the application icon itself and the icon shown on the SplashScreen.
A word of caution: the ng serve command does not support PWA features. To verify that our integration works correctly, we have to rely on a separate HTTP server. A simple option is http-server; you can find more details in the Angular documentation.
Another important restriction is that the @angular/pwa package can only be installed within the application module itself (because ServiceWorkerModule has to be imported into app.module). You cannot install it inside a separate library or another module.
Service Worker Service
In order for our application to communicate with the SW, we need to listen for incoming messages. This is done by defining the ServiceWorkerContainer.onmessage property. We created a ServiceWorkerService class for this purpose, which exposes a method to start listening for events.
Repository Service
To keep the logic for fetching remote resources separate, we introduced a RepositoryService. At this stage, it contains a single method that requests images from our server, which we will build in the next section.
Server
Our integration also requires a server that provides an API returning images that update every five seconds. To build this, we first need the @nrwl/nest plugin. Using that, we generate a NestJS server application with the following commands:

followed by

In terms of implementation, we only need an endpoint that returns one of the available pictures upon each request. The service logic responsible for selecting the graphic boils down to this simple method:
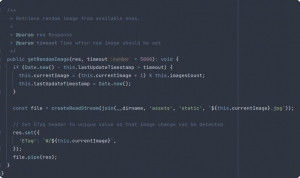
This method controls which image is served.
The crucial part here is setting the ETag header to a unique value that corresponds to the current graphic. Our application uses this value to detect when the image on the server has changed.
We also need to make sure that the client can access this header. This requires a quick change in the main.ts file.
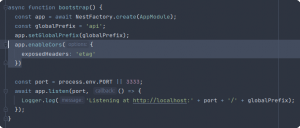
Server-side configuration that exposes the chosen header to the client.
Recipes
With the setup from the previous chapters in place, we can finally focus on implementing the Service Worker itself. Initially, we will not rely on any ready-made libraries; we'll work directly with the Service Worker API. To achieve the stale-while-revalidate strategy, we can use a simple, ready-made recipe.
Service Worker
The implementation involves a few key elements. When the SW is being installed, we cache a set of static files. In our case, these are the index.html file, the application icon, and the manifest.
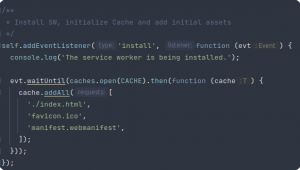
Caching the application's core resources ahead of time.
The core logic, however, lives in the handler for the fetch event. This event is triggered every time the application asks for any resource.
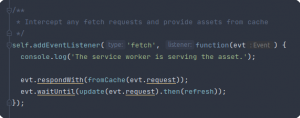
The handler used for incoming resource requests.
As you can observe, whenever the app makes a request, the resource is served from the memory cache. At the same time, the request goes out to the network. Upon receiving the fresh response, it is stored in the cache, and a notification is sent to the application informing it about the availability of new content.
Keep in mind that this behavior only kicks in after the SW is activated. Activation depends on the registrationStrategy that was set up during SW registration.
If we use registerImmediately, the SW is registered instantly. Moreover, by calling Clients.claim(), it can take charge of the page right away. This way, even the first requests are captured and stored in the cache.
On the other hand, if the SW does not have the ability to intercept the initial requests, its activation is postponed until the user reloads the application. Only after the reload, requests will be cached.
To address this limitation, we could add more files to the cache during the installation process. However, this does not solve the problem for the dynamic images served by our backend. For that, we might implement a fallback mechanism that shows a placeholder until the actual data arrives. The final choice depends on the specific needs of your application.
As a final step in this section, we should clean up the Angular Service Worker configuration from the angular.json file. This way, the unused NGSW won't be copied to the final build, and we can keep the overall bundle size down.
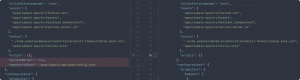
Adjusting angular.json to opt out of NGSW.
Integrating the Angular Service Worker
When working with the predefined Angular Service Worker, the primary task is setting up the ngsw-config.json file properly. The configuration file drives how the service worker behaves in your Angular application.
A critical part of this configuration involves the dataGroups property, which dictates the caching rules for resources fetched from specific URLs. For our app, the priority is caching images received from the server. Implementing the stale-while-revalidate approach for these images is done by configuring the strategy and timeout fields within a data group.
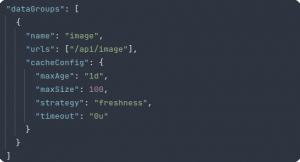
A visual example of caching images using the stale-while-revalidate strategy.
Once the caching rules are set, the next step is to enable communication between the Service Worker and the app so the latter knows when fresh data is available.
This is achieved by registering a custom Service Worker that listens for the fetch event. If the request matches our specified data, it notifies the client. To avoid breaking the built-in functionality of NGSW, we rely on WorkerGlobalScope.importScripts(), a technique discussed in the previous article under the section “Multiple Service Workers”.
Aside from the refresh() function, the core implementation looks like this:
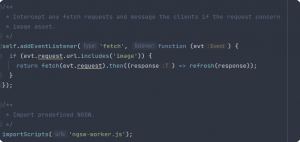
Extending the Angular Service Worker with custom logic.
Leveraging WorkBox for Service Workers
When defining a Service Worker with WorkBox, the implementation is streamlined by using a method from the workbox-recipes package.
Following a pattern similar to the Angular Service Worker, we enhance this setup by adding logic to notify the client about newly cached graphics.
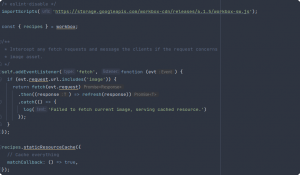
Service Worker implementation utilizing the WorkBox library.
It's important to note that the workbox-sw library is loaded from a CDN when the SW script is parsed. This loads a global workbox object from which the required modules are accessed. These modules are then cached automatically upon first use.
Just as with the Recipe approach, you must clean up the angular.json file by removing the Angular Service Worker configuration settings.
Comparing Recipes, Angular Service Worker, and WorkBox
Having integrated various Service Workers into our PWA, we now have a clear picture of the implementation methods and their inherent differences. Let's break down what we've learned.
Recipes
Using the raw Service Worker API for a hand-rolled implementation involves a significant amount of boilerplate when compared to other options. Managing cache versions is also a manual process (renaming is required with each new version), and certain intricate features can quickly become overwhelmingly complex to code.
That said, starting with this approach is an excellent way to learn the mechanics and understand what happens “under the hood”. It offers complete authority over SW behavior, which allows for fully bespoke implementations.
However, this freedom comes with risks. Since the safety of the app relies entirely on the developer's code, the security margin can vary. Furthermore, the learning curve is steeper compared to the other two libraries.
Angular Service Worker
The Angular Service Worker is an ideal fit for Angular projects that need standard PWA functionalities like caching and Push Notifications. Getting it set up is painless, and most of the work involves filling in the configuration file.
Difficulties appear when you require custom logic. The extension can feel cumbersome, implying a need to overwrite parts of the default setup to insert your own logic.
Moreover, the Angular Service Worker might solve underlying problems in a way that diverges from your specific requirements. In such cases, patching may fall short, and moving to WorkBox might be the more viable path.
WorkBox
WorkBox significantly cuts down the boilerplate code. It also provides a high degree of control, allowing you to compose various modules using different strategies. Should the requirement arise, you can even define your own strategy or plug-in. This makes it the most flexible option presented here.
If your application demands non-standard features, WorkBox is the strongest candidate. Its documentation is also excellent, complete with real-world use cases, courtesy of Google's development team.
Concluding Thoughts
Adopting PWA functionality is a solid step towards improving the User Experience. As we've demonstrated, there are several routes you can take to turn your application into a PWA.
Each solution has its strengths and weaknesses. The one you pick should align with the complexity and specific needs of your project.
To help wrap up our analysis, the following chart provides a quick visual recap of how the different approaches measure up across key categories.
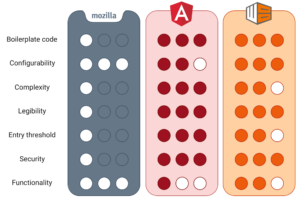
Comparison of different Service Worker implementation techniques across various criteria.
We hope this deep dive clarifies the intricate and constantly changing domain of Progressive Web Apps and that you found something useful to take away from this read.
Further Resources
- https://developers.google.com/web/tools/workbox/modules
- https://angular.io/guide/service-worker-getting-started
- https://serviceworke.rs/
- https://pwa-fundamentals.nl/chapters/service-workers.html
- https://developer.mozilla.org/en-US/docs/Web/API/Service_Worker_API/Using_Service_Workers
- https://web.dev/two-way-communication-guide/
- https://jakearchibald.com/2014/offline-cookbook
- https://stackoverflow.com/questions/45257602/sharing-fetch-handler-logic-defined-across-multiple-service-workers
- https://developers.google.com/web/fundamentals/primers/service-workers
- https://developer.mozilla.org/en-US/docs/Web/API/Service_Worker_API
- https://wicg.github.io/background-sync/spec/
- https://whatwebcando.today/