Assembling the Plugin-Based Workflow Designer
In the preceding installment of this series, we explored Dynamic Module Federation. That approach lets us load Micro Frontends — or remotes, the broader term within Module Federation — without knowing them at compile time. The total number of remotes doesn't need to be known ahead of time either. The earlier article used the router to integrate available remotes. Here, we focus on loading individual components directly. Our sample scenario is a straightforward workflow designer built on a plugin architecture.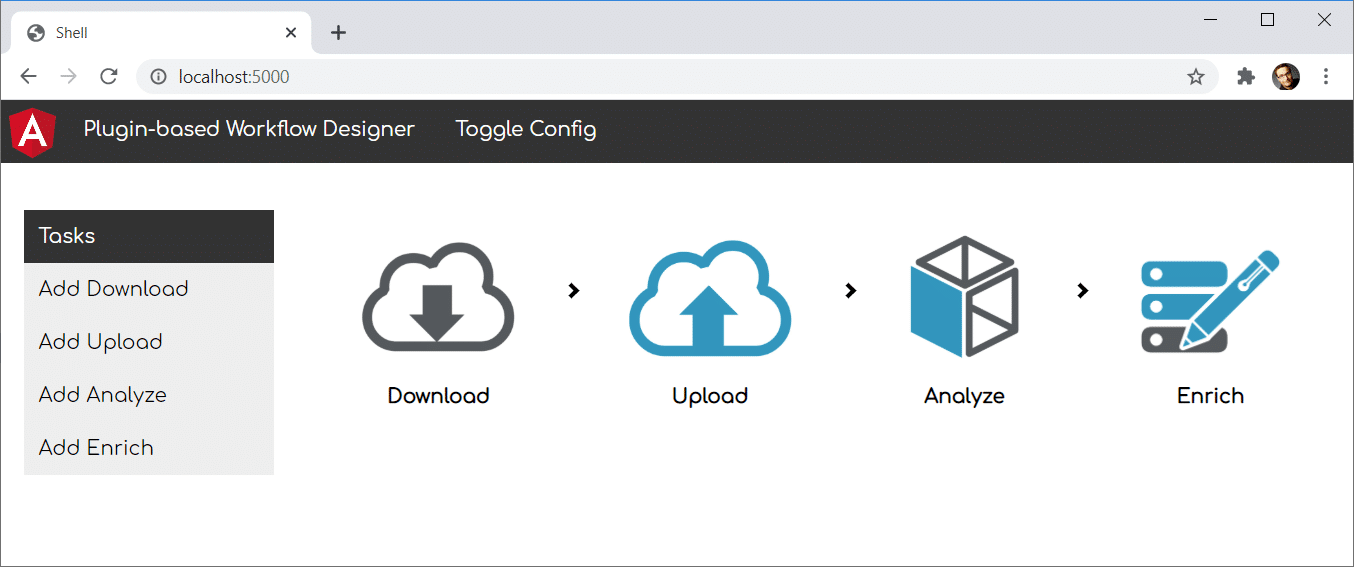 This designer acts as the host, pulling in tasks from plugins that are themselves remotes. Each plugin can therefore be built and deployed separately. When the designer boots, it receives a configuration that lists the available plugins:
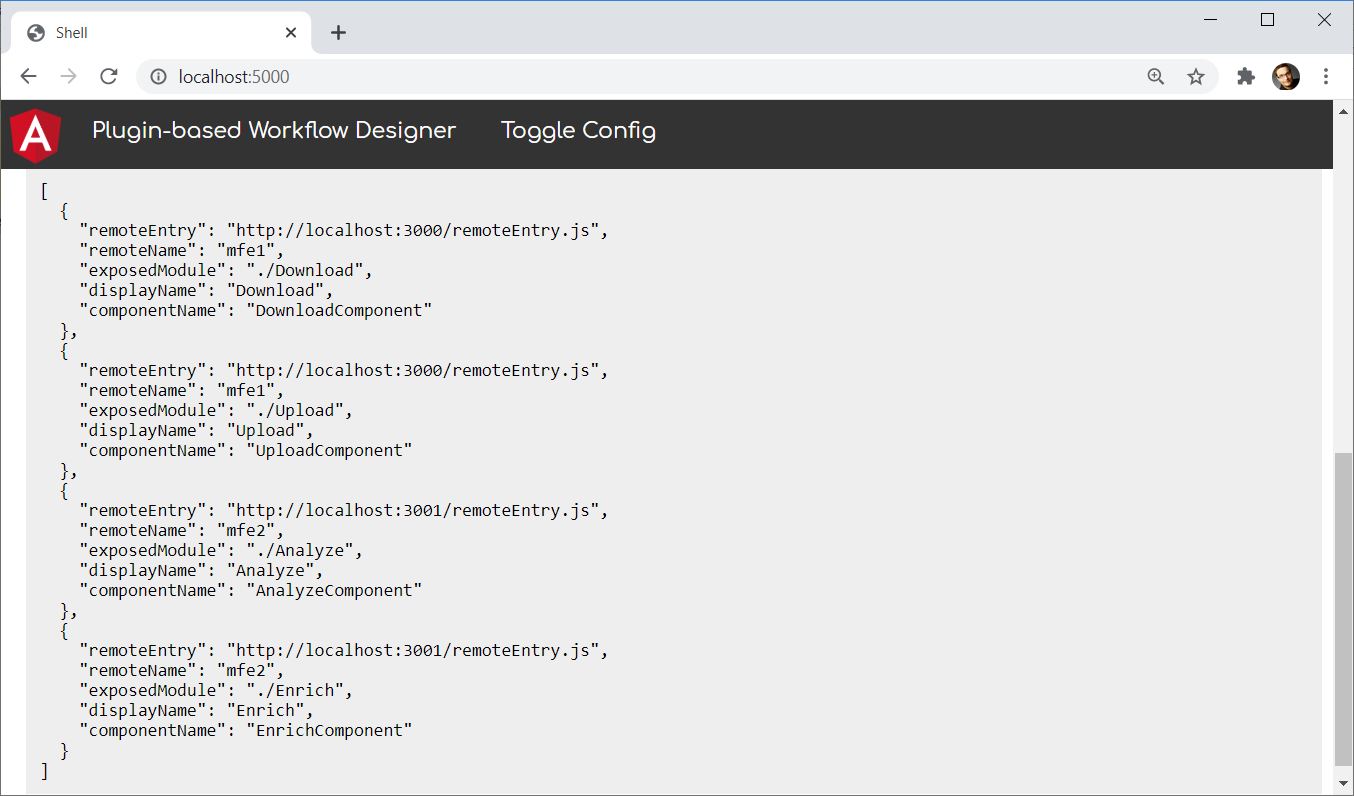 Observe that these plugins live on separate origins (http://localhost:4201 and http://localhost:4202), while the designer itself is served from its own origin (http://localhost:4200).
📂 Source Code
Observe that these plugins live on separate origins (http://localhost:4201 and http://localhost:4202), while the designer itself is served from its own origin (http://localhost:4200).
📂 Source Code
Note: This guide targets Angular and Angular CLI 14.x or newer. Ensure your setup matches if you want to replicate the examples. For a detailed breakdown of the changes and how to migrate to Angular 14.x, refer to this migration guide.Credit goes to Zack Jackson and Jack Herrington for clarifying the newer API for Dynamic Module Federation.
Creating the Plugins
Each plugin lives in its own Angular application. For simplicity, we place all these applications in one monorepo. Their webpack configurations rely on Module Federation to expose the plugins, just as we demonstrated earlier in the series:const { shareAll, withModuleFederationPlugin } = require('@angular-architects/module-federation/webpack');
module.exports = withModuleFederationPlugin({
name: 'mfe1',
exposes: {
'./Download': './projects/mfe1/src/app/download.component.ts',
'./Upload': './projects/mfe1/src/app/upload.component.ts'
},
shared: {
...shareAll({ singleton: true, strictVersion: true, requiredVersion: 'auto' }),
},
});singleton: true together with strictVersion: true forces webpack to throw a runtime error if the shell and the micro frontend(s) rely on incompatible dependency versions (for instance, different major releases). Without strictVersion, or with it set to false, webpack only logs a warning during runtime.
Loading Plugins into the Designer
The integration relies on theloadRemoteModule helper, which ships with the @angular-architects/module-federation package. To pull in the Download task, you’d invoke loadRemoteModule like this:
import { loadRemoteModule } from '@angular-architects/module-federation';

 [...]

 const component = await loadRemoteModule({
     type: 'module',
     remoteEntry: 'http://localhost:4201/remoteEntry.js',
     exposedModule: './Download'
 })
Exposing Plugin Metadata
At runtime, the workflow designer needs certain information about each plugin. This is captured in thePluginOptions type. It builds on the LoadRemoteModuleOptions discussed above, adding a displayName and a componentName:
export type PluginOptions = LoadRemoteModuleOptions & {
     displayName: string;
     componentName: string;
};To clarify:You could also extend the Module Federation Manifest, as we covered in the article on Dynamic Module Federation.
displayName is what the user sees, whereas componentName points to the TypeScript class for the Angular component itself.
The designer obtains this key data via a LookupService:
@Injectable({ providedIn: 'root' })
 export class LookupService {
     lookup(): Promise<PluginOptions[]> {
         return Promise.resolve([
             {
                 type: 'module',
                 remoteEntry: 'http://localhost:4201/remoteEntry.js',
                 exposedModule: './Download',

                 displayName: 'Download',
                 componentName: 'DownloadComponent'
             },
             [...]
         ] as PluginOptions[]);
     }
}LookupService returns a few hardcoded entries. In practice, you’d probably fetch this data from an HTTP endpoint.
Creating Plugin Components on the Fly
The designer wraps each plugin in aPluginProxyComponent. This proxy receives a PluginOptions object through an input, uses Dynamic Module Federation to fetch the respective plugin, and then renders the plugin’s component inside a placeholder:
@Component({
     standalone: true,
     selector: 'plugin-proxy',
     template: `
         <ng-container #placeHolder></ng-container>
     `
 })
 export class PluginProxyComponent implements OnChanges {
     @ViewChild('placeHolder', { read: ViewContainerRef, static: true })
     viewContainer: ViewContainerRef;

     constructor() { }

     @Input() options: PluginOptions;

     async ngOnChanges() {
         this.viewContainer.clear();

         const Component = await loadRemoteModule(this.options)
             .then(m => m[this.options.componentName]);

         this.viewContainer.createComponent(Component);
     }
}// Before Angular 13, we needed to retrieve a ComponentFactory
//
// export class PluginProxyComponent implements OnChanges {
// @ViewChild('placeHolder', { read: ViewContainerRef, static: true })
// viewContainer: ViewContainerRef;
// constructor(
// private injector: Injector,
// private cfr: ComponentFactoryResolver) { }
// @Input() options: PluginOptions;
// async ngOnChanges() {
// this.viewContainer.clear();
// const component = await loadRemoteModule(this.options)
// .then(m => m[this.options.componentName]);
// const factory = this.cfr.resolveComponentFactory(component);
// this.viewContainer.createComponent(factory, null, this.injector);
// }
// }Bringing It Together
Next, we assemble all the pieces. The designer’sAppComponent maintains two arrays: plugins and workflow. The first holds the PluginOptions for every available plugin — essentially the full task palette. The second tracks the PluginOptions for tasks the user has actually selected, in their configured order:
@Component({ [...] })
 export class AppComponent implements OnInit {

   plugins: PluginOptions[] = [];
   workflow: PluginOptions[] = [];
   showConfig = false;

   constructor(
     private lookupService: LookupService) {
   }

   async ngOnInit(): Promise<void> {
     this.plugins = await this.lookupService.lookup();
   }

   add(plugin: PluginOptions): void {
     this.workflow.push(plugin);
   }

   toggle(): void {
     this.showConfig = !this.showConfig;
   }
}AppComponent populates its plugins array through the injected LookupService. When the user adds a plugin to the workflow, the add method appends that plugin’s PluginOptions object to the workflow array.
To render the workflow, the designer loops through every item in the workflow array and creates a plugin-proxy for each entry:
<ng-container *ngFor="let p of workflow; let last = last">
     <plugin-proxy [options]="p"></plugin-proxy>
     <i *ngIf="!last" class="arrow right" style=""></i>
</ng-container> plugins array. Each entry gets a clickable link bound to the add method:
<div class="vertical-menu">
     <a href="#" class="active">Tasks</a>
     <a *ngFor="let p of plugins" (click)="add(p)">Add {{p.displayName}}</a>
 </div>
Wrapping Up
Module Federation isn’t just for Micro Frontends — it’s equally useful for building plugin architectures. That approach opens the door for third-party extensions to an existing solution. It also fits well for SaaS products that need customization per customer.What’s Next? Deeper into Architecture!
Module Federation clearly offers a straightforward path to Micro Frontends with Angular. Still, a few follow-up questions often surface:- What criteria should guide the split of a large application into Micro Frontends?
- Which access-control policies are practical?
- Which battle-tested patterns should we reach for?
- How do we sidestep the common Module Federation pitfalls?
- What advanced use cases are within reach?